SSL-Enabling the eG Manager Using a Certificate Signed by an Internal CA
If you do not want to use the default SSL certificate bundled with the eG manager, then you can obtain a signed certificate from an internal certificate authority and use that certificate for SSL-enabling the eG manager.
For this, follow the steps given below:
- Generate the Keystore file
- Generate a certificate request
- Submit the certificate request to the internal certificate Authority (CA) and obtain a certificate
- Import the certificate into a keystore
- Configure Tomcat for using the keystore file
Each of these steps has been discussed in the sections that follow.
Generating the Keystore File
The keystore file stores the details of the certificates necessary to make the protocol secure. Certificates contain the information pertaining to the source of the application data, and helps validate the source. To generate the keystore, use the keytool command. For this purpose, login to the Windows manager and go to the command prompt. Set the java_home path if it is not done already. Then, execute the following commands, one after another:
cd %JAVA_HOME%\bin
keytool -genkey -alias egitlab1 -keyalg RSA -keypass mykey -keystore <Filename>.keystore -storepass mykey -keysize 2048 -validity 1095 -ext SAN=DNS:[Details of DNS1],DNS:[Details of DNS2], IP:[Details of IP1],IP:[Details of IP2]
The text in Bold in the above command line indicates those inputs that can change according to the requirements of your environment. These inputs have been described below:
- -alias : an alias name for the certificate being generated
- -keypass : a password used to protect the key that is generated; ensure that you provide the same values for -keypass and -storepass.
-
-keyalg : specifies the algorithm that is used to generate the keys. The options are as follows:
- dsa: Digital Signature Algorithm
- RSA : An algorithm used for public-key cryptography
- -keystore : the keytool command stores the generated key in a .keystore file; provide a name for this file as input to the -keystore command
- -keysize : the size of the key that is generated; the minimum key size that we recommend is 2048 bits
- -validity : indicates the number of days for which the key/certicate will be valid - 1095 days refer to 3 years.
-
-ext SAN: The Subject Alternative Name (SAN) field lets you specify additional host names (sites, IP addresses, common names, etc.) to be protected by a single SSL Certificate. Against this parameter, specify the host names, fully qualified domain names, and/or IP addresses you want this certificate to protect. Wild card patterns can also be included in your SAN specification. A sample specification is provided below:
-ext SAN=DNS:example.com,DNS:www.example.com,DNS:mail.example.*, IP:93.184.216.34,IP:2606:2800:220:1:248:1893:25c8:1946
The command, upon execution, will request the following inputs:
What is your first and last name?
[Unknown]: <Type the eG manager’s fully qualified domain name here>
What is the name of your organizational unit?
[Unknown]: United States
What is the name of your organization?
[Unknown]: eG Innovations Inc
What is the name of your City or Locality?
[Unknown]: Bridgewater
What is the name of your State or Province?
[Unknown]: New Jersey
What is the two-letter country code for this unit?
[Unknown]: US
Is CN=eG Innovations Inc, OU=United States, O=eG Innovations Inc, L=Bridge Water, ST=New Jersey, C=US correct?
[no]: yes
When requested for the first and last name, indicate the fully qualified domain name using which you will be accessing the eG manager. For instance, if the eG manager is to be accessed as http://egmanager.eginnovations.com, where egmanager.eginnovation.com is the fully qualified domain name of the eG manager, then specify egmanager.eginnovations.com here.
Once all the required inputs are provided, a .keystore file will be generated in the <JAVA_HOME_DIR>\bin directory with the <Filename> you had provided while issuing the command. Copy this keystore file to the <EG_INSTALL_DIR>\manager\tomcat\webapps directory.
Generating a Certificate Request
Once a keystore file is generated, proceed to request for a certificate from an internal certifying authority. The procedure for this is as follows:
- Login to the eG manager and go to the Windows command prompt.
- Set the java_home path if it is not done already.
-
Execute the following commands one after another:
cd %JAVA_HOME%\bin
keytool -certreq -alias egitlab1 -keyalg RSA -file <Name_of_the_text_file> -keypass mykey -keystore <filename>.keystore –storepass mykey -ext SAN=DNS:[Details of DNS1],DNS:[Details of DNS2], IP:[Details of IP1],IP:[Details of IP2]
The text in Bold in the above command line indicates those inputs that can change according to the requirements of your environment. These inputs have been described below:
- -alias : the alias name of the certificate being requested; make sure that you provide the same alias name that you provided while generating the keystore file (see Generating the Keystore File).
- -keyalg : specifies the algorithm that was used to generate the keys; this can be rsa or dsa, depending upon which algorithm was used for key generation in the procedure detailed in Generating the Keystore File.
- -file : Provide a name for the text file to which the certificate request will be saved.
- -keypass : the password used to protect the key that was generated; make sure that you provide the same password that you provided while generating the keystore file (see Generating the Keystore File). Also, note that -storepass and -keypass should be the same.
- -keystore : Provide the name of the keystore file in which the key has been stored; specify the same file name that you used to store the key (see ).
- -ext SAN: The Subject Alternative Name (SAN) field lets you specify additional host names (sites, IP addresses, common names, etc.) to be protected by a single SSL Certificate. Against this parameter, specify the host names, fully qualified domain names, and/or IP addresses you want this certificate to protect. Wild card patterns can also be included in your SAN specification. Make sure your SAN specification here is the same as the one you used when generating the key store (see SSL-Enabling the eG Manager Using a Certificate Signed by an Internal CA).
- If this command executes successfully, then a certificate request will be generated and automatically stored in the text file you specified in step 2 above. Alongside, a private key file is also created, which will be used in the encryption/decryption of data sent between the eG agents and the manager. Make sure you store the private key file in a secure location on the eG manager host.
Obtaining the Certificate from the Internal CA
-
The first step towards obtaining a certificate is to submit the certificate request to the internal CA. For this connect to the Certificate server of the internal CA and select the option to submit the certificate. For instance, if you are using Microsoft Active Directory Certificate Services to request for a self-signed certificate, then, you need to connect to http://<YourWebServerName>/certsrv, and then pick the option to submit the certificate. Figure 1 will then appear.
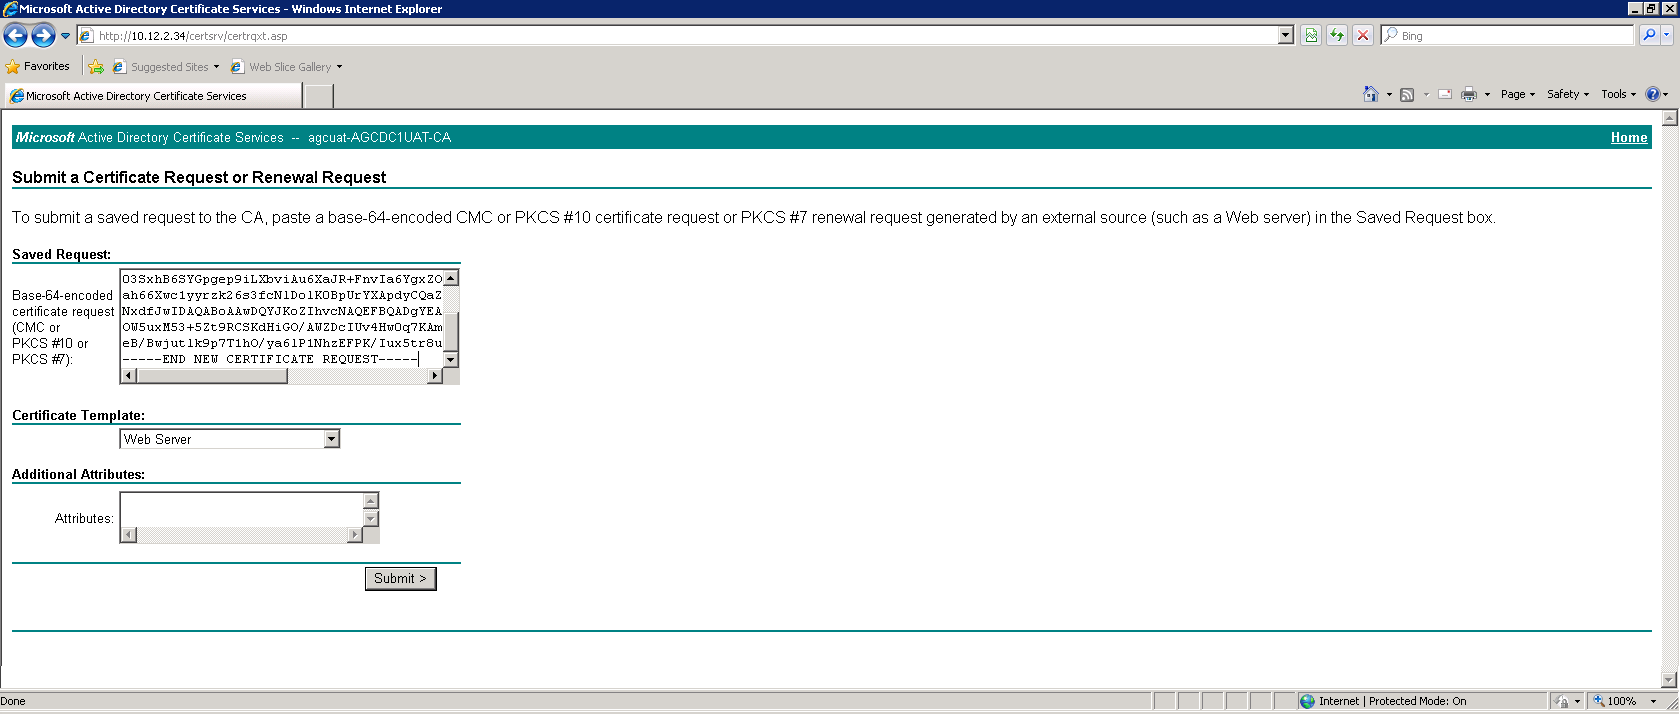
- Open the text file containing the certificate request (which was created using the procedure detailed in SSL-Enabling the eG Manager Using a Certificate Signed by an Internal CA above), copy the contents of the file, and then paste it to the text area of the Base 64-encoded certificate request text box of Figure 1. Then, click the Submit button.
-
The certificate will thus be generated. Download the certificate.

Figure 2 : Downloading the certificate
-
We recommend that you obtain the certificate in one of the following formats:
-
P7B format: PKCS#7 or P7B extension means one or more Base64 ASCII certificates stored in a .p7b or .p7c file (container). The P7B file contains the certificate and its chain (intermediate certificates) but does not contain the private key.
-
A chain of certificates: . The Chain of Trust of a Certificate Chain is an ordered list of certificates, containing an end-user subscriber certificate and intermediate certificates (that represents the Intermediate CA), that enables the receiver to verify that the sender and all intermediate certificates are trustworthy. A certificate chain is governed by a certificate hierarchy. The Certificate Hierarchy is a structure of certificates that allows individuals to verify the validity of a certificate’s issuer. Certificates are issued and signed by certificates that reside higher in the certificate hierarchy, so the validity and trustworthiness of a given certificate is determined by the corresponding validity of the certificate that signed it.
-
PFX / PKCS#12 format: This is a binary format for storing a certificate (including its intermediate) with a private key. Certificates and private key are password protected in the PFX file (container).
- PEM format: PEM is a container format that may include just the public certificate (such as with Apache installs, and CA certificate files /etc/ssl/certs), or may include an entire certificate chain including public key, private key, and root certificates, or may only contain a certificate and a private key.
-
-
Make sure that you copy the downloaded certificate to the <EG_MANAGER_INSTALL_DIR>\manager\tomcat\webapps folder.
Importing the Certificates into the Keystore File
Once the certificate is obtained in the recommended format, it needs to be imported into the keystore.
The procedure for importing a certificate will change according to the format in which the certificate is downloaded. Each of these procedures is detailed below.
Note:
It is mandatory for a P7B certificate, a PEM certificate, or a certificate chain to be imported into the keystore. However, importing is optional for certificates of the PFX/PKCS#12 format.
Importing a P7B Certificate into the Keystore File
To know how to import a certificate of the P7B format into a keystore, issue the following commands at the prompt, one after another:
cd %JAVA_HOME%\bin
keytool -import -aliasegmanager -keystore<FileName>.keystore -file<CertificateFile>.p7b
The text in Bold in the above command line indicates those inputs that can change according to the requirements of your environment. These inputs have been described below:
- -alias : the alias name of the certificate being imported; make sure that you provide the same alias name that you provided while generating the keystore file (see SSL-Enabling the eG Manager Using a Certificate Signed by an Internal CA).
- -keystore : Provide the name of the keystore file to which the certificate is to imported; specify the name of the same keystore file that you generated earlier (see SSL-Enabling the eG Manager Using a Certificate Signed by an Internal CA).
- -file: the name of the P7B certificate that you want to import.
Importing a Certificate Chain into the Keystore File
Before attempting to import a certificate chain into a keystore, you will have to understand the hierarchy of the certificates. The trust anchor for a certificate chain is the Root Certificate Authority (CA). So, in keeping with hierarchy, you will have to import the root certificate first and then the intermediate certificates. To know which is the root and which is the intermediate certificate, refer to the web site of the certificate authority. Then, proceed as follows:
-
First, import the Root certificate. For this, execute the following commands, one after another in the command prompt:
cd %JAVA_HOME%\bin
keytool -import –trustcacerts -alias rootcert -file <Name_of_the_root_certificate> -keystore <Name_of_the_keystore_file>.keystore –keypass mykey –storepass mykey
The text in Bold in the above command line indicates those inputs that can change according to the requirements of your environment. These inputs have been described below:
- -alias : the alias name of the certificate being requested; make sure that you provide a unique alias name for the root certificate.
- -file: the name of the root certificate that you want to import
- -keystore : Provide the name of the keystore file you generated when you followed the procedure detailed in SSL-Enabling the eG Manager Using a Certificate Signed by an Internal CA above.
- -keypass and –storepass : Provide the same keypass and storepass that you specified when generating the keystore; refer to SSL-Enabling the eG Manager Using a Certificate Signed by an Internal CA above for details.
-
Next, import each of the intermediate certificates, one after another, using the following command:
keytool -import –trustcacerts -alias intercert1-file <Name_of_the_intermediate_certificate>-keystore <Name_of_the_keystore_file>.keystore–keypass mykey–storepass mykey
The text in Bold in the above command line indicates those inputs that can change according to the requirements of your environment. These inputs have been described below:
- -alias : the alias name of the certificate being requested; make sure that you provide a unique alias name for every intermediate certificate.
- -file: the name of the intermediate certificate that you want to import
- -keystore : Provide the name of the keystore file you generated when you followed the procedure detailed in SSL-Enabling the eG Manager Using a Certificate Signed by an Internal CA above.
- -keypass and –storepass : Provide the same keypass and storepass that you specified when generating the keystore; refer to SSL-Enabling the eG Manager Using a Certificate Signed by an Internal CA above for details.
-
Finally, import the entity/domain certificate into the keystore by issuing the following command:
keytool -import –trustcacerts -alias egitlab1 -file <Name_of_the_domain_certificate> -keystore <Name_of_the_keystore_file>.keystore
The text in Bold in the above command line indicates those inputs that can change according to the requirements of your environment. These inputs have been described below:
- -alias : the alias name of the certificate being requested; make sure that you provide the same alias name you provided when generating the keystore (see SSL-Enabling the eG Manager Using a Certificate Signed by an Internal CA) .
- -file: the name of the domain certificate that you want to import
- -keystore : Provide the name of the keystore file you generated when you followed the procedure detailed in SSL-Enabling the eG Manager Using a Certificate Signed by an Internal CA.
Note:
If the domain certificate import command throws an error for any reason, it could be because, all related certificates may not have been imported. Check the web site of the CA for more details.
Importing a Certificate that is in the PEM Format
If the certificate you downloaded is in the PEM format and includes only a certificate file and a private key file, then follow the steps below to import that certificate into a keystore file.
-
Run the following command from the command prompt to export the certificate and private key file into the pkcs12 format:
openssl pkcs12 -export -in certificate.crt -inkey private.key -certfile certificate.crt -name “My certificate” -out keystore.p12
The text in Bold in the above command line indicates those inputs that can change according to the requirements of your environment. These inputs have been described below:
- -in : the name of the certificate that is included in the PEM container
- -inkey: the name of the private key file the PEM container consists of
- -certfile : the name of the certificate that is included in the PEM container
- -name : Provide a unique name for the certificate file that is being exported.
- -out : Specify the name of the keystore file to which the certificate and private key are to be exported. The keystore file can have any name of your choice.
-
Next, you need to convert the keystore file, which is currently in the pkcs12 format, into the Java keystore (i.e., JKS) format. For this, issue the following command at the command prompt:
keytool -importkeystore –alias egitlab1 -deststorepass mykey -destkeypass mykey -destkeystore keystore,jks -srckeystore keystore.pk12 -srcstoretype PKCS12 -srcstorepass mykey
The text in Bold in the above command line indicates those inputs that can change according to the requirements of your environment. These inputs have been described below:
- -alias : the alias name of the certificate being requested; make sure that you provide the same alias name that you specified in SSL-Enabling the eG Manager Using a Certificate Signed by an Internal CA.
- -deststorepass : this refers to the storepass of the destination keystore file – i.e., the keystore file in the JKS format. The storepass of the destination keystore should be the same as the storepass of the source keystore.
- -destkeypass : this refers to the keypass of the destination keystore file - i.e., the keystore file in the JKS format. The storepass and keypass of the destination keystore file should be the same.
- -destkeystore: the name of the destination keystore file – i.e., the keystore file in the JKS format.
- -srckeystore : the name of the destination keystore file – i.e., the keystore file in the PKCS12 format.
- -srcstorepass : The storepass of the source keystore file – i.e., the keystore file in the PKCS12 format. Make sure that you provide the same storepass you specified in SSL-Enabling the eG Manager Using a Certificate Signed by an Internal CA.
Configuring Tomcat for Using the Keystore File
The eG manager on Windows uses Tomcat as the web server. Therefore, to SSL-enable the eG manager, you need to configure the server.xml file of Tomcat with the name and full path to the keystore file which was created earlier.
- Edit the server.xml file in the <CATALINA_HOME>\conf directory.
-
In the file, search for the XML block where the SSL Coyote HTTP connector on port 8443 is defined. If this block is commented, it indicates that the eG manager is not SSL-enabled and is hence listening on an HTTP port only. To SSL-enable the eG manager, first uncomment this block as indicated below:
<Connector executor="tomcatThreadPool" protocol="org.apache.coyote.http11.Http11Nio2Protocol" port="8443"
sslImplementationName="org.apache.tomcat.util.net.jsse.JSSEImplementation" scheme="https" secure="true" SSLEnabled="true"
enableLookups="false" acceptCount="100" connectionTimeout="300000" socket.rxBufSize="131072" socket.txBufSize="131072" maxHttpHeaderSize="131072" URIEncoding="UTF-8" useSendfile="false" tcpNoDelay="false" compression="force" compressibleMimeType="font/woff,font/woff2,text/html,text/xml,text/plain,application /x-java-applet,application/octet-stream,application/xml,text/javascript,text/css,image/png,image/bmp,image/jpeg,image /gif,application/pdf,application/x-javascript,application/javascript,application/json,application/x-shockwave-flash,application/xhtml+xml,application/xml+xhtml" noCompressionUserAgents="gozilla, traviata" server="eG Manager">
<SSLHostConfig honorCipherOrder="true" ciphers="TLS_ECDHE_RSA_WITH_AES_256_GCM_SHA384,TLS_ECDHE_ECDSA_WITH_AES_256_GCM_SHA384,TLS_ECDH_ECDSA_WITH_AES_256_GCM_SHA384,TLS_ECDH_RSA_WITH_AES_256_GCM_SHA384,TLS_ECDHE_RSA_WITH_AES_128_GCM_SHA256,TLS_ECDHE_RSA_WITH_AES_256_CBC_SHA384,TLS_ECDHE_RSA_WITH_AES_128_CBC_SHA256,TLS_ECDHE_RSA_WITH_AES_256_CBC_SHA,TLS_ECDHE_RSA_WITH_AES_128_CBC_SHA,TLS_ECDHE_RSA_WITH_AES_256_CBC_SHA" certificateVerification="none" protocols="TLSv1.2" sslProtocol="TLS"></SSLHostConfig>
</Connector> -
Then, proceed to make the changes indicated in Bold below in the SSL XML block:
<Connector executor="tomcatThreadPool" protocol="org.apache.coyote.http11.Http11Nio2Protocol"
port="<eG_Manager_Port>"
sslImplementationName="org.apache.tomcat.util.net.jsse.JSSEImplementation" scheme="https" secure="true" SSLEnabled="true"
enableLookups="false" acceptCount="100" connectionTimeout="300000" socket.rxBufSize="131072" socket.txBufSize="131072" maxHttpHeaderSize="131072" URIEncoding="UTF-8" useSendfile="false" tcpNoDelay="false" compression="force" compressibleMimeType="font/woff,font/woff2,text/html,text/xml,text/plain,application /x-java-applet,application/octet-stream,application/xml,text/javascript,text/css,image/png,image/bmp,image/jpeg,image /gif,application/pdf,application/x-javascript,application/javascript,application/json,application/x-shockwave-flash,application/xhtml+xml,application/xml+xhtml" noCompressionUserAgents="gozilla, traviata" server="eG Manager">
<SSLHostConfig honorCipherOrder="true" ciphers="TLS_ECDHE_RSA_WITH_AES_256_GCM_SHA384,TLS_ECDHE_ECDSA_WITH_AES_256_GCM_SHA384,TLS_ECDH_ECDSA_WITH_AES_256_GCM_SHA384,TLS_ECDH_RSA_WITH_AES_256_GCM_SHA384,TLS_ECDHE_RSA_WITH_AES_128_GCM_SHA256,TLS_ECDHE_RSA_WITH_AES_256_CBC_SHA384,TLS_ECDHE_RSA_WITH_AES_128_CBC_SHA256,TLS_ECDHE_RSA_WITH_AES_256_CBC_SHA,TLS_ECDHE_RSA_WITH_AES_128_CBC_SHA,TLS_ECDHE_RSA_WITH_AES_256_CBC_SHA" certificateVerification="none" protocols="TLSv1.2" sslProtocol="TLS"><Certificate <Certificate certificateKeystoreFile="<Full_path_to_keystore_file_you_generated>" certificateKeyAlias="<Alias_specified_when_genning_keystore>" certificateKeystorePassword="<Keystore_password_given_when_genning_keystore>"/></SSLHostConfig>
</Connector>
Set the port parameter in the XML block to reflect the port number that you have configured for the eG manager. Also, note that a new <Certificate> code block is inserted into the SSL block, containing three new parameters, namely - certificateKeystoreFile , certificateKeyAlias, and certificateKeystorePassword. The certificateKeystoreFile parameter has to be set to the full path to the .keystore file that you generated earlier. The certificateKeyAlias parameter should be set to the alias name you provided at the time of generating the certificate file. Finally, the certificateKeystorePassword is where you enter the password that you specified while issuing the keytool command for generating a certificate request.
Note:
If the certificate downloaded is of the PFX format, and you chose not to import the certificate into the keystore, then make sure you specify the path to that PFX file against the certificateKeystoreFile parameter in the <Certificate> code block above. Here again, the certificateKeyAlias parameter should be set to the alias name you provided at the time of generating the certificate file. Finally, the certificateKeystorePassword is where you enter the password that you specified while issuing the keytool command for generating a certificate request.
-
With that change, the eG manager on Windows has acquired the capability to listen on two ports - the SSL port and the non-SSL port. To configure the eG manager to listen only on the SSL port, simply comment that section of the server.xml file where the non-SSL Coyote HTTP connector on port 8081 has been defined, as indicated below:
<!-- Define a non-SSL Coyote HTTP/1.1 Connector on port 8081 -->
<!--
<Connector executor="tomcatThreadPool" protocol="org.apache.coyote.http11.Http11Nio2Protocol"
port="7077"
enableLookups="false" redirectPort="8443"
acceptCount="2000" connectionTimeout="300000" socket.rxBufSize="131072" socket.txBufSize="131072" maxHttpHeaderSize="131072"
URIEncoding="UTF-8" useSendfile="false" tcpNoDelay="false" compression="force" noCompressionUserAgents="gozilla, traviata" compressibleMimeType="font/woff,font/woff2,text/html,text/xml,text/plain,application /x-java-applet,application/octet-stream,application/xml,text/javascript,text/css,image/png,image/bmp,image/jpeg,image /gif,application/pdf,application/x-javascript,application/javascript,application/json,application/x-shockwave-flash,application/xhtml+xml,application/xml+xhtml" server="eG Manager" />
-->
- Save the file.
-
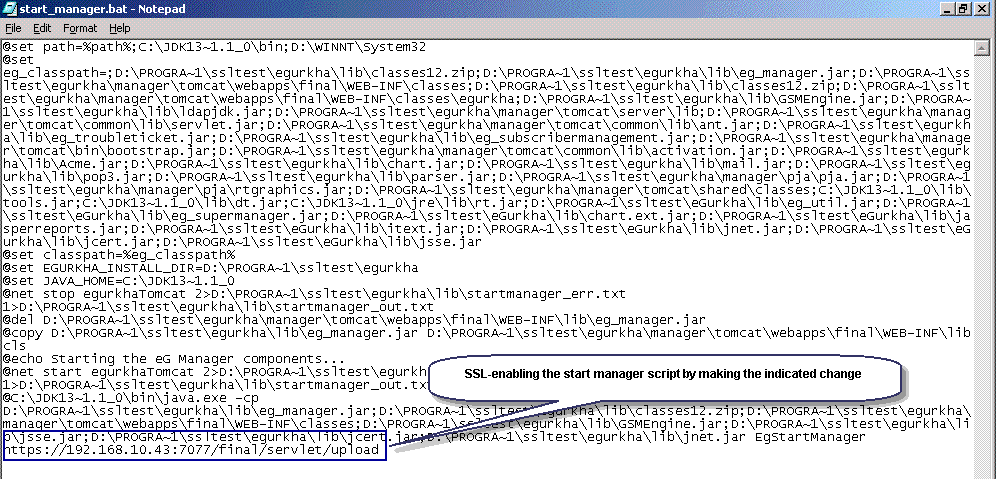
Then, SSL-enable the start_manager.bat script. For this, first open the start_manager.bat file (see Figure 3) residing in the <EG_INSTALL_DIR>\lib directory. Change the URL http://<eGmanagerIp>:<eGmanagerdefaultTCPPort>/final/servlet/upload present in the last line of the batch file to https://<eGmanagerIp>:<eGmanagerPort>/final/servlet/upload (see Figure 3).
- Next, make sure that the eG manager URL configured against the MailHomeURL parameter in the [misc_args] section of the eg_services.ini file (in the <EG_INSTALL_DIR>\manager\config directory) begins with https:// instead of http://. Then, save the file.
- Finally, start the eG manager.