Adding Custom Fields for JIRA Integration
Only custom fields created in JIRA can be added as custom parameters to the Trouble Ticket Integration page of the eG admin interface. This means that fields that pre-exist in JIRA cannot be included in the Trouble Ticket Integration page for JIRA in the eG admin interface.
Let us say that a custom field named ‘eg manager url’ has been added to JIRA. This field will contain a value only for eG alerts – not for alerts from any other source. With this information displayed alongside alerts, help desk staff will not only know where the alerts are coming from, but will also know where to go for more details about the problem.
To make sure that the ‘eg manager url’ field in JIRA is populated with a valid eG manager URL, the eG alerts sent into JIRA should also carry the URL of the eG manager that generated the alerts in the first place. For this to happen, let us add a custom field named ‘eG manager URL’ to the Trouble Ticket Integration page for JIRA in the eG admin interface, and then configure it with a static and valid eG manager URL.
The steps to be followed in this regard are discussed hereunder:
-
Find the ID that JIRA internally assigns to its custom field, ‘eg manager url’. For this, follow the steps below:
-
Login to the JIRA console. Figure 1 will then appear. Click on the
 icon on the toolbar at the right, top corner of the JIRA console to invoke a drop-down menu. From the menu, pick the Issues option.
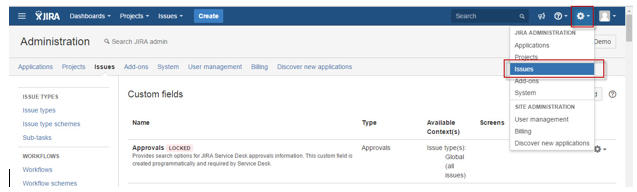
-
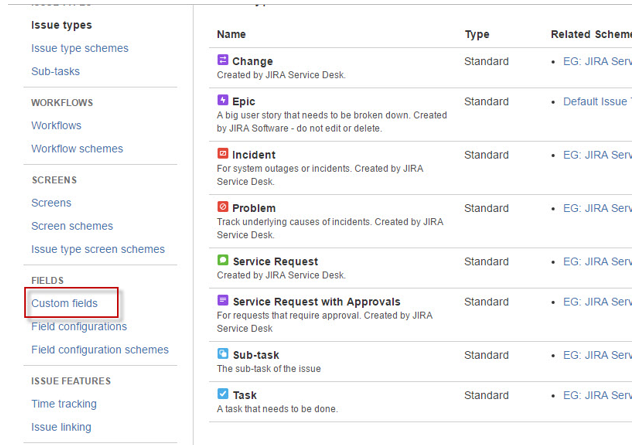
When Figure 2 appears, click on the Custom Fields option under fields.
-
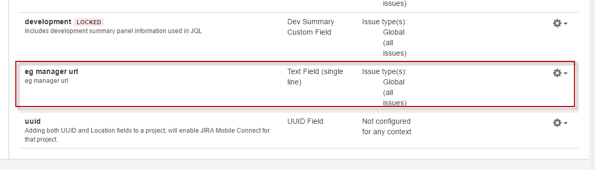
Figure 3 will then appear listing all the custom fields that have been created in JIRA. Browse the list until you locate the ‘eg manager url’ field.
-
Next, click on the
 icon corresponding to the ‘eG manager url’ custom field, and select the Edit option from the drop-down menu.
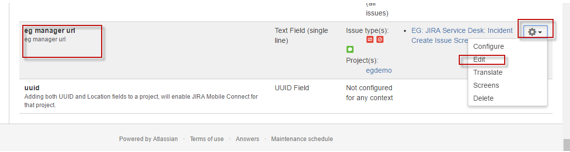
Figure 4 : Selecting the Edit option from the drop-down menu
-
When Figure 5 appears, shift your focus to the browser address bar. In the URL that appears in the address bar, look for the following entry: EditCustomField!default.jspa?id=
The same has been indicated by Figure 5.
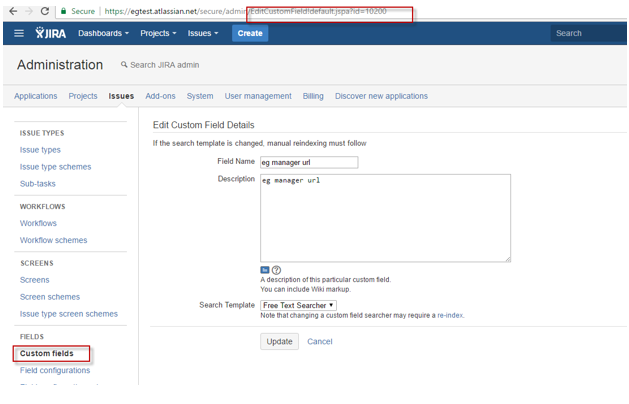
Figure 5 : Determining the ID of the ‘eG manager URL’ custom field
The value that appears after the = symbol in the entry, is the ID of the custom field that is being edited – i.e., the ID of the ‘eG manager url’ custom field in our example. In Figure 5, this ID is 10200. Make a note of this ID.
-
-
Next, login to the eG manager host, and edit the eg_services.ini file (in the <EG_INSTALL_DIR>\manager\config directory). Look for the JIRA key in the [tt_integration_system_fields] section of the file. A comma-separated list of parameters currently available in the Trouble Ticket Integration page for JIRA will be displayed by default against the JIRA key in this section. Insert the ID of the new field anywhere into the list of parameters that are pre-defined against the jira key. Since the field is a custom field, you need to add the prefix customfield_ to the ID 10200. This means that your custom field specification will be, customfield_10200. Note that the field will be displayed in the Trouble Ticket Integration page in the same position in which you insert the field here. In the sample entry below, you can see that the new field has been inserted just before the ttIntegratorClass field.
JIRA=url,user,password,projectKey,issueType,TitleFormat,DescriptionFormat,customfield_10200,ttIntegratorClass
-
Next, look for the [tt_integration_field_mapping] section of the file. Under this section, add an entry of the following format:
<customfieldID>=<fieldtype>
<fieldtype> represents the type of values the new field will support. In the case of our example, this entry will read as follows:
customfield_10200=Textfield
-
Then, go to the [tt_integration_text_mapping] section and add an entry of the following format to it:
<customfieldID>=<displayname>
<displayname> represents the label using which the new field will be displayed in the Trouble Ticket Integration page.
In the case of our example, your specification can be:
customfield_10200=eG Manager URL
-
Finally, go to the [tt_integration_JIRA] section and add an entry of the following format to it:
<customfieldID>=<defaultvalue>
<defaultvalue> denotes the value that will be displayed by default against the new field in the Trouble Ticket Integration page. You can either provide a valid value or leave it as unconfigured. Since we know the URL of the eG manager that is integrating with JIRA, let us provide a valid value here. For the purpose of our example, let this value be: http://192.168.9.244:7077
The specification will therefore be:
customfield_10200=http://192.168.9.244:7077
- Finally, save the file.
-
If you now visit the Trouble Ticket Integration page for JIRA, you will find that the eG Manager URL field therein (see Figure 6).

Figure 6 : The custom field appearing in the Trouble Ticket Integration page of JIRA in the eG admin interface