Integrating with HipChat
HipChat is a web service for internal private online chat and instant messaging. As well as one-on-one and group/topic chat, it also features cloud-based file storage, video calling, searchable message-history and inline-image viewing.
eG integration with HipChat ensures that eG alerts are automatically routed to a configured chat room, so that they can be circulated as messages amongst all users in that chat room. For instance, if help desk personnel are part of a single chat room on HipChat, you can have eG Enterprise integrate with that chat room. This way, help desk personnel are instantly notified of problem conditions, and can effectively work together for a speedy resolution.
Note:
HipChat was acquired by Slack in July 2018. Following this, HipChat customers were migrated to the Slack group collaboration platform.
The steps in this regard are as follows:
- Login to the eG administrative interface.
-
Select the Manager option from the Settings tile.
-
Figure 1 will then appear. From the manager settings tree in the left panel of Figure 1, select the ITSM/Collaboration Integration node. The third-party ITSM/Collaboration tools that eG Enterprise can integrate with will be listed in the right panel.

-
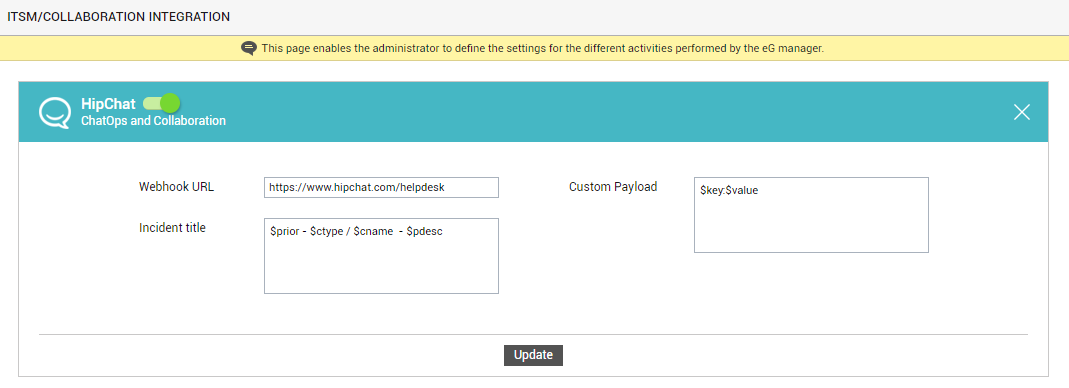
Now, click on the HipChatoption in the right panel (see Figure 1). A HiptChat section will now appear in the right panel (see Figure 2).

- To enable integration with HipChat, first slide the HipChat slider in Figure 2 to the right.
-
Then, specify the following in Figure 2:
- Webhook URL: Webhooks are used by eG Enterprise to send event notifications to HipChat via REST API. A Webhook is typically associated with a specific chat room only. Therefore, indicate the chat room to which the eG alerts are to be transmitted by specifying that chat room’s Webhook URL here.
-
Incident title: Specify the format in which the title of the trouble ticket is to be displayed in HipChat. The default format is as follows:
$prior - $ctype / $cname - $pdesc
The ‘dollared’ ($) text in the format above is a key, the value of which varies at run time, depending upon the information contained in the eG alarms. For example, in the default format above, $prior is a key that represents the alarms priority, and changes according to the priority of the actual alarm that is sent by the eG manager to HipChat. You are advised against changing any of the keys, as these are the keys that the HipChat REST API supports.
The other variables that are part of the default format are discussed in the table below:
$cname
Will display the name of the problem component
$ctype
Will display the component type to which the problem component belongs
$pdesc
Will display a brief problem description
-
Custom payload: Use custom payload to customize the alert information you send to HipChat, so that it includes additional static information.
Typically, the details of an eG alert are sent as a JSON file to the configured Webhook URL. Every piece of information contained within an eG alert - eg., priority, component name, component type etc. - is represented in the JSON file as a $key:$value pair, where 'key' denotes the alert field, and 'value' denotes the actual value of that field at run time. The 'key' is configured based on what the HipChat REST API supports. For instance, if the REST API represents alarm priorities using the key 'prior', then the same key will be used in the JSON file for denoting alarm priorities. Accordingly, the entry for alarm priority in the JSON file will be $prior:$value. The $value will be Critical, Major, Minor, or Normal, depending upon the actual priority of the alarm being sent.
If you want eG incidents routed to HipChat to include additional information, then you can define a Custom Payload for that information as a $key:$value pair. For example, say, you want incidents to indicate the FQDN of the eG manager that generated the incidents. Say that the FQDN of your eG manager is egmanager.innovations.com. To include this information in HipChat incidents, do the following:
- First, check whether the HipChat REST API supports a 'key' that can be used for capturing the 'source' of alerts/incidents. If no such key exists, then you cannot proceed with the Custom Payload configuration. On the other hand, if such a key is available, then proceed to replace the $key in your Custom Payload specification, with that key value. For the purpose of our example, let us assume that the REST API supports the key named 'source'. In this case therefore, substitute '$key' with 'source'.
- Then, proceed to explicitly specify the FQDN of your eG manager in the place of $value. This is because, you can use the Custom Payload configuration to add only 'static' information - i.e., information that you explicitly configure, and hence will never change. In the case of our example therefore, the $value will be egmanager.innovations.com.
- The complete Custom Payload specification will now be: source:egmanager.innovations.com
- Finally, click the Update button in .