Integrating with Zendesk
Zendesk is a customer support platform that lets you connect with customers on any channel. It boasts of an omnichannel ticketing system that helps collect all your customer support requests from any source and lets you manage them from one location.
eG Enterprise integrates with Zendesk's ticketing system, so that eG alerts are automatically fed into Zendesk as and when they are generated. This results in the automatic creation/updation of trouble tickets, the quick assignment of tickets to the right troubleshooting agents, and the speedy resolution of issues.
To integrate eG Enterprise with Zendesk, do the following:
- Login to the eG administrative interface.
-
Select the Manager option from the Settings tile.
-
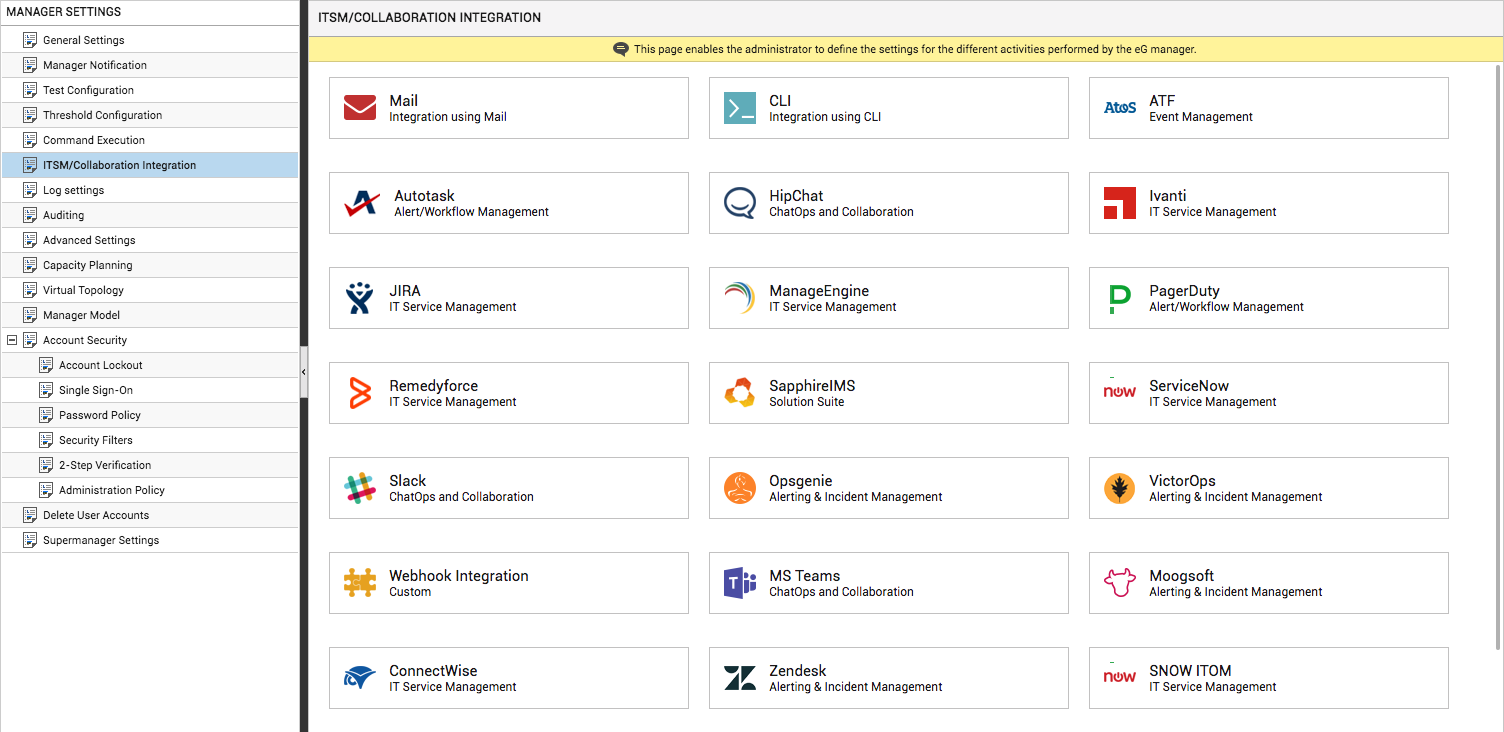
Figure 1 will then appear. From the manager settings tree in the left panel of Figure 1, select the ITSM/Collaboration Integration node. The third-party ITSM/Collaboration tools that eG Enterprise can integrate with will be listed in the right panel.
-
Now, click on the Zendeskoption in the right panel (see Figure 1). A Zendesk section will now appear in the right panel (see Figure 2).
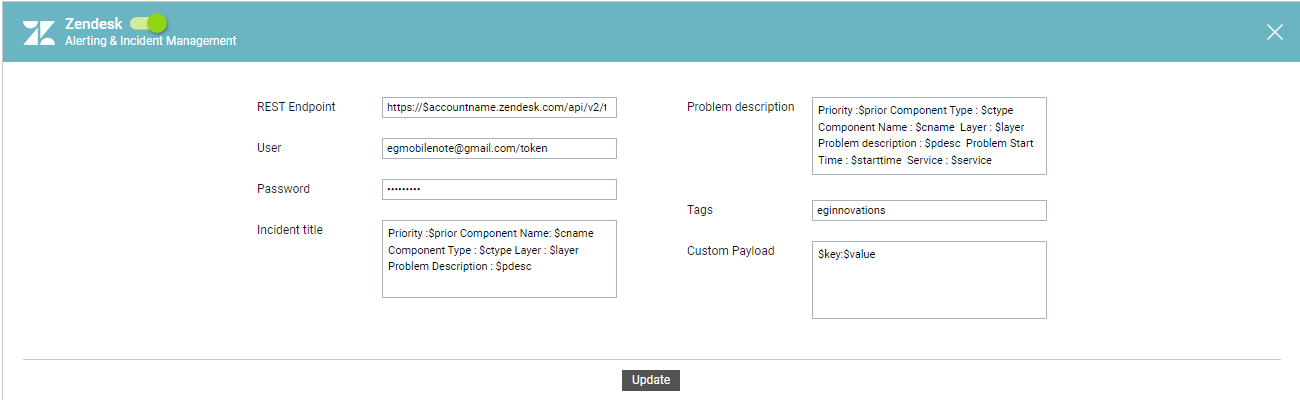
- To enable integration with Zendesk, first slide the Zendesk slider in Figure 2 to the right.
-
Then, specify the following in Figure 2:
- URL: eG Enterprise integrates with Zendesk using its REST API. Via HTTP/S, eG alerts are POSTed to the REST endpoint URL of Zendesk as JSON payloads containing problem information. To enable this communication, specify the REST endpoint URL here.
- User and Password: API requests made by the eG manager to Zendesk are authenticated using an API token. API tokens are auto-generated passwords that you can use with a username to authenticate API requests. Each API token can be used by any verified user on the account. Specify the email ID of such a verified user in the User text box. Make sure that you suffix the email ID with the string, /token. Then, specify the API token that corresponds to that email address in the Password text box.
- Incident title: Specify the title format for all trouble tickets auto-generated for eG-reported incidents. The default title format is as follows:
Priority :$prior Component Name: $cname Component Type : $ctype Layer : $layer Problem Description : $pdesc
The text preceding the ‘:’ (colon) in the format above indicates what information follows. The ‘dollared’ ($) text that follows the ‘:’ (colon) is a key, the value of which varies at run time, depending upon the eG alarms. For example, in the default format above, Priority is a label that indicates that the information that follows the ‘:’ is the priority of the alarm. The key $prior that succeeds the ‘:’ represents the alarm priority, and changes according to the priority of the actual alarm that is sent by the eG manager to Zendesk. While you can change the labels, you are advised against changing any of the key names.
The other keys that are part of the default title format are discussed in the table below:
$cname
Will display the name of the problem component
$ctype
Will display the component type to which the problem component belongs
$layer
Will display the name of the problematic layer
$pdesc
Will display a brief problem description
-
Problem description: Against Problem description, specify the format in which the problem description should appear in the trouble ticket that is auto-created for eG alerts, in Zendesk. The default format is as follows:
Priority: $prior Component: $cname Component Type: $ctype Layer: $layer Problem Description: $pdesc Problem Start Time: $starttime Service: $service
The text preceding the ‘:’ (colon) in the format above indicates what information follows. The ‘dollared’ ($) text that follows the ‘:’ (colon) is a key, the value of which varies at run time, depending upon the eG alarms. For example, in the default format above, Priority is a label that indicates that the information that follows the ‘:’ is the priority of the alarm. The key $prior that succeeds the ‘:’ represents the alarm priority, and changes according to the priority of the actual alarm that is sent by the eG manager to service desk. While you can change the labels, you are advised against changing any of the key names.
The other keys that are part of the default format are discussed in the table below:
$cname
Will display the name of the problem component
$ctype
Will display the component type to which the problem component belongs
$layer
Will display the layer affected by the problem
$starttime
Will display the problem start time
$pdesc
Will display a brief problem description
$service
Will display the name of the affected service
- Tags: Zendesk tags are words used to categorize alerts, so that Zendesk users are able to instantly determine the nature and/or source of the alerts. By default, alerts routed by the eG manager are categorized using the tag 'eginnovations'. You can change this default specification, if you so need.
- Custom payload: Use custom payload to customize the alert information you send to Zendesk, so that it includes additional static information.
Typically, the details of an eG alert are sent as a JSON file to the configured URL. Every piece of information contained within an eG alert - eg., priority, component name, component type etc. - is represented in the JSON file as a $key:$value pair, where 'key' denotes the alert field, and 'value' denotes the actual value of that field at run time. The 'key' is configured based on what the Zendesk REST API supports. For instance, if the REST API represents alarm priorities using the key 'prior', then the same key will be used in the JSON file for denoting alarm priorities. Accordingly, the entry for alarm priority in the JSON file will be $prior:$value. The $value will be Critical, Major, Minor, or Normal, depending upon the actual priority of the alarm being sent.
If you want eG incidents routed to VictorOps to include additional information, then you can define a Custom Payload for that information as a $key:$value pair. For example, say, you want incidents to indicate the FQDN of the eG manager that generated the incidents. Say that the FQDN of your eG manager is egmanager.innovations.com. To include this information in Zendesk tickets, do the following:
- First, check whether the Zendesk REST API supports a 'key' that can be used for capturing the 'source' of alerts/incidents. If no such key exists, then you cannot proceed with the Custom Payload configuration. On the other hand, if such a key is available, then proceed to replace the $key in your Custom Payload specification, with that key value. For the purpose of our example, let us assume that the REST API supports the key named 'source'. In this case therefore, substitute '$key' with 'source'.
- Then, proceed to explicitly specify the FQDN of your eG manager in the place of $value. This is because, you can use the Custom Payload configuration to add only 'static' information - i.e., information that you explicitly configure, and hence will never change. In the case of our example therefore, the $value will be egmanager.innovations.com.
- The complete Custom Payload specification will now be: source:egmanager.innovations.com
- Finally, click the Update button in Figure 2 to save the changes.
Once the integration is enabled, the eG manager will start to send alerts it generates to Zendesk. When transmitting an alert to Zendesk, the eG manager first checks which zone that alert pertains to, and whether that zone is mapped to any Zendesk organization. Typically, zone-organization mappings are maintained in the [ZENDESK_ZONE_MAPPING] section of the eg_services.ini file (in the <EG_INSTALL_DIR>\manager\config directory on Windows, or the /opt/egurkha/manager/config directory on Unix). This mapping should be created in the format given below:
zone=OrganizationName#userName
In this specification, replace zone with the name of a geographic zone configured in eG Enterprise. Replace OrganizationName with the name of a Zendesk organization. In the userName placeholder, enter the name of a user in the specified Zendesk organization. A sample specification is given below:
east_coast=EastCoastOrgn#john
This way, you can create mappings for multiple zones in eG Enterprise. Note that a single zone can be mapped to only one Zendesk organization. Some sample mappings are provided below:
east_coast=EastCoastOrgn#john
west_coast=WestCoastOrgn#julie
Canada=CanadaOrgn#candy
At the time of transmitting an eG alert to Zendesk, if the eG manager finds that the zone on which the alert is raised has an organization mapped to it in the eg_services.ini file, then it will automatically create a trouble ticket for that alert in the specified Zendesk organization. Also, in the same trouble ticket, the userName that you specified in the eg_services.ini file will appear as the user who reported the issue.
However, if the eG manager finds that the zone on which an alert is raised has no organization mapped to it in the eg_services.ini file, then, by default, the trouble ticket for such an alert will be automatically created in the 'Default' organization in Zendesk. Accordingly, the useDefaultOrganization parameter in the [TT_INTEGRATION_ZENDESK] section of the eg_services.ini file in the <EG_INSTALL)DIR>\manager\config directory (on Windows; on Unix, this will be the /opt/egurkha/manager/config directory) is set to true by default. If you want, you can set this parameter to false. If this is done, then if a problem zone in eG Enterprise is not mapped to any Zendesk organization, then the eG manager will not automatically create a trouble ticket for that alert in Zendesk.