Custom Webhook Integration
A webhook is an HTTP callback which allows one application to provide other applications with real-time information. eG Enterprise is capable of posting event messages - i.e., eG alerts - to any third-party trouble ticketing system that is capable of accepting incoming webhooks.
To implement this integration, do the following:
- Login to the eG administrative interface.
-
Select the Manager option from the Settings tile.
-
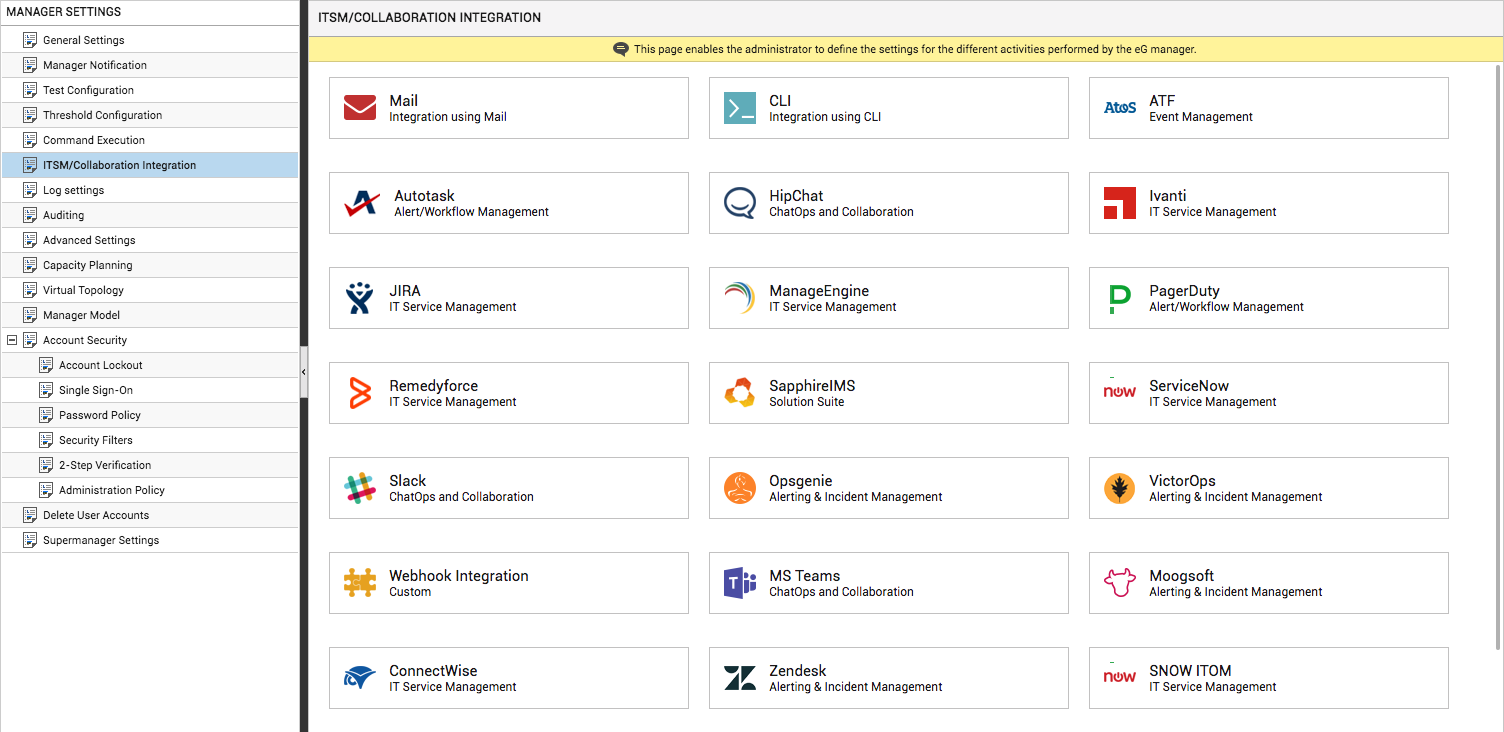
Figure 1 will then appear. From the manager settings tree in the left panel of Figure 1, select the ITSM/Collaboration Integration node. The third-party ITSM/Collaboration tools that eG Enterprise can integrate with will be listed in the right panel.
-
Now, click on the Webhook Integration option in the right panel (see Figure 1). A Webhook Integration section will now appear in the right panel (see Figure 2).
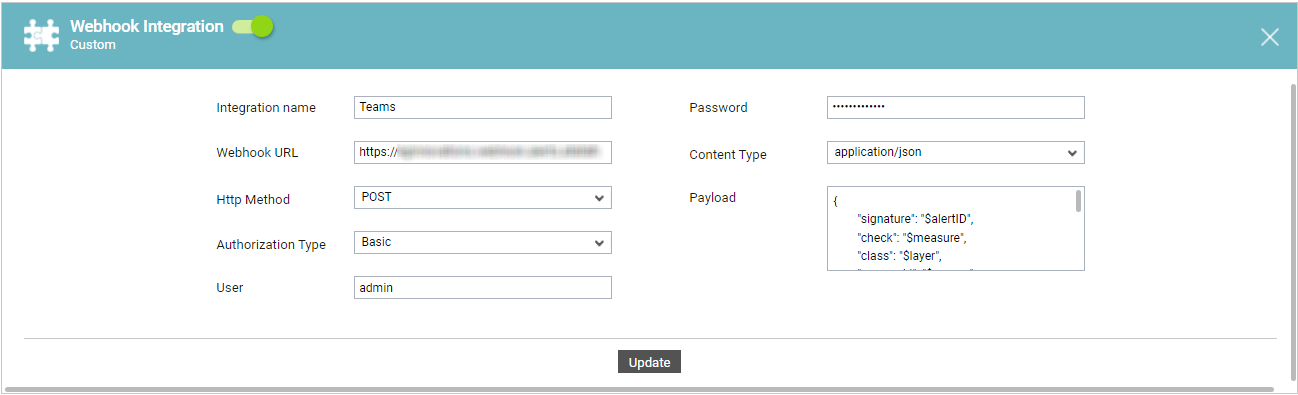
- To enable integration using webhooks, first slide the Webhook Integration slider in Figure 2 to the right.
-
Then, specify the following in Figure 2:
- Integration Name: Specify the name of trouble ticketing system with which eG Enterprise should integrate.
- Webhook URL: Here, specify the incoming webhook URL of the target trouble ticketing system. eG alerts will be transmitted to this URL only.
- HTTP Method: Select the HTTP method that eG Enterprise uses to send event notifications into the trouble ticketing system. The options are GET, POST, and PUT.
- Authorization Type: Some trouble ticketing systems require authorization from the external source to accept the incoming webhook. If the target of this integration requires such an authorization, then first select the type of authorization from this drop-down. The options are as follows:
- Basic authentication
-
API Key
- Content Type: Then, indicate in what format eG alert information is to be sent to the third-party trouble ticketing system. Since the eG manager typically sends alarm information as JSON files, the application/json option is chosen by default here.
-
Payload: Configure the event payload that is to be fed into the target trouble ticketing system. In other words, configure the type of information that each eG alert sent to the target system should contain. A sample payload specification is provided below:
{
"signature": "$alertID",
"check": "$measure",
"class": "$layer",
"source_id": "$cname",
"source": "$cname",
"type": "$ctype",
"agent_time": "$starttime",
"severity": "$customprior",
"description": " $pdesc",
"zone": "$zone",
"dd": "$DD"
}
Each line of the Payload specification should contain a distinct '<TT_System_Field>:$<eG_Alert_Field>' pair (as shown in the sample code block above).
'TT_System_Field' should indicate a field/column in the third-party system's trouble ticket. The dollared ($) 'eG_Alert_Field' should indicate the field/column in the eG alert that accurately maps to the configured 'TT_System_Field'. Post integration, whenever the eG manager sends an alert to the third-party TT system, then this mapping is used to determine which information contained in the eG alert should be captured into which field in the third party system's trouble ticket. For example, in the sample above, you should be able to see the following entry:
"signature": "$alertID"
In this entry, signature is a field in the target TT system's trouble ticket. $alertID represents the unique Alarm ID that the eG manager automatically generates and assigns to each alarm it raises. The entry above signifies that when the eG manager sends an alert to the TT system, the ID of that alert will be captured and displayed againstthesignature field/column in the corresponding trouble ticket.
You can change the 'TT_System_Field' based on the fields supported by the target TT system. For instance, what is 'signature' in one TT system, could be called as 'Ticket ID' in another. Study the TT system that you will be integrating with thoroughly, and determine the right field names to use in your Payload specification.
However, note that you cannot change the names of the eG_Alert_Fields. For instance, you cannot change '$alertID' to '$alarmID'. If you do, then the integration will fail.
The other 'eG_Alert_Fields' that the webhook integration supports and the values that they will report in the TT system are as follows:
eG_Alert_Field
Value Displayed in the TT System
$measure
Displays the name of the problematic measure
$cname
Displays the name of the problem component
$ctype
Displays the component type to which the problem component belongs
$pdesc
Displays a brief problem description
$layer
Displays the problematic layer
$starttime
Displays the start time of the problem
$prior
Displays the problem priority
$zone
Displays the zone which the problem component belongs
$service
Displays the service ID
$test
Displays the name of the test that reported the problem
$DD
Displays the detailed description
$info
Displays the problem descriptor
$problemtime
Displays the problem start time in milliseconds
ticketState
Displays the ticket state based on the following mappings:
State in eG Enterprise
State in TT System
CreateTicket
NEW
UpdateTicket
UPDATED
CloseTicket
CLOSED
The $customprior specification automatically converts the 'problem priority strings' in eG alerts - i.e., Critical, Major, Minor, and Normal - into 'integer values', so that these integers are routed to the TT system and are displayed in the trouble ticket against 'priority'. The number:priority mapping maintained internally by the eG manager to perform this conversion is as follows:
Priority in eG Enterprise
Integer Value
Critical
5
Major
4
Minor
3
Normal
0
Note:
If the target trouble ticketing system enforces Basic Authentication, then select the Basic option from the Authorization Type drop-down. Where Basic Authentication is enforced, the trouble ticketing system requires that webhooks be accompanied by the credentials of a valid user with the right to send webhooks. In this case therefore, provide the credentials of such a user in the User and Password text boxes.
Some other trouble ticketing systems may authenticate incoming webhooks using a unique API key. If the eG manager is being integrated with such a trouble ticketing system, then first generate an API key using the third-party system. Next, when configuring eG integration with that trouble ticketing system, set the Authorization Type to API Key and specify the correct API key.
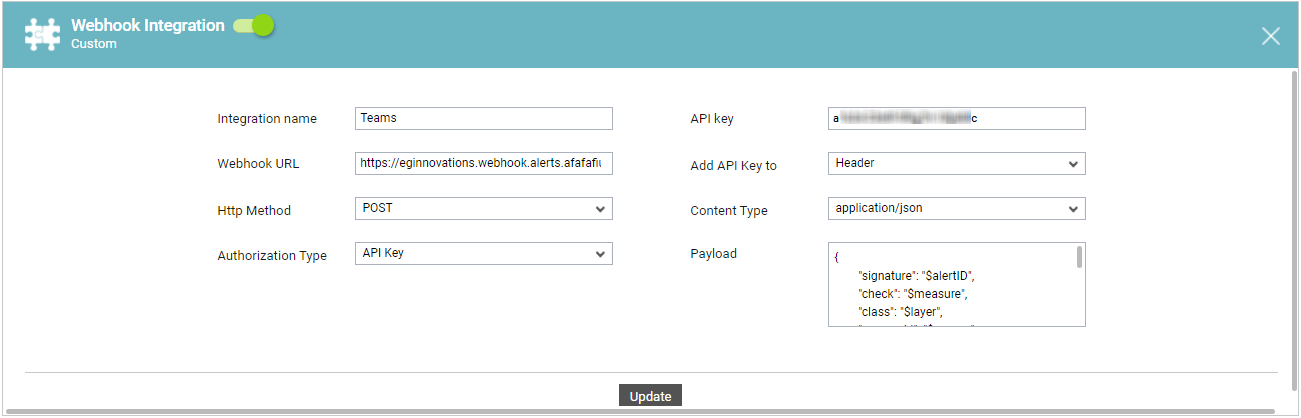
Figure 3 : Setting Authorization Type to API Key
Then, by selecting the appropriate option from the Add API Key to drop-down, indicate where the API key needs to be inserted - in the HTTP request header? or in query params?
- Finally, click the Update button in Figure 2.