Asset Management
eG Enterprise now allows administrators to record asset information for every application, device, or server being managed. When an application, server, or device experiences performance degradation, through the Alarms window in the eG monitoring console, a help-desk person has single-click access to the asset information of each problematic application, server or device. Administrators can also configure the eG manager so that asset information can be included in email alerts sent out to users. By making useful asset details easily available to help desk staff and administrators, eG Enterprise helps minimize troubleshooting time and improves the efficiency of IT operations.
Asset Management Dashboard
An Asset Management dashboard is used to monitor, manage, and analyze assets (such as equipment, infrastructure, financial investments, or digital resources) in real time.
To view the asset information of the target environment, do the following:
- Navigate through the menu sequence: Admin -> Infrastructure -> Asset Management.
-
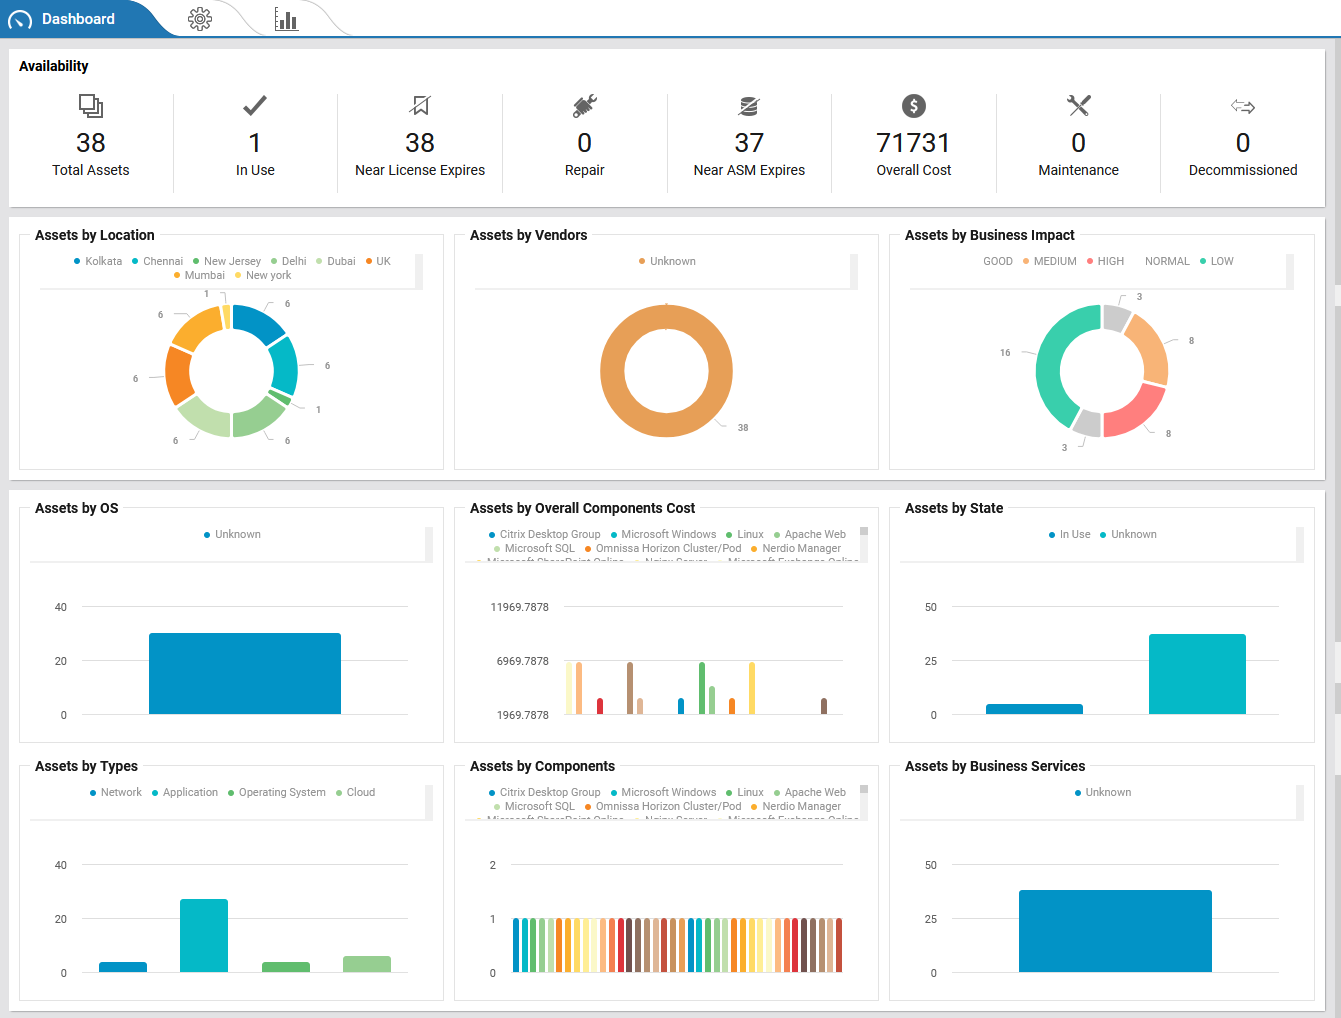
Figure 1 then appears displaying the Asset Management Dashboard.
-
The Asset Management Dashboard as shown in Figure 1 consists of the following sections:
-
The Availability section reveals at a single glance the total number of assets in the target environment, the number of assets in use and the number of assets that are in a repair state. This section further reveals the count of the assets for which the licenses are expiring and the Annual Service Maintenance (ASM) is expiring. Also, this section reveals the overall cost of the assets in the target environment, the count of assets that are under maintenance and those that are decommissioned.
-
Next is a series of Assets by <Category> graphs and charts that reveal a pictographic representation of the assets based on different categories such as location, vendors, state, component types, operating system, business impact, business service etc. Using these graphs and charts, administrators can easily figure out the exact location of the assets, the asset that is consuming maximum cost, the operating system of the assets, etc.
-
Asset Configuration
Asset configuration in an environment plays a major role in effective tracking, inventory control, service reliability and operational efficiency.
To record the asset configuration of a specific component, do the following:
-
Navigate through the menu sequence: Admin -> Infrastructure -> Asset Management. In Figure 1 that appears, click the
 icon. Figure 2 will then appear displaying the Asset Management page.
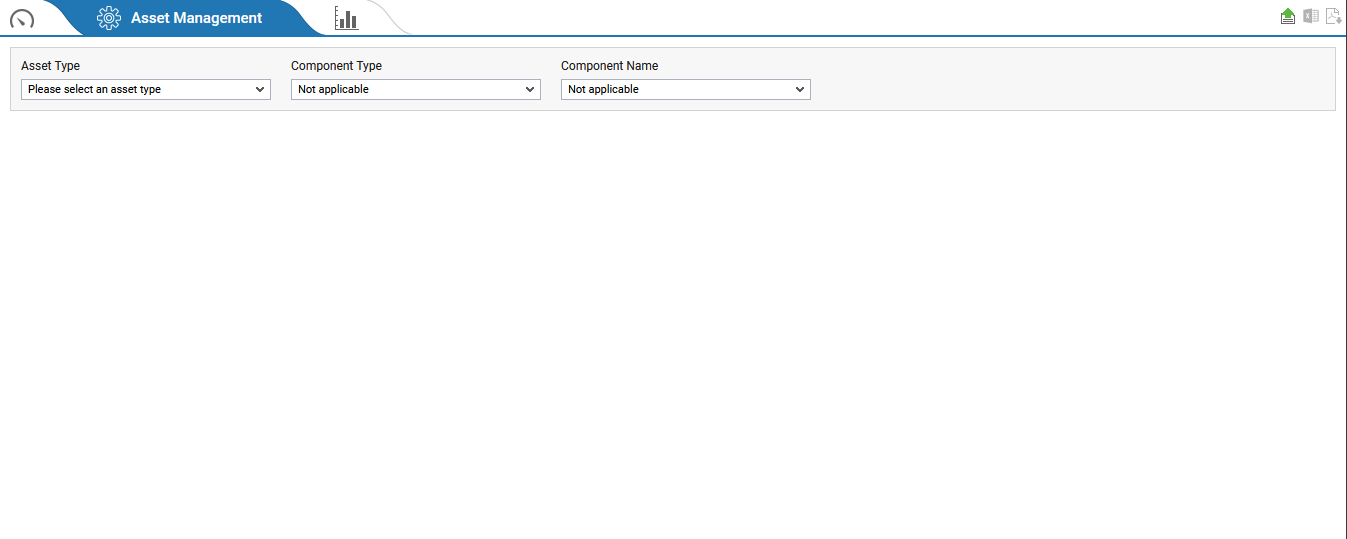
- In Figure 2, pick an Asset Type and then a Component Type.
- All managed components of the chosen component type will then be listed in the Component Name list.
-
As soon as you pick a component from the Component Name list of Figure 2, Figure 3 will appear prompting you to configure the asset details of a managed component.
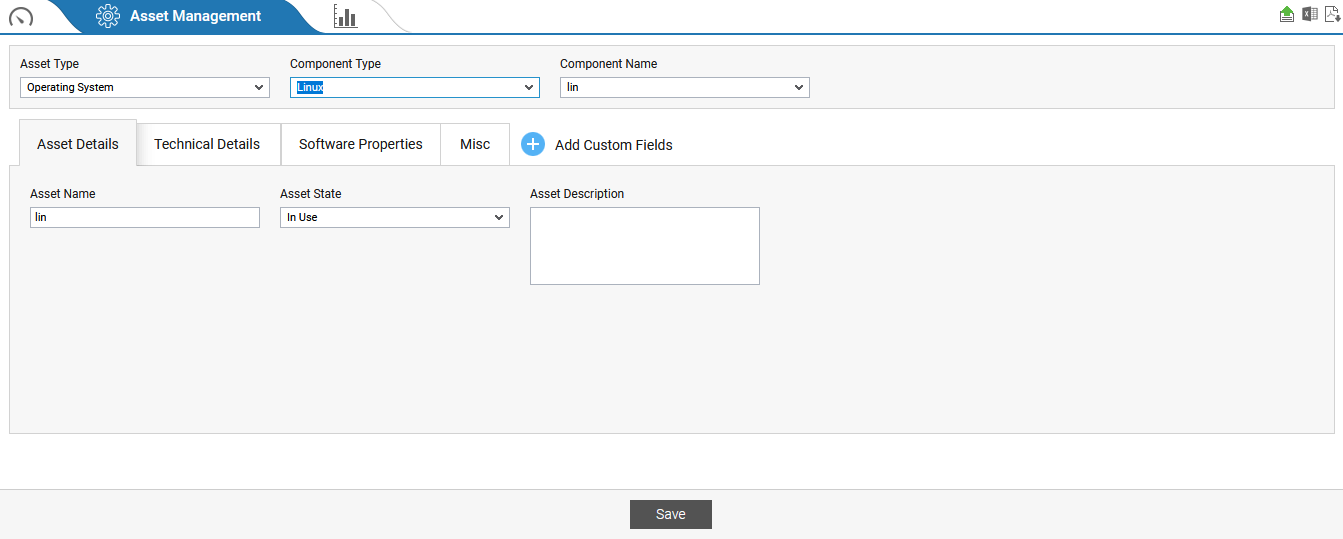
- Using the fields displayed in the Asset Details tab of Figure 3, you can record details such as the name of the asset, description, and type of the asset in the relevant text boxes.
-
Next navigate to the Technical Details tab as shown in Figure 4.
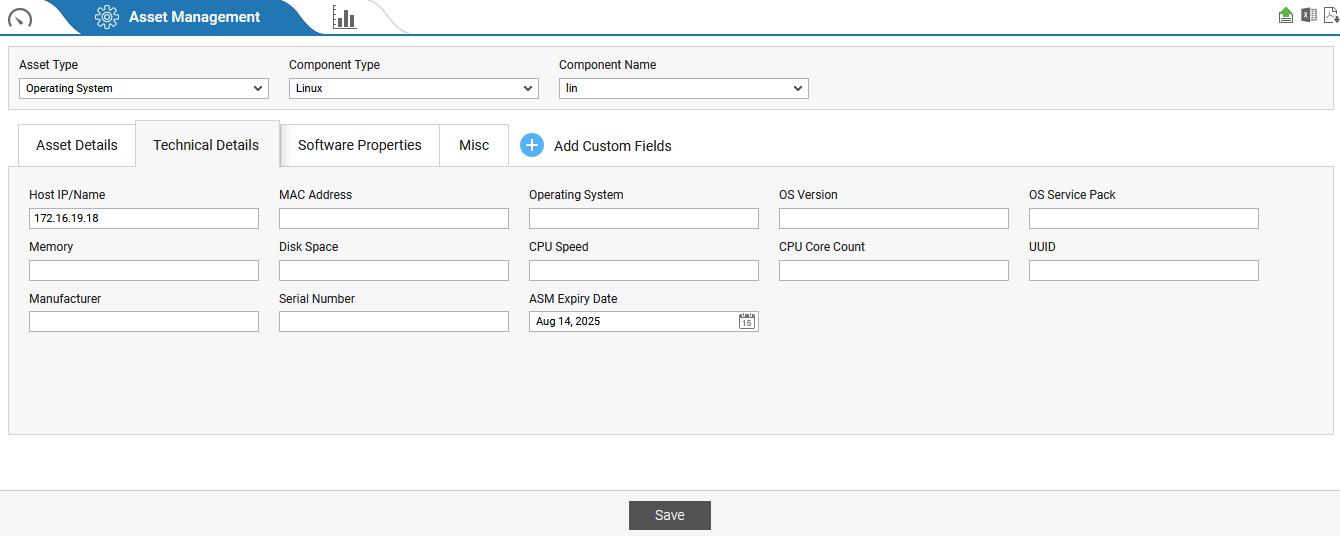
- In Figure 4, you can record various technical information such as the Host IP/Name, MAC Address, Operating System, OS Version, OS Service Pack, Memory, Disk Space, CPU Speed, Manufacturer, Serial Number etc in the respective text boxes. You can even pick the ASM Expiry Date using the date picker.
-
Then, navigate to the Software Properties tab (see Figure 5).
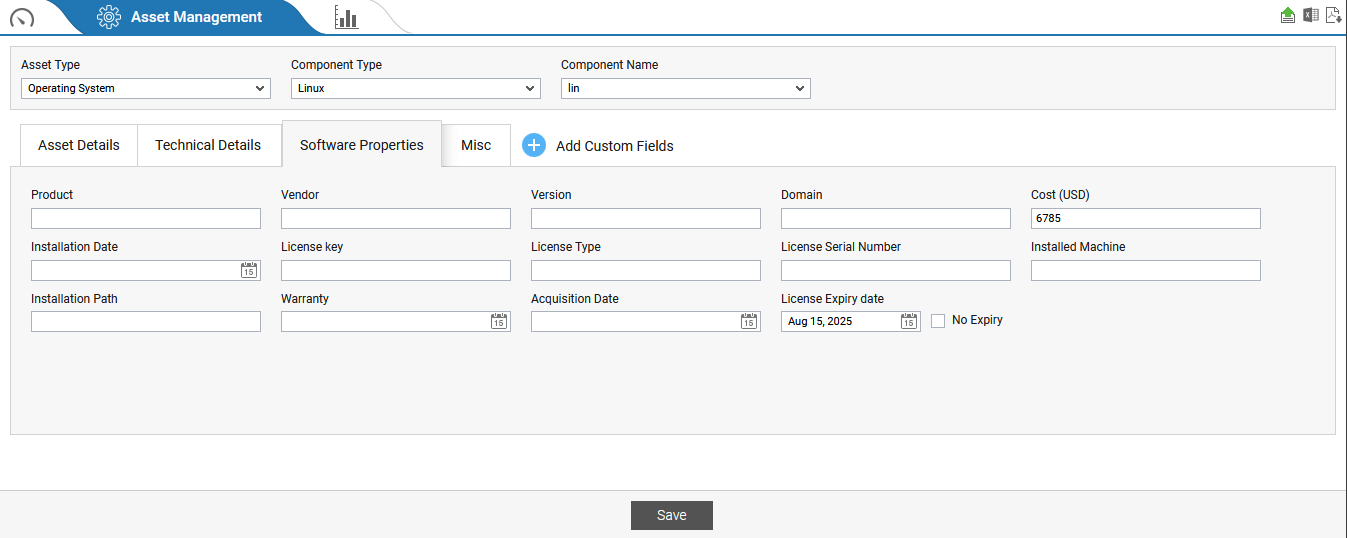
- In Figure 5, you can record, the software information of the asset such as the name of the Product, Vendor, Version, Domain, Cost, License Key, License Type, License Serial Number, Installed Machine, Installation Path etc in the respective text boxes. You can even pick the Installation Date, Warranty, Acquisition Date and License Expiry Date using the date picker in the corresponding text boxes.
-
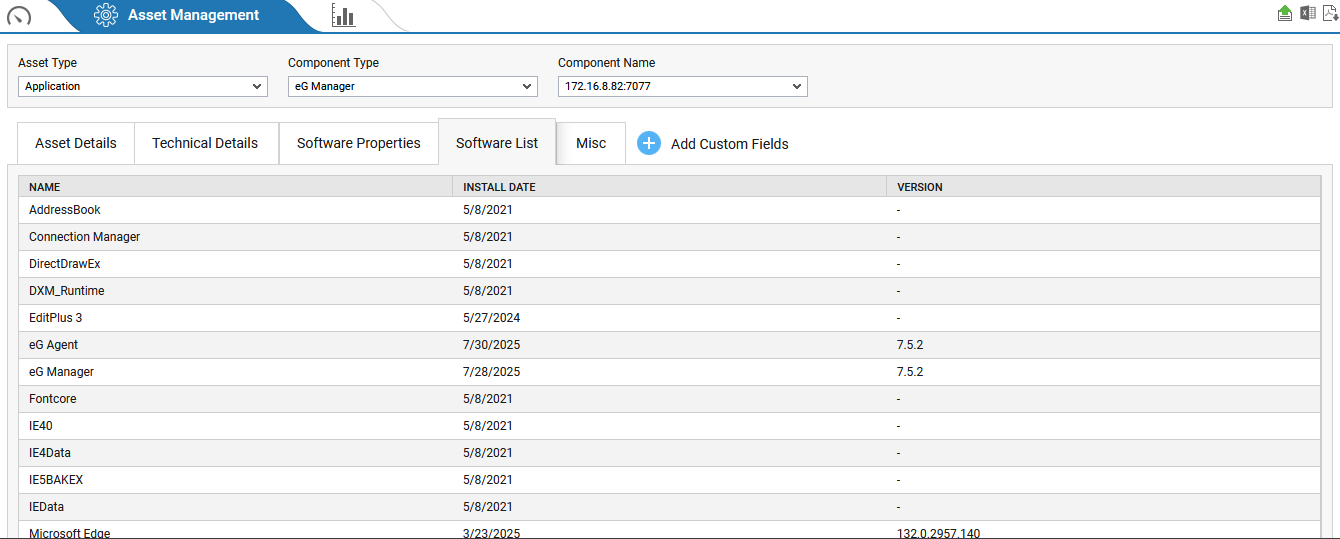
Next, if you have chosen a component after choosing Application from the Asset Type list, then a Software List tab as shown in Figure 6 will appear. Here, the name of each software installed, the date on which each software was installed and the version of software installed for the chosen asset will be displayed.
-
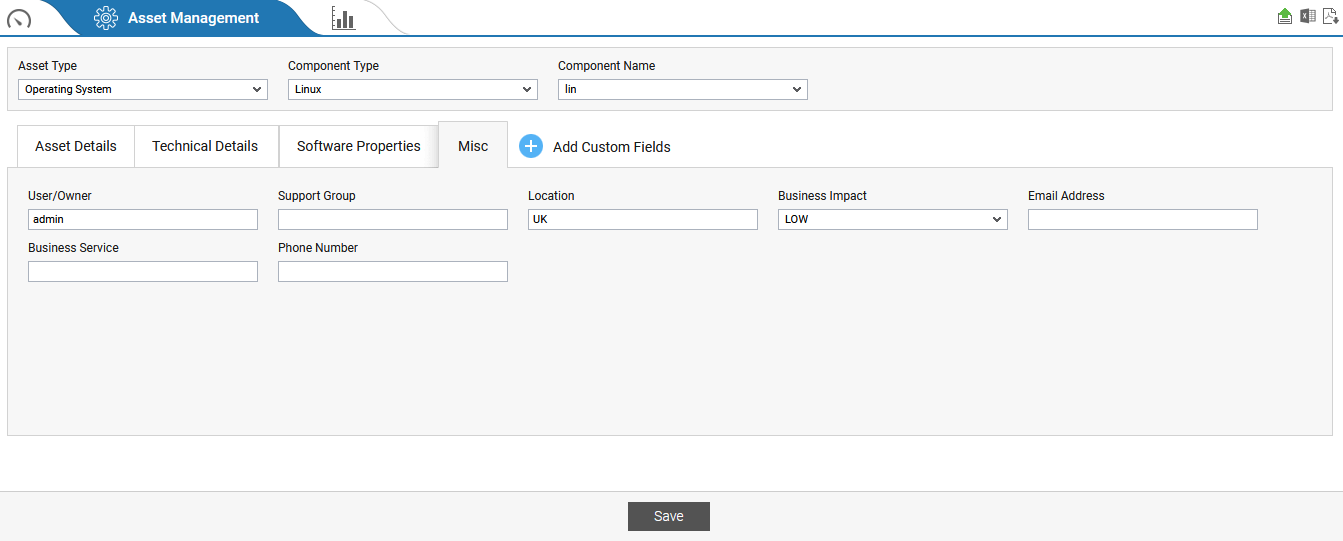
Now, navigate to the Misc tab (see Figure 7) where you can record varied user information of the asset such as Owner/User, Suport Group, Email Address, Phone Number, Location and Business Service in the respective text boxes. You can also set the business impact of the asset as High, Medium and Low using the Business Impact drop down.
-
If required, you can customize the asset details to capture more asset-related parameters than what is provided by default by eG Enterprise. For this purpose, custom fields can be added to the Asset Management page. To add custom fields, click the Add Custom Fields option available to the right of Misc tab (see Figure 8).
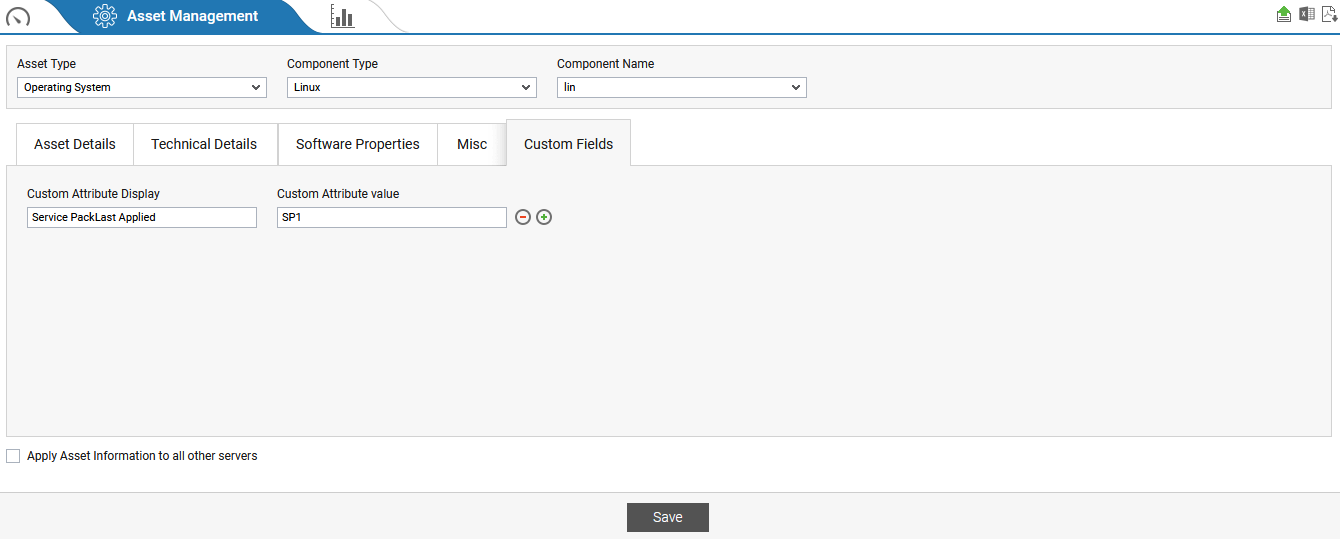
- Type the name of the new attribute that you want to capture against the Custom Attribute Display text box of Figure 8. Enter the value of new attribute in the Custom Attribute value text box.
- In the same way, you can add more asset parameters and configure their values by clicking the
 icon.
icon. - At any given point in time, you can delete an attribute-value pair by clicking the
 icon corresponding to that pair in Figure 8.
 - To apply the same asset information to all other servers in the target environment, check the check box preceding the Apply Asset Information to all other servers option (see Figure 8).
- Finally, click the Save button to record the asset information.
-
Asset information can also be mass imported into eG Enterprise from CSV files. For this, click the
 button at the right, top corner of
Figure 8. Figure 9 will then appear using which you can indicate the full path to the CSV/XLS file containing asset details.
button at the right, top corner of
Figure 8. Figure 9 will then appear using which you can indicate the full path to the CSV/XLS file containing asset details. 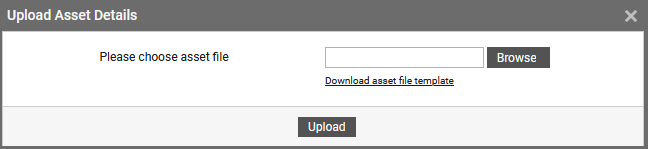
- The asset details should be provided in a specific format in the CSV/XLS file you upload. To know the format, download a sample CSV file by clicking the Download sample CSV link in Figure 9. An AssetDetails.csv file will then be downloaded.
- Once the file is downloaded, open the file, save it using any other name you want to (if required) and as any file type (CSV/XLS) of your choice, and then open the file. In the file, you will find a series of columns, each of which represents a standard asset-related parameter - e.g., OS/DEVICE/APPLICATION, HOSTNAME, PORT, ASSETNAME, DESCRIPTION, etc. By default, eG Enterprise auto-discovers the OS/Device/Applications in the target environment and the corresponding hostname and port details. These details are auto-populated in the downloaded CSV file in the OS/DEVICE/APPLICATION, HOSTNAME and PORT columns. Replace the sample entries under each of the column heads with the details of the assets you want to manage. Each row should contain details of one asset.
- For an asset, besides the default/standard asset information, you can also maintain custom properties. To enable you to specify these custom properties, columns labeled ATTR2 and ATTR3 are provided in the sample CSV file. Replace these column labels with the names of the properties that you want to additionally capture for an asset. However, before that, make sure that you add custom fields to your asset management page using steps 12 and 13 above. Make sure that the count of custom fields you add is equal to the count of custom attributes you specify in the sample file. Also, when labeling the columns for custom properties in the sample file, take care to assign the same names as the custom fields to these columns.
- To upload the file, click the Browse button against the Please choose asset file field and choose the file that you wish to upload.
- Then, click the Upload button in Figure 9 to upload the file to the eG manager and import its contents into the asset details repository.
- You can save the asset details as a CSV file by clicking the
 icon.
icon. - You can even download the asset information in a PDF format by clicking the
 icon.
icon.
Asset Reports
Asset reports provide a comprehensive overview of all hardware, software, and digital resources within an organization. These reports when generated enables administrators in better decision-making, improve security, and adhere to compliance. Also, using these reports, administrators can track the location, status, and usage of IT assets which ensures accountability and efficient resource allocation. These reports help administrators in identifying outdated or vulnerable systems, maintain software license compliance, and plan for upgrades or replacements. Thus these reports help administrators to proactively and strategically manage their IT environments.
To generate an Asset report, do the following:
-
Navigate through the menu sequence: Admin -> Infrastructure -> Asset Management. In Figure 1 that appears, click the
 icon. Figure 10 will then appear displaying the Reports page.
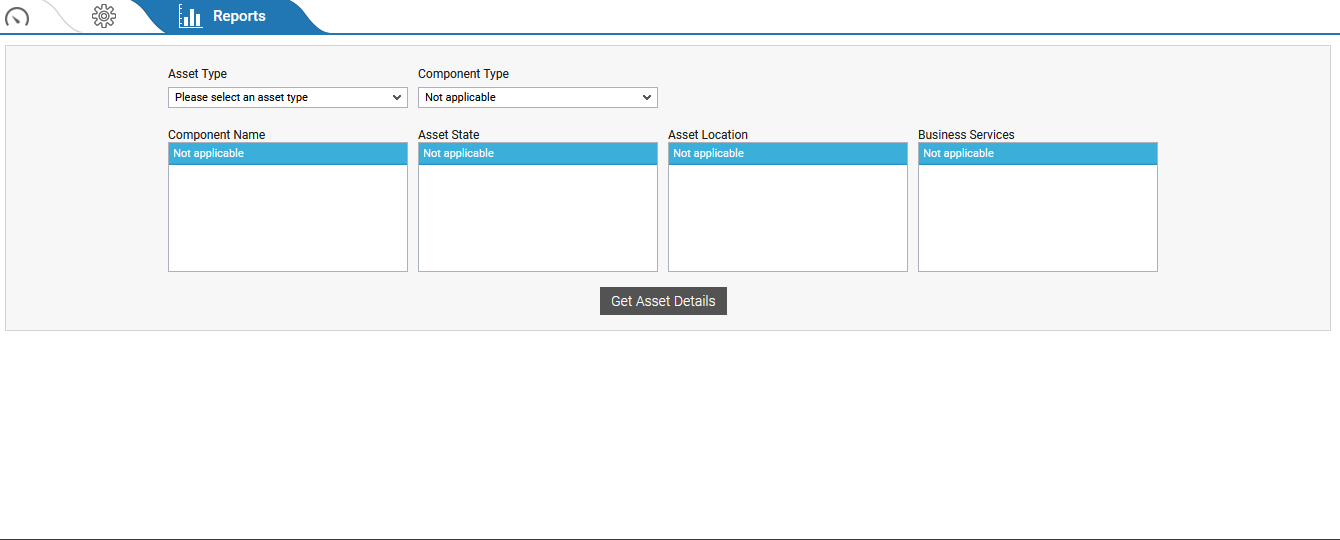
-
In Figure 10, pick an Asset Type and then a Component Type.
- The Component Name, Asset State, Location and Business Services list box will then be populated automatically. By default, All components, All states, All location and All business services will be chosen from the corresponding list boxes.
- You can either pick a component from the Component Name list of Figure 10 or choose the default All components option to generate the Asset report.
-
Clicking the Get Asset Details button reveals the generated report (see Figure 11).
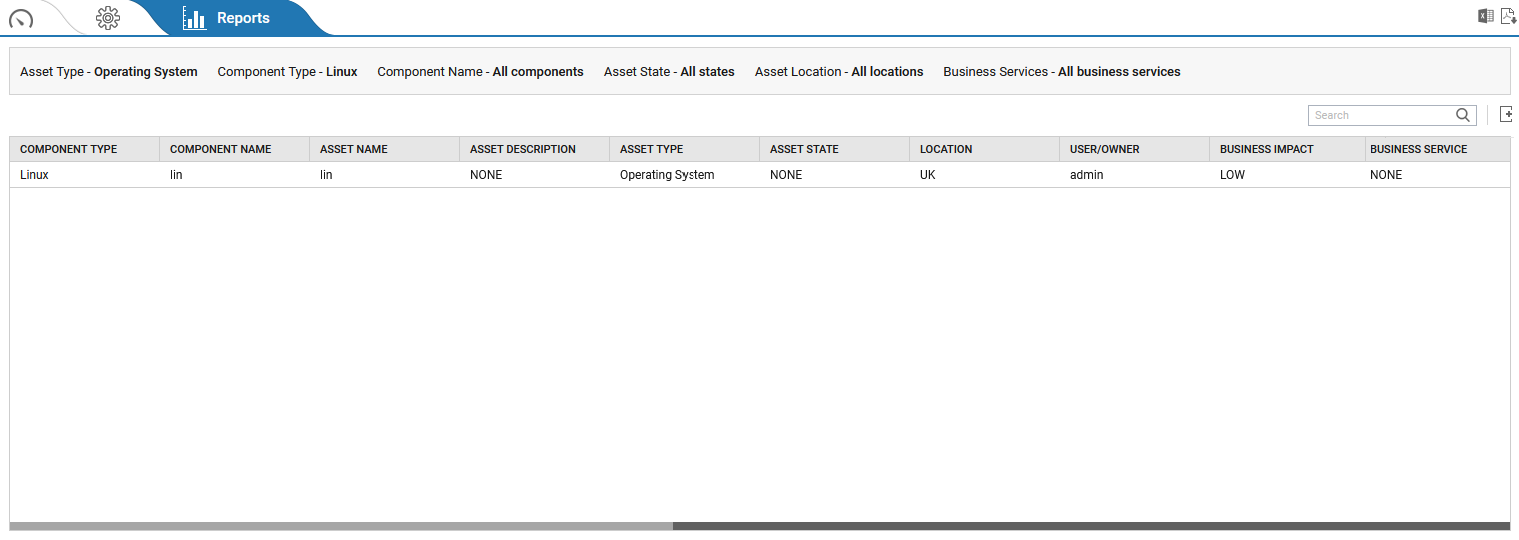
-
The generated report lists the asset information recorded the chosen component in the target environment. Clicking the
 icon reveals Figure 12 using which you can add one/more columns to the generated report.
Figure 12 : Adding additional columns to the Assets Report
Choosing the columns in Figure 12 and clicking the Apply button will reveal Figure 13 with the newly added additional columns.
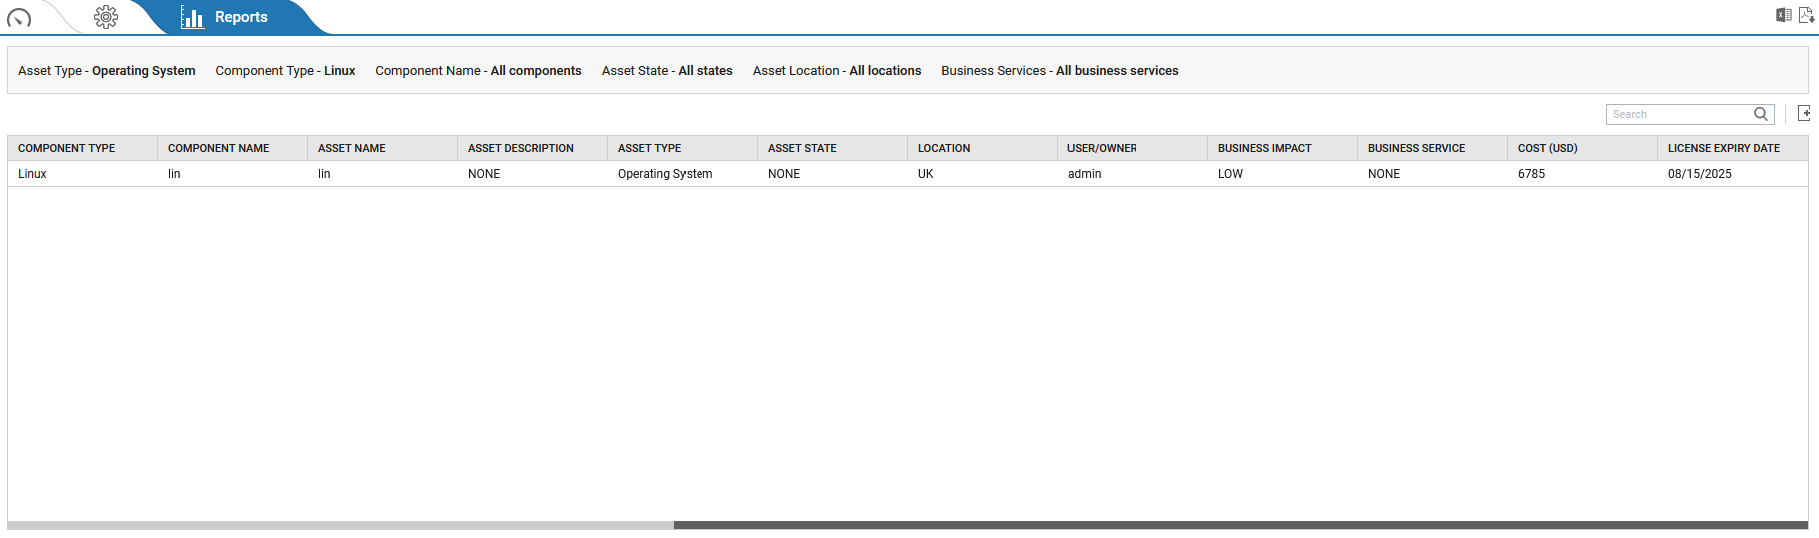
Figure 13 : Additional Columns included in the generated report
- You can save the asset details as a CSV file by clicking the icon.
- You can even download the asset information in a PDF format by clicking the icon.