Automatically Discovering Parent and Child Domains
The eG manager is capable of automatically discovering only that domain in which it has been deployed. To auto-discover the parent domain in which the eG manager operates, follow the steps given below:
- Click on the Add a new domain button in the right panel of Figure 1.
-
Doing so displays the domain configuration parameters in the right panel (see Figure 1).
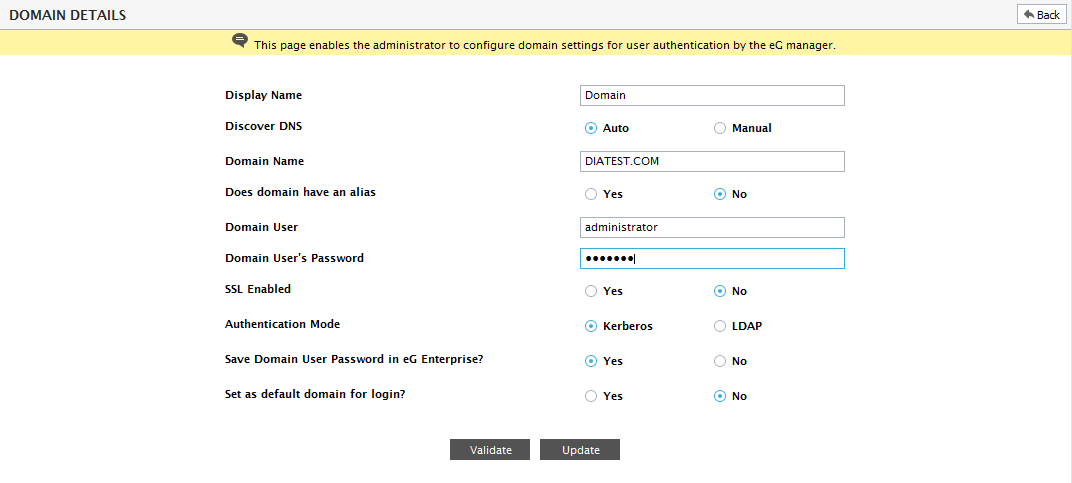
Figure 1 : Automatically discovering the eG manager’s domain
-
To auto-discover the eG manager’s parent domain, specify the following in Figure 1:
- First, provide a Display Name for the domain in the right panel of Figure 1.
-
Next, indicate whether or not the eG manager needs to auto-discover the IP/Port number of the AD server. To auto-discover the domain, set the Discover DNS settings flag to Auto.
Note:
Note that only the domain in which the eG manager is deployed can be auto-discovered.
- Next, specify the fully-qualified Domain Name.
- To connect to the AD server and access the domain user information stored within, the eG manager requires a domain user’s privileges. To facilitate this connection, provide a valid domain user’s name and password against Domain User and Domain User's Password.
- Then, indicate whether the AD server is SSL-enabled or not, by setting the ssl flag to Yes or No, as the case may be. If the ssl flag is set to Yes, then you will have to follow the procedure discussed in the Appendix below to ensure that the eG manager is able to communicate with the AD server over SSL.
- Next, indicate how accesses to the AD server are to be authenticated - using Kerberos or LDAP. Kerberos is a computer network authentication protocol which works on the basis of "tickets" to allow nodes communicating over a network to prove their identity to one another in a secure manner. Kerberos is ideal for AD environments with high security considerations. The Lightweight Directory Access Protocol on the other hand, is an application protocol for accessing and maintaining distributed directory information services over an Internet Protocol (IP) network. The LDAP authentication mechanism is best suited for environments with not very high security constraints.
- Next, indicate whether the Domain User's Password that you have provided here for enabling the eG manager to connect to the AD server, should be saved in eG Enterprise or not. To save the password, set the Save Domain User Password in eG Enterprise? flag to Yes. If this is done, then, the specified Domain User's Password will be automatically encrypted and saved to the eg_authenticate.ini file, which will be available in the <EG_MANAGER_INSTALL_DIR>\manager\config directory. On the other hand, if the Save Domain User Password in eG Enterprise? flag is set to No instead, the password will not be saved to the eg_authenticate.ini file. If the password is not saved, then every time the eG manager attempts to connect to the AD server - say, when validating/registering domain user profiles configured on the eG manager (using the add user page) with the AD server - you will be prompted for the Domain User's Password.
- Also, indicate whether/not the domain being configured should be set as the default domain at the time of login. To set the new domain as the default domain, set the Set as default domain for login? flag to Yes. If this is done, then the next time a user attempts to log into the eG management console by typing his/her user name in the login page, the Domain selection will instantly change from Local to the domain that you have set as the default. This capability is most useful in environments where the eG manager integrates with only one domain. By setting this domain as the default, administrators can save users the trouble of selecting a Domain every time he/she tries to login.
-
Then, to verify the correctness of your specifications, click the Validate button. Figure 2 will then appear indicating whether/not the Display Name, Domain Name, Domain User, and Domain User Password values that you have provided are indeed valid.

- Since the eG manager auto-discovers the IP/Port of the AD server, you will not be prompted to manually specify the same. Therefore, simply click the Update button to add the new domain.
-
Once the parent domain is auto-discovered and added to the eG Enterprise system, a message to that effect will appear (see Figure 3). The tree in the left panel will also change to reflect the addition of the parent domain.
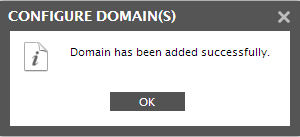
Figure 3 : A message box informing the successful addition of a domain
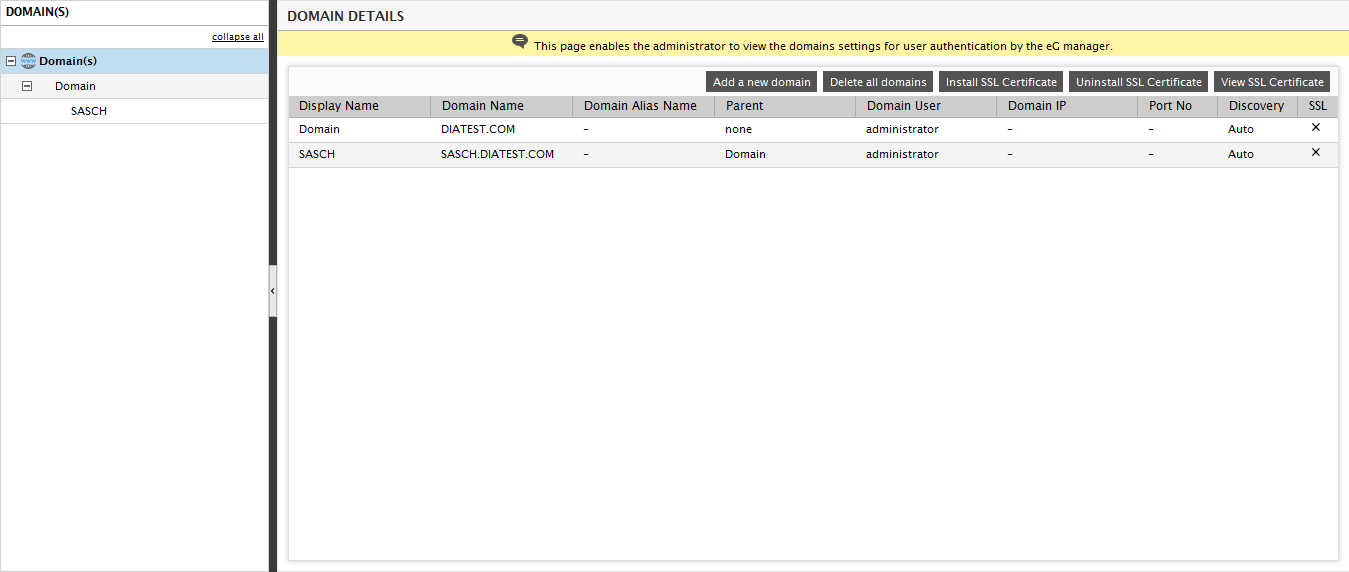
- By default, only the parent domain of the eG manager can be auto-discovered; the child domains (if any) under this parent domain will not be auto-discovered. This is because, the AutoDiscoverChildDomains flag in the [misc_args] section of the eg_services.ini file (in the <EG_INSTALL_DIR>\manager\config directory) is set to false by default. If need be, you can configure the eG manager to automatically discover the child domains along with the eG manager’s parent domain; to achieve this, set the AutoDiscoverChildDomains flag to true. In this case therefore, the child domains (if any) will also be automatically discovered along with the eG manager's parent domain and will be displayed as sub-nodes of the parent domain's node, as depicted by Figure 4 below.
-
To view the details of all domains (both parent and child) that have been configured, click on the Domains node tree. The right panel will then change to display a tabular column, where you can view the configuration of all the domains that you have created (see Figure 4).
-
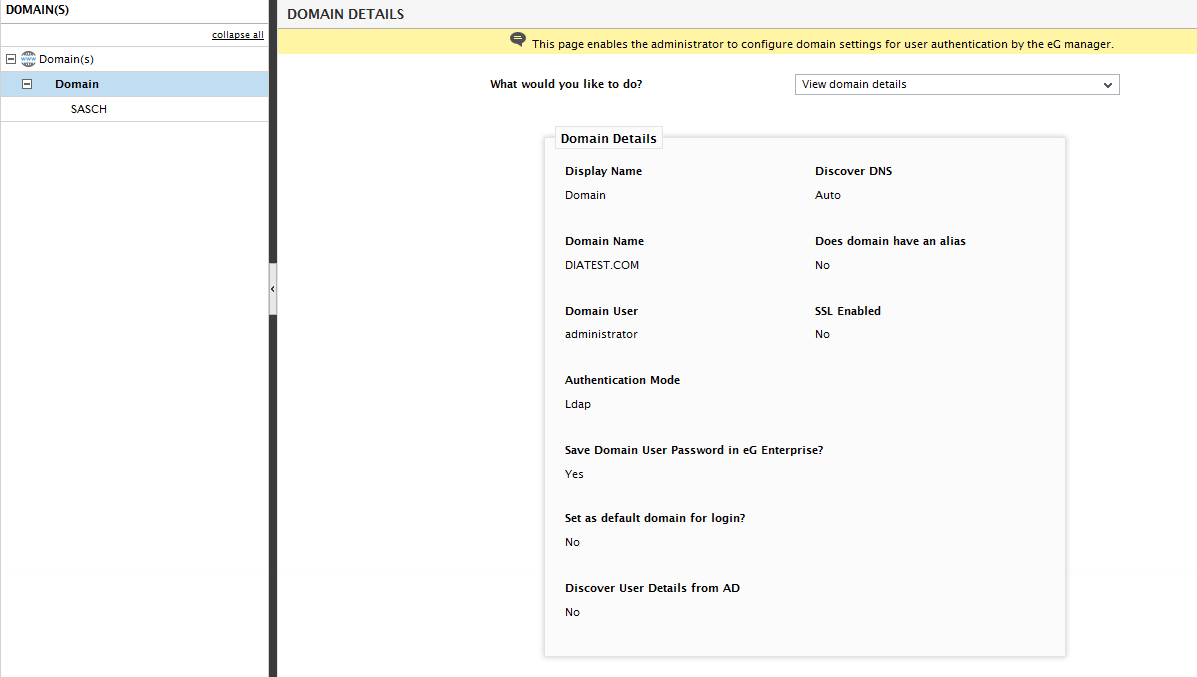
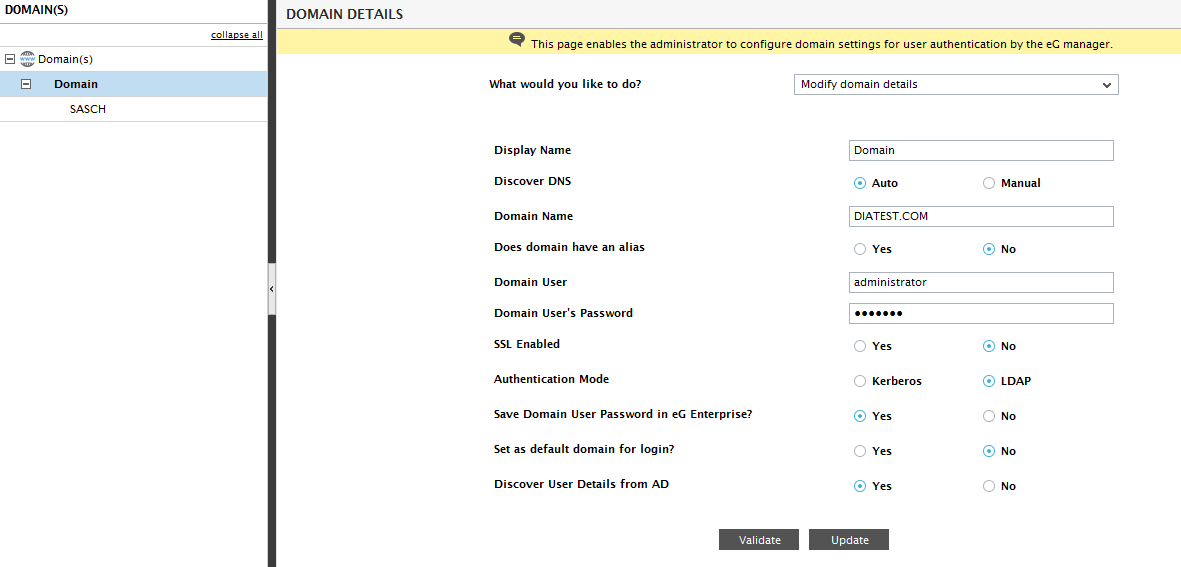
At any time, you can view the configuration of the auto-discovered parent domain by just clicking on the node representing that domain in the domain(s) tree. The right panel will then change to display the parent domain’s current configuration (see Figure 5).
-
To modify the configuration of a parent domain, just select the Modify domain details option from the What would you like to do? list in Figure 5.
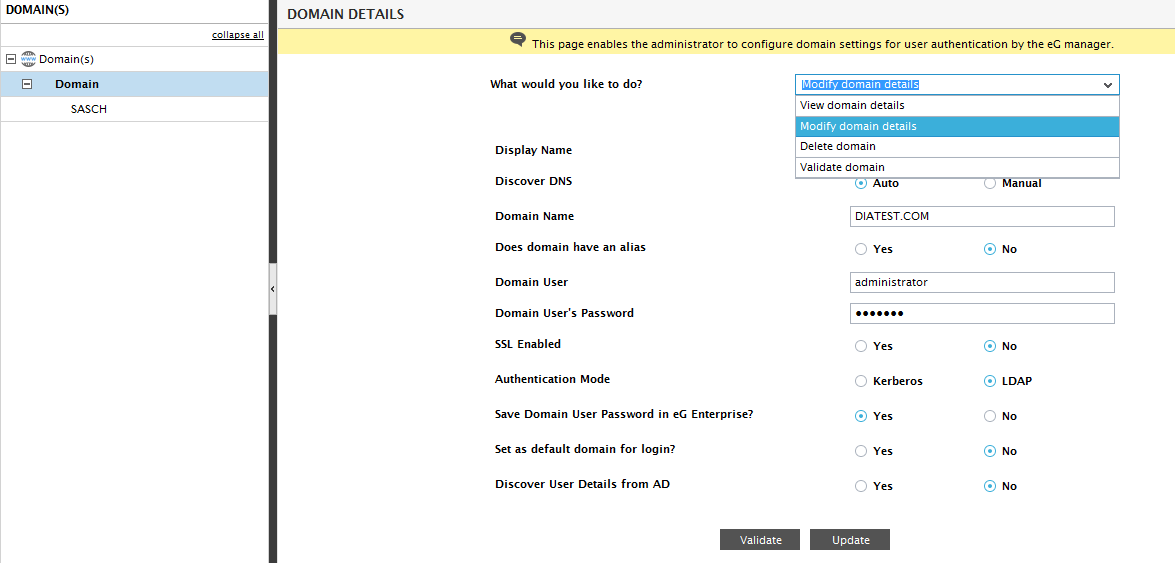
Figure 6 : Selecting the Modify option of an auto-discovered parent domain
-
The right panel will once again change to display the parent domain’s current configuration, but in an editable mode (see Figure 7).
-
Except the Display Name, all other details of the parent domain can be modified. Once you are done with your changes, click the Update button in the right panel of to save the changes.
Note:
Whenever the configuration of a parent / child domain is modified, make sure that you restart the eG manager.
-
To view the details of an auto-discovered child domain, click on the node representing the child domain in the tree structure. The details of the chosen node will be displayed in the right panel (see Figure 8).
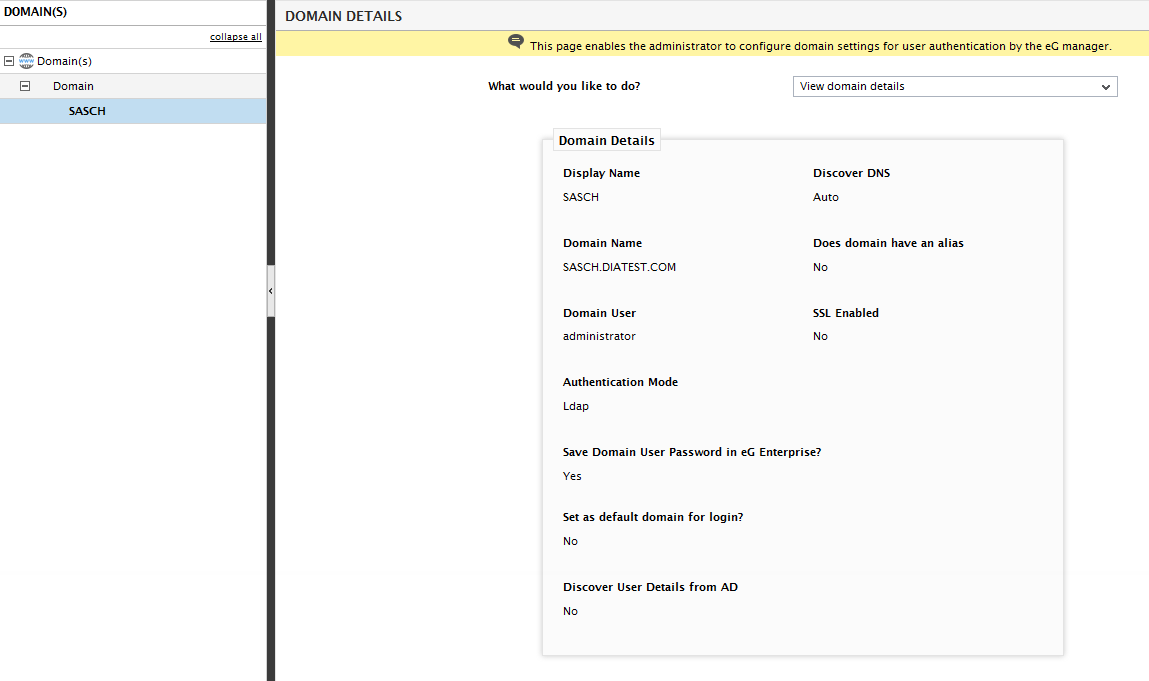
Figure 8 : Selecting the option to view the details of the auto-discovered child domain
-
Unlike an auto-discovered parent domain, an auto-discovered child domain cannot be modified. However, you can delete an auto-discovered child domain. For this, just select the Delete domain option from the What would you like to do? list as depicted by .
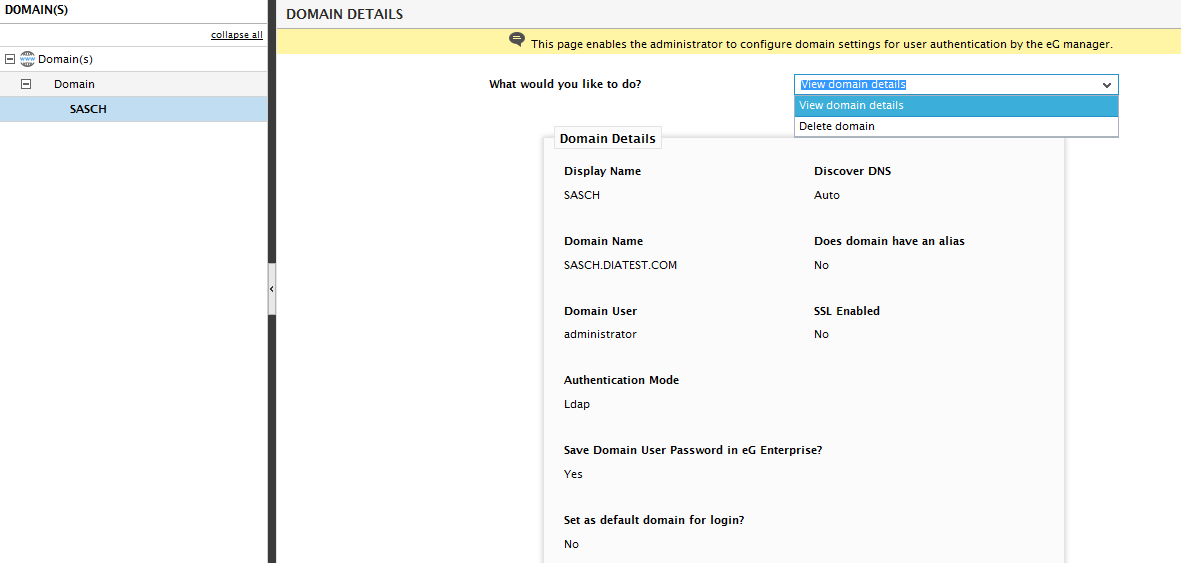
Figure 9 : Selecting the Delete option of an auto-discovered child domain
-
Doing so will invoke the message box of Figure 10, which will request for your confirmation to delete the child domain. Click the Delete button in Figure 10 to confirm deletion.

-
While deleting a child domain will delete only that domain, deleting a parent domain will delete all its child domains as well. Therefore, to delete a parent domain and all its child domains, first, click on the parent domain node in the domain(s) tree and select the Delete option from the What would you like to do? list. A message box requesting your confirmation to delete the parent domain will appear. Click the Delete button in the message box to confirm deletion.
Note:
- Ensure that the eG manager is restarted after deleting a domain.
- Deleting an auto-discovered parent domain automatically deletes all its discovered sub-domains as well.
- A domain can be deleted only if no user registered with eG belongs to that domain.
Procedure for integrating the AD server with eG manager for retrieving user specific information
In virtual environments where LDAP is used to authenticate access to the AD server, administrators may want to keep track on specific user information for e.g., location, vendor etc of the users accessing their environment through the AD server. For example, in addition to viewing the user experience with their virtual environment, if administrators are able to view the location of the user, it would help them troubleshoot location specific issues at the earliest. This approach would definitely help administrators improve the overall performance of their environment. To view such user specific information in the eG monitoring console, administrators should do the following:
- First, set the Discover User Details from AD flag to Yes. This flag appears only when the Authentication Mode is set to LDAP. By default, this flag is set to No.
- Once this flag is set to Yes, the user specific information will automatically be populated in the ADUserDetails.ini file that is located in the <eG_INSTALL_DIR>/manager/config location.
-
The user specific information so updated can be viewed in the following features offered by the eG Enterprise:
- User Experience Dashboard
- Current Alarms
- Layer model page of the tests where users are the descriptors of the tests
-
To view the user specific information in the User Experience Dashboard, you have to edit the <EG_INSTALL_DIR>/manager/config/eG_enduserdetails.ini file with the procedure mentioned below:
- First, if you want to view user specific information in the User Experience dashboard for VDI environments, then you have to set the VDI:ShowUserLocations flag under the [GEO_LOCATION_SETTINGS] location to true.
- Set the XenApp7:ShowUserLocations flag to true if you want to view the User Experience dashboard for Citrix XenApp 7 and above environments. Set the XenApp:ShowUserLocations flag to true if you want to view the User Experience Dashboard for Citrix XenApp servers.
-
Once you have set the ShowUserLocations flag to true, you have to specify the format of the user details that were discovered from the AD server and populated in the ADUserDetails.ini file. This can be achieved using the <UserType>:Format=Vendor-City-CompanyName where UserType can be VDI or XenApp7 or XenApp. For example, if you want the location of the users to be displayed in the User Experience Dashboard for VDI environments, then you can specify the format as:
VDI:Format=Vendor-City-CompanyName
Then, you have to specify the separator using which the user details have to be separated into columns while being displayed in the User Experience dashboard against the Separator field. By default, the separator is hyphen (-).
- Once the format and separator are specified, you have to provide the display name for all user specific information that you have mentioned against the format field. By default, the display name for certain user specific information that you have mentioned in the UserType:Format section would be specified under the [USER_DESKTOP_METRICS] section.
-
If you want to include the address of the user in the dashboard, then you have to use the following format:
;GeoDetails:Address~$~Address
In the above example, the format is GeoDetails:<Internalname specified in the UserType:Format section>~$~D<Displayname>.
-
Once you have provided all the entries, the final step in this process is to specify the columns that should appear in the User Experience Dashboard. By default, the eG Enterprise provides out of the box support to display the Vendor, City and Company of the users in the User Experience Dashboard. If you want to include the address of the VDI users in the dashboard, then you have to append the GeoDetails:Address~$~Address format to the "VDI=" section under the [USER_DESKTOP_METRICS] section as shown below:
VDI=EsxLoginTest:New_logins:LoginTime:DATE:Logon Time, GeoDetails:Address~$~Address
- Once you have configured the necessary files, it is mandatory for you to restart the eG manager to effect your changes.
-
To view the user specific information in the current alarms and the layer model, you have to append the user specific test to the [Show_User_location] section of the eg_dashboardConfig.ini file which is situated in the <eG_INSTALL_DIR>/manager/config location. By default, the entry in this section should be in the following format:
<Testname>:iconDesktopUser
If you have to view the user specific information, then you have to remove the semicolon(;) in front of the <Testname>.
- Once you have configured the necessary files, it is mandatory for you to restart the eG manager to effect your changes.
Updating the user information from the AD server to the eG manager
By default, if the Discover User Details from AD flag is set to Yes (see Figure 7), then, the user information available in the AD server would be updated to the ADUserDetails.ini file once in 7 days. Once the flag is set to Yes, an additional Update User Details from AD option will appear in the What would you like to do? list in the right panel as shown in Figure 11.

Figure 11 : Updating the user information from the AD server
By clicking the Update button the user information from the AD server is immediately updated to the ADUserDetails.ini file available in the <eg_install_dir>\manager\config directory.
Note:
If you wish to override the default setting of updating the user information once in 7 days, then you can do the following:
- Edit the eg_services.ini file (in the <eg_install_dir>\manager\config directory).
- Set the ThreadFrequency parameter in the [ADUserDetails_Thread_Settings] section of the file to a frequency of your choice.
- By default, the information will be integrated every Sunday. If you wish to override this default day, then you can change the DayToRun parameter to the day of your choice.
- Save the file.