Configuring Additional Remote Agents
By default, the eG agent on the eG manager host will function as both the external and remote agent for the monitored environment. If required, you can add more remote agents. The procedure for this is discussed below:
- Select the Remote Agents option from the Agents tile.
-
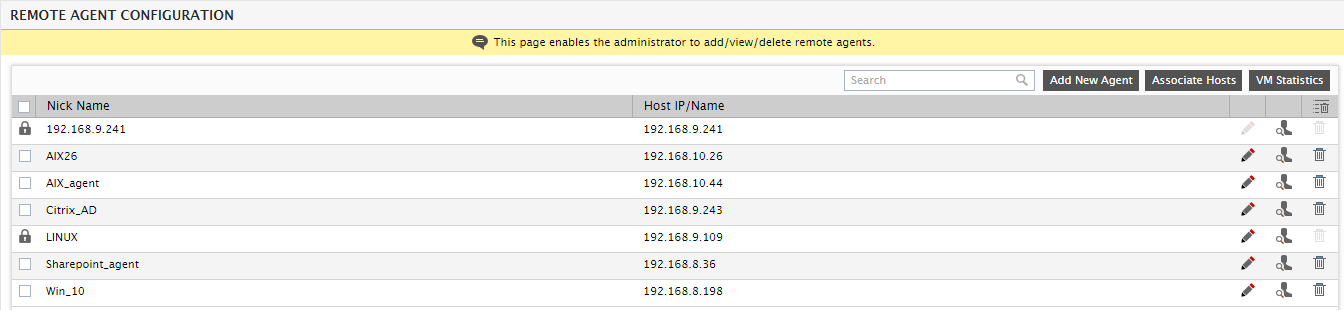
The page that appears next will list the remote agents that pre-exist (if any). By default, if no additional remote agents are yet to be configured in the environment, then Figure 1 will display the IP address of the default remote agent on the eG manager host alone. However, note that this default remote agent cannot be modified or deleted.
-
Click on the Add New Agent button in Figure 1 to add a new remote agent. Doing so will invoke Figure 2, wherein the Host IP/Name and the Nick name of the remote agent need to be specified. If you want to add an external agent with the same IP/host name and nick name as the remote agent that is being configured, set the Add as External agent flag in Figure 2 to Yes.
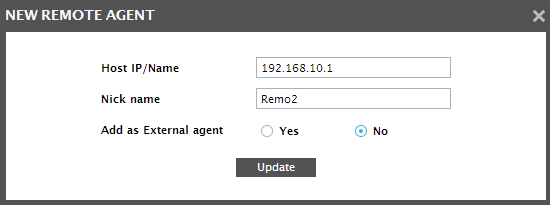
Figure 2 : Adding a new remote agent
Note:
- You can configure a remote agent with its IP address or its ‘fully qualified host name’.
- If you choose to configure a remote agent with its IP address (instead of its host name), then remember that this IP address can be an IPv4 or an IPv6 address.
- If required, you can configure both the Host IP/Name and Nick name parameters with the IP address of the remote agent. However, if the Host IP/Name has been configured with an IPv6 address, then you cannot configure the Nick name with that IPv6 address; in this case, the Nick name should be some other logical name using which you want to identify the remote agent.
- Finally, click the Update button in Figure 2 to register the changes.
-
Figure 3 then appears displaying the newly created remote agent. To modify the configuration of a remote agent, click the Modify icon (i.e., the ‘pencil’ icon) corresponding to that agent in Figure 3.

Figure 3 : The newly configured remote agent appearing in the remote agents list
-
Doing so brings up Figure 4, using which you can modify the Host IP/Name and Nick name of the remote agent. If you had not added an external agent earlier with the IP and nick name of the remote agent, you can do so in the Modify mode by setting the Add as External Agent flag to Yes. However, if you have already added such an external agent, then you cannot modify that flag setting once again in the Modify mode. After making the necessary changes, click on the Update button in Figure 4 to register the changes.

After configuring a remote agent, assign the hosts to be monitored by the remote agent. You can either assign a remote agent to multiple hosts simultaneously, or can do it for one host component at a time.
To assign a remote agent to multiple hosts at one shot, do the following:
- First, click on the Associate Hosts button in Figure 3.
-
When Figure 5 appears, select the remote agent in question from the Remote agent drop-down. The hosts that are currently managed by the chosen remote agent will appear in the Hosts managed by this agent list box. The Hosts managed by list will list all the other remote agents in the target environment. From this list, choosing the remote agent of your choice will populate all the hosts associated with that remote agent.
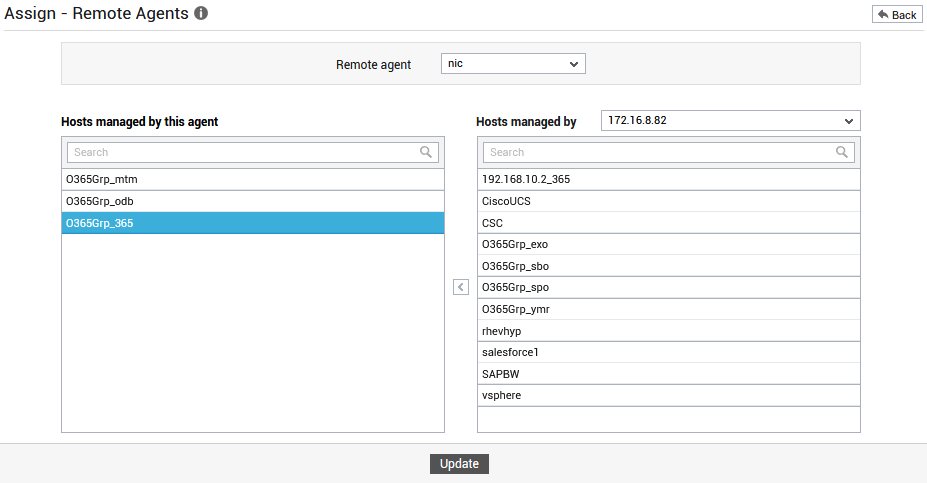
- To assign the selected remote agent to multiple hosts, select the hosts that are populated below the Hosts managed by list box and click the < button.
-
To disassociate the remote agent from hosts with which they are currently associated, repeat the procedure mentioned in step 2 & 3.
- Finally, click the Update button to save the changes.
-
Alternatively, you can click the
 button corresponding to a remote agent in Figure 1 and then assign hosts to that agent using Figure 5.
 Note:
It is recommended that a remote agent be used to support up to 10 targets.
Note:
- Typically, the remote agent should be installed and configured on the same operating system and locale as that of the servers that are monitored by that agent. In multi-lingual environments therefore, you would require a remote agent for every locale that is in use - for instance, in environments with servers that support both French and Japanese locales, you would require an exclusive remote agent for the French servers and another for the Japanese servers.
- A remote agent can monitor only those hosts that have the same architecture as the remote agent. For instance, a remote agent executing on a 32-bit host can monitor only another 32-bit host. Similarly, a remote agent deployed on a 64-bit host can only monitor other 64-bit hosts.
In some environments, administrators may have configured one/more remote agents, but might not have assigned any hosts to them - i.e., these remote agents might not be monitoring any host in the environment. Administrators might want to remove such “unused” agents from the eG Enterprise system. To enable administrators to isolate such unused remote agents and delete them, the remote agent configuration page marks every used remote agent with a ‘lock’ icon (see Figure 6) and the unused remote agents with a check box. To delete the unused agents, simply select the check box corresponding to such agents, and click the ‘trash can’ icon against them. Remote agents that are in use (i.e., agents with the lock symbol) can be modified, but not deleted.

Figure 6 : Deleting remote agents not monitoring any host
To know how to assign a remote agent for each component at a time, refer to How to Manage Components in an Agentless Manner? .