Discovering Virtual Platforms
By default, the eG manager attempts to discover virtual platforms using the port-scanning technique (that was described earlier in this chapter). In the case of some virtual platforms, this technique may not be effective. In case of a few others, security considerations may discourage administrators from opting for this technique. To address these concerns, eG Enterprise allows administrators the flexibility to discover virtual platforms without running the port scans. How this is done differs from one virtual platform to another. The sub-sections below elaborate on how each virtual platform can be discovered using the eG manager.
Discovering vSphere/ESX Servers
eG Enterprise is capable of automatically discovering the ESX servers in the environment using the eG manager or the eG agent that is monitoring the ESX server. Since both these approaches employ a port-scanning technique to discover ESX servers, they might not be suitable for high-security environments where the firewall has been configured to block traffic to and from specific ports. Likewise, in environments that are spread across multiple sub-nets, discovery performed using the eG manager or the agents could increase the bandwidth consumption. To address these concerns, eG Enterprise provides you with the option to directly connect to one/more VMware vCenter installations in your environment to perform ESX discovery. The additional benefit that accrues in this process is that, when one/more ESX servers discovered using vCenter are managed, then eG Enterprise automatically uses the same vCenter server to collect performance metrics related to the ESX servers. In other words, eG Enterprise auto-configures the tests pertaining to the managed ESX servers with the details of the vCenter server used for their discovery; this way, the solution minimizes the time and effort involved in manual test configuration, and quickly starts collecting metrics from vCenter. Similarly, if the vCenter details need to be modified for any reason, then, you will not be required to manually reconfigure each test for this purpose; changing the configuration of the vCenter server in the discovery page will automatically update all the tests that have been configured to collect metrics from that vCenter server.
To discover the vSphere/ESX hosts, select the Virtual Platforms option under the Settings sub-node of the Manager Discovery node in the discovery tree in the left panel of Figure 1. Then, choose the vSphere/ESX Hosts option from the Choose a virtual platform to discover drop-down in the right panel (see Figure 1). If one/more vCenter servers have already been added to enable the discovery of vSphere/ESX servers, the details of the same will be displayed in the right panel as shown by Figure 1.
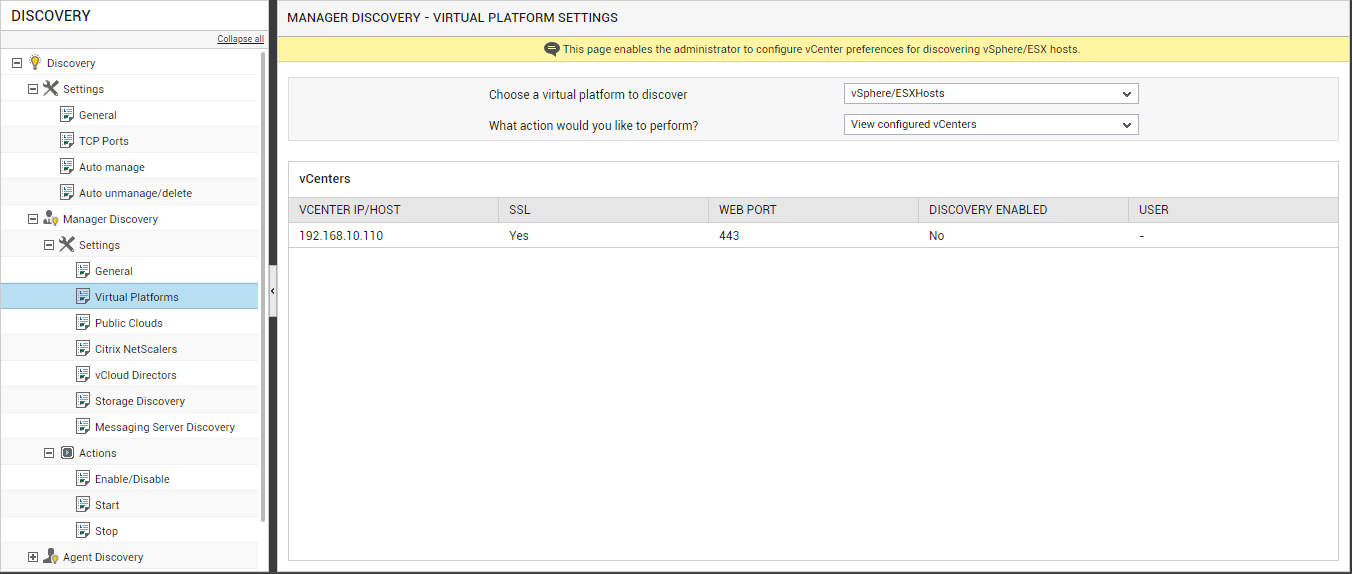
Figure 1 : Discovering vSphere/ESX Hosts
The first step towards using vCenter for ESX discovery and performance monitoring is to configure the eG manager with the details of the vCenter server(s), and mark the server(s) that will be used for discovery.
Prior to vCenter creation, you might have to increase the memory settings of the eG manager. This is because, VI APIs are memory intensive, and therefore, the default memory setting of 128 MB for the eG manager might not be sufficient for performing ESX discovery via vCenter. To override this default setting, select the Configure memory settings for discovery option from the What action would you like to perform? drop-down list in the right panel of Figure 1. Figure 2 will then appear.
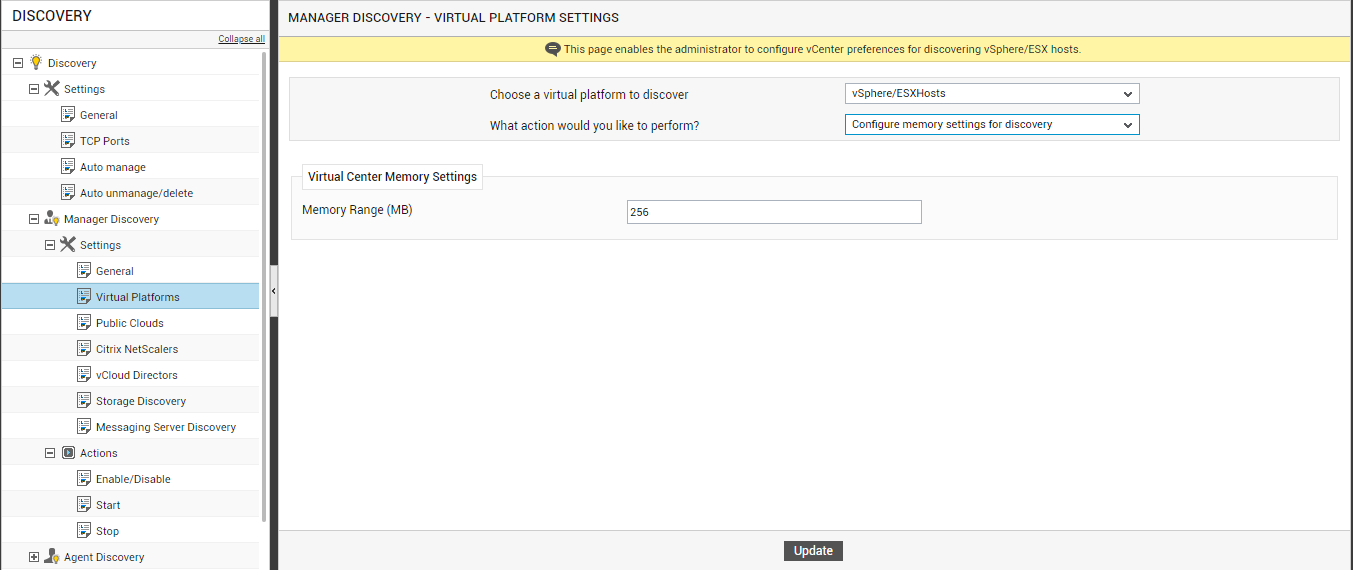
Figure 2 : Overriding the default memory settings of the eG manager
You can specify any value between 256 MB and 1024 MB in the Memory Range (MB) text box in Figure 2, and click the Update button therein.
Next, you can proceed to add a new vCenter. To add a new vCenter server, do the following:
-
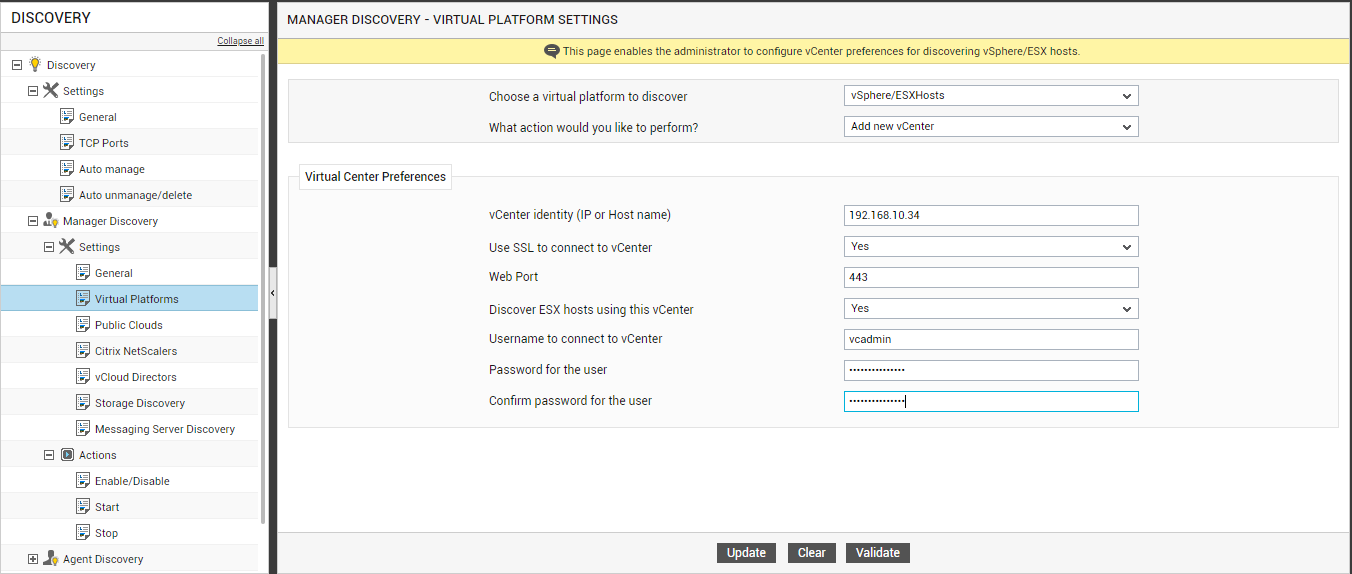
Select the Add new vCenter option from the What action would you like to perform? drop-down in the right panel (see Figure 3).
-
Then, specify the following in right panel of Figure 3:
-
Specify the IP or host name of the vCenter in the vCenter identity (IP or Host name)text box.
Note:
When providing the IP address of the vCenter server against vCenter identity, you can specify either the IPv4 or the IPv6 address of the vCenter server.
- Then, indicate whether the eG manager is to connect to vCenter using SSL or not by selecting the Yes or No option from the Use SSL to connect to vCenter list. By default, this flag is set to Yes.
- By default, in most virtualized environments, vCenter listens on port 80 (if not SSL-enabeld) or on port 443 (if SSL-enabled) only. This implies that while discovering ESX servers using vCenter, eG Enterprise communicates with vCenter via the default ports 80 or 443, depending upon the SSL-enabled status of vCenter. Accordingly, the Web Port parameter in Figure 3 is set to 443 by default, if the ssl flag is set to Yes, and displays the default value 80 if the ssl flag is set to No. In some environments however, the default ports 80 or 443 might not apply. In such a case, in the Web Port text box, specify the exact port at which vCenter in your environment listens.
- Typical virtualized environments may consist of multiple vCenter installations, each managing a different set of ESX servers. To enable the eG manager to automatically discover those ESX servers that are managed by the vCenter being added, then set the Discover ESX hosts using this vCenter flag to Yes. If not, then set it to No.
- In order to be able to discover ESX servers using a vCenter server, the eG manager needs to connect to vCenter using the credentials of a valid user to vCenter. Provide the user name and password of such a user in the Username to connect to vCenter and Password for the user text boxes. This user typically requires Administrator or Virtual Machine Administrator privileges. However, if you cannot expose the credentials of such a user owing to security constraints, then, you can use the credentials of a user with ‘Read-only’ privileges to vCenter. If such a user pre-exists, then, provide the name and password of that user in the text boxes mentioned above. Otherwise, assign the ‘Read-only’ role to a local/domain user to vCenter, and provide the name and password of this user in the Username to connect to vCenter and Password for the user text boxes. The steps for achieving this are detailed in the Monitoring VMware Infrastructures document.
- Confirm the password of the user by retyping it in the Confirm password for the user text box.
- To clear all the configured details, click on the Clear button in Figure 3. To start discovery instead, click on the Update button.
-
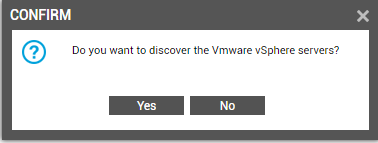
Clicking on Update brings up Figure 4, which requests you to confirm whether you want to start discovery based on the specifications provided. Click the Yes button to begin discovery.
- Regardless of the discovery approach used (discovery using an IP range or using vCenter), triggering ESX discovery will lead you straight to the components -manage / unmanage. To know how to manage/unmanage components using this page, refer to Managing and Unmanaging Components.
-
To view the vCenter servers so added, select the View configured vCenters option from the What action would you like to perform? drop-down. Figure 5 will then appear listing the vCenter servers that have been configured for discovering ESX servers.
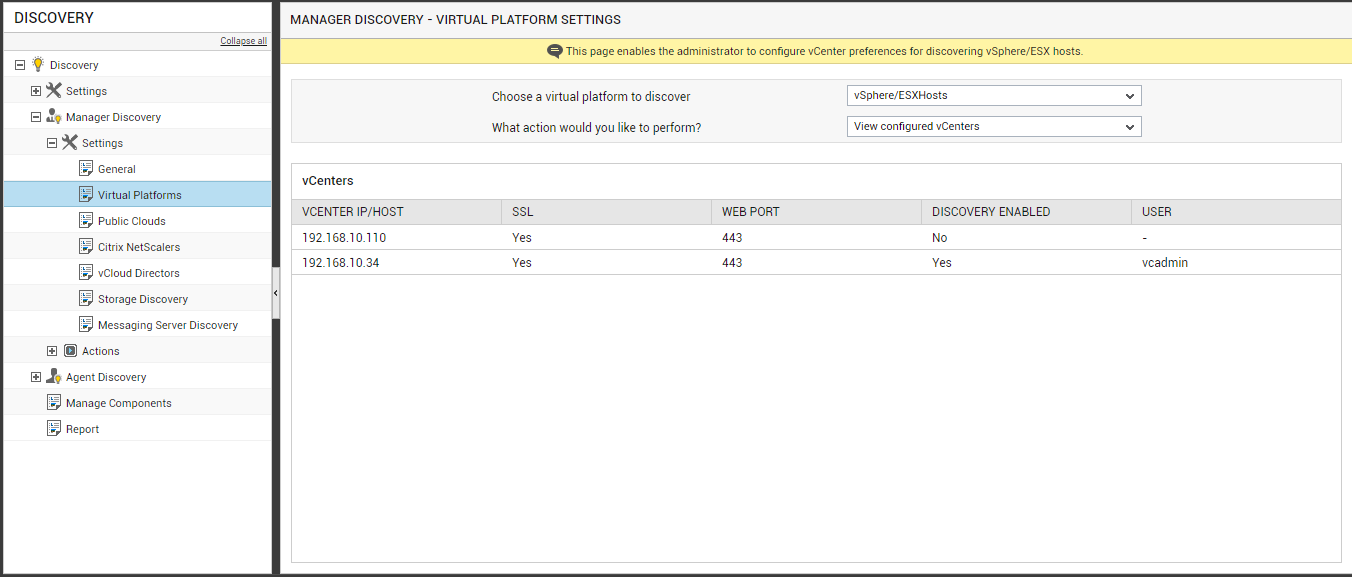
Figure 5 : Viewing the configured vCenter servers
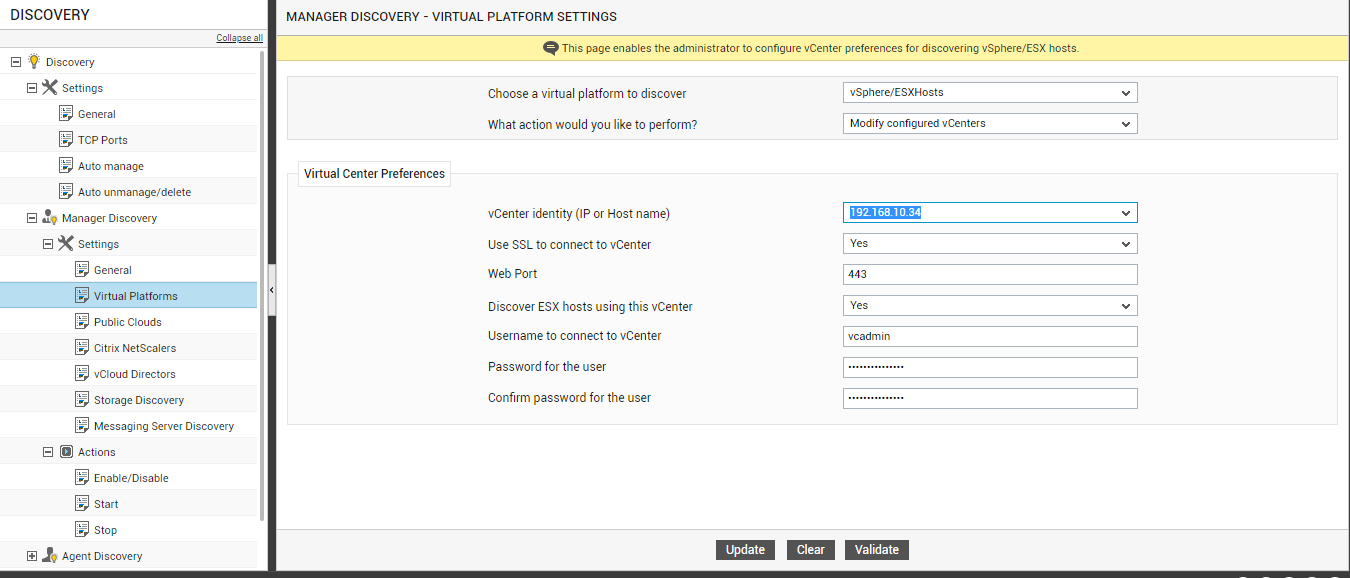
To modify a vCenter configuration, do the following:
-
Select the Modify configured vCenters option from the What action would you like to perform? drop-down. Figure 6 will then appear, using which you can modify the vCenter configuration. For that, first, select the IP/host name of the vCenter to be modified from the vCenter identity (IP or Host name) list. The details of the chosen vCenter will then be displayed against the appropriate fields. You can modify any of the displayed details and update the changes by clicking the Update button.
To delete a particular vCenter, select the Delete configured vCenter option from the What action would you like to perform? drop-down. Figure 7 then appears listing the available vCenter servers.
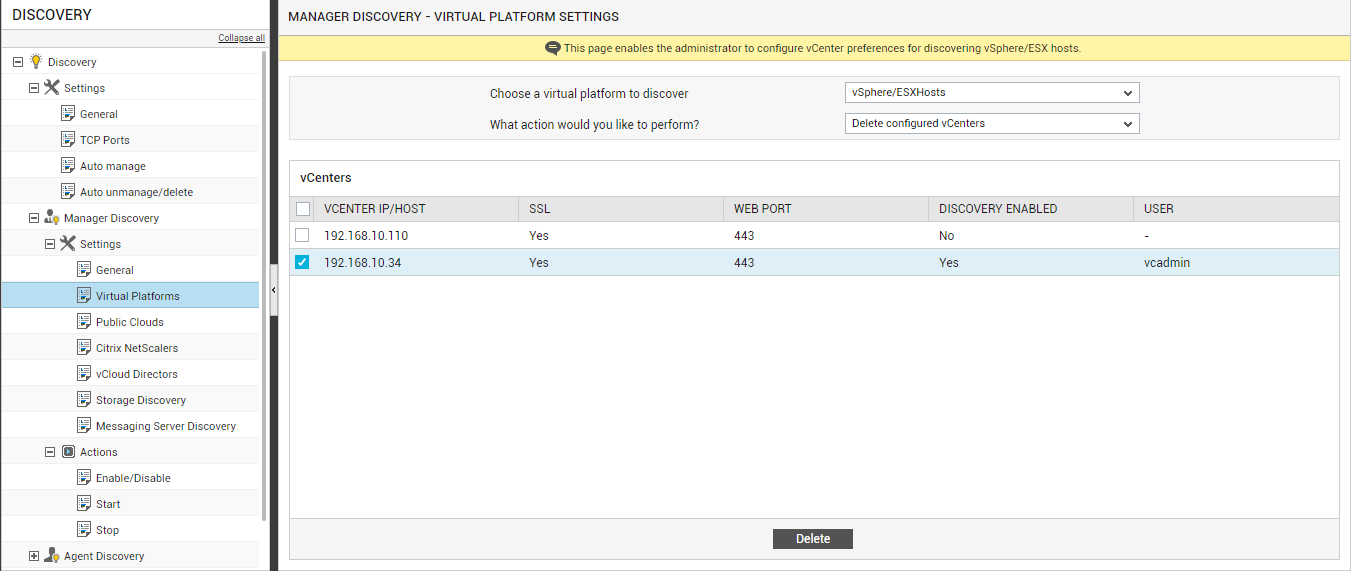
Select the vCenter servers to be deleted by selecting the check boxes corresponding to the vCenter configuration in Figure 7. To mark all the listed vCenter servers for deletion simultaneously, simply select the top-most check box in the column of check boxes. To delete the marked vCenter servers, click on the Delete button in Figure 7.
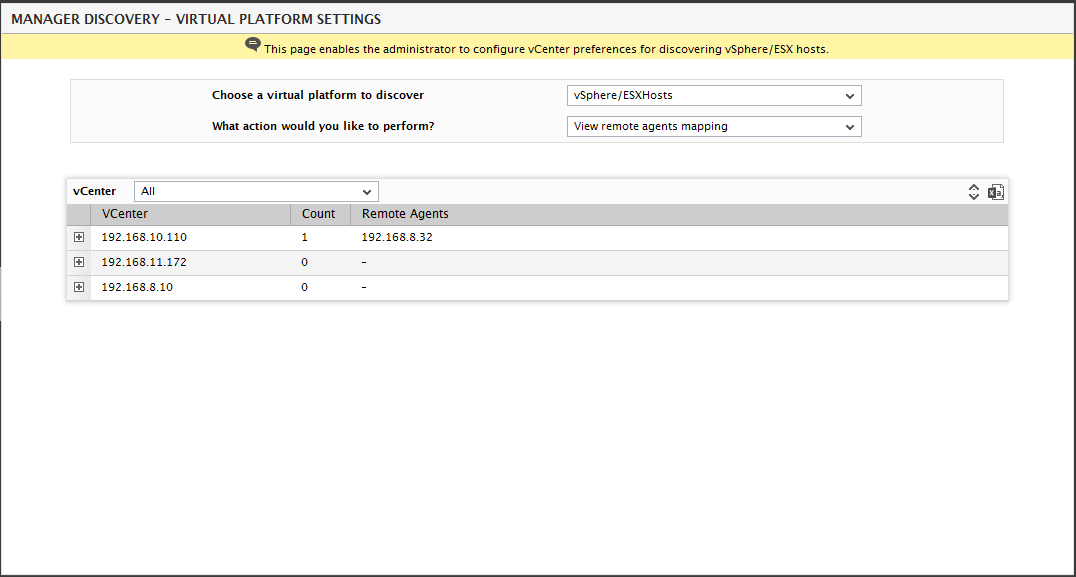
Often administrators may want to view the remote agents that are currently monitoring the discovered vSphere/ESX hosts with ease!To identify the remote agents that are assigned to the vCenters while discovering the vSphere/ESX hosts, do the following:
- Select the View remote agent mapping option from the What would you like to perform? drop-down list. Figure 8 will then appear.
-
As shown in Figure 8, all the vCenters will be listed along with the count of the remote agents and the name of the remote agents.
-
Further drilling down each vCenter, the components associated with each remote agent will be listed (see Figure 9).
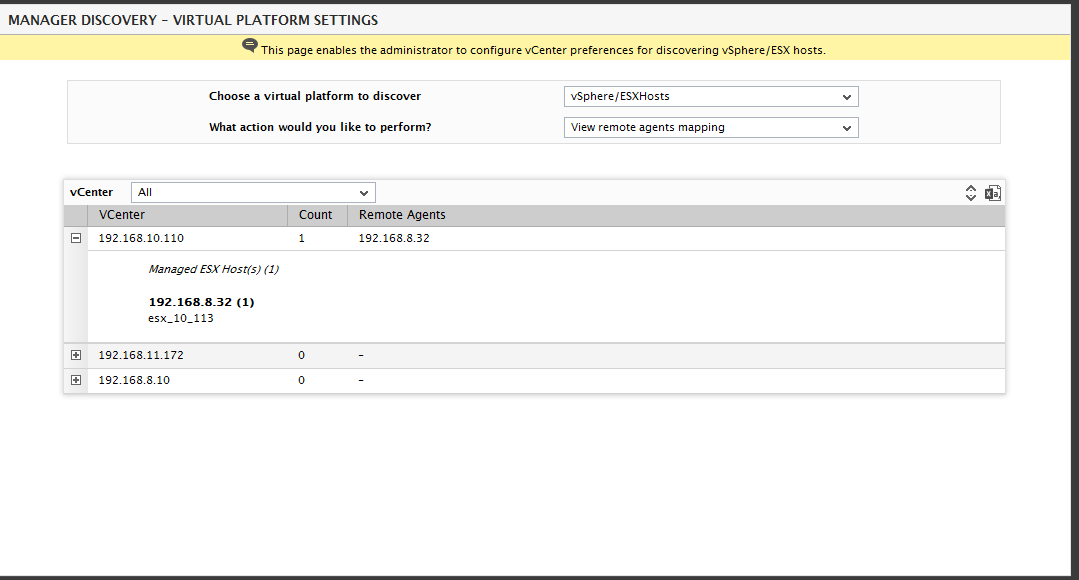
Figure 9 : Listing the vSphere/ESX hosts within the vCenter associated with each remote agent
Discovering IBM pSeries Servers
eG Enterprise is capable of monitoring the AIX LPARs that are operating on IBM pSeries servers using a patented 'In-N-Out' monitoring approach. The first step towards implementing this approach is to discover the IBM pSeries servers in the environment. To save administrators the trouble of manually adding each IBM pSeries server to be monitored, the eG management console facilitates the configuration of an HMC (Hardware Management Console) server, using which the IBM pSeries servers can be automatically discovered.
To discover the pSeries Servers using an HMC server, select the Virtual Platforms option under the Settings sub-node of the Manager Discovery node in the Discovery tree. Then, choose the pSeries Servers option from the Choose a virtual platform to discover drop-down in the right panel, as shown by Figure 10.
To add a new HMC server, do the following:
- Select the Add new HMC option from the What action would you like to perform? drop-down.
-
In the right panel, specify the IP address of the Hardware management console to be used for the discovery.
Note:
Only an IPv4 address can be specified against IP address of the Hardware management console.
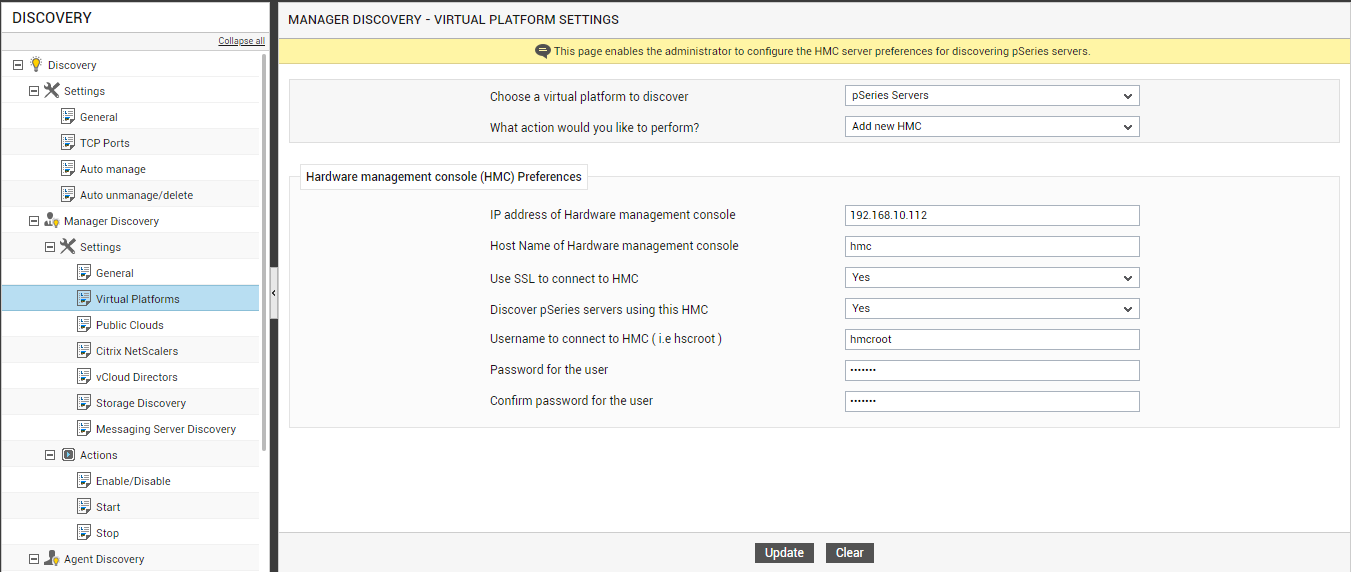
- Then, mention the Host Name of the Hardware management console.
- Next, indicate whether/not the eG manager needs to use SSL to connect to HMC. To use SSL, set the Use SSL to connect to HMC flag to Yes. Otherwise, set it to No.
- If more than one HMC server is deployed in your environment, you may want to discover the IBM pSeries servers using one of the HMC servers alone; you may still want to feed the eG manager with the details of the other HMC server, so that it can be used for discovery some time later. This is why, while configuring an HMC server using this page, you need to indicate whether/not the HMC server being configured is to be used for discovery or not. To use the HMC server for discovery, set the Discover pSeries servers using this HMC flag to Yes. Set the flag to No if you do not want to discover pSeries servers using this HMC server.
- Provide a valid user name for connecting to the HMC server in the Username to connect to HMC text box.
- Specify the Password for the user of the HMC user.
- Confirm the password by retyping it in the Confirm password for the user text box.
- Finally, click the Update button to save the changes.
-
A message box will then appear requesting your confirmation to proceed with the discovery. Click the OK button to discover the pSeries servers, or click the Cancel button to cancel discovery.
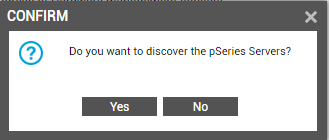
Figure 11 : Discovering the pSeries servers
To view the HMC servers that have been configured, pick the View configured HMCs option from the What action would you like to perform? drop-down in Figure 12. The details of the HMC servers that pre-exist will then appear.

Figure 12 : Viewing the HMC server configuration
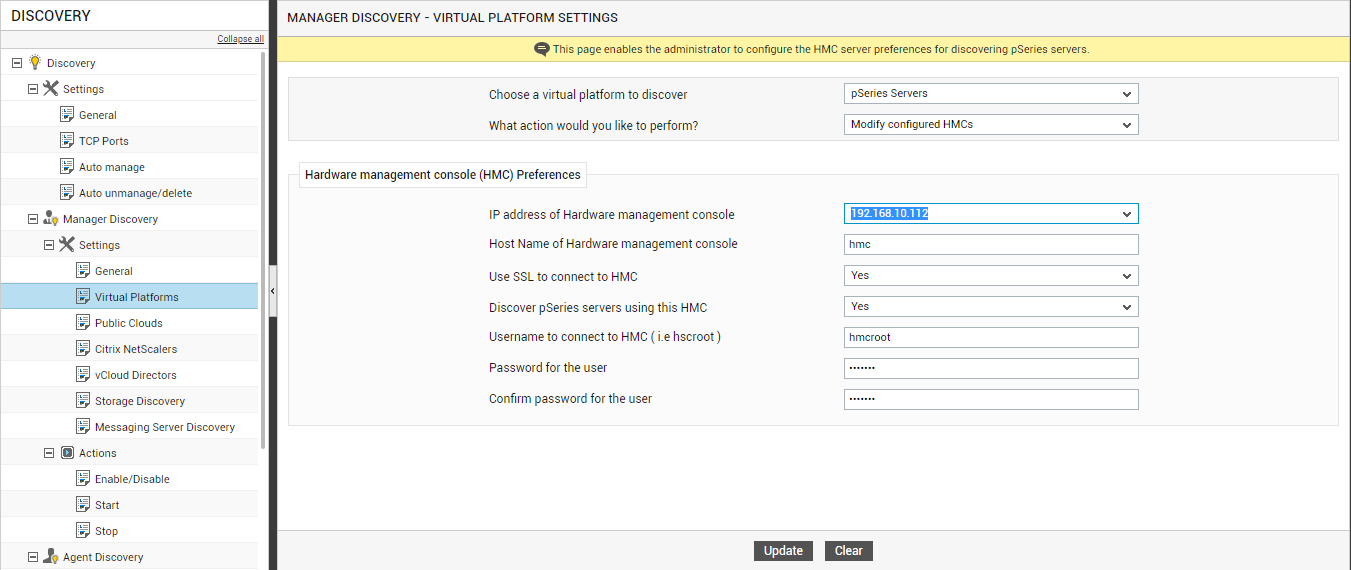
To modify the configuration of an HMC server, do the following:
- Click on the Modify configured HMCs option from the What action would you like to perform? drop-down, as depicted by Figure 13.
-
Pick the IP address of the Hardware management console to be modified from the right panel. The details of the chosen HMC will then be displayed. Make the required changes, and click the Update button to save them.
To delete a HMC configuration, do the following:
- Click on the Delete configured HMCs option from the What action would you like to perform? drop-down.
-
The details of all existing HMC servers will then be displayed in the right panel. To mark a HMC server for deletion, simply select the check box alongside the details of that HMC. To mark all listed HMC servers for deletion, simply select the check box that precedes the column lable HMC IP.
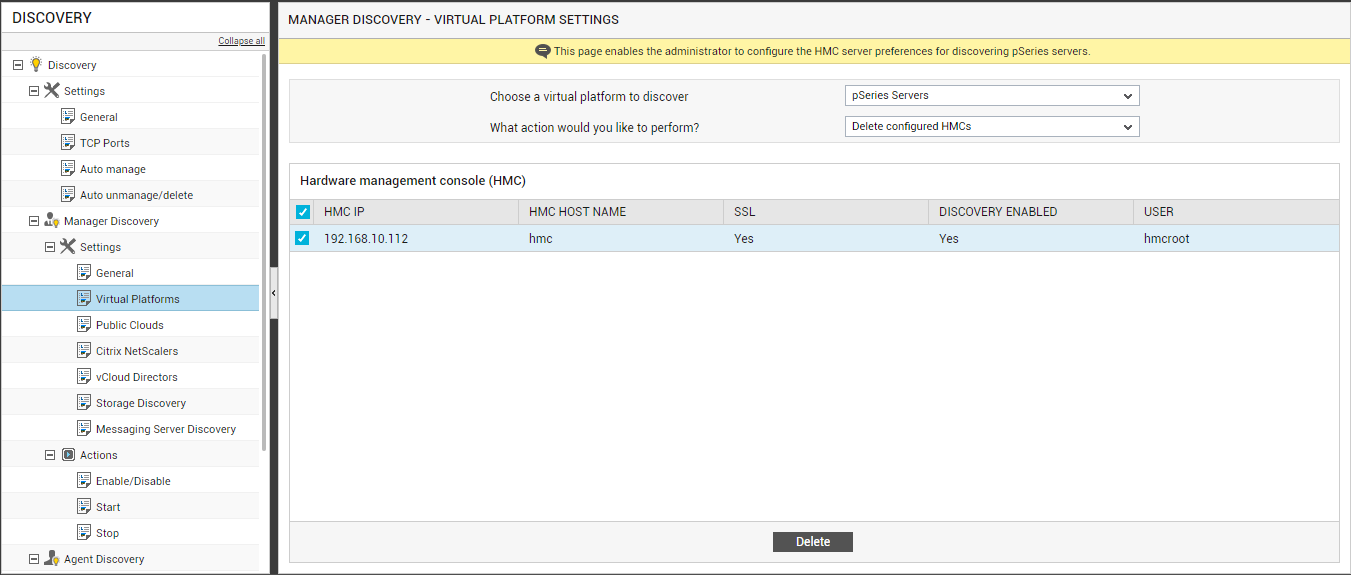
Figure 14 : Deleting an HMC server
- Finally, click the Delete button to delete the selection.
Discovering RHEV Servers via the RHEV Manager
eG Enterprise embeds the ability to monitor the RHEV servers in an environment and the VMs operating on those servers. The first step to monitoring the RHEV servers is to identify those servers that require monitoring. The eG Enterprise system can auto-discover the RHEV servers in a virtualized environment using the RHEV managers that manage those servers. To enable this auto-discovery, you first need to enable the eG manager to connect to the RHEV manager in the environment. The Virtual Platforms sub-node in the discovery tree can be used for this purpose. This is how:
To discover the RHEV Servers, select the Virtual Platformsoption under the Settings sub-node of the Manager Discovery node in the discovery tree in the left panel of Figure 15. Then, choose the RHEV Hypervisors option from the Choose a virtual platform to discover drop-down in the right panel of Figure 15.
-
First, you need to configure the RHEV manager with which the eG manager should connect for automatically discovering the RHEV servers that require monitoring. For this, select the Add new RHEV Manager option from the What action would you like to perform? drop-down.
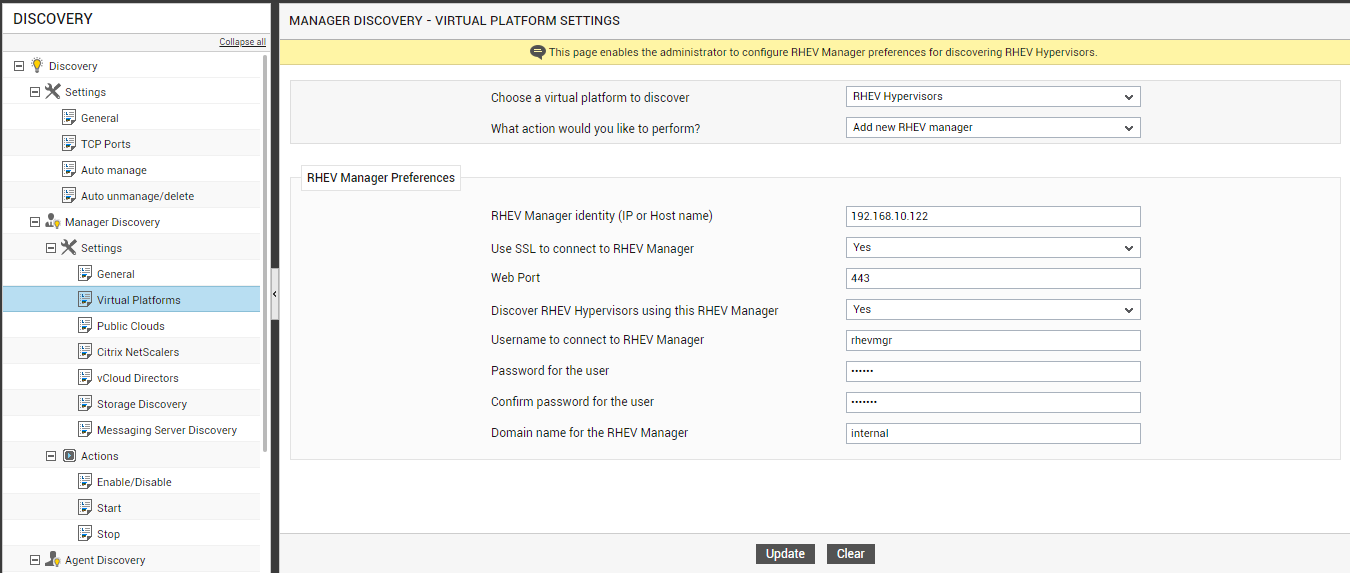
Figure 15 : Adding the RHEV Manager to be used for discovering the RHEV servers
-
In the right panel of Figure 15, specify the following:
-
RHEV Manager identity: Specify the IP address/host name of the RHEV manager in your environment.
Note:
If you choose to specify the IP address of the RHEV manager against RHEV Manager Identity, then make sure that you specify only an IPv4 address.
- Use SSL to connect to the RHEV Manager: Set this flag to Yes if the RHEV manager in your environment is SSL-enabled. Otherwise, set this flag to No.
- Web Port: If the RHEV manager is SSL-enabled, then 8443 will be displayed here by default. On the other hand, if the manager is not SSL-enabled, the default Web Port will be 8080. If the RHEV manager in your environment listens on a different SSL or non-SSL port, then make corresponding changes to the default setting.
- Discover RHEV Hypervisors using this RHEV Manager: If you want to discover RHEV servers in your environment using this RHEV manager, set this flag to Yes. If you only want to use this RHEV manager to obtain the outside view of VMs, set this flag to No.
- Username to connect to RHEV Manager and Password for the user: Specify the credentials (i.e., user name and password) of a user who has been assigned the RHEVMUser role. If no such user pre-exists, then create a special user for this purpose, assign the RHEVMUser role to this user, and provide his/her login credentials here.
- Confirm password for user: Confirm the password of the RHEVMUser by retyping it here.
- Domain name for the RHEV Manager: Specify the name of the domain to which the RHEV manager belongs.
-
-
Then, click the Update button in Figure 15. A message box requesting your confirmation to proceed with the discovery will then appear (see Figure 16. Click the ok button in the message to trigger the discovery. Clicking the Cancel button will save the details of the RHEV manager, but will not start the discovery. In this case, you can use the RHEV manager configuration so saved to perform discovery at a later point in time.
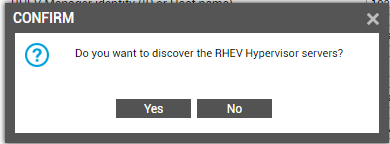
Figure 16 : A message box requesting confirmation to discover the RHEV servers
- This way, you can add the details of multiple RHEV managers to the eG Enterprise system.
-
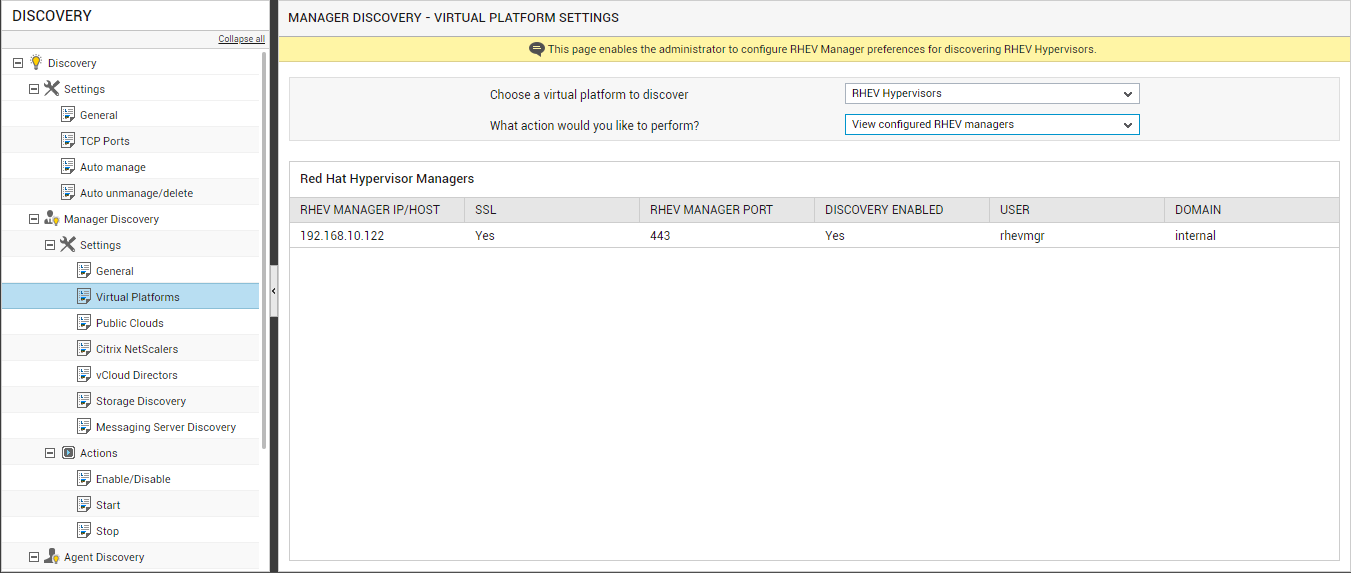
To view the details of all the RHEV managers that are added, choose the View configured RHEV managers option from the What action would you like to perform? drop-down in the right panel of Figure 17. The right panel will then change to display the names and other details of the RHEV managers that have been configured.
To modify the details of an RHEV manager, select the Modify configured RHEV managers option from the What action would you like to perform? drop-down. The right panel will then change as depicted by Figure 18. From the RHEV Manager identity (IP or Host name)list, select the IP address of the RHEV manager to be modified. Upon selection of the RHEV manager's IP address, the other parameters in the right panel will be populated with the corresponding details. You can change any of the displayed details to suit your needs. Finally, click the Update button to save the changes.
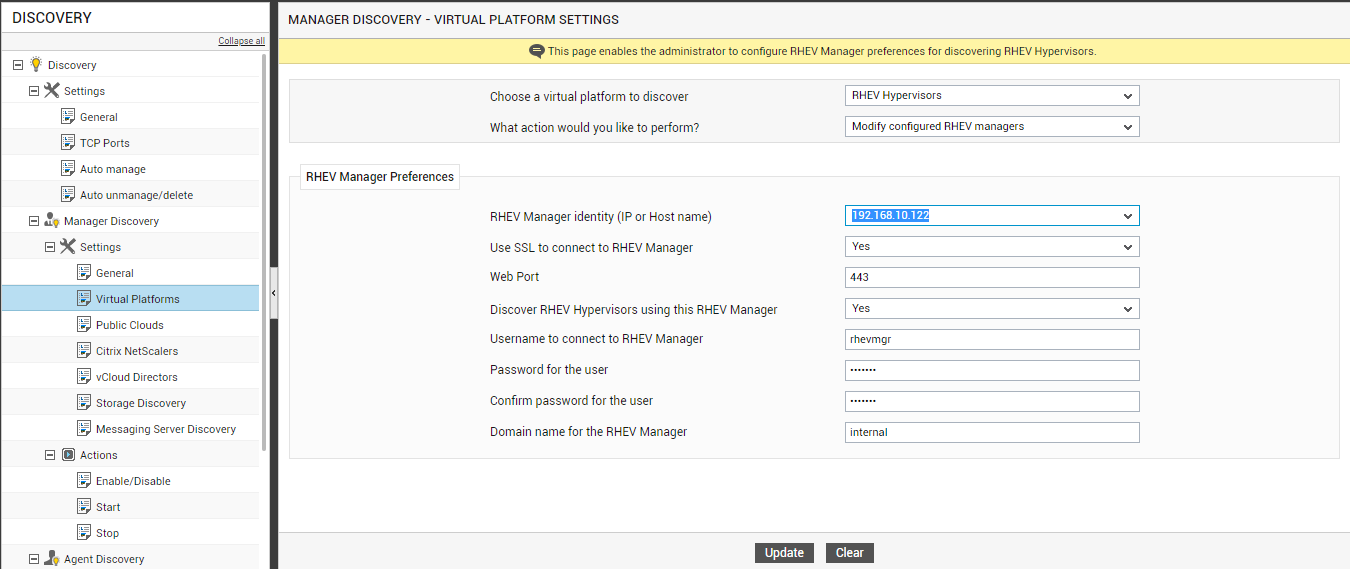
Figure 18 : Modifying the RHEV Manager's configuration
To delete an RHEV manager, select the Delete configured RHEV managers option from the What action would you like to perform? drop-down. Select the check box corresponding to the RHEV manager to be deleted and click the Delete button to delete it. To delete all the RHEV managers at one shot, select the check box just before the column heading, RHEV Manager IP / Host, and click the Delete button.
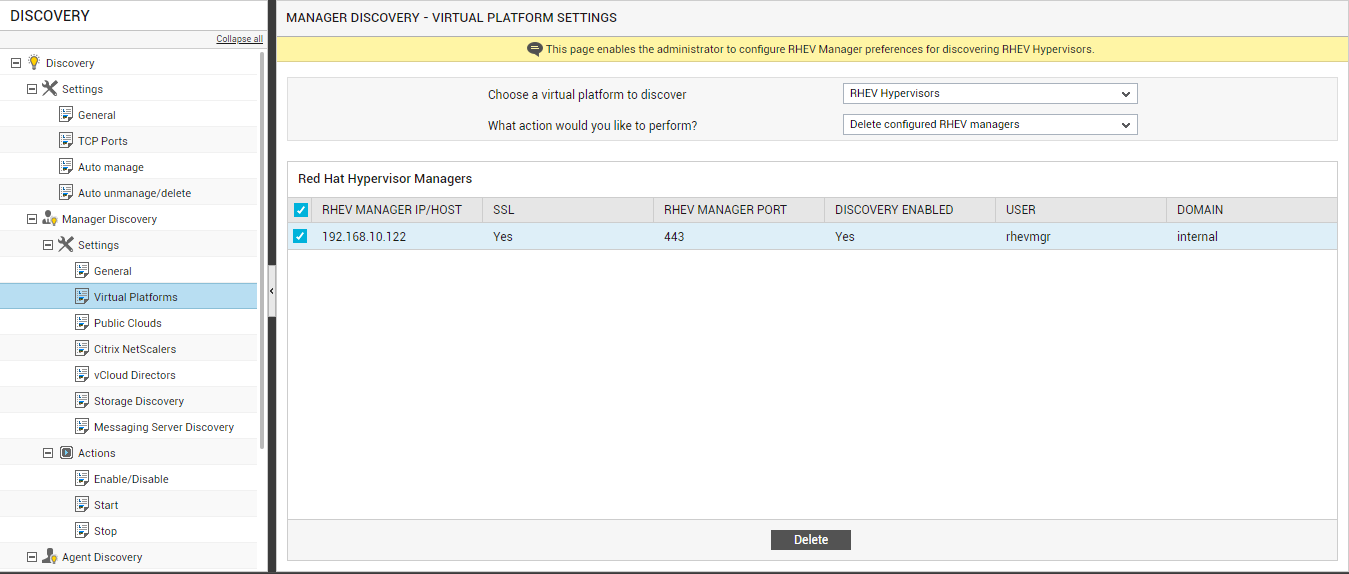
Figure 19 : Deleting an RHEV manager
Discovering Citrix XenServers in a Citrix XenServer Pool
eG Enterprise embeds the ability to monitor the Citrix XenServers and the VMs operating on those servers. The first step to monitoring the Citrix XenServers is to identify those servers that require monitoring. The eG Enterprise system can auto-discover the Citrix XenServers in a itrix XenServer pool using the IP address of the Citrix XenServer within the pool. To enable this auto-discovery, you first need to enable the eG manager to connect to a Citrix XenServer in the Citrix XenServer pool. The Virtual Platforms sub-node in the discovery tree can be used for this purpose. This is how:
To discover the Citrix XenServers in a Citrix XenServer pool, select the Virtual Platforms option under the Settings sub-node of the Manager Discovery node in the discovery tree in the left panel of Figure 20. Then, choose the Citrix XenServers option from the Choose a virtual platform to discover drop-down in the right panel of Figure 20.
-
First, you need to configure the Citrix XenServer with which the eG manager should connect to automatically discover all other Citrix XenServers in a Citrix XenServer pool that require monitoring. For this, select the Add new Citrix XenServer option from the What action would you like to perform? drop-down.
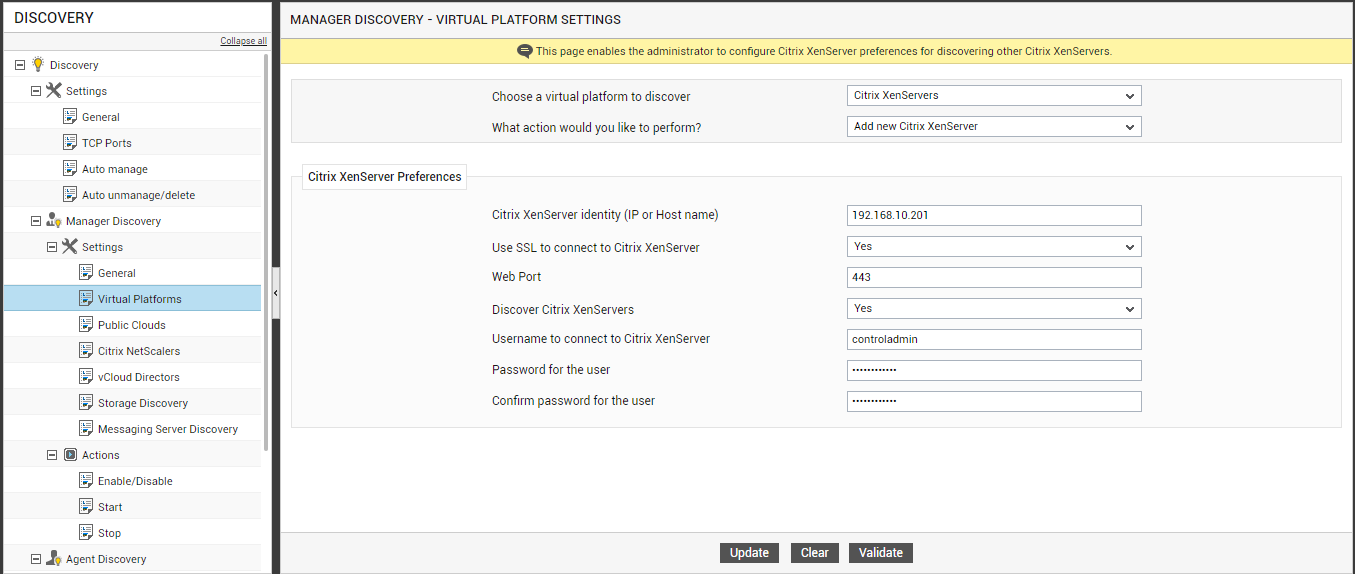
Figure 20 : Adding the Citrix XenServer to be used for discovering the Citrix XenServers in a Citrix XenServer pool
-
In the right panel of Figure 20, specify the following:
- Citrix XenServer identity (IP or Host name): Specify the IP address/host name of any server in a XenServer pool. eG Enterprise can connect to a member server or the master server in a pool for discovery. If the IP/host name of a master server is provided here, then eG Enterprise discovers the details of other servers in the pool directly from the master. On the other hand, if the IP/host name of a member server is specified, then eG Enterprise connects to that member server to figure out which is the master server in the pool. Once the master server is identified, eG Enterprise connects to the master to discover the details of the other XenServers in the pool.
- Use SSL to connect to the Citrix XenServer: Set this flag to Yes if the Citrix XenServer in the pool is SSL-enabled. Otherwise, set this flag to No.
- Web Port: If the Citrix XenServer is SSL-enabled, then 443 will be displayed here by default. On the other hand, if the Citrix XenServer is not SSL-enabled, the default Web Port will be 80. If the Citrix XenServer in the pool listens on a different SSL or non-SSL port, then make corresponding changes to the default setting.
- Discover Citrix XenServers: If you want to discover the Citrix XenServers in a pool using this Citrix XenServer, set this flag to Yes. If you only want to use this Citrix XenServer to obtain the outside view of VMs, set this flag to No.
- Username to connect to Citrix XenServer and Password for user: Specify the credentials (i.e., user name and password) of a user who has been assigned the pool-admin privilege or Read-only privilege. If no such user pre-exists, then create a special user for this purpose, assign the required privileges to this user, and provide his/her login credentials here.
- Confirm password for user: Confirm the password of the user by retyping it here.
-
Then, click the Update button in Figure 20. A message box requesting your confirmation to proceed with the discovery will then appear (see Figure 21). Click the ok button in the message to trigger the discovery. Clicking the Cancel button will save the details of the Citrix XenServer, but will not start the discovery. In this case, you can use the Citrix XenServer configuration so saved to perform discovery at a later point in time.
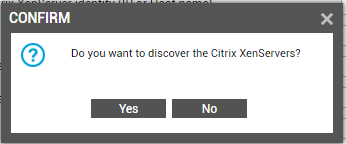
Figure 21 : A message box requesting confirmation to discover the XenServers
- This way, you can add the details of the master/member servers in multiple XenServer pools to the eG Enterprise system.
-
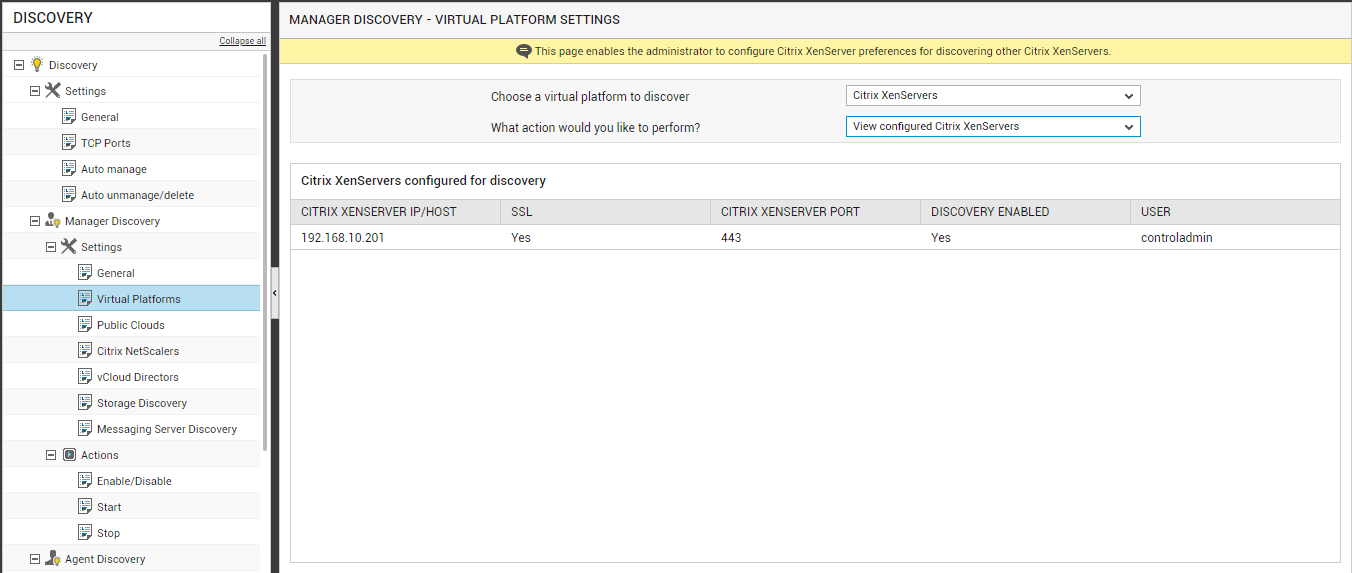
To view the details of all the Citrix XenServers that are added, choose the View configured Citrix XenServers option from the What action would you like to perform? drop-down in the right panel of Figure 22. The right panel will then change to display the names and other details of the Citrix XenServers that have been configured.
To modify the details of a Citrix XenServer, select the Modify configured Citrix XenServers option from the What action would you like to perform?drop-down. The right panel will then change as depicted by Figure 23. From the Citrix XenServer identity list, select the IP address of the Citrix XenServer to be modified. Upon selection of the Citrix XenServer's IP address, the other parameters in the right panel will be populated with the corresponding details. You can change any of the displayed details to suit your needs. Finally, click the Update button to save the changes.
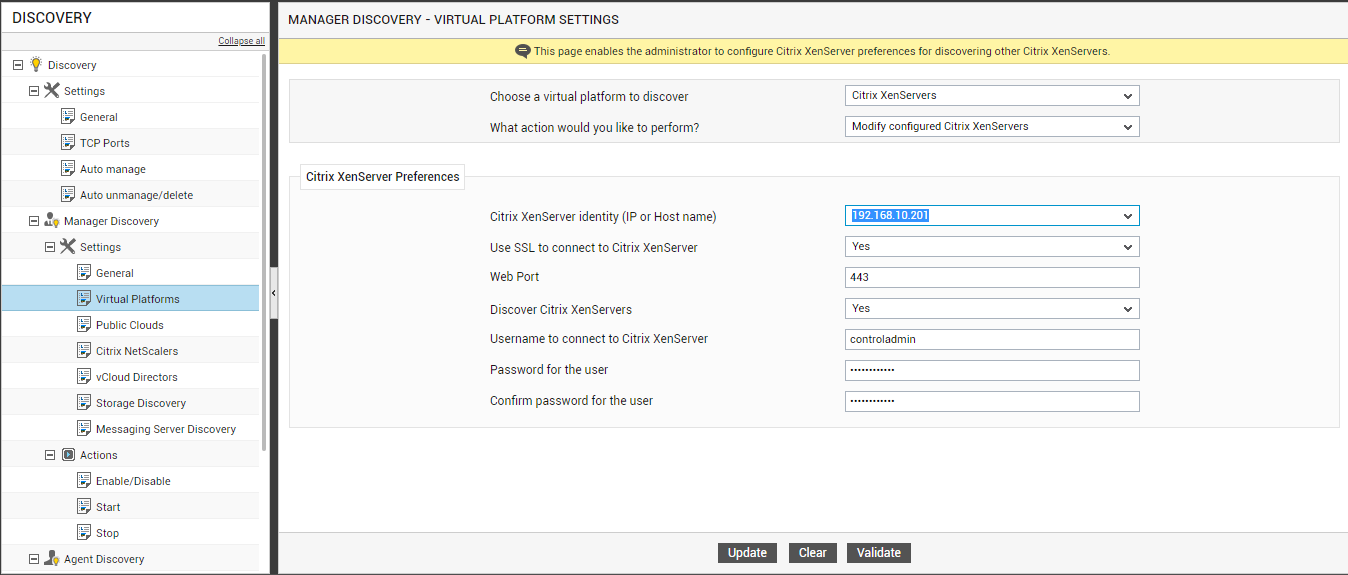
Figure 23 : Modifying the Citrix XenServer's configuration
To delete a Citrix XenServer, select the Delete configured Citrix XenServers option from the What action would you like to perform? drop-down as shown in Figure 24. Select the check box corresponding to the Citrix XenServer to be deleted and click the Delete button to delete it. To delete all the Citrix XenServers at one shot, select the check box just before the column heading, CITRIX XENSERVER IP / HOST, and click the Delete button.
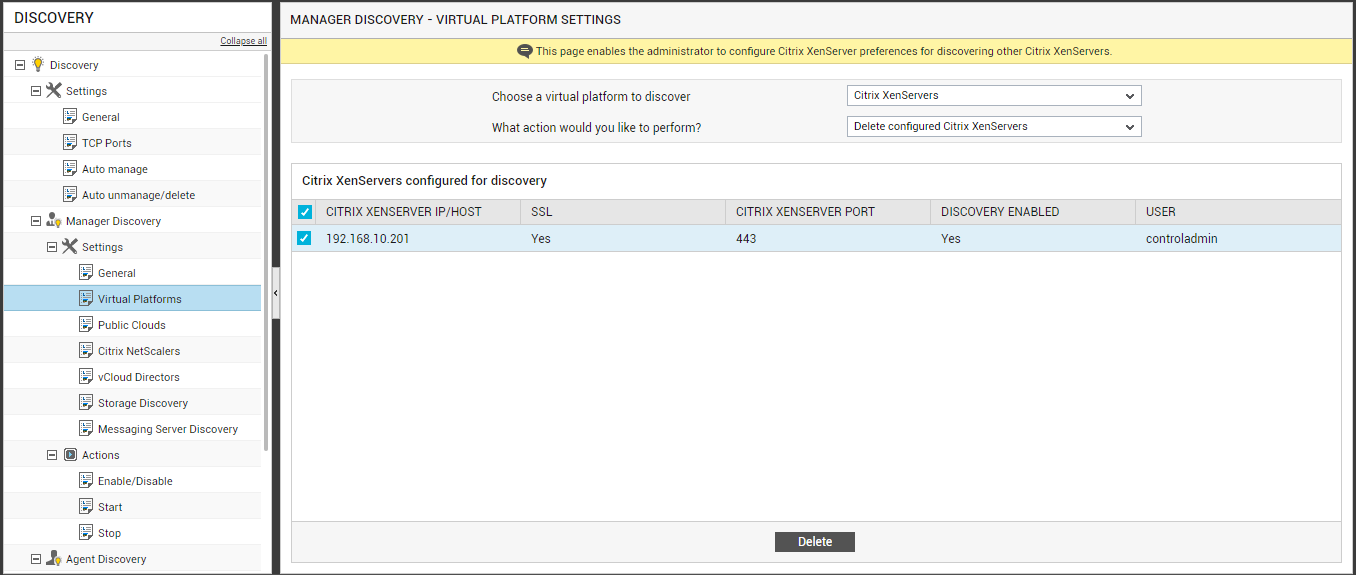
Figure 24 : Deleting a Citrix XenServer
Discovering Nutanix AHV Using Nutanix Prism Manager
eG Enterprise can automatically discover the Nutanix AHV servers in an environment by connecting to the Nutanix Prism Manager managing them. To configure auto-discovery through a Prism, do the following:
- Select the Virtual Platforms option under the Settings sub-node of the Manager Discovery node in the discovery tree in the left panel of Figure 20. Then, choose the Nutanix Infrastructure option from the Choose a virtual platform to discover drop-down in the right panel of Figure 20.
-
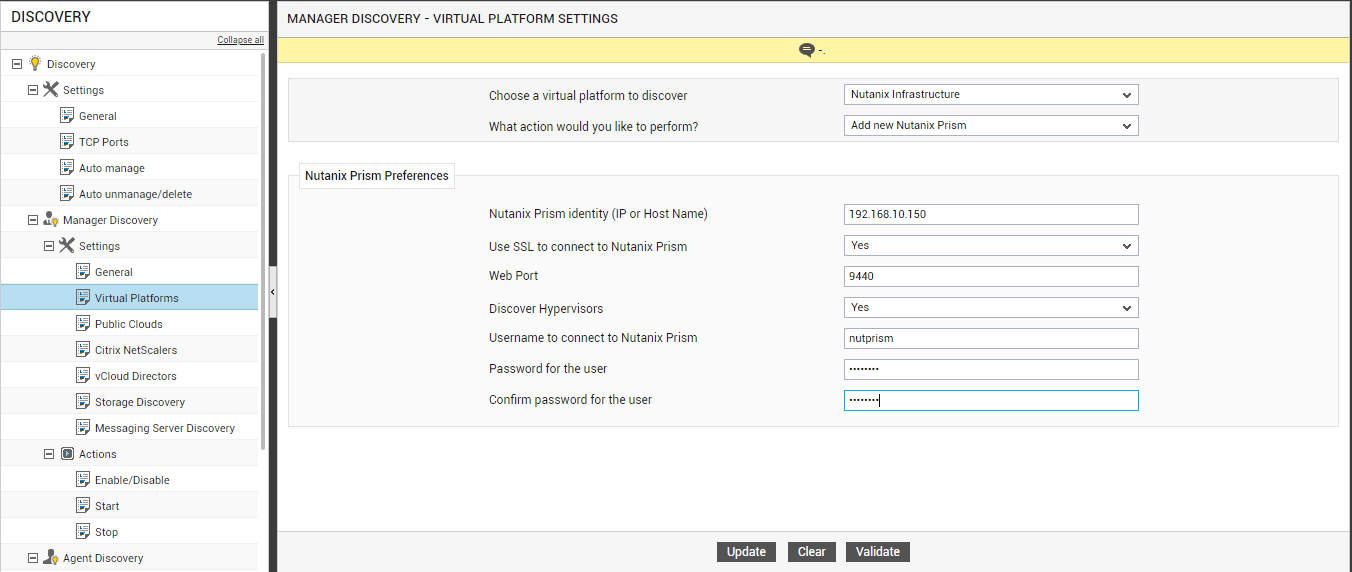
First, you need to configure the Nutanix Prism Manager with which the eG manager should connect to automatically discover the Nutanix infrastructure. For this, select the Add Nutanix Prism Manager option from the What action would you like to perform? drop-down.
-
In the right panel of Figure 20, specify the following:
- Nutanix Prism Manager Identity (IP or Host name): Specify the IP address/host name of the Nutanix Prism Manager that the eG manager should use for discovery.
- Use SSL to connect to Nutanix Prism Manager: Set this flag to Yes if the Nutanix Prism Manager is SSL-enabled. Otherwise, set this flag to No.
- Web Port:By default, the Nutanix Prism Manager listens on port 9440. This implies that to auto-discover Nutanix AHVs, the eG manager connects to the Nutanix Prism server via port 9440.
- Discover Hypervisors: If you want to discover the Nutanix AHVs using the configured Nutanix Prism Manager, set this flag to Yes. If you only want to use this Prism Manager Manager to obtain the outside view of VMs, set this flag to No.
- Username to connect to Nutanix Prism Manager and Password for user: Specify the credentials (i.e., user name and password) of a user who has been assigned the Cluster administrator or a User administrator privilege on Nutanix Prism Manager. However, some high security Nutanix environments may prefer not to expose the credentials of a Cluster administrator or a User administrator. In such environments, the eG manager can be configured with the credentials of a Prism user with the Viewer role. The steps for creating such a user are detailed in the
- Confirm password for user: Confirm the password of the user by retyping it here.
-
Then, click the Update button in Figure 20. A message box requesting your confirmation to proceed with the discovery will then appear (see Figure 21). Click the ok button in the message to trigger the discovery. Clicking the Cancel button will save the details of the Nutanix Prism Manager, but will not start the discovery. In this case, you can use the Prism configuration so saved to perform discovery at a later point in time.
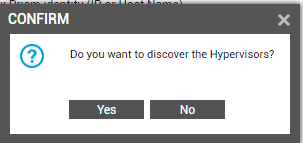
Figure 26 : A message box requesting confirmation to discover the Nutanix AHV hypervisors
- This way, you can add the details of the multiple Nutanix Prism Managers to the eG Enterprise system.
-
To view the details of all the Nutanix Prism Maangers that are added, choose the View Nutanix Prism Managers option from the What action would you like to perform? drop-down in the right panel of Figure 22. The right panel will then change to display the names and other details of the Nutanix Prism Managers that have been configured.
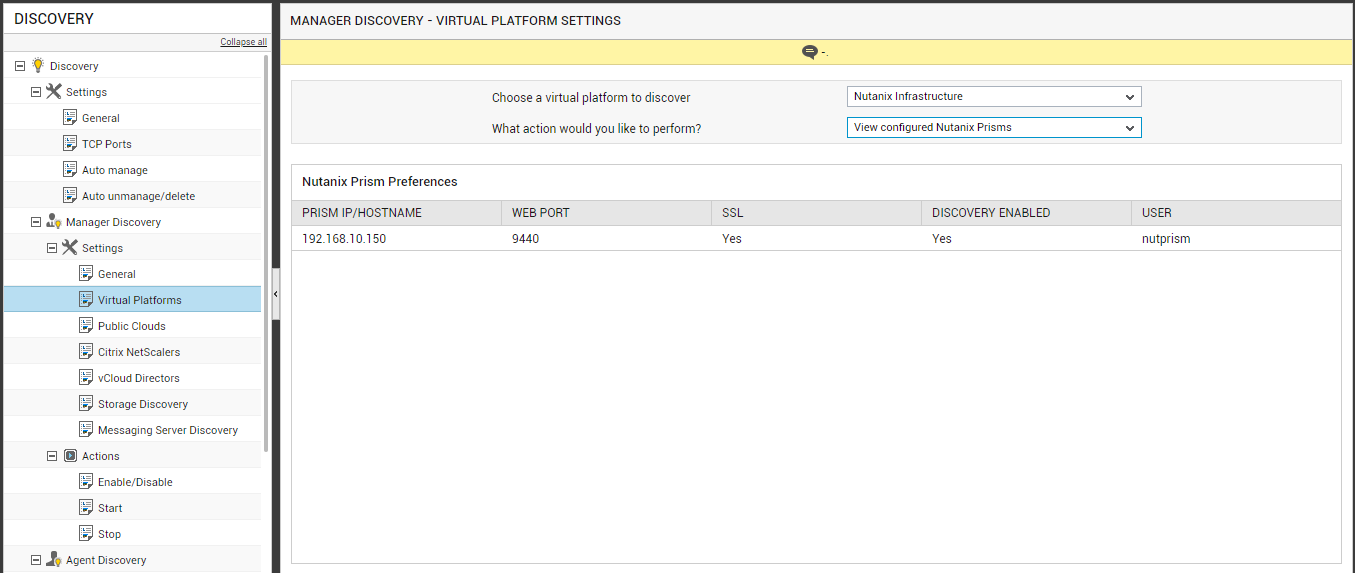
Figure 27 : Viewing the details of Nutanix Prism Managers configured for discovery
To modify the details of a Nutanix Prism, select the Modify Nutanix Prism Manager option from the What action would you like to perform?drop-down. The right panel will then change as depicted by Figure 23. From the Nutanix Prism Manager Identity list, select the IP address of the Nutanix Prism Manager to be modified. Upon selection of the Nutanix Prism Manager's IP address, the other parameters in the right panel will be populated with the corresponding details. You can change any of the displayed details to suit your needs. Finally, click the Update button to save the changes.
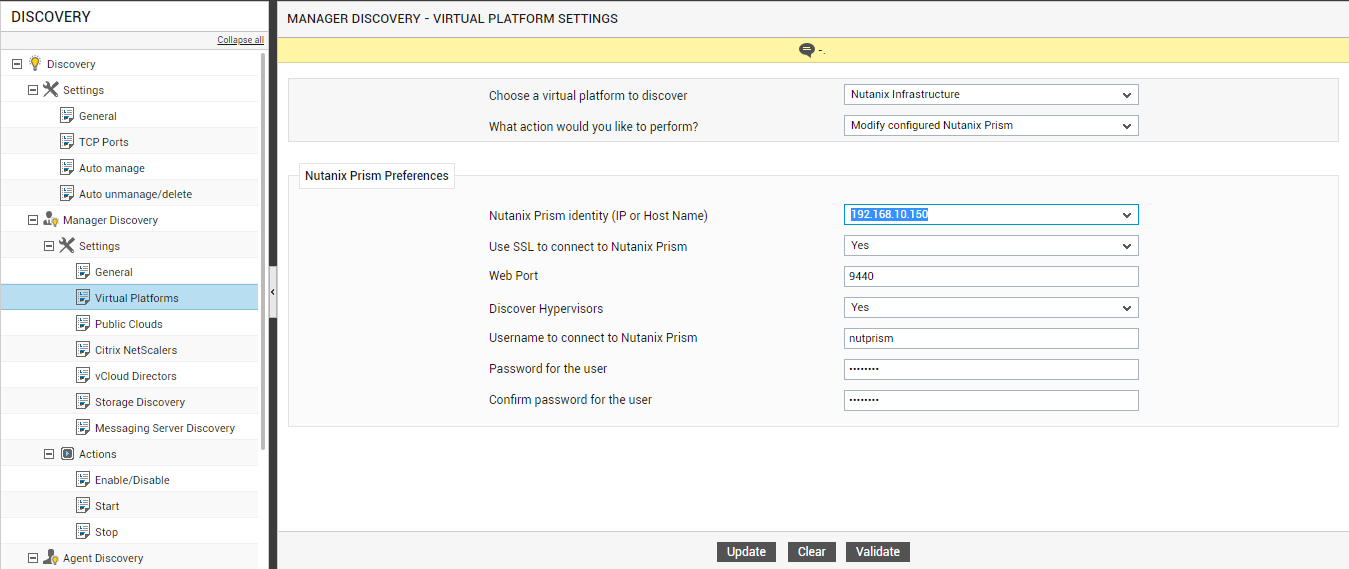
Figure 28 : Modifying the Nutanix Prism Manager configuration
To delete a Nutanix Prism Manager, select the Delete Nutanix Prism Manager option from the What action would you like to perform? drop-down as shown in Figure 24. Select the check box corresponding to the Prism Manager to be deleted and click the Delete button to delete it. To delete all the Nutanix Prism Managers at one shot, select the check box just before the column heading, PRISM IP / HOST, and click the Delete button.
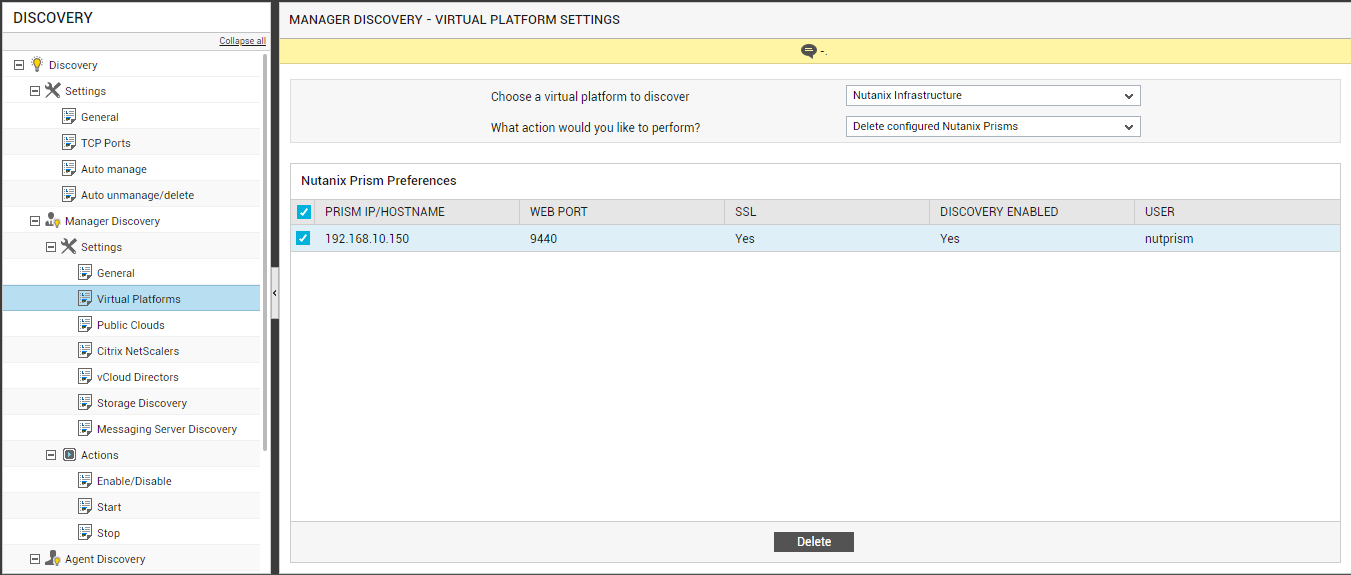
Figure 29 : Deleting a Nutanix Prism Manager
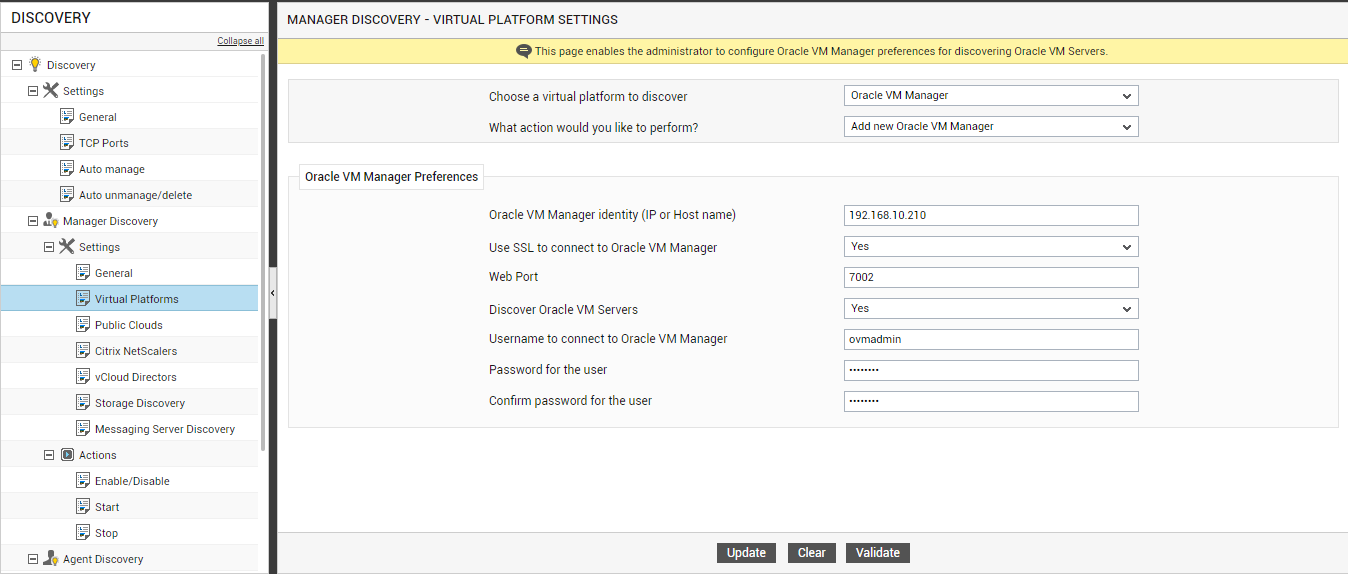
Discovering Oracle VM Servers Using Oracle VM Manager
eG Enterprise can automatically discover the Oracle VM servers in an environment by connecting to the Oracle VM Manager managing them. To configure auto-discovery through an Oracle VM manager, do the following:
- Select the Virtual Platforms option under the Settings sub-node of the Manager Discovery node in the discovery tree in the left panel of Figure 20. Then, choose the Oracle VM Manager option from the Choose a virtual platform to discover drop-down in the right panel of Figure 20.
-
First, you need to configure the Oracle VM Manager with which the eG manager should connect to automatically discover the Oracle VM server. For this, select the Add new Oracle VM Manager option from the What action would you like to perform? drop-down.
-
In the right panel of Figure 20, specify the following:
- Oracle VM Manager identity (IP or Host name): Specify the IP address/host name of the Oracle VM Manager that the eG manager should use for discovery.
- Use SSL to connect to Oracle VM Manager: Set this flag to Yes if the Oracle VM Manager is SSL-enabled. Otherwise, set this flag to No.
- Web Port:By default, the Oracle VM Manager server listens on port 7002. This implies that to auto-discover Oracle VM servers, the eG manager connects to the Oracle VM Manager server via port 7002.
- Discover Oracle VM Servers: If you want to discover the Oracle VM servers using the configured Oracle VM Manager, set this flag to Yes. If you only want to use this Oracle VM Manager to obtain the outside view of VMs, set this flag to No.
- Username to connect to Oracle VM Manager and Password for user: Specify the credentials (i.e., user name and password) of a user who has been assigned the Admin rights to the Oracle VM Manager.
- Confirm password for user: Confirm the password of the user by retyping it here.
-
Then, click the Update button in Figure 20. A message box requesting your confirmation to proceed with the discovery will then appear (see Figure 21). Click the ok button in the message to trigger the discovery. Clicking the Cancel button will save the details of the Oracle VM Manager, but will not start the discovery. In this case, you can use the Oracle VM Manager configuration so saved to perform discovery at a later point in time.
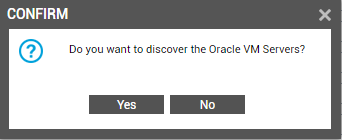
Figure 31 : A message box requesting confirmation to discover the Oracle VM servers
- This way, you can add the details of the multiple Oracle VM Managers to the eG Enterprise system.
-
To view the details of all the Oracle VM Managers that are added, choose the View configured Oracle VM Managers option from the What action would you like to perform? drop-down in the right panel of Figure 22. The right panel will then change to display the names and other details of the Oracle VM Managers that have been configured.
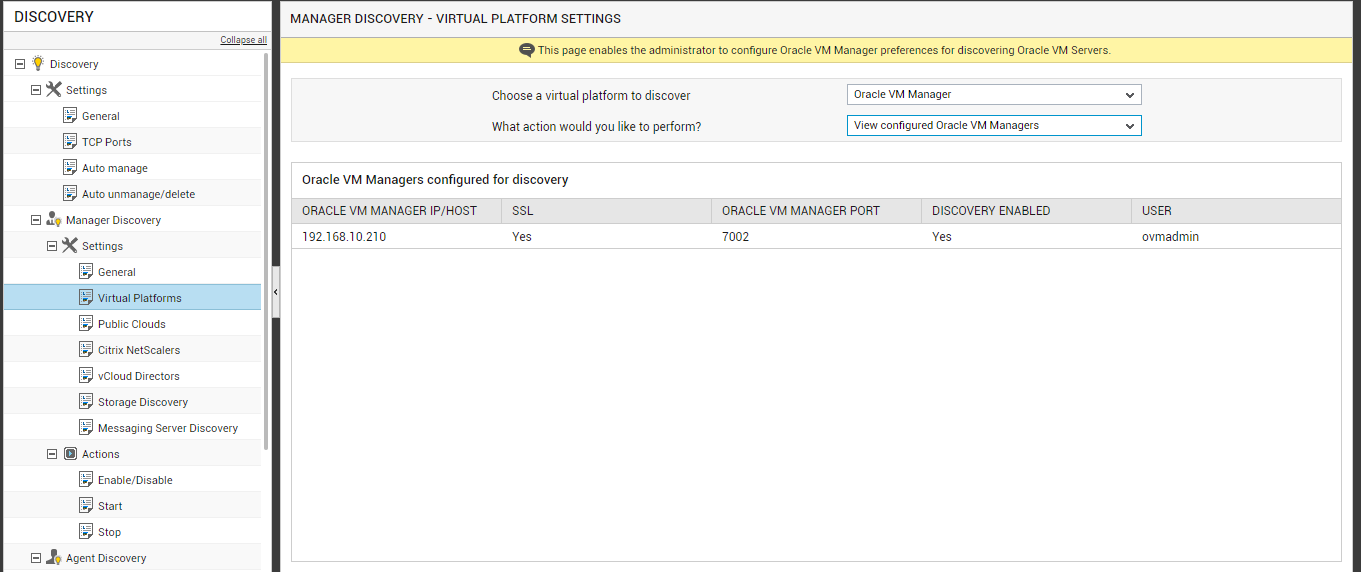
Figure 32 : Viewing the details of Oracle VM Managers configured for discovery
To modify the details of a Oracle VM Manager, select the Modify configured Oracle VM Manager option from the What action would you like to perform?drop-down. The right panel will then change as depicted by Figure 23. From the Oracle VM Manager identity list, select the IP address of the Oracle VM Manager to be modified. Upon selection of the Oracle VM Manager's IP address, the other parameters in the right panel will be populated with the corresponding details. You can change any of the displayed details to suit your needs. Finally, click the Update button to save the changes.
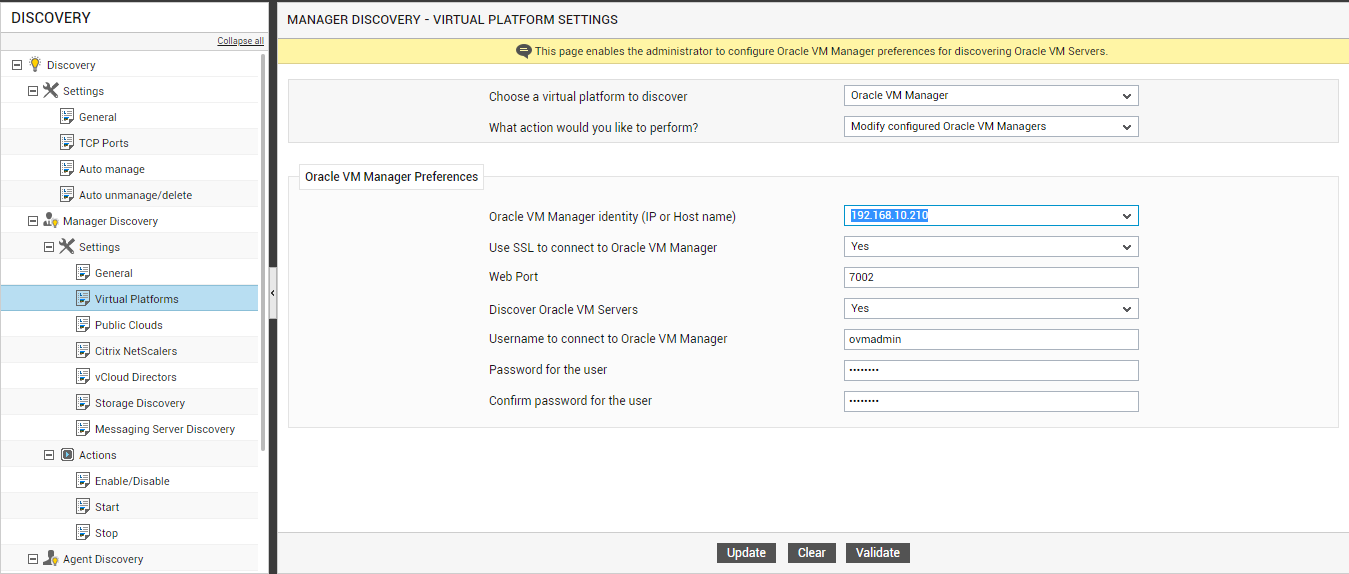
Figure 33 : Modifying the Oracle VM Manager configuration
To delete a Oracle VM Manager, select the Delete configured Oracle VM Managers option from the What action would you like to perform? drop-down as shown in Figure 24. Select the check box corresponding to the Oracle VM Manager to be deleted and click the Delete button to delete it. To delete all the Oracle VM Managers at one shot, select the check box just before the column heading, ORACLE VM MANAGER IP / HOST, and click the Delete button.
