Adding a Descriptor-based REST API Test
To illustrate a descriptor-based REST API test, consider another example. Say you have an environment where multiple servers/desktops are installed. This example involves the creation of a CPUPerformance_ex, which will use the REST API to execute in the target environment and provide a report on the CPU utilization of each server/desktop.
Begin adding this test by selecting the Test option from the Integration Console tile (see Figure 1). In the integration console - test page that appears next (see Figure 2), click the Add New Test button. The new test details page (see Figure 1) appears, wherein the following details need to be provided for our example:
-
Test type - Performance
-
Test name – CPUPerformance_ex
Note:
While adding a new test using the Integration Console, ensure that the Test name always ends with _ex. If not, an error message (see Figure 3) will appear upon clicking the Add button in Figure 1.
- Duplicate - Since the new test is not a duplicate of any existing test, set the Duplicate flag to No.
-
Execution – Internal, as an internal agent will be executing the test
Note:
Using the Integration Console plugin, you can add an internal or an external test, but you cannot add tests that need to be run by a remote agent – i.e., tests that need to be executed in an agentless manner.
- Port based – Specify whether the target server listens on a port or not.
- Category - REST
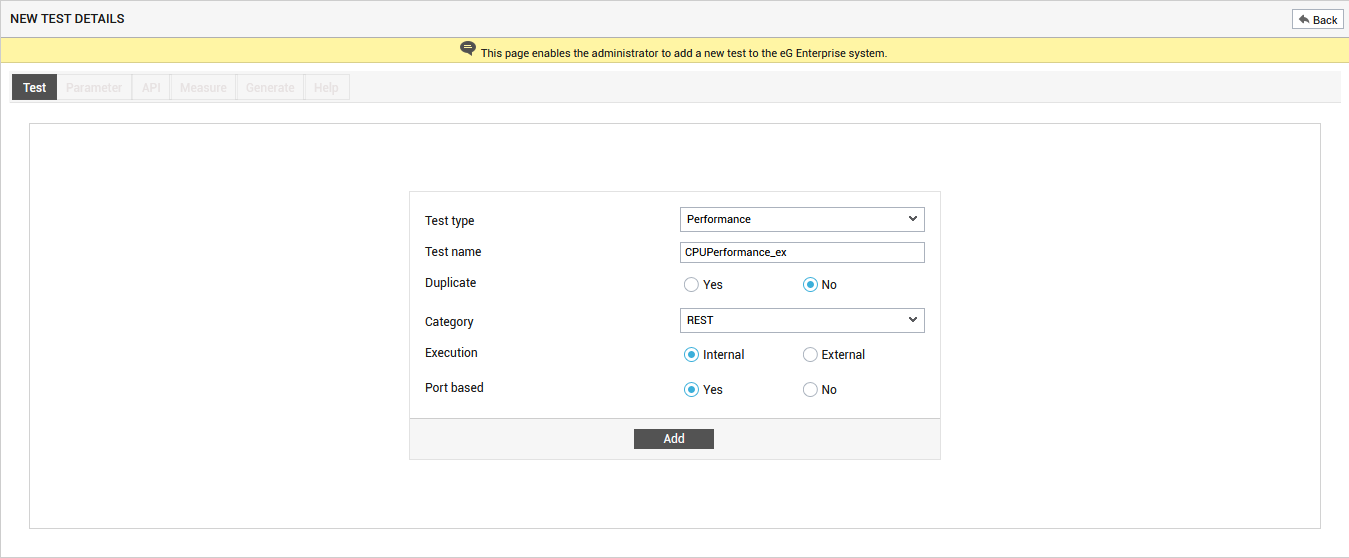
Figure 1 : Adding a descriptor-based test of type REST
Then, click the Add button in Figure 1 to add the new test to the eG Enterprise system. The API tab page then opens automatically (see Figure 2).
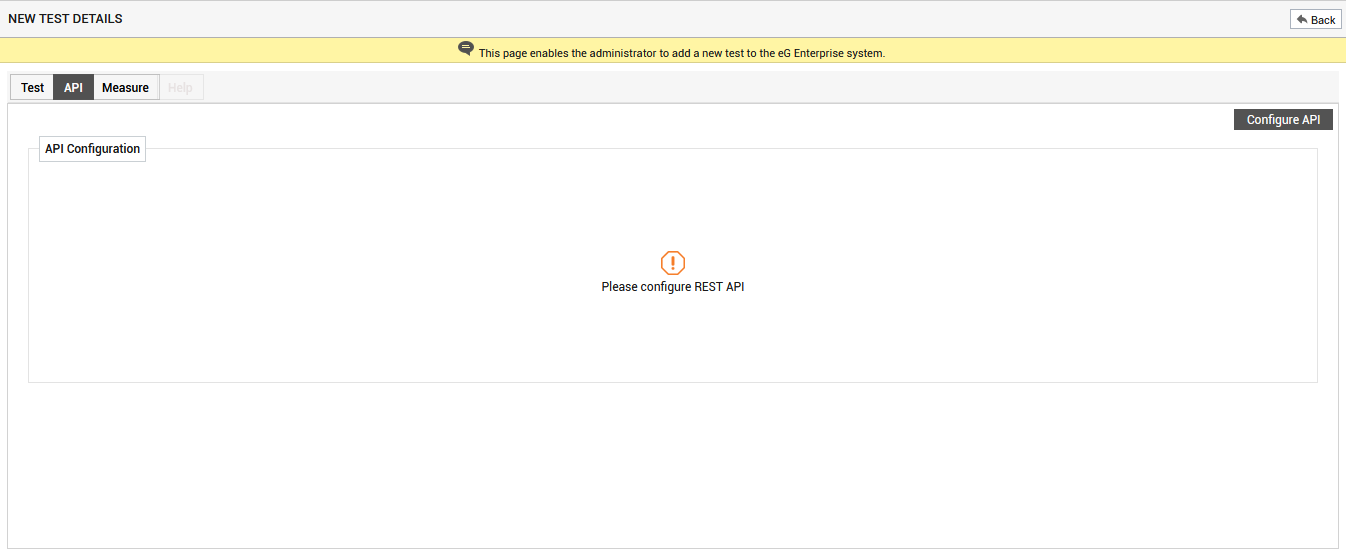
Click the Configure API button in Figure 2 to configure a REST API of your choice. then appears.
-
API Name - Specify the name of the API that you wish to configure.
-
REST URL - Specify the exact REST URL that this test should connect to and collect the required metrics.
-
HTTP Method - Here, pick the required HTTP Method. By default, this is set to GET.
-
Authorization Type - Here, pick the authorization type that is used for accessing the target environment using REST URL.
-
No Auth - By default, No Auth will be chosen from this list (see ). This indicates that the data can be collected by any user from the REST URL.
-
Basic Auth - In some environments, only a specific user will be authorized to execute the REST API in order to collect the required data. In such environments, administrators can specify the credentials of the user who is authorized to execute the REST API in the User name and Password text boxes.
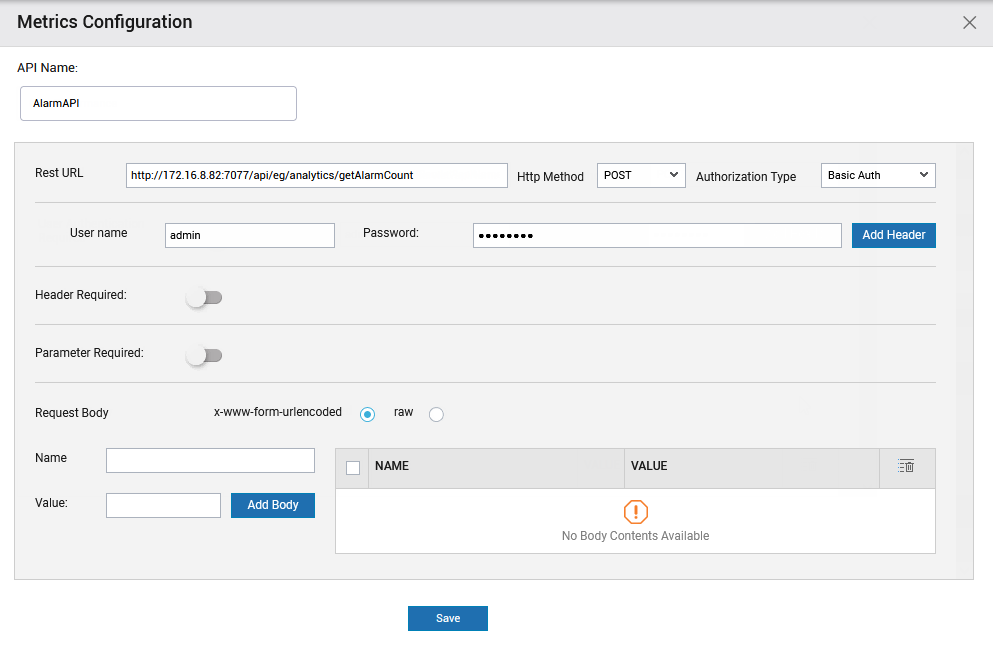
Figure 3 : Configuring the REST API with Basic Authentication
-
API Key - Pick this option if you wish to send a key-value pair to the REST API either in the request headers or query parameters. Once this option is chosen, specify the following:
-
Key - Specify the name of the key here.
-
Value - Specify the value corresponding to the Key.
-
Add API Key to - By default, Header is chosen from this list indicating that the key-value pair will be sent in the request headers. If you wish to send the key-value pair in the query parameters, then, pick the Param option from this list.
Clicking the Add button will add the key-value pair to the appropriate section (Header Required or Parameter Required) based on your selection from the Add API Key to list.
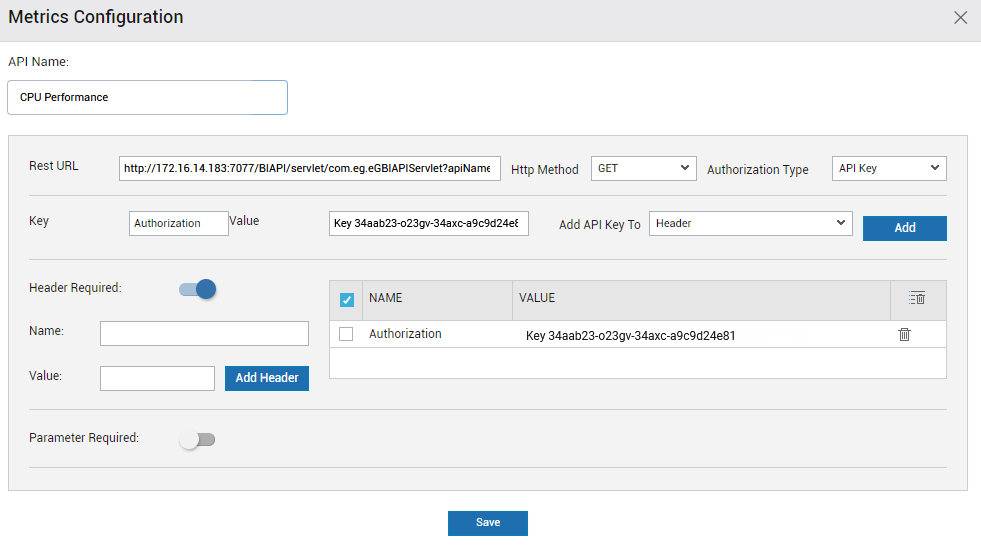
Figure 4 : Configuring the REST API with API Key
-
-
Bearer Token - Bearer tokens enable requests to authenticate using an access key, such as a JSON Web Token (JWT). The token is a text string, included in the request header. Against this text box, enter the API key value. For added security, store the API key in a variable and reference the variable by name. You can also specify the name of the variable here. Clicking the Add button will add the bearer token to the request header of the API and hence, the Header Required section will be auto-populated with the bearer token.
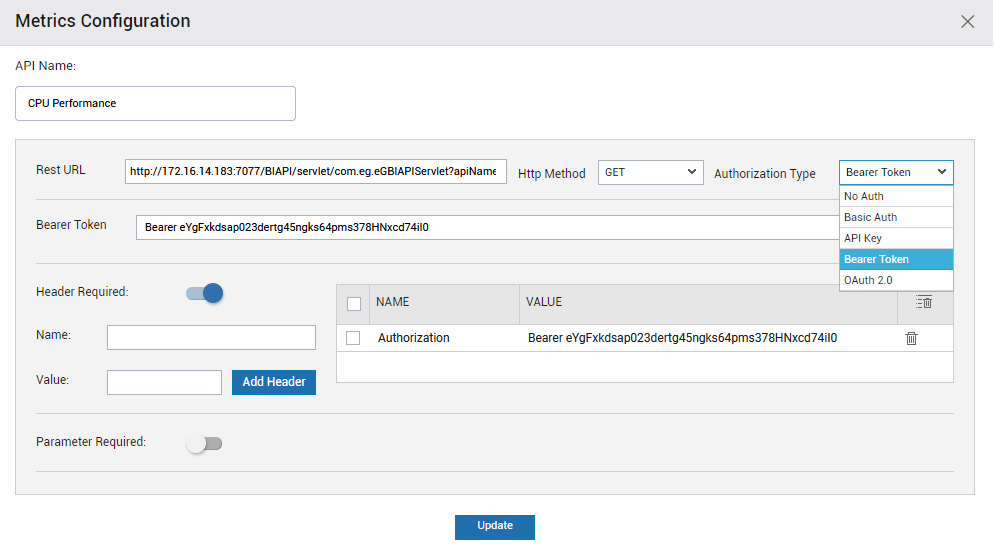
Figure 5 : Configuring the REST API with Bearer Token
-
OAuth 2.0 - Modern authentication or OAuth 2.0 enables client applications to access data provided by a third-party API. For example, as a user of a service, you can grant another application access to your data with that service without exposing confidential credentials such as username and password. With OAuth 2.0, you first retrieve an access token for the API, then use that token to authenticate future requests. Accessing data with OAuth 2.0 varies greatly between API service providers, but typically involves a few requests back and forth between client application, user, and API.
An example OAuth 2.0 flow is as follows:
-
A client application makes a request to the user to authorize access to their data.
-
If the user grants access, the application requests an access token from the service provider, passing the access grant from the user and authentication details to identify the client.
-
The service provider validates these details and returns an access token.
-
The client uses the access token to request the user data with the service provider.
If OAuth 2.0 is chosen, then, specify the following:
-
Grant Type - Pick an option from this list to instruct how the user is required to be authenticated with the service provider. By default, Password Credentials option is chosen from this list.
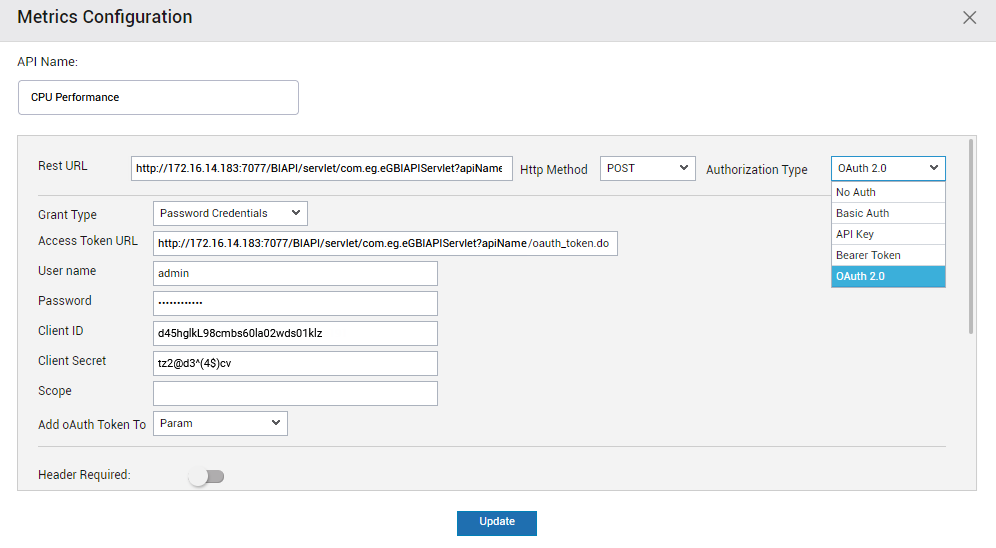
Figure 6 : Configuring the REST API with Password Credentials using OAuth2.0
If you have chosen Password Credentials option from the Grant Type list, then, specify the following:
-
Access Token URL - Here, specify the URL to access the authentication server of the service provider, to exchange an authorization code for an access token.
-
User name - Specify the user who is authorized to request the access token in exchange of an authorization code.
-
Password - Specify the password corresponding to the user specified in the User name.
-
Client ID - Here, specify the ID of the client application registered with the API provider.
-
Client Secret - Specify the secret key corresponding to the Client ID.
-
Scope - In this text box, specify the scope of access that you are requesting, which may include multiple space-separated values.
-
Add oAuth Token to - By default, Header is chosen from this list indicating that the oAuth token will be sent in the request headers. If you wish to send the oAuth token in the query parameters, then, pick the Param option from this list.
If you have chosen Client Credentials option from the Grant Type list, then, specify the following:
-
Access Token URL - Here, specify the URL to access the authentication server of the service provider, to exchange an authorization code for an access token.
-
Client ID - Here, specify the ID of the client application registered with the API provider.
-
Client Secret - Specify the secret key corresponding to the Client ID.
-
Scope - In this text box, specify the scope of access that you are requesting, which may include multiple space-separated values.
-
Add oAuth Token to - By default, Header is chosen from this list indicating that the oAuth token will be sent in the request headers. If you wish to send the oAuth token in the query parameters, then, pick the Param option from this list.
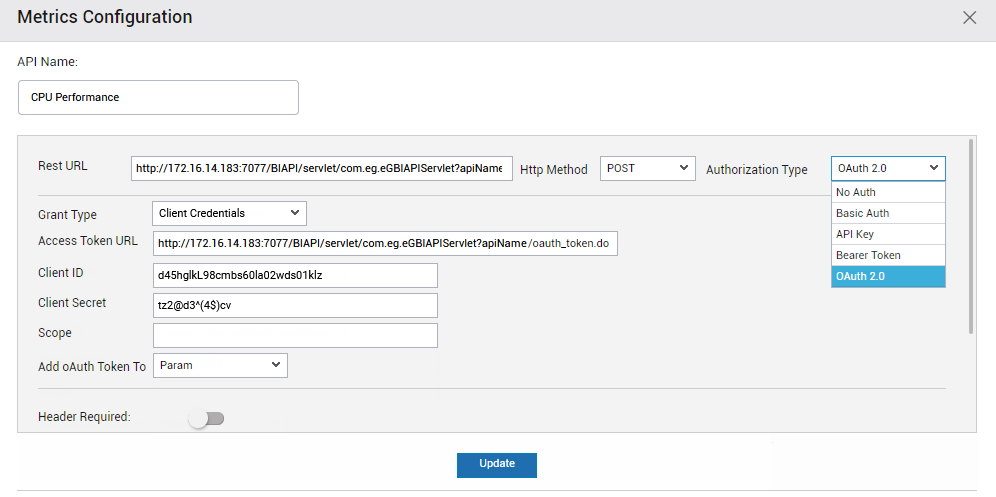
Figure 7 : Configuring the REST API with Client Credentials using OAuth2.0
-
-
-
-
Header Required - By default, the Header Required slider is turned off (see ) indicating that no additional information is provided in the HTTP header while executing the REST API. If you wish to provide additional information in the HTTP header, turn on the Header Required slider as shown in Figure 8. The Name and Value text boxes will then appear. Specify the Name and Value parameters that you need to include in the Header of the REST API and click the Add Header button. The NAME and VALUE columns in the section below will now be populated. To delete a Name and Value pair, click the
 icon available in that row. To delete all the Name and Value pairs, select the check box preceding the NAME column and click the
  icon.
icon.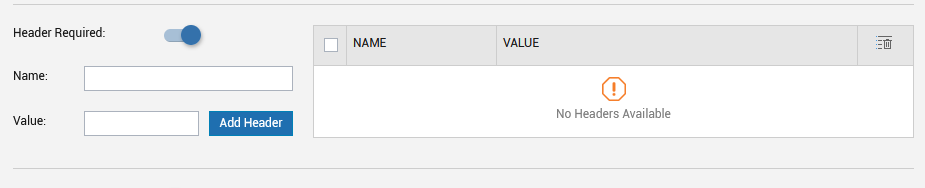
-
Parameter Required - By default, the Parameter Required slider is turned off (see ) indicating that no additional parameters are specified as variable parts of your REST API resources i.e., the data that you are working on. If you wish to provide additional parameters, turn on the Parameter Required slider as shown in Figure 9. The Name and Value text boxes will then appear. Specify the Name and Value parameters that you need to include in the parameter of the REST API and click the Add Param button. The NAME and VALUE columns in the section below will now be populated. To delete a Name and Value pair, simply, click the
icon available in that row. To delete all the Name and Value pairs, select the check box preceding the NAME column and click the icon.
-
Request Body - If POST is chosen from the HTTP Method list, then an additional Request Body section will appear as shown in . By default, the x-www-form-urlencoded flag will be chosen indicating that the name and values are encoded in name-value tuples separated by '&', with a '=' between the name and the value. Specify the Name and Value parameters that you need to include in the body of the REST API and click the Add Body button. The NAME and VALUE columns in the section below will now be populated. To delete a Name and Value pair, simply click the
icon available in a NAME, VALUE row. To delete all the Name and Value pairs, select the check box preceding the NAME column and click the icon. If you wish to post raw data, then you can choose the raw flag. -
Clicking the Save button will invoke Figure 10.
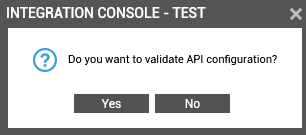
-
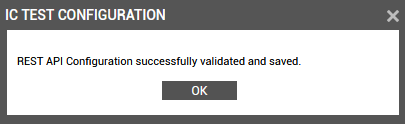
If you wish to validate your REST API configuration, then, choose the Yes button in Figure 10. If your validation is successful, then a message as shown in Figure 11 will appear.
-
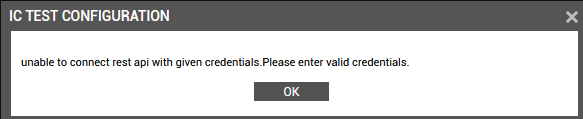
If your REST API configuration validation failed, then , Figure 12 will appear.
-
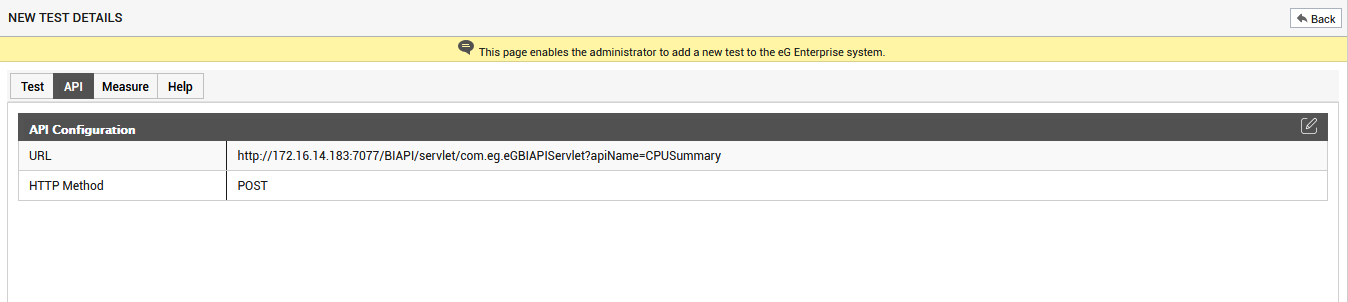
Once your REST API is validated successfully, then, your configuration will be displayed in the API tab as shown in Figure 13.
Now, click the Measure tab in Figure 13 to configure the measures for the test. Figure 14 then appears.
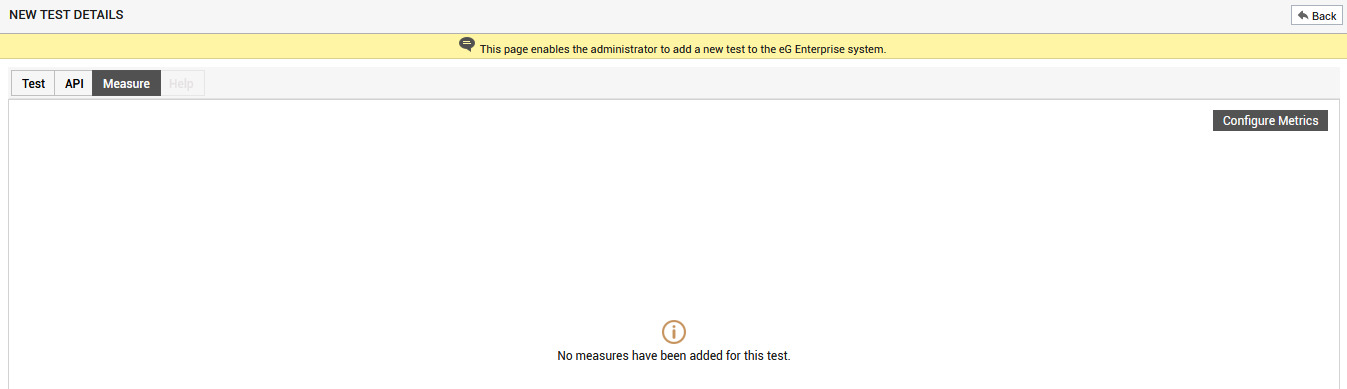
Clicking the Configure Metrics button in Figure 14 will invoke the Metrics Configuration pop up window as depicted by Figure 15.

Figure 15 : The Metrics Configuration window with the API output
By default, the Data Field Configuration section in Figure 15 will list the data obtained as a result of the REST API execution in the target environment. Each set of data obtained will be listed in separate columns. By default, all the columns will be chosen indicating that each column label will be a measure of the test. If you wish to choose only a few columns, then, you can do so by deselecting the check box preceding the column name.
Note:
If the data returned upon execution of the REST API in the target environment is of JSON format and comprises of numeric values, then, the test is considered as a non-descritpor based test. If multiple rows of data are returned as the output of the executed REST API and if a column contains values that are alpha-numeric, then, you can consider the test to be a descriptor-based test. The Column that contains alpha-numeric values will be the "descriptor" of the test. If multiple columns with alpha-numeric values are returned as the output by the REST API, then, ensure that you select only one column from Figure 15.
Once you have chosen the columns that need to be displayed as measures, click the Next button in Figure 15. Figure 16 will then appear listing all the Measures chosen for the test.
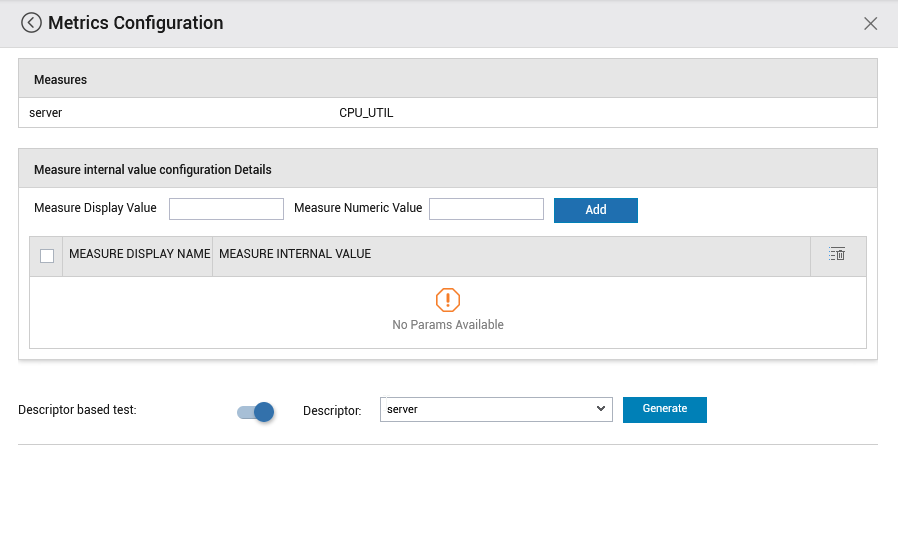
Figure 16 : Measures listed for the CPUPerformance_ex test
From Figure 15, we can easily figure out that the JSON output obtained upon execution of the REST API contains multiple rows of data as well as alpha-numeric values in the SERVER column (see Figure 15). Therefore, we can conclude that this is a descriptor-based test and the values in the SERVER Column are the descriptors of the test.
To this effect, Figure 16 will display a Descriptor based test slider which will be turned off by default. If you wish to develop this test as descriptor-based, turn on the slider. The Descriptor list will then appear listing the column that contained non-numeric values. In our example, this is server. So choosing the server option from this list ensures that the descriptors of this test will be the values displayed in the SERVER column of Figure 15.
Click the Generate button in Figure 16 to integrate the test’s implementation into the eG Enterprise system.
When a test’s measurements are successfully configured, the eG Enterprise system prompts the user to specify the default threshold settings for each of the measurements made by the newly added test as shown in Figure 17. You can set your own thresholds by clicking on the measure.
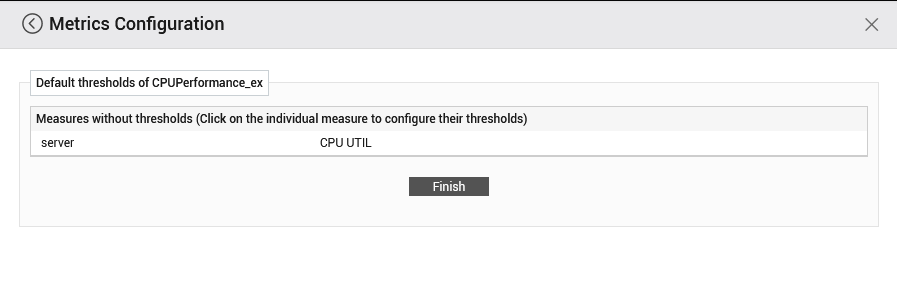
Figure 17 : Configuring thresholds for the newly created descriptor-based REST API test
Clicking the Finish button in Figure 17 will complete the creation of the descriptor based REST API test.
In some cases, the status of the descriptors may be returned by the REST API as alpha-numeric values. Let us take the example of InterfaceTest_ex test. The name of the Interfaces and their availability along with their bandwidth are returned as the output (see Figure 18).
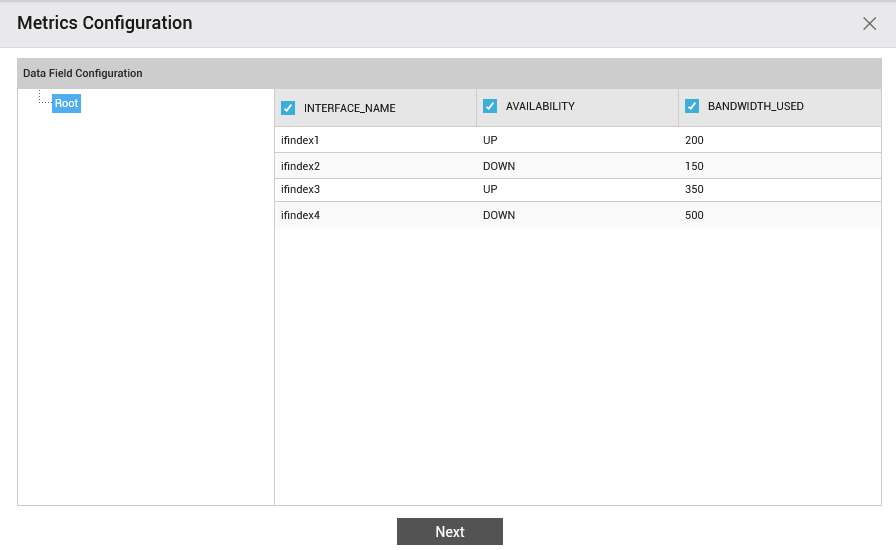
Figure 18 : The JSON output of the InterfaceTest_ex
The Availability column displays unique alpha-numeric values corresponding to each Interface. If you choose the Interface name as the Descriptor (see Figure 19), the Availability and Bandwidth measure will be reported for each Interface. To plot the measure graph for the Availability measure that takes the values UP/Down, you can use the Measure internal value configuration Details section. You can specify the value obtained as the output of the REST API in the Measure Display Value (in our example, the value obtained in the Availability column of Figure 18) and specify a corresponding numeric value in Measure Numeric value text box. Click the Add button to add those values. Similarly you can specify any number of numeric values corresponding to the status of the measures. Thee values displayed in the Measure Numeric value text box are the values that will be used to plot the Measure graph of the measure displayed in the eG monitor console for this test.

Figure 19 : Specifying the numeric values corresponding to the status of the chosen descriptor
Click the Generate button in Figure 19 to integrate the test’s implementation into the eG Enterprise system.
When a test’s measurements are successfully configured, the eG Enterprise system prompts the user to specify the default threshold settings for each of the measurements made by the newly added test as shown in Figure 20. You can set your own thresholds by clicking on the measure.
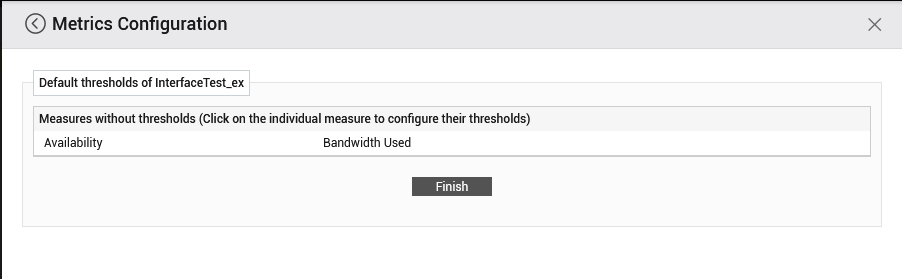
Figure 20 : Configuring thresholds for the newly created InterfaceTest_ex