Adding a Descriptor-based SNMP Test
To illustrate a descriptor-based Snmp test, consider another example. Say you have a BEA Tuxedo domain server running. This example involves the creation of a TuxDomainTest_ex, which will use the Tuxedo server’s SNMP MIB to report the number of machines and servers running in a Tuxedo domain.
Begin adding this test by selecting the Test option from the Integration Console tile (see Figure 1). In the integration console - test page that appears next (see Figure 2), click the Add New Test button. The new test details page (see Figure 1) appears, wherein the following details need to be provided for our example:
-
Test name –TuxDomainTest_ex
Note:
While adding a new test using the Integration Console, ensure that the Test name always ends with _ex. If not, an error message (see Figure 3) will appear upon clicking the Add button in Figure 1.
- Duplicate - Since the new test is not a duplicate of any existing test, set the Duplicate flag to No.
-
Execution – External, as an external agent will be executing the test
Note:
Using the Integration Console plugin, you can add an internal or an external test, but you cannot add tests that need to be run by a remote agent – i.e., tests that need to be executed in an agentless manner.
- Port based – Specify whether the target server listens on a port or not. In our case, the Tuxedo domain server is not listening on a port.
- Test type - Snmp
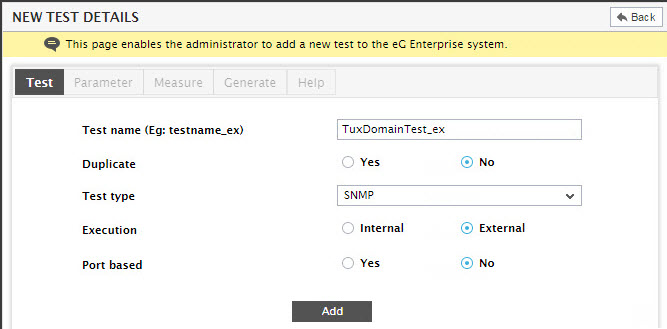
Figure 1 : Adding a descriptor-based test of type SNMP
Then, click the Add button in Figure 1 to add the new test to the eG Enterprise system. This will automatically open the Parameter tab page (see Figure 2), where the default parameters of the SNMP-based test will be displayed.
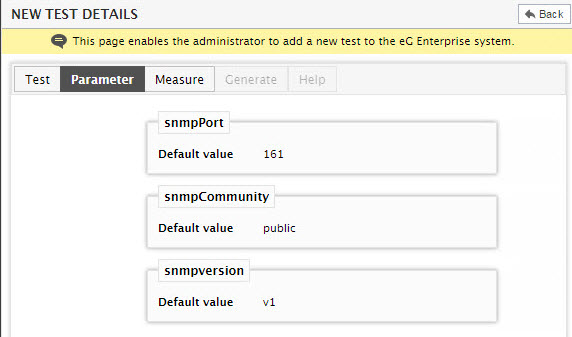
Figure 2 : Viewing the default parameters of the TuxedoDomainTest_ex
Since no additional parameters need be added to the new test, click the Measure tab page in Figure 2 to add measures for the test. Figure 3 will then appear indicating that no measures have been configured for the test yet.
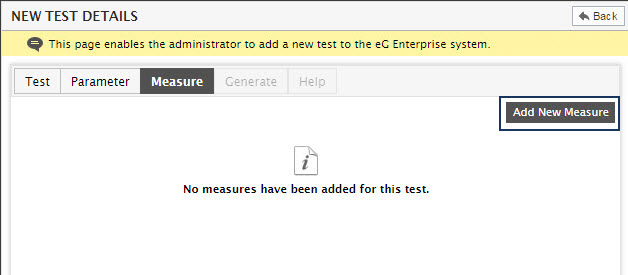
Figure 3 : The Measure tab page indicating that no measures have been configured yet for the descriptor-based SNMP test
To add a new measure, click the Add New Measure button in Figure 3. The new measure details page of Figure 4 will then appear, where you can specify the details of the new measure.
The first measure of the TuxDomainTest_ex in our example is Curr_machines. This represents the current number of machines in the domain. Therefore, in the new measure details page of Figure 4, specify Curr_machines as the Measure name. Then, mention the Database column size, the Unit, the Conversion Factor, and the Process method as shown in Figure 4 below. As before, leave the Alarm display string, blank.
Note:
- To know more about the Process method, refer to Adding a Script/Batch File-based Test.
- To know more about the Conversion factor, refer to Adding a Custom Performance Test .
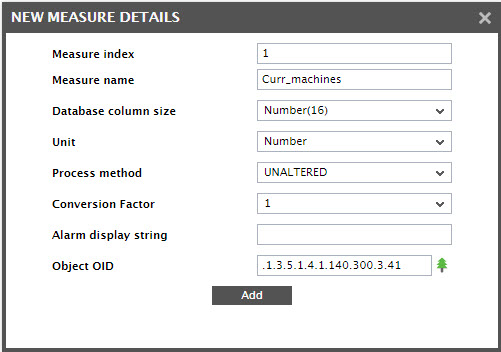
Figure 4 : Adding the Curr_machines measure to the eG Enterprise system
Then, in the Object OID text box, enter the object ID of the specified measure. Here again, you can either manually specify the OID, or use the MIB browser that eG Enterprise provides. Let us begin with the manual procedure.
Figure 5 depicts a part of the MIB for the Tuxedo domain server.
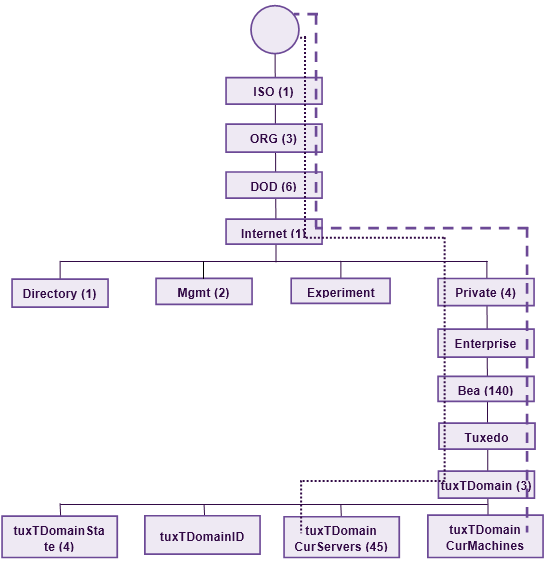
Figure 5 : A portion of the MIB for the Tuxedo domain server
The tuxTDomain object in the tree is a table of entries, where each entry includes at least four attributes. The four objects that you can see below the tuxTDomain object in Figure 5 are the attributes that are relevant to our example. Of these:
- The tuxTDomainID attribute returns the domain identification string
- The tuxTDomainCurMachines attribute returns the number of machines currently available in the Tuxedo domain
- The tuxTDomainCurServers attribute returns the number of servers currently available in the Tuxedo domain
- The tuxTDomainState attribute returns the status of each of the servers in the Tuxedo domain
Since the tuxTDomainCurMachines object returns the number of machines currently available in the Tuxedo domain, the ID of this object needs to be specified as the object oid of the Curr_machines measure. The dashed lines (-------) in Figure 5 trace the path from the root of the MIB tree to the tuxTDomainCurMachines object. Now, do the following:
-
Follow the dashed lines closely and identify the objects through which the lines pass. In our example, note that the lines pass through the following objects:
- ISO
- ORG
- DOD
- Internet
- Private
- Enterprise
- Bea
- Tuxedo
- tuxTDomain
- tuxTDomainCurMachines
-
Pick the numbers representing the objects. In our example, the numbers are:
- ISO - 1
- ORG - 3
- DOD - 6
- Internet - 1
- Private – 4
- Enterprise – 1
- Bea – 140
- Tuxedo – 300
- tuxTDomain – 3
- tuxTDomainCurMachines - 41
- Note the order in which the above-mentioned objects appear in the MIB tree and arrange the corresponding numbers in the same order using the dotted notation.
- You will now have the ID for the Curr_machines measure, which is: .1.3.6.1.4.1.140.300.3.41.
Now, specify this ID in the Object OID text box of Figure 4. Finally, click the Add button to add the new measure.
On the other hand, if you want to use the MIB browser to determine the Object OID, then click on the  button next to the Object OID text box in Figure 4. The MIB Browser then appears. In the MIB browser, open the SNMP MIB file of the Tuxedo Domain server, view the MIB tree, and drill down the MIB tree to determine the OID of the object. The detailed procedure for navigating the MIB browser is available in the Determining the OID using the MIB Browser section of the Adding a Non-Descriptor-Based SNMP Test
Note:
In order to use the MIB browser for specifying the OID of the Curr_machines measure, you need to ensure that the SNMP MIB of the Tuxedo Domain Server is uploaded to the eG manager.
Once the first measure is added, click the Add button in Figure 4 to add the measure. When prompted to add more measures for the test, click the Yes button. Figure 6 will then appear, using which one more measure can be added to the TuxDomainTest_ex.
Figure 6 depicts the procedure for adding the Curr_servers measure, which reports the number of servers currently available in the Tuxedo domain.
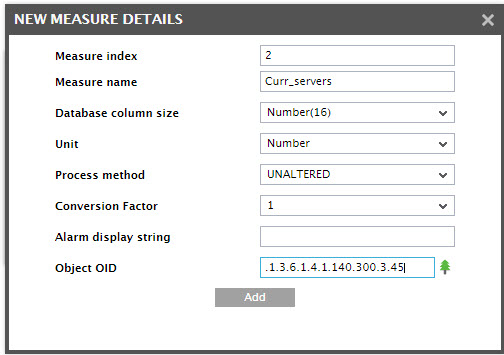
Figure 6 : Adding the Curr_servers measure to the eG Enterprise system
Since the Curr_servers measure corresponds to the tuxTDomainCurServers attribute, the ID of this attribute has to be specified as the Object OID of the Curr_servers measure. The dotted lines (…..) in Figure 5 trace the path from the root of the MIB tree to the tuxTDomainCurServers object. Follow this path to arrive at the Object oid of the Curr_servers measure. Accordingly, you will have the ID: .1.3.6.4.1.140.300.3.45. Specify the same against the Object OID text box, click the Add button, and add the second measure also to the eG Enterprise system. When prompted again to add more measures, click the No button. This will automatically lead you to the Generate tab page (see Figure 7).
As before, the Generate tab page will reveal two options: Multiple elements and Single element. In our example, since the measurements of the TuxDomainTest_ex involve access to SNMP table objects, the test is a descriptor-based test. Hence, choose the Multiple elements option.
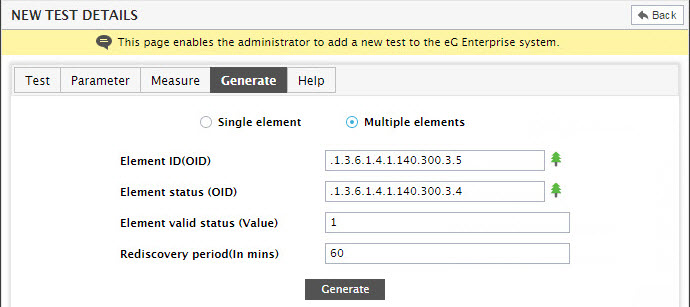
Figure 7 : Configuring a descriptor-based TuxedoDomainTest_ex
In the resulting page (see Figure 7), provide the following details:
-
Element ID(OID):Here, specify the ID of the object that supplies the descriptors for a test. For our example, the descriptor is the identification string of the Tuxedo domain. To manually specify the OID that reports the identification string, once again refer to the MIB tree in Figure 5. The object that returns this string value is the tuxTDomainID object of the MIB tree. Using the MIB tree, you can manually arrive at the ID of this object, and the same will be:.1.3.6.1.4.1.140.300.3.5.
To use the MIB browser instead, click on the
button next to the Element ID (OID) text box in Figure 7. In the MIB browser that then appears, open the SNMP MIB file of the Tuxedo Domain server, view the MIB tree, and drill down the MIB tree to determine the OID of the object that returns the descriptors of the TuxDomainTest_ex. For the detailed procedure, Determining the OID using the MIB Browser section of Adding a Non-Descriptor-Based SNMP Test -
Element status(OID):In this text box, specify the ID of the object that returns the status of the descriptor. This specification combined with that of the Element Valid Status (Value) field form a filter condition that will enable you to view the measures pertaining to only those elements that are in a particular state. Such a condition is optional. Therefore, if filtering is not required, you can specify none in both these text boxes. In our example, we need to view the measures pertaining to only the “active” servers in the Tuxedo domain. Therefore, a filter condition is a must. Hence, specify the ID of the tuxTDomainState object that returns the status (whether active or inactive) of the servers in the Tuxedo domain. Its ID, as inferred from the MIB tree (see Figure 5) is .1.3.6.1.4.1.140.300.3.4. To browse the MIB tree using the MIB browser, click on the
button next to the Element status (OID) text box in Figure 7. For the detailed procedure to use the browser, refer to the Determining the OID using the MIB Browser section of the Adding a Non-Descriptor-Based SNMP Test Note:
In order to use the MIB browser for specifying the Element ID (OID) and the Element status (OID), you need to ensure that the SNMP MIB of the Tuxedo Domain Server is uploaded to the eG manager.
- Element valid status (Value): Specify the value that indicates the state of the descriptor. As mentioned already, if filtering is not required, you can specify none here. In our example, the value 1 indicates that the server is active and value 0 indicates that it is inactive. As we require only the measures pertaining to active servers, specify 1 here.
- Rediscovery period (In mins): Specify the frequency with which rediscovery needs to occur. By default, this is 60 minutes. For our example, the default frequency is to be retained.
Now, click the Generate button to integrate the test’s implementation into the eG Enterprise system. When a test’s measurements are successfully configured, the eG Enterprise system prompts the user to specify the default threshold settings for each of the measurements made by the newly added test.
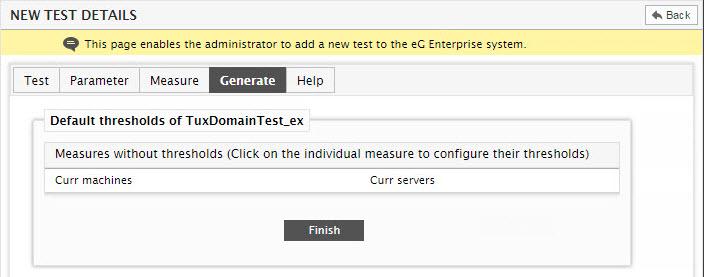
Figure 8 : Configuring thresholds for the measures of the descriptor-based SNMP test