Adding a Script/Batch File-based Test
Many system administrators would not prefer to write Custom tests, by programming in Java. To allow administrators to easily extend eG’s capabilities, the Integration Console includes a Script/Batch File test. This test allows an administrator to simply write a shell script / batch file / VB script / powershell script, which they can incorporate into the Integration Console to provide custom monitoring capability. This section will help you gain a lucid understanding of how to add and configure a new test of the Script/Batch File type.
To illustrate how to add a Script/Batch File test, let us take an example of a DiskSpaceTest, which tracks the disk utilization of a server. In order to create the test, first, click the Add New Test button in the integration console - test page (see Figure 2). In the new test details page (see Figure 1) that appears next, specify the Test name.
Note:
While adding a new test using the Integration Console, ensure that the Test name always ends with _ex. If not, an error message (see Figure 3) will appear upon clicking the Add button in Figure 1.
Since the new test is not a duplicate of any existing test, set the Duplicate flag to No. Then, select Script/Batch File as the Test type. Next, mention the Execution mode. The choice of an execution mode depends upon whether the test is to be executed by an internal agent or an external agent. Since the DiskSpaceTest_ex is to be run only by an internal agent, select the Internal option against the Execution field.
Note:
Using the Integration Console plugin, you can add an internal or an external test, but you cannot add tests that need to be run by a remote agent – i.e., tests that need to be executed in an agentless manner.
Next, as the DiskSpaceTest_ex is to be run at the system level, select No against Port based to enable it to be associated with any of the component types.
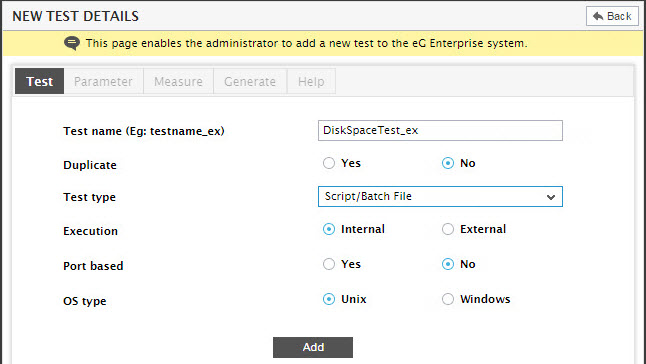
Figure 1 : Providing the details of the new test of type Script/Batch File
If the test is to be associated with a shell script file, choose Unix as the OS type. If the test is to be associated with a batch file/VB/powershell script, choose the Windows option. Our DiskSpaceTest_ex is associated with a script, and hence, the Unix option needs to be chosen. Then, click the Add button.
The Parameter tab page will automatically open (see Figure 2). To add a new parameter, click the Add New Parameter button. However, as the DiskSpaceTest_ex does not take any parameters, click the Measure tab page in Figure 2.
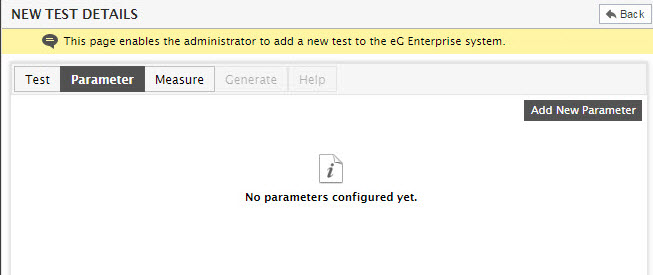
Figure 2 : The Parameter tab page of the DiskSpaceTest_ex
Click the Add New Measure button in the Measure tab page of Figure 3 to add a measure for the DiskSpaceTest_ex.
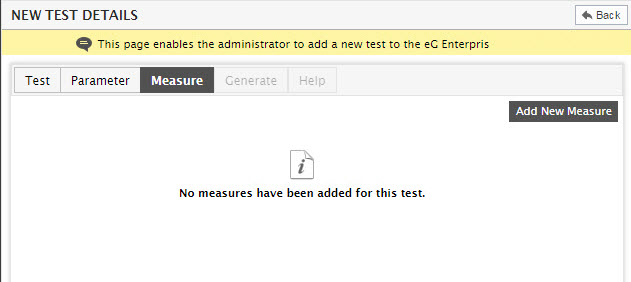
Figure 3 : The Measure tab page of the DiskSpaceTest_ex
Figure 4 will then appear, using which you can configure the new measure for the DiskSpaceTest_ex. As the test should indicate the percentage of disk space utilized, add PercentUtil as the only measure of this test. Therefore, specify PercentUtil as the Measure name. Then, specify the Database column size, the Unit, Conversion Factor, and the Alarm display string in the same manner as discussed in the previous section.

Figure 4 : Specification of a measure (PercentUtil) of the DiskSpaceTest_ex
In addition to the above, this test type requests the specification of a Process method. By selecting an option from the Process method list box, you can indicate the processing that must be performed on the script / batch file’s output before passing the results to the eG agent. The options offered by this list box are:
By default, unaltered is selected as the Process method. In the DiskSpaceTest_ex example, no further processing is required. Hence, the default selection is left as is. Finally, click the Add button to add the measure.
When you are prompted to add more measures for the test (see Figure 5), click No to stop adding any more measures; this is because, the DiskSpaceTest_ex in our example reports only one measure.
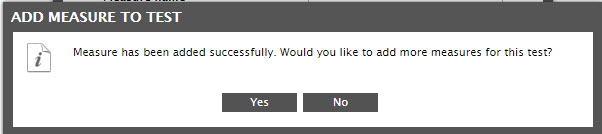
Figure 5 : A message box requesting your confirmation to continue adding measures for the NetShare_cf_ex test
Doing so will instantly open the Generate tab page (see Figure 6). Here, proceed to specify the Path of script/batch File (see Figure 6) associated with the test. Multiple script / batch file paths can also be specified, but remember to separate each entry using a comma.

Figure 6 : Generating a test of type Script/Batch File
Note:
While associating a test with multiple script / batch files, make sure that the “main” script that needs to be executed is specified last. Otherwise, no measures will be reported by eG Enterprise.
Any script used for a Script/Batch File test should provide one or more lines of output. If a test is descriptor-based, it can have multiple lines of output, with the first entry of each line being the descriptor.
By default, the descriptor and its corresponding measures are separated by colon (:), as shown in the sample output below:
DESC_1:Value_1:Value_2:…:Value_N
DESC_2:Value_1:Value_2:…:Value_N
.
.
DESC_N:Value_1:Value_2:…:Value_N
You can however, override this default configuration. For this, follow the steps below:
-
Login to the system hosting the eG manager.
-
Edit the eg_tests.ini file in the <EG_INSTALL_DIR>\manager\config directory (on Windows; on Unix, this will be the /opt/egurkha/manager/config directory).
-
In the [AGENT_SETTINGS] section of the file, you will find the following entries:
OtherScriptSeparator=:
VbPsScriptSeparator=:
The OtherScriptSeparator parameter dictates what separator the output of non-VB/non-Powershell scripts should use. The VbPsScriptSeparator dictates what separator should be used in the output of VB/Powershell scripts. By default, both parameters are set to : (colon), indicating that the colon (:) is by default used as separator for all types of scripts.
The DiskSpaceTest_ex we have configured is a descriptor-based test and hence, its output would be of the following format (by default):
/tmp:30
/boot:22
/usr:12
In the above output, /tmp, /boot and /usr are some of the descriptors for the DiskSpaceTest_ex and 30, 22 and 12 are the values of the PercentUtil measure of each of these descriptors. For example, for the /tmp descriptor, the disk space utilized is 30%.
If a test is not descriptor-based, then the script should report only one line of output. The first entry of this line should be “NONE”.
NONE:Value_1:Value_2:…:Value_N
If the DiskSpaceTest_ex we have configured is a non-descriptor-based test, its output would be of the following format (by default):
NONE:30
:
| DESC_1 | Value_1 | Value_2 | . | Value_N |
| DESC_2 | Value_1 | Value_2 | . | Value_N |
| . | ||||
| . | ||||
| DESC_N | Value_1 | Value_2 | . | Value_N |
| /tmp | 30 |
| /boot | 22 |
| /usr | 12 |
| NONE | Value_1 | Value_2 | . | Value_N |
| NONE | 30 |
A script on Linux would look like this:
#!/bin/sh
df -k | grep “/” | awk ‘{print $6 “ “ $5 -1}’
A sample powershell script has also been provided below:
$services = get-service
foreach($service in $services)
{
$name = $service.displayname
$status = $service.status
if($status -eq “Running”)
{
$value = 100
}
else
{
$value = 0
}
Write-Host($name,$value) -Separator “:”
}
The above script implements a descriptor-based test. This script reports the status of each of the services available on a Windows host.
Find below a sample non-descriptor-based powershell script:
$x = Get-Random -minimum 50 -maximum 101
$y = Get-Random -minimum 25 -maximum 50
$z = $x + $y
$w = $x - $y
Write-Host($x,$y,$z,$w) -Separator “:”
The above script reports random I/O-related measurements pertaining to a target Windows host.
Note:
Powershell scripts can be executed on only those targets that have Powershell SDK v1/v2 installed.
All the scripts sampled above (the Linux script and the powershell scripts) did not take any arguments. To offer more flexibility in script execution, the Integration Console allows a user to specify multiple arguments for a script/batch file test. When the script/batch file is executed each time, the test’s arguments are passed to the script/batch file. Note that the arguments are typically passed to a script with a hyphen (i.e., ‘-‘) preceding them. Each argument is expected to be followed by its value (e.g., -argument1 <argument1Val> -argument2 <argument2Val>). The script/batch file has to parse the arguments that are passed to it at the time of invocation and perform the appropriate functions. The following example provides an illustration of how a Linux shell script can parse the arguments provided to it:
#!/bin/sh
# This is an example of a simple script that processes its arguments.
# This script takes two arguments and outputs the values of the arguments.
out1=””;
out2=””;
#out1 and out2 are output variables
while [ $# -ge 1 ]
do
case $1 in
-argument1) shift; out1=$1;; # if the current argument is argument1
-argument2) shift; out2=$1;; # if the current argument is argument2
esac
shift;
done
echo “NONE $out1 $out2”
If the script files are present in a remote location, then you can upload them to the eG manager, by clicking on the Choose button adjacent to the Path of script/batch File text box in Figure 6. This will invoke a pop-up window using which you can Browse for the files and specify their location. Finally, click on the Upload button in the pop-up window, to upload the script/batch files in the remote location to the eG manager. However, if the files have already been uploaded to the eG manager, then this procedure can be dispensed with. Instead, just specify the location of the files against the Path of script/batch File text box.
Select the Load file (see Figure 6) check box if:
- The specified script/batch file has been modified, or
- The measures are being associated with the script/batch file for the very first time
If the script/batch file has changed, then selecting the Load file check box will ensure that when the test runs, the agent downloads the revised version of the file from the manager, and executes the same. This in turn ensures that the changes take effect. While associating the script/batch file with the test for the first time, it is mandatory to select this check box, as doing so enables the agent to download the file along with the measurements during test execution.
Finally, click the Generate button in Figure 6 to generate the test.
When a test’s measurements are successfully configured and the associated script/batch file has been added to the eG Enterprise system, the eG Enterprise system prompts you to specify the default threshold settings for each of the measurements made by the newly added test (see Figure 7). Click on the measure name in Figure 7 to configure its thresholds.
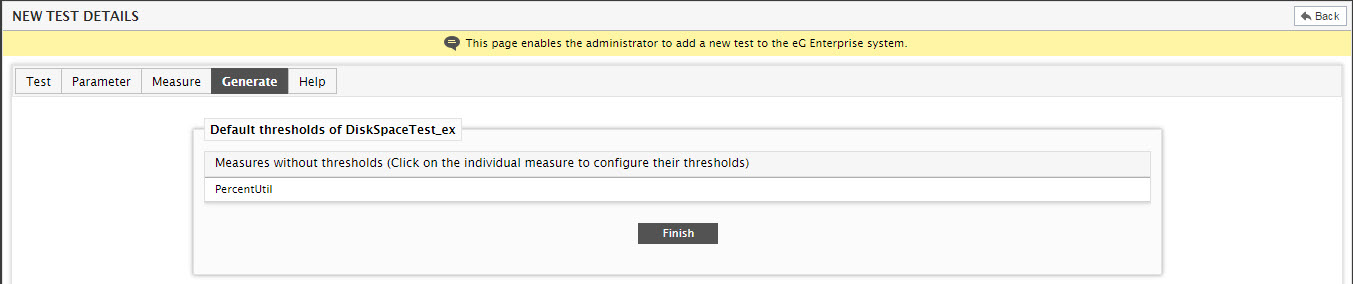
Figure 7 : Specifying the threshold values of the measures of the DiskSpaceTest_ex