Instrumenting SAP Fiori Apps
SAP Fiori is a new user experience (UX) for SAP software and applications. It provides a set of applications that are used in regular business functions like work approvals, financial apps, calculation apps and various self-service apps.
eG RUM offers support to Fiori Apps running on the SAP Cloud Platform and on the SAP On-Premises setup. The procedure to RUM-enable Fiori Apps varies with where the Apps are running - whether on the cloud or on-premises.
Instrumenting SAP Fiori Apps Running on the SAP Cloud Platform
To RUM-enable Fiori Apps running on the SAP cloud, do the following:
-
First, manage the SAP Fiori App to be monitored as a Real User Monitor component using the eG admin interface (see Figure 1).
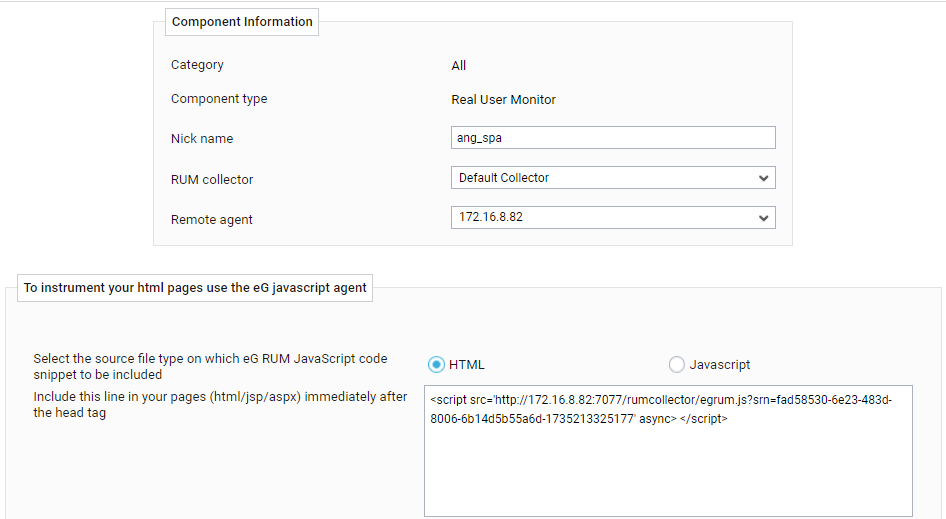
Figure 1 : Managing a SAP Fiori APP using the eG admin interface
- Then, to instrument the SAP Fiori App, you need to download the egrum.js to be embedded into the app to any folder on the local host. For that, click the Download button indicated by Figure 1.
-
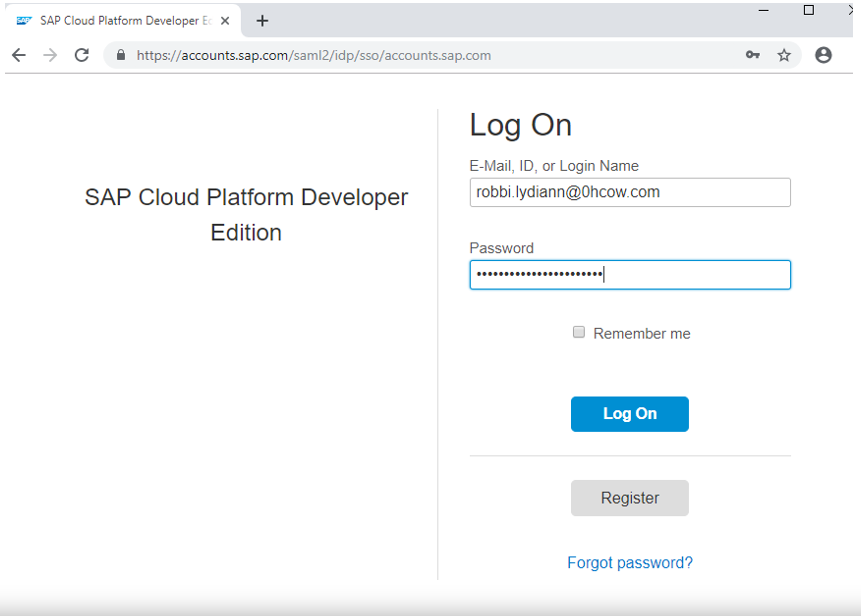
Next, login to the SAP Cloud Platform (see Figure 2).
-
When Figure 3 appears, click on the Services option in the left panel of Figure 3. Then, with All Categories selected from the drop-down in the right panel, type SAP Web IDE in the text box adjacent to that drop-down and press Enter on your keyboard. This will trigger a search for the service that has the string SAP Web IDE as whole/part of the service name. Once SAP Web IDE Full-Stack appears as the search result, click on it.

-
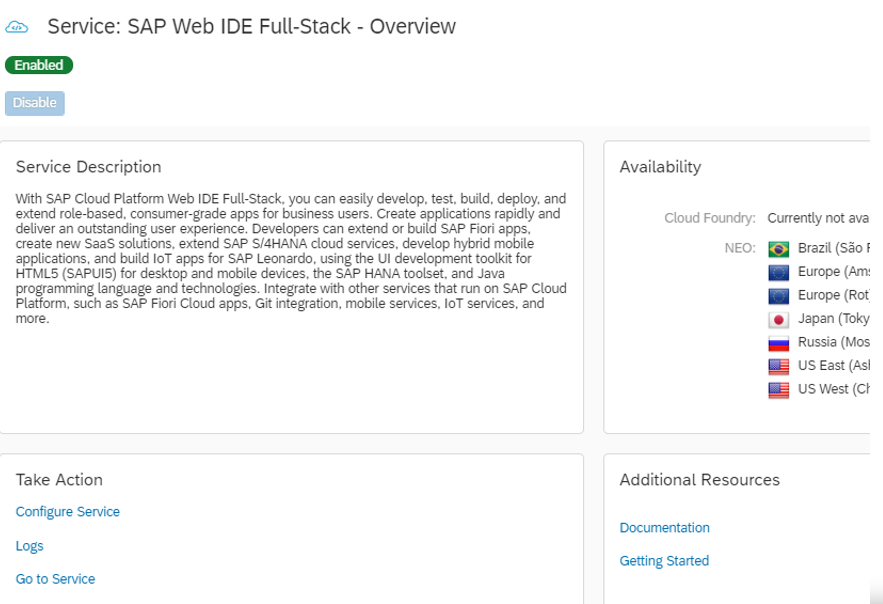
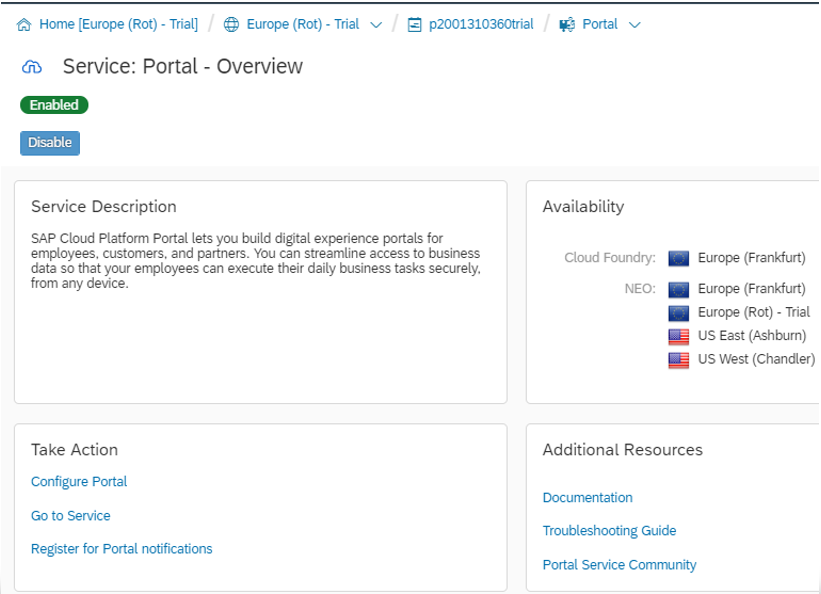
This will openFigure 4. Here, enable the SAP Web IDE Full-Stack service, if it is not done already. For that, click on the Enabled button in Figure 4. Then, click on the Go to Service link in Figure 4.
-
Figure 5 then appears. Here, click on the Gear (
.png) ) icon in the list of icons displayed in the left panel. Then, in the right panel of Figure 5, turn On the SAP Fiori Launchpad Extensibility feature, and click the Save button to save the changes.
) icon in the list of icons displayed in the left panel. Then, in the right panel of Figure 5, turn On the SAP Fiori Launchpad Extensibility feature, and click the Save button to save the changes. 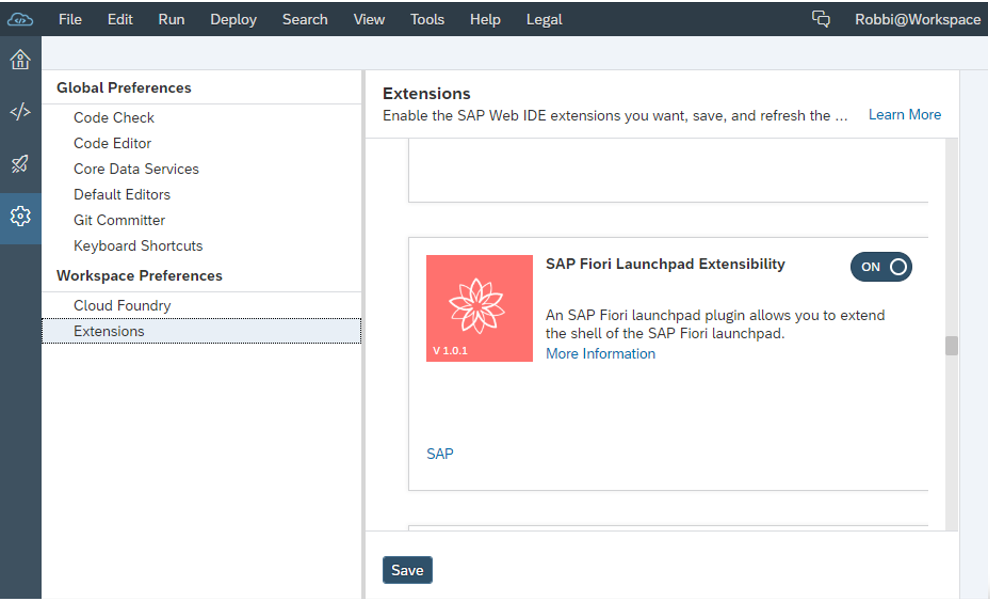
-
Next, click on the
.png) icon in the list of icons displayed in the left panel of Figure 5. This will display the Workspace folder in the right panel. Then, right-click on the Workspace folder, move your mouse pointer over New, and select the Project from Template option (see Figure 6).
icon in the list of icons displayed in the left panel of Figure 5. This will display the Workspace folder in the right panel. Then, right-click on the Workspace folder, move your mouse pointer over New, and select the Project from Template option (see Figure 6). 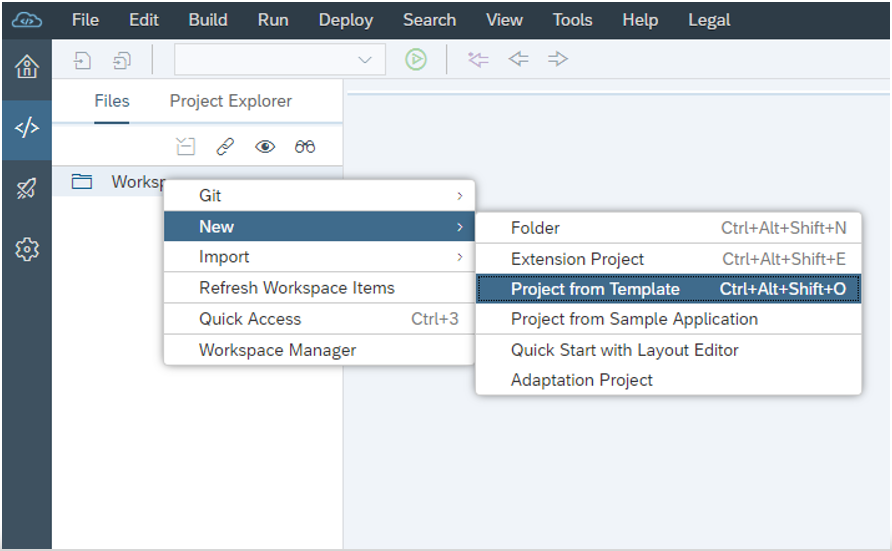
-
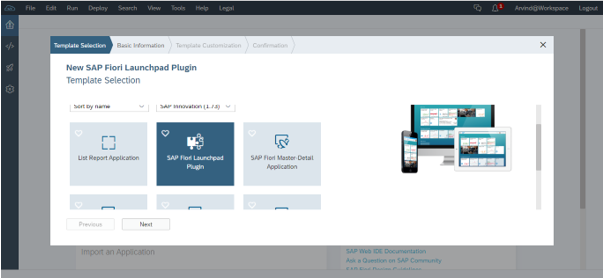
Using Figure 7 that then appears, you can create a new SAP Fiori Launchpad Plugin. For that, select the SAP Fiori Launchpad Plugin template displayed therein and click the Next button.
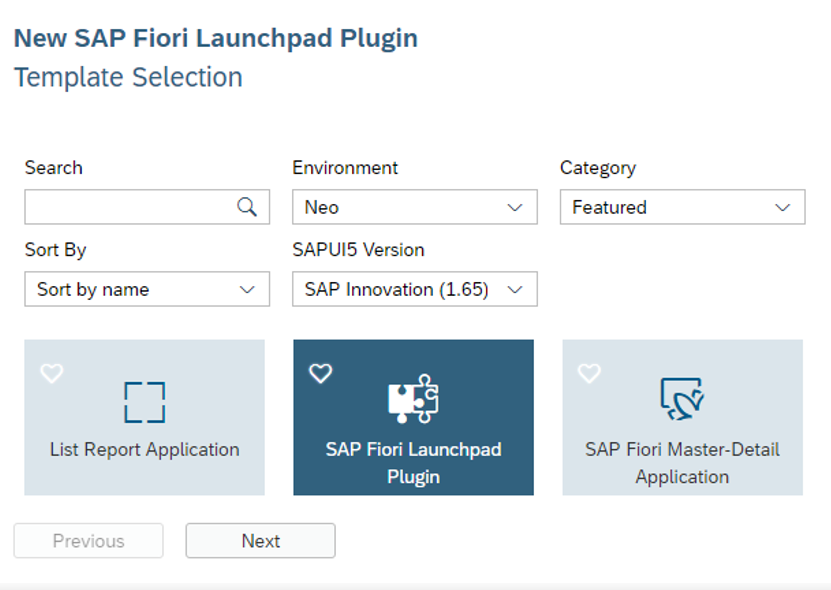
Figure 7 : Choosing to create a new SAP Fiori Launchpad Plugin
-
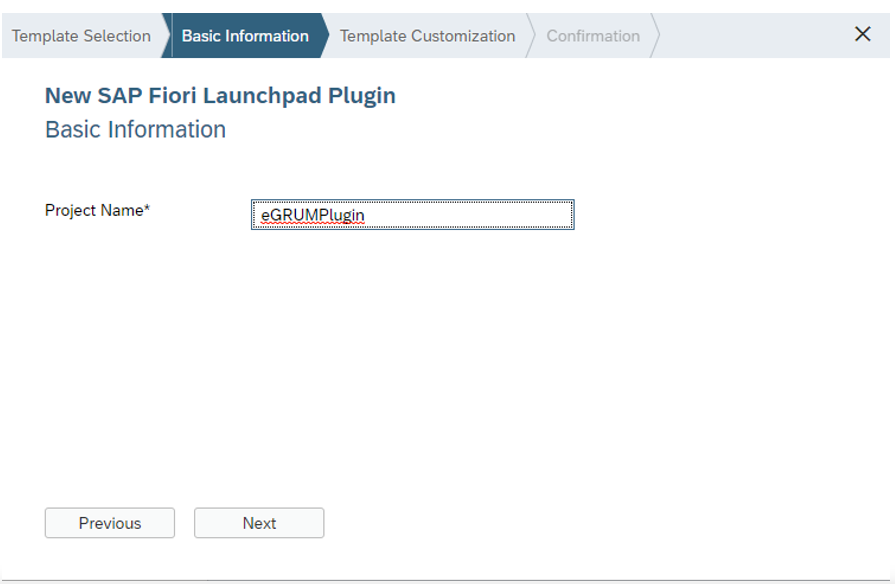
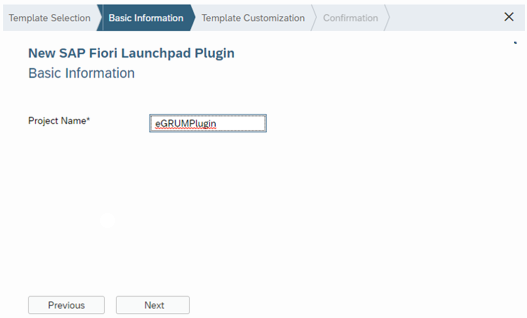
Figure 8 will then appear. Enter the name of the new project in the Project Name text box in Figure 8. Type eGRUMPlugin as the name of the new project. Then, click the Next button to proceed.
-
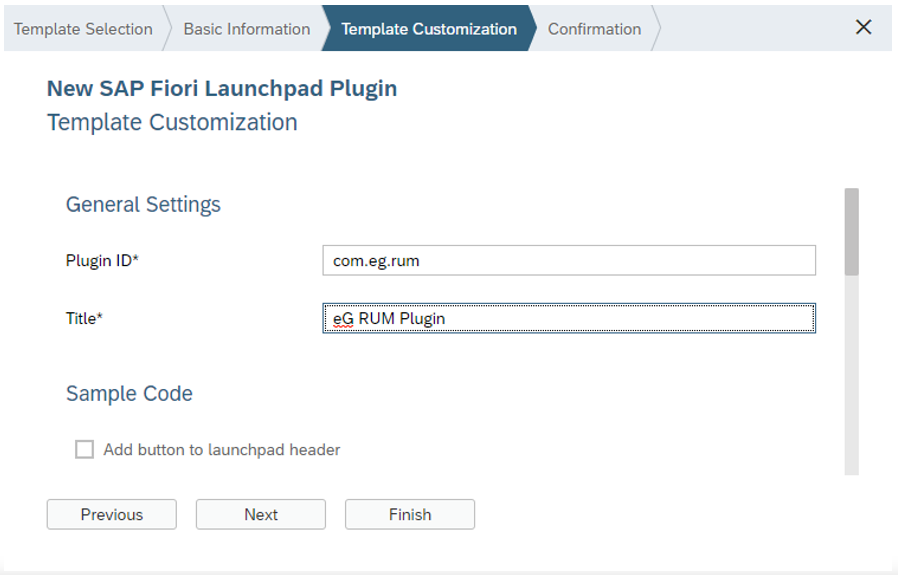
Figure 9 will then appear. Here, type com.eg.rum as the Plugin ID, eG RUM Plugin as the Title, and click the Finish button to complete plugin creation.
-
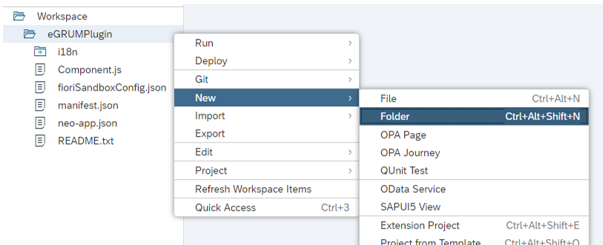
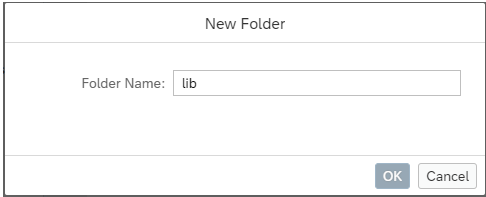
When Figure 10 appears, you will find that the project you just created - i.e., eGRUMPlugin - has been added as a sub-folder of the Workspace folder. Now, proceed to create a sub-folder for the eGRUMPlugin folder. For that, right-click on the eGRUMPlugin folder, move your mouse pointer over the New option, and select the Folder option (see Figure 10). A New Folder dialog box will then appear (as shown by Figure 10), where you can specify the Folder Name. Enter lib as the Folder Name of the sub-folder, and click the OK button in the dialog box.
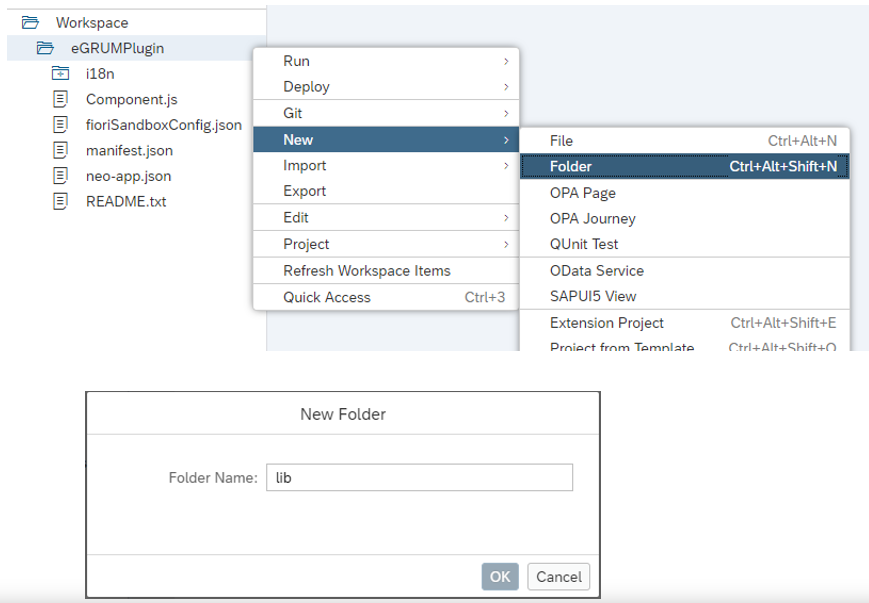
Figure 10 : Creating a lib folder under the eGRUMPlugin folder
-
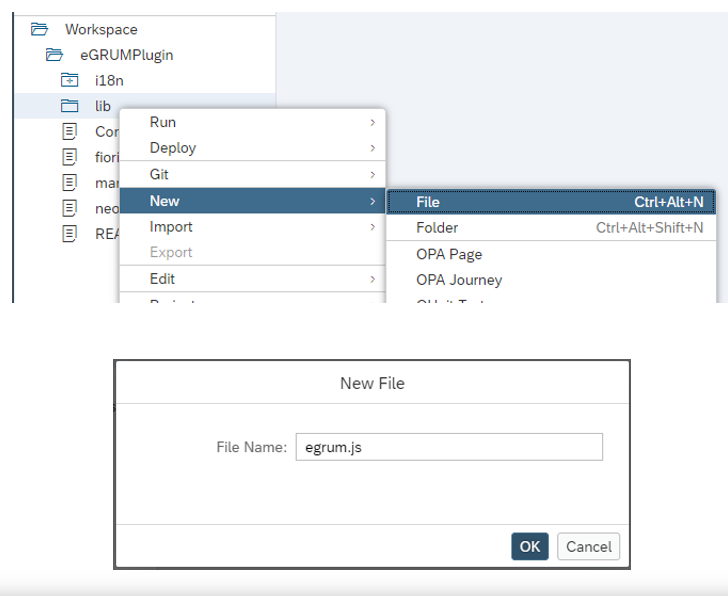
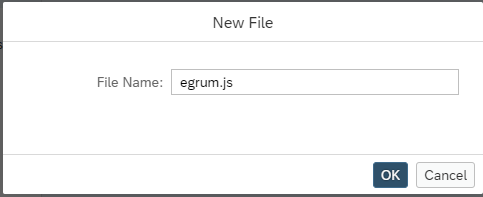
Figure 11 will appear, where you will be able to see the lib folder under the eGRUMPlugin folder. Now, proceed to create a file under the lib folder, where the RUM JavaScript code snippet needs to be stored. For that, right-click on the lib folder, move your mouse pointer over New, and choose the File option (see Figure 11). A New File dialog box will now appear, where you will have to specify the File Name of the new file. Type egrum.js as the name of the new file and click the OK button.
-
Figure 12 then opens. You will now find that an egrum.js file has been created under the Workspace -> eGRUMPlugin -> lib folder. Open the egrum.js file by clicking on it in the left panel of Figure 12. An empty file will open in the right panel. Now, using a Text Editor, open the egrum.js file that you downloaded at step 2 above, copy the contents of that file, and paste the copied contents to the empty file in the SAP console. Press Ctrl+S on your keyboard to save these changes.
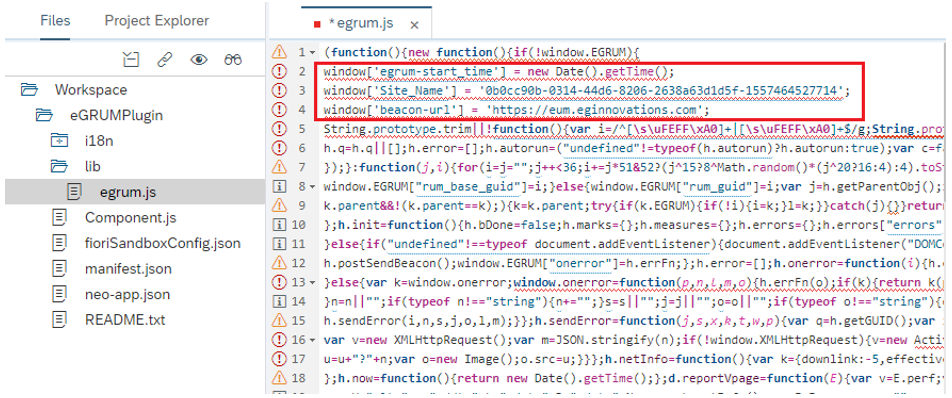
Figure 12 : Copying the contents of the downloaded egrum.js file to the empty egrum.js file in the SAP console
-
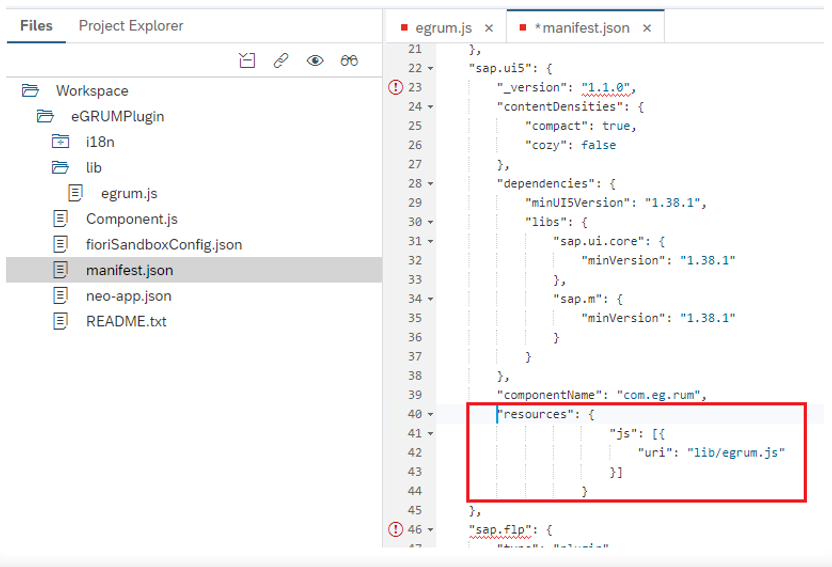
Then, double-click the manifest.json file under the eGRUMPlugin folder to open it (see Figure 13). Look for the entry, "componentName": "com.eg.rum" in the file. Once you find the entry, append the following code block to that entry, as depicted by Figure 13. Then, save the changes by pressing Ctrl+S on your key board.
Copy,"resources": {
"js": [{
"uri": "lib/egrum.js"
}]
}
-
Next, proceed to deploy the eG RUM Plugin to the SAP Cloud platform. For that, first right-click on the eGRUMPlugin folder, move your mouse pointer over Deploy, and choose the Deploy to SAP Cloud Platform option (see Figure 14).
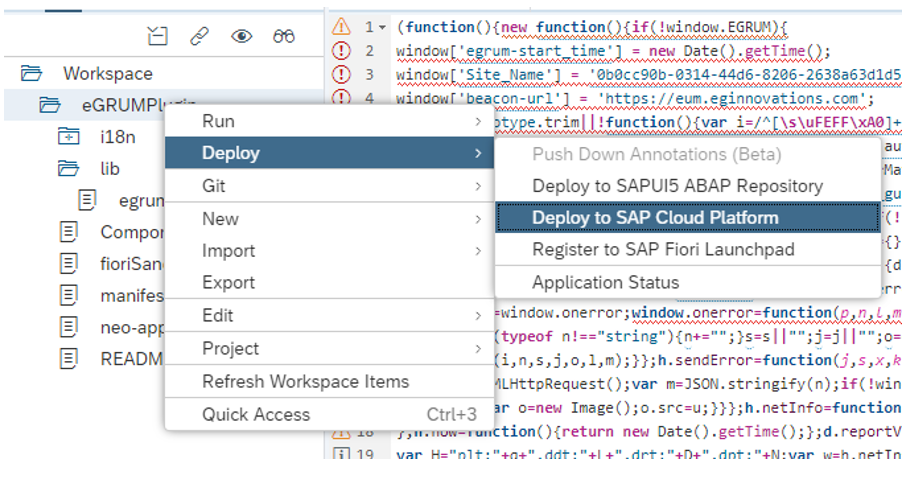
Figure 14 : Initiating the deployment of the eGRUMPlugin to the SAP Cloud platform
-
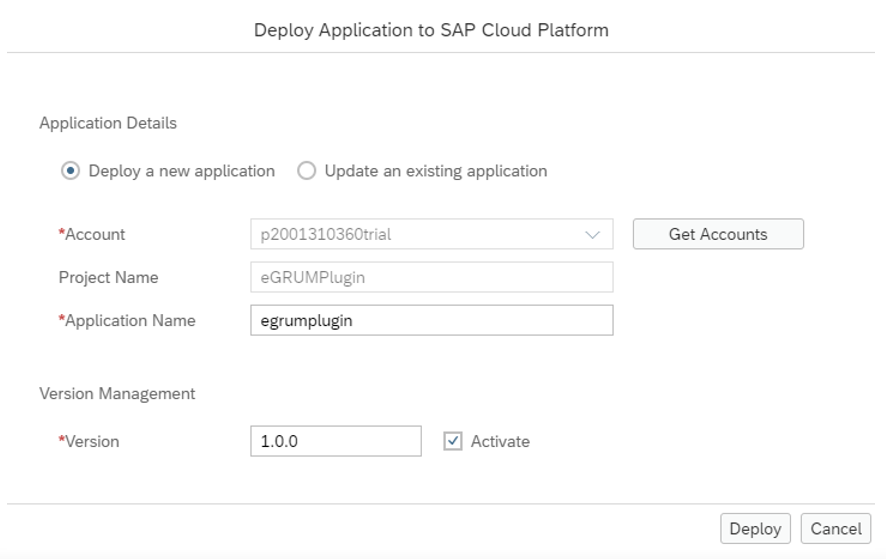
Then, choose the Deploy a new application option from Figure 15, provide egrumplugin as the Application Name, and click the Deploy button therein to deploy the plugin.
-
Upon successful deployment, a message to that effect will appear (see Figure 16). Click the Close button in Figure 16 to close the message.
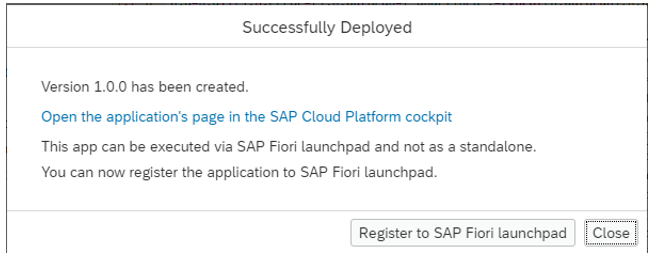
Figure 16 : A message confirming the successful deployment of the plugin
-
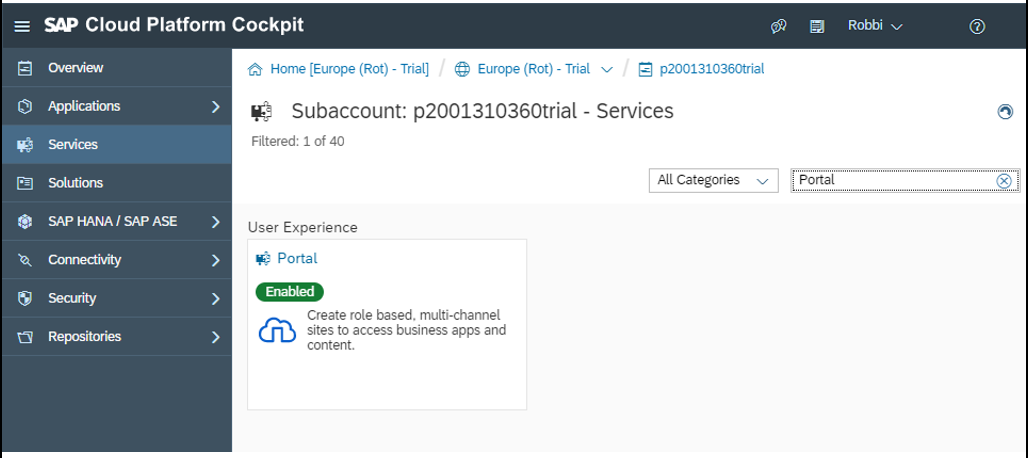
Now, you need to select a portal and attach it to the eG RUM Plugin you created and deployed previously. For that, return to the SAP Cloud Platform Cockpit (see Figure 17). Click on the Services option in the left panel of the Cockpit. Using the Search option provided by the right panel, search for the string 'Portal'. A service named 'Portal' will then appear in the search results. Click on the Portal service link in Figure 17.
-
When Figure 18 appears, click on the Go to Service link at the bottom of Figure 18.
-
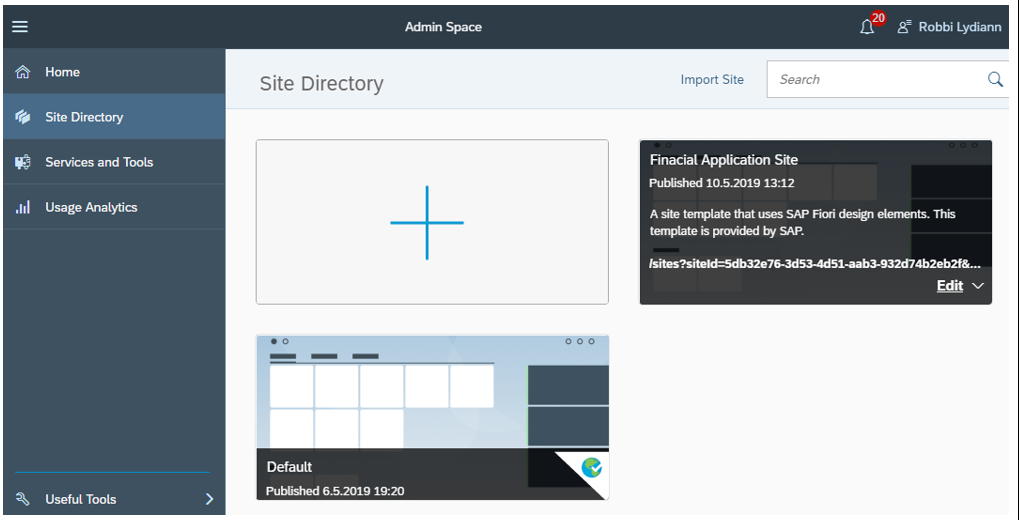
Doing so will open the Site Directory. From here, choose the site for which you want to enable RUM. Then, click on the Edit link that appears when you hover your mouse pointer over the site URL (see Figure 19).
-
Figure 20 will then appear. Expand the Content Management node in the left panel of Figure 20, and choose the Apps sub-node within. Then, to add the eG RUM Plugin to the chosen site, click the
.png) button that is last in an array of buttons that you will find at the bottom of the right panel.
button that is last in an array of buttons that you will find at the bottom of the right panel. 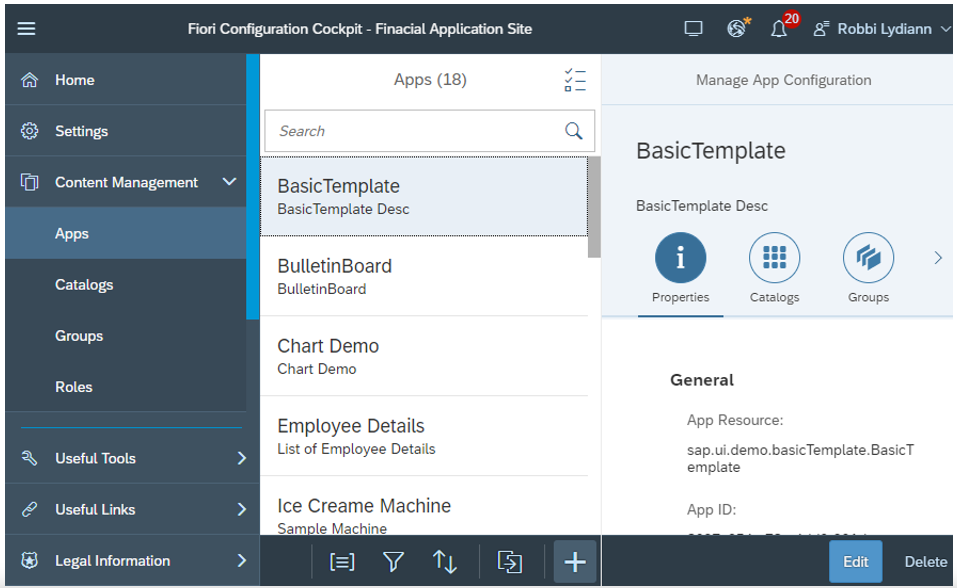
Figure 20 : Clicking the '+' icon to add the eGRUMPlugin to the chosen site
-
Figure 21 will then appear. Here, you need to select the eG RUM Plugin as the App Resource you want to associate with the site. To perform this selection, you first need to browse the list of available App resources. For that, click the Browse (
.png) ) button at the end of the App Resource text box in Figure 21.
) button at the end of the App Resource text box in Figure 21. 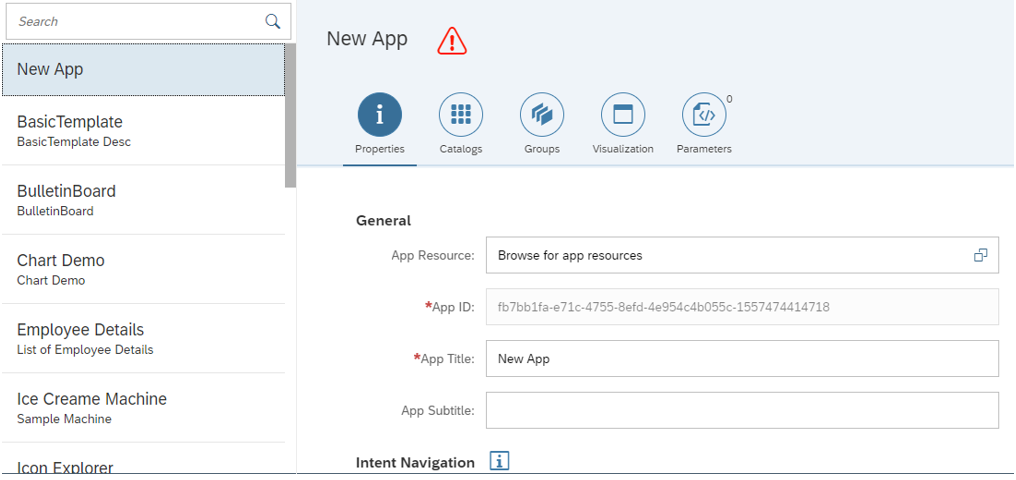
Figure 21 : Clicking the App Resource Browse button to look for the eGRUMPlugin
-
Figure 22 will then appear, where the available app resources will be listed. Browse the list and select the egrumplugin resource from it. Then, click the OK button in Figure 22.
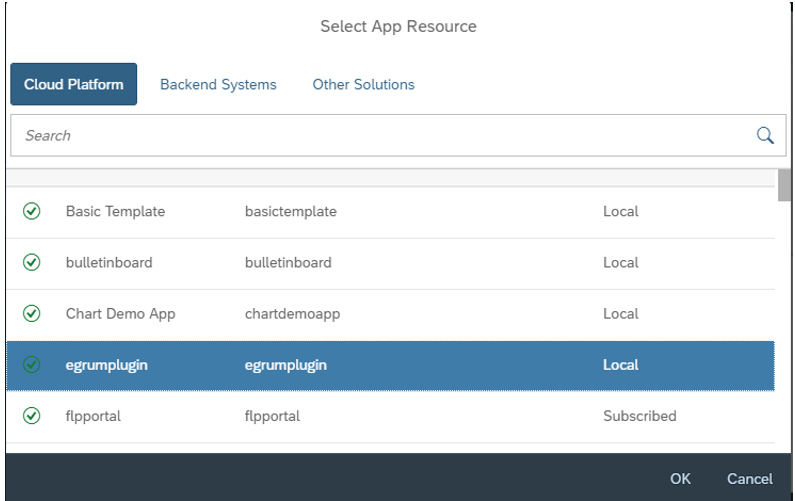
Figure 22 : Selecting the eGRUMPlugin from the list of App Resources
-
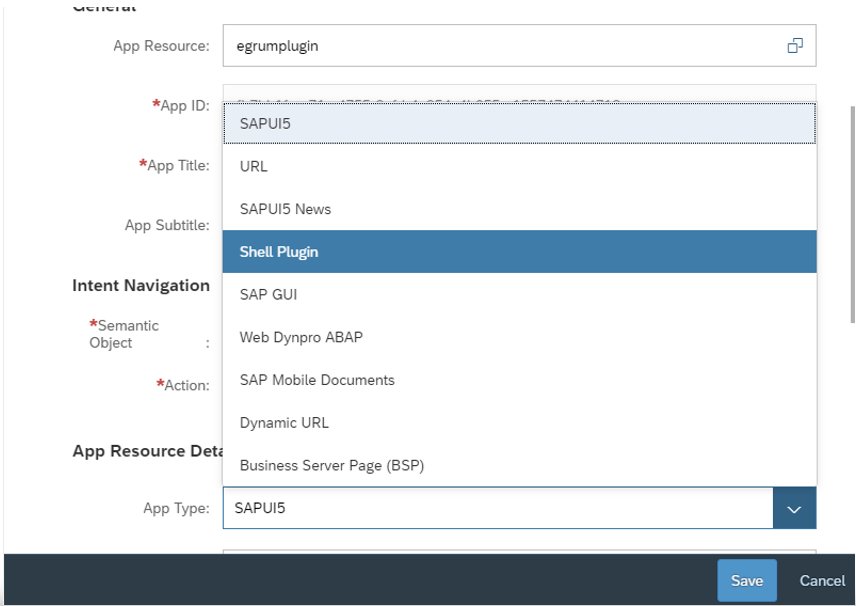
This will bring you back to Figure 21. This time however, you will see that the egrumplugin is displayed as the App Resource (see Figure 23). Now, indicate what type of an app the egrumplugin is. For that, select the Shell Plugin option from the App Type drop-down (see Figure 21). Then, click the Save button.
-
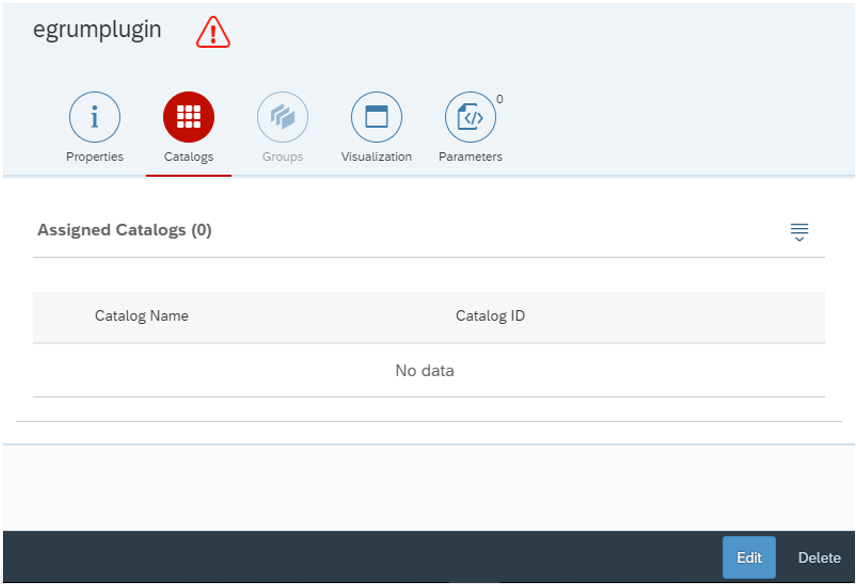
When Figure 24 appears, click on Catalogs to assign the eG RUM Plugin to a catalog. Then, click the Edit button in Figure 24.
-
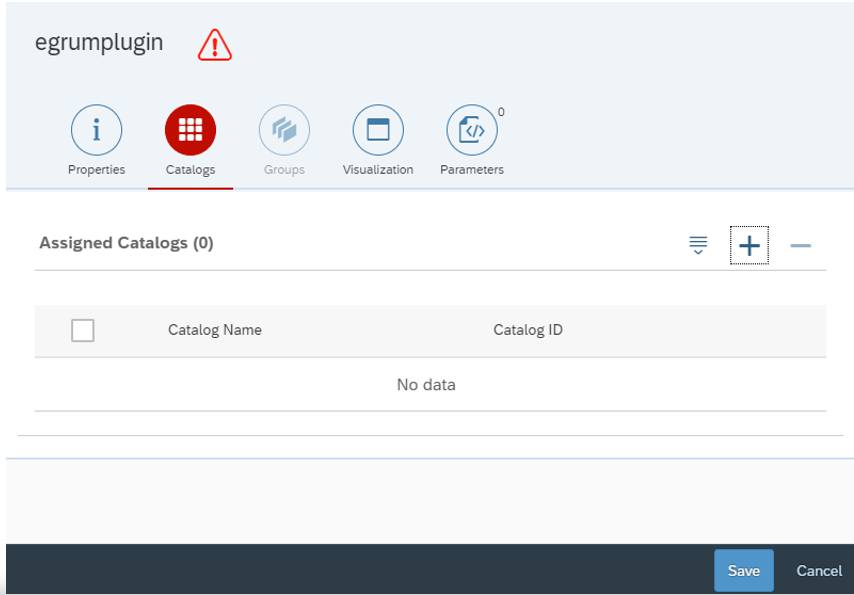
Figure 25 then appears. Click on the '+' icon in Figure 25 to add a catalog.
-
From the list of catalogs that appears, select the catalog in which you want to add the eG RUM Plugin (see Figure 26). Then, click the OK button.
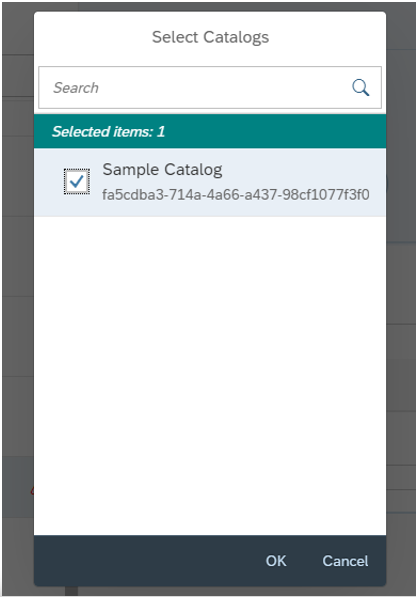
Figure 26 : Selecting the catalog in which the eG RUM Plugin is to be added
-
Upon selection, you will return to Figure 25. This time however, you will see the catalog you selected displayed under Assigned Catalogs (see Figure 27). Now, click the Save button to save the changes.
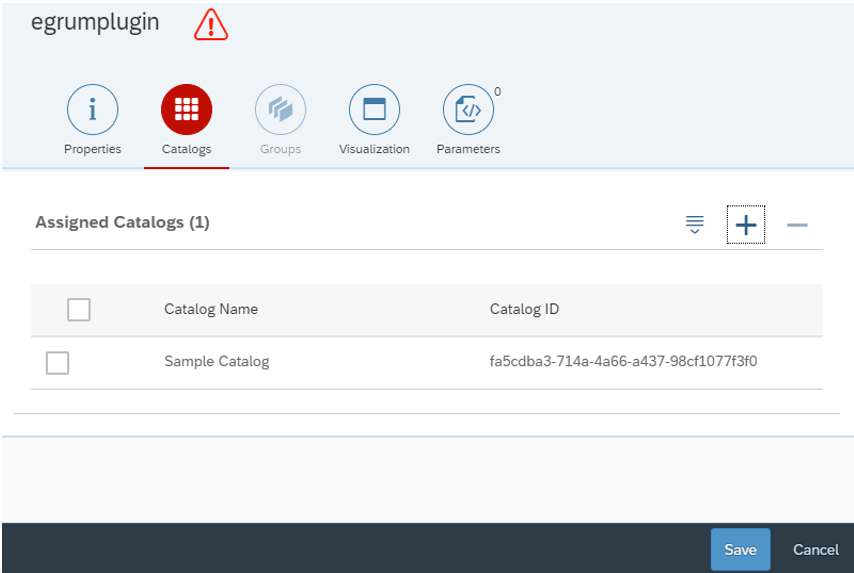
Figure 27 : The selected catalog displayed under Assigned Catalogs
-
Finally, to make sure that all changes are applied, you will have to publish the site. For that, when Figure 28 appears, click on the
.png) button at the right, top corner of Figure 28. A Publish Site dialog box will then appear. Check the Clear HTML5 application cache check box in the dialog box, and then click the Publish and Open button therein, to publish the site.
button at the right, top corner of Figure 28. A Publish Site dialog box will then appear. Check the Clear HTML5 application cache check box in the dialog box, and then click the Publish and Open button therein, to publish the site. 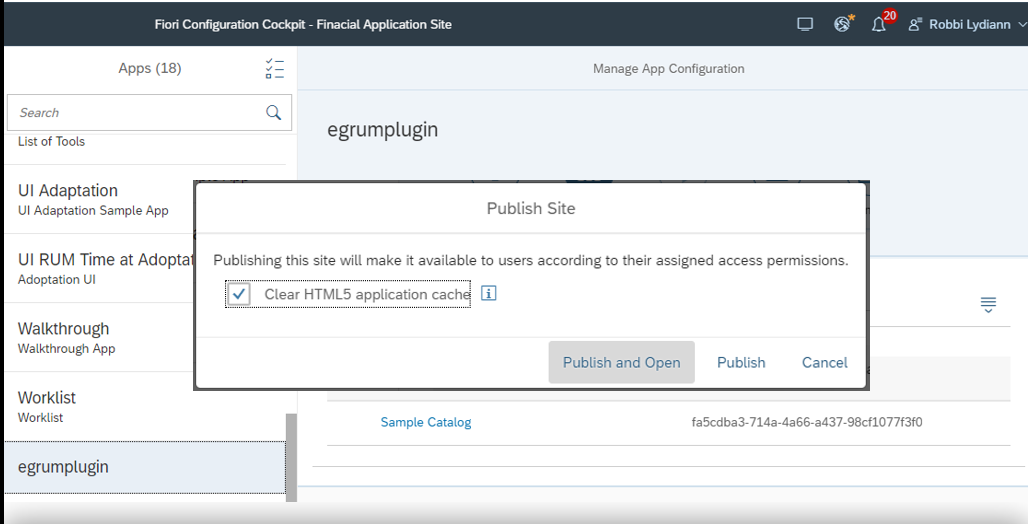
Once the site is successfully published, it automatically opens. You can now invoke Developer Tools from the site. If you find a GET request to the site, as indicated by Figure 29, you can conclude that the egrum.js has been successfully loaded. If you find a POST request bearing the RUM collector's IP and port number (as indicated by Figure 29), it means that the browser is sending beacons to the eG RUM collector.
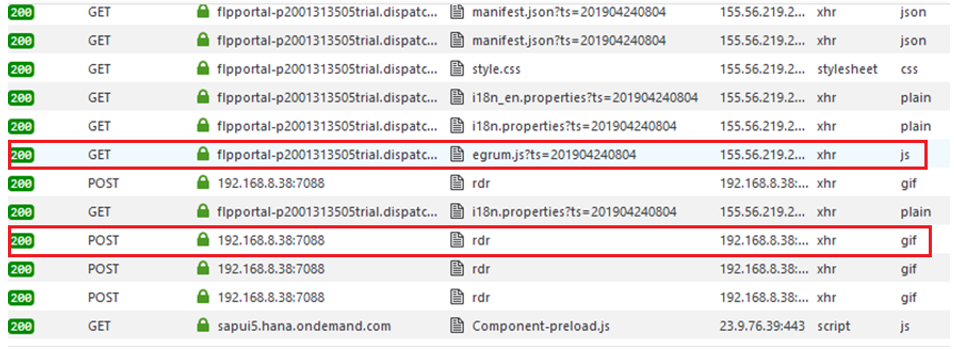
Figure 29 : Verifying successful loading of egrum.js and the transmission of beacons to collector using Developer tools
Instrumenting SAP Fiori Apps Running On-premises
The broad steps for instrumenting SAP Fiori Apps running On-premises are as follows:
- Configure the SAP Cloud Connector; this step is required only if you do not have on-premises full stack SAP Web IDE;
- Configure the SAP Cloud Platform destination;
- Configure SAP full stack Web IDE and deploy it to On-premises application;
- Configure SAP user and backend;
- Verify whether configuration works
These steps have been elaborately discussed below:
-
First, manage the SAP Fiori Apps to to be monitored as a Real User Monitor component using the eG admin interface (see Figure 1).
- Then, to instrument the SAP Fiori Apps, you need to download the egrum.js to be embedded into the app to any folder on the local host. For that, click the Download button indicated by Figure 1.
-
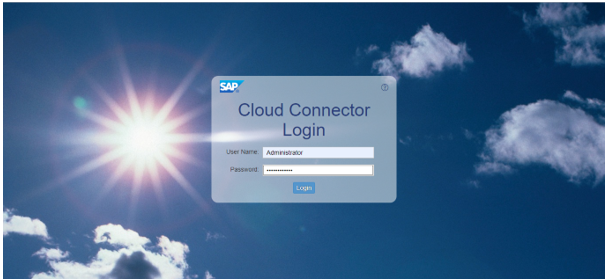
Then, connect to the SAP Cloud Connector using the URL, https://localhost:8443/, and login to it using valid login credentials (see Figure 30). Before attempting to connect, make sure that the SAP Cloud Connector is installed.
-
After logging in, proceed to create a sub-acccount. For that, in the SAP Cloud Platform Cockpit that appears, click on the option that corresponds to your SAP cloud platform subscription - eg., Cloud Foundry Trial, Neo Trial etc. In the case of the example illustrated by Figure 31, the Neo Trial option is clicked as the Neo trial subscription is in use.
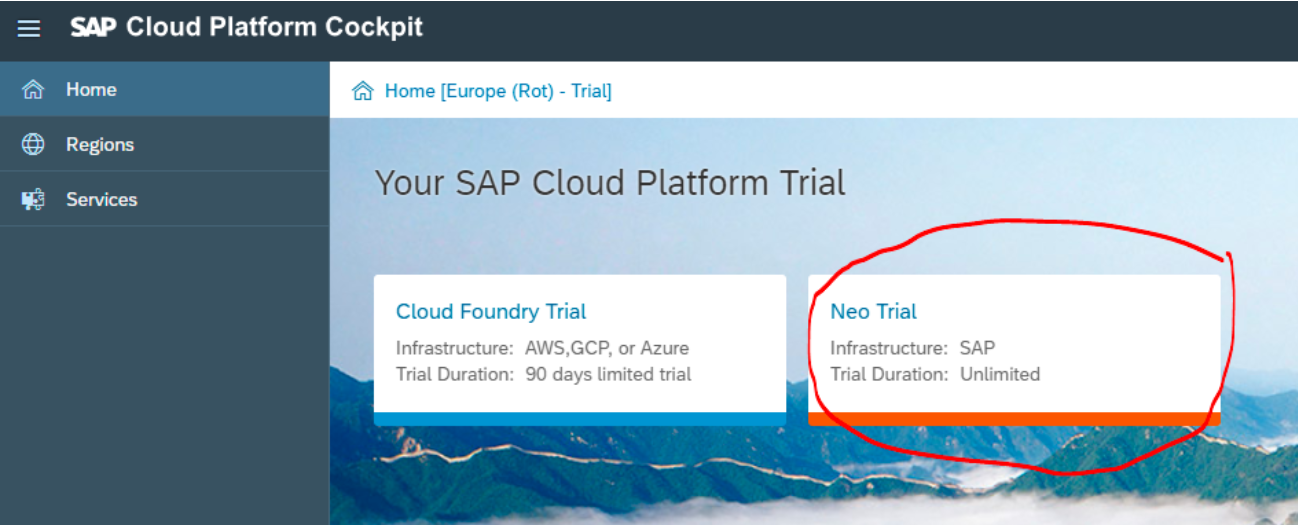
Figure 31 : Clicking on the option that corresponds to the SAP Cloud Platform subscription in use
-
In the page that appears next, click on the Create Subaccount button to create a new subaccount. Figure 32 will then appear.
-
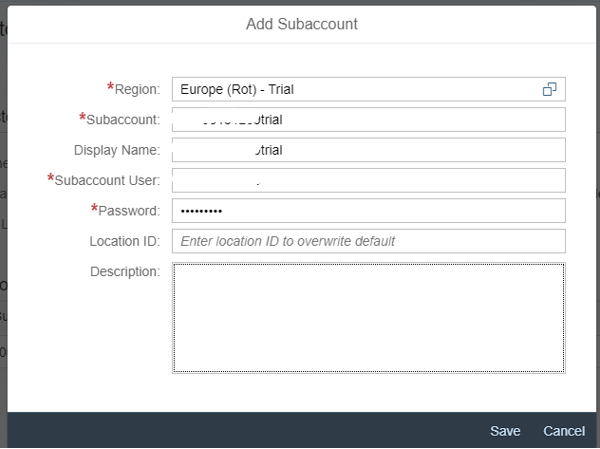
In Figure 32, select a Region for the new subaccount. Then, specify the Subaccount name. To know what the subaccount name is, first minimize the Add Subaccount dialog box of Figure 32, so that the SAP Cloud Platform Cockpit comes into view (see Figure 33). Scroll down the cockpit until you can view a Subaccount Information section. The value displayed under Name in this section is the name of the new subaccount you are creating. Copy this name and paste it against Subaccount name in Figure 32. Then, proceed to specify the Subaccount User name. This should be the same as the Subaccount name, but sans the 'trial' suffix. For instance, if the Subaccount name is p1940914553trial, the Subaccount User name should be just p1940914553. Then, specify the Password of the user. Leave the Location ID empty and click the Save button in Figure 32 to save the new subaccount.

-
Next, proceed to create a virtual system on the Cloud Platform, which will map to the system on-premises. For that, first select the Cloud to On-Premise option in the left panel of the SAP Cloud Platform Cockpit (see Figure 34).
-
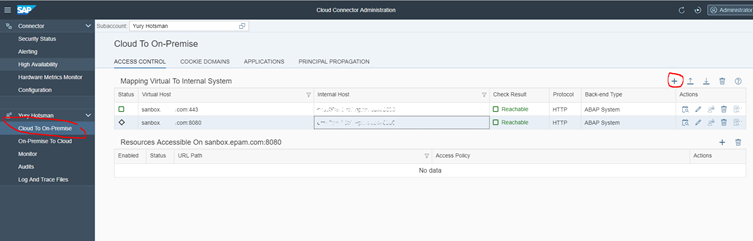
When the Cloud To On-Premise section appears in the right panel, click the '+' button (indicated by Figure 34) in that section to map the virtual system to the internal system. In the dialog box that appears next (not shown in this topic), set the Back-end type as ABAP System and set Protocol as HTTP. Then, specify the Internal Host name. To know the internal host name, go to the Application Server section in your SAP Logon. Then, configure the Internal Port. To know the internal port, execute the transaction SMICM, and go to Services -> HTTP -> Port. Then, provide any name against Virtual Host and any port number against Virtual Port. Let the Principal Type be None. Once you Save this configuration, the new mapping will appear in the Mapping Virtual to Internal System list, as depicted by Figure 35.

Figure 35 : The new mapping appended to the Mappint Virtual To Internal System list
-
If you now scroll down the Cloud to On-Premise section, you will find a Resources Accessible section. Select the new mapping you created from the Mapping Virtual to Internal System section of Figure 34, and then click the '+' button in the Resources Accessible section to add a new resource (see Figure 36).
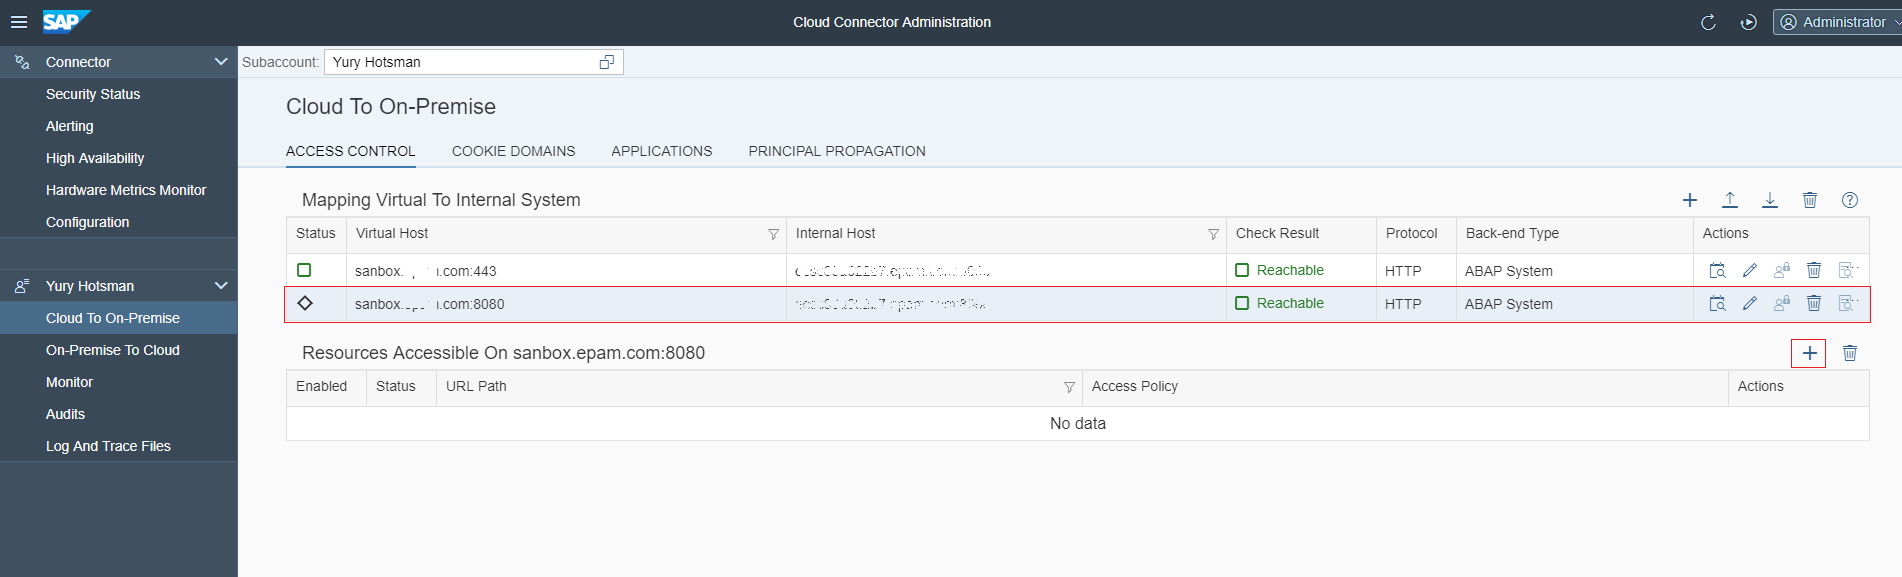
Figure 36 : Selecting the new mapping and clicking the '+' icon to add a new resource
-
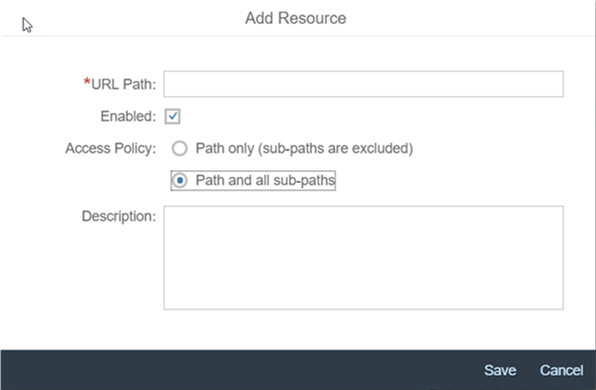
Figure 37 will then appear. To RUM-enable SAP Fiori Apps, we need to add the eG RUM Plugin as a cloud application. To make the necessary resources available to this cloud application, you first need to add each resource the eG RUM Plugin needs to the SAP Cloud Platform (see Figure 37). The first resource to be added is the URL to which the eG RUM Plugin should be deployed. Therefore, first enter sap/bc/ui5_ui5 in the URL Path text box in Figure 37. Then, set Path and all sub-paths as the Access Policy, and click the Save button to save the changes.
- You will now return to Figure 36, where the new resource will be appended to the list of resources in the Resources Accessible section. Next, proceed to add another resource that the eG RUM Plugin needs. For that, click the '+' icon in the Resources Accessible section of Figure 36. When Figure 37 comes up again, set the URL Path as /sap/opu/odata, set Path and all sub-paths as the Access Policy, and click the Save button to save the changes. This path allows the eG RUM Plugin access to odata gateway services it requires for its functioning.
-
Once both the resources are added, proceed to check whether the cloud to on-premises connection is working. For that, select the new mapping from the Mapping Virtual to Internal System section, and click the Check Availability button corresponding to it. If the Check Result column returns the value 'Reachable', you can conclude that the mapping is working.
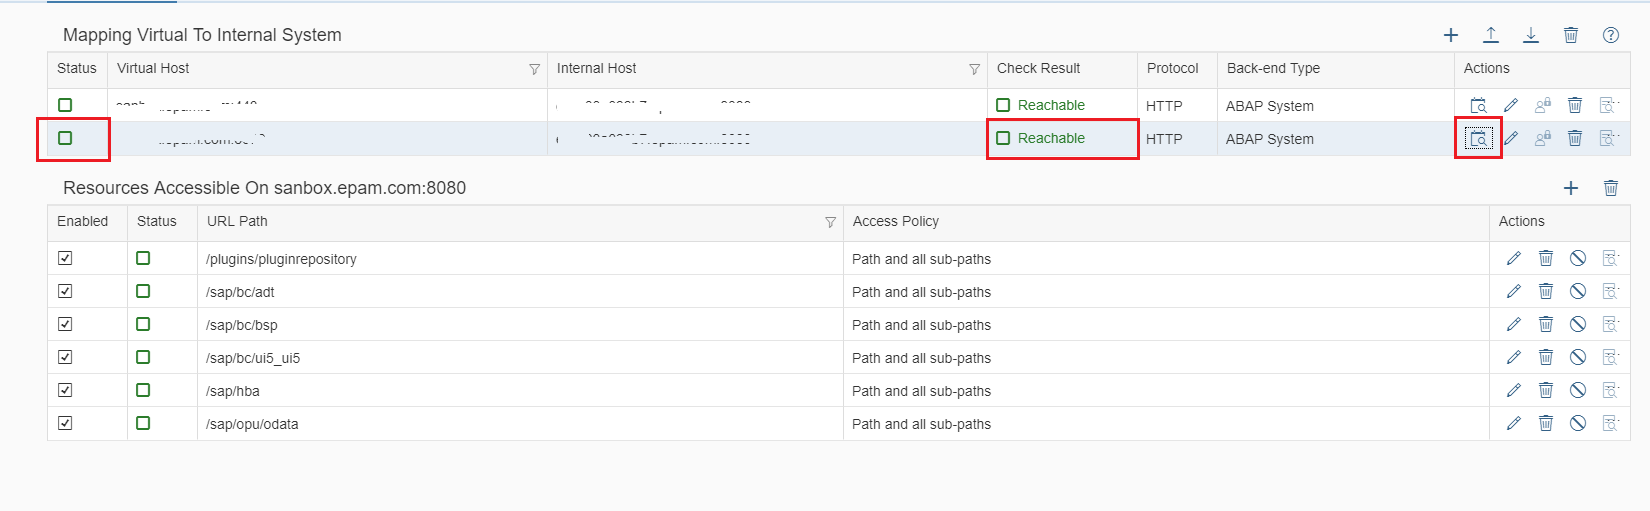
Figure 38 : Checking connectivity
-
Next, proceed to configure a destination. For that, once again login to the SAP Cloud Platform and select your cloud subscription. Figure 39 will then appear. In the left panel of Figure 39, expand the Connectivity node, and select the Destinations node within.
Figure 39 : Selecting the Destinations option from the Connectivity node
-
This will invoke Figure 40. Here, click the New Destination button to create a new destination.

-
Figure 41 will then appear.
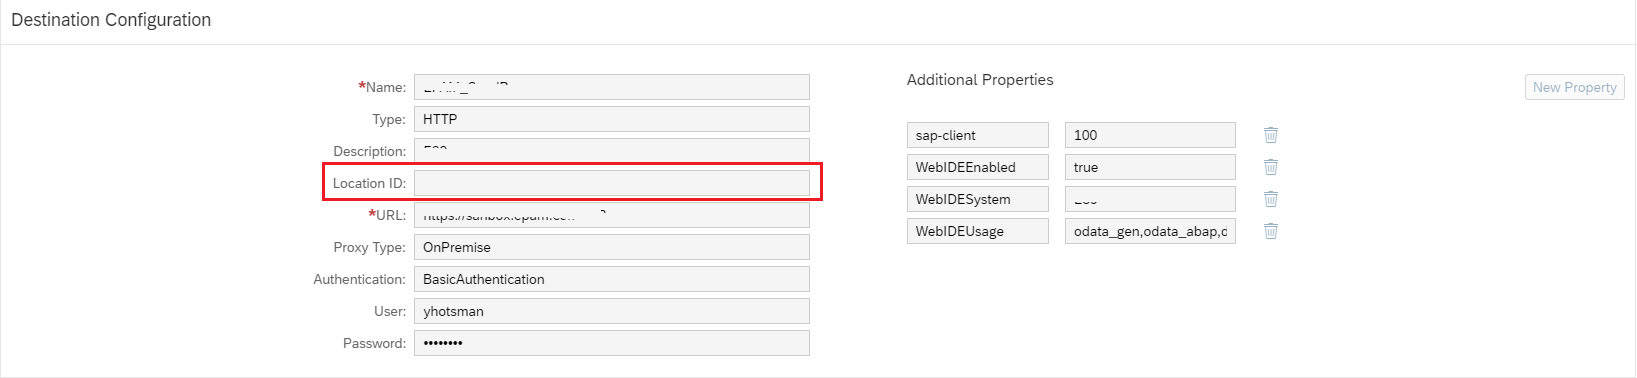
- In Figure 41, first assign any unique Name to the new destination. Then, set Type to HTTP. Provide any Description for the new destination. Next, in the URL text box, provide a URL of this format: <Name_of_virtual_host_in_new_mapping_you_created>:<Port_number_of_virtual_host>. For the name and port number of virtual host, refer to step 9 above. Then, set ProxyType to OnPremise and Authentication to BasicAut. Against User and Password, specify your system username and password. Then, under Additional Properties, set the WebIDEEnabled flag to true. Specify the name of the backend system in the WebIDESystem text box, and enter odata_gen,odata_abap,dev_abap in the WebIDEUsage text box. Once all the destination parameters are configured, click Save to create the new destination.
-
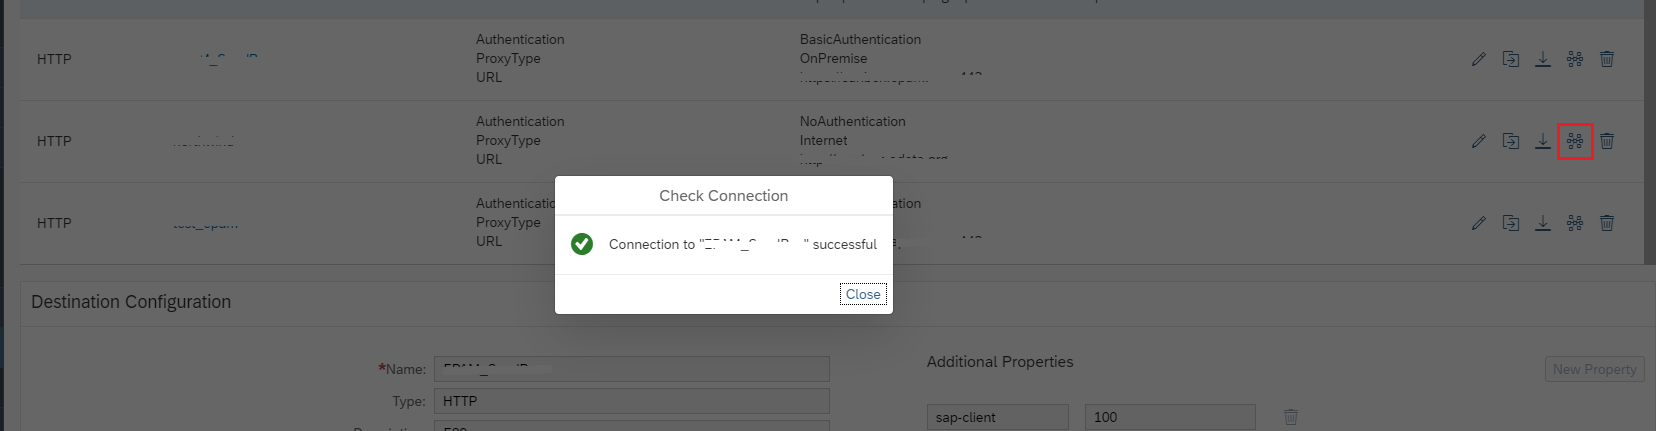
After saving the new destination, click the Check Connection button (indicated by Figure 42) corresponding to the new destination to check if the destination is accessible. If it is, a message to that effect will pop up, as depicted by Figure 42.
- Next, proceed to configure the SAP full stack Web IDE in the SAP Cloud Platform. For that, open the SAP Cloud Platform using the link, https://cockpit.hanatrial.ondemand.com/cockpit/#/home/trial.
-
When Figure 43 appears, click Launch SAP Web IDE.

-
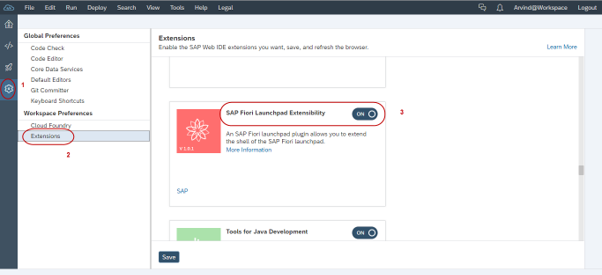
Figure 44 will then appear. First, enable SAP Fiori Launchpad extensibility for Sap Web IDE. For that, click the Preferences icon in the left panel of Figure 44, select Extensions, and turn On the SAP Fiori Launchpad Extensibility flag (see Figure 44).
-
Next, proceed to create a new project from template. For that, follow the menu sequence File -> New -> Project from Template (see Figure 45).
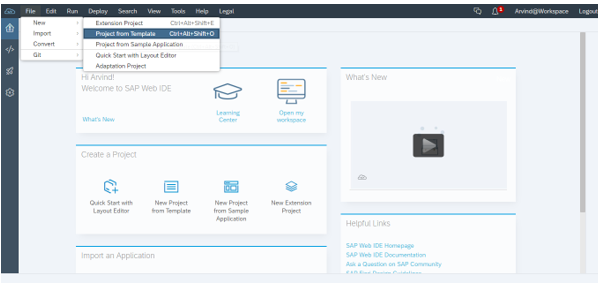
Figure 45 : Selecting the option to create a new project from template
-
When Figure 46 appears, click on SAP Fiori Launchpad Plugin.
-
When prompted for a Project Name, specify eGRUMPlugin (see Figure 47). Then, click the Next button to proceed.
-
In Figure 48 that appears next, specify com.eg.rum as the Plugin ID and eG RUM Plugin as the Title. Then, click the Finish button to complete the plugin creation process.

-
You will now find that an eGRUMPlugin folder is created under the Workspace folder (see Figure 49). Now, create a lib folder under eGRUMPlugin. For that, right-click on eGRUMPlugin, move your mouse pointer over New, and select the Folder option.
-
When Figure 50 appears, specify lib as the Folder Name.
-
Next, create an egrum.js file under the lib folder. For that, right-click on the lib folder, move your mouse pointer over New, and select the File option. When Figure 52 appears, specify egrum.js against File Name.
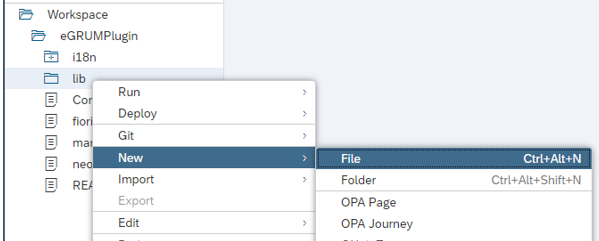
Figure 51 : Creating a file under the lib folder
-
You will now find that an egrum.js file has been created under the Workspace -> eGRUMPlugin -> lib folder. Open the egrum.js file by clicking on it in the left panel of Figure 53. An empty file will open in the right panel. Now, using a Text Editor, open the egrum.js file that you downloaded at step 2 above, copy the contents of that file, and paste the copied contents to the empty file in the SAP Cloud Platform cockpit. Press Ctrl+S on your keyboard to save these changes (see Figure 53).
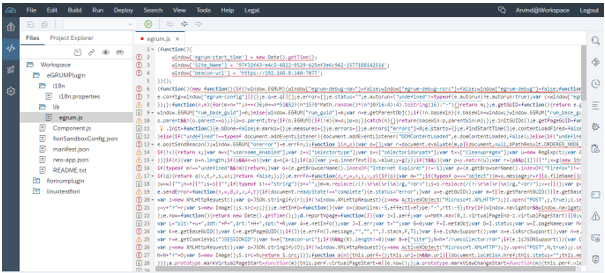
Figure 53 : Pasting the contents of the downloaded egrum.js file into the empty egrum.js file
-
Then, double-click the manifest.json file under the eGRUMPlugin folder to open it (see Figure 54). Look for the entry, "componentName": "com.eg.rum" in the file. Once you find the entry, append the following code block to that entry, as depicted by Figure 13. Then, save the changes by pressing Ctrl+S on your key board.
Copy,"resources": {
"js": [{
"uri": "lib/egrum.js"
}]
}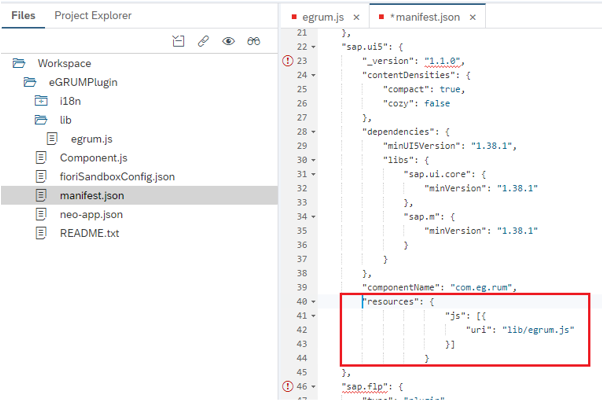
Figure 54 : Editing the manifest.json file when RUM-enabling SAP Fiori Apps On-Premises
-
Now, deploy the plugin to the SAP ABAP repository. For that, right-click on eGRUMPlugin, move your mouse pointer over Deploy, and select Deploy to SAPUI5 ABAP Repository (see Figure 55).
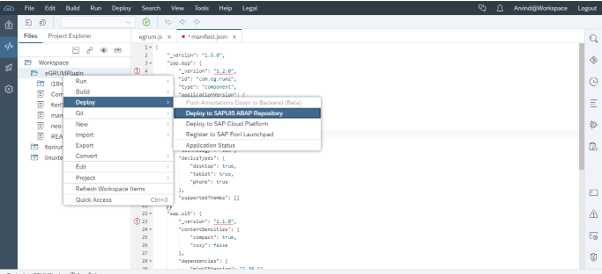
Figure 55 : Deploying the eGRUMPlugin to the SAPUI5 ABAP Repository
-
A Deployment Options tab page will then appear. From the System drop-down here, select the destination to which the eG RUM Plugin is to be deployed. Here, make sure you select the same destination you created using steps 14-17 above. Then, select the Deploy a new application option to deploy the plugin as a new application. Click the Next button to proceed.

Figure 56 : Selecting the deployment destination
-
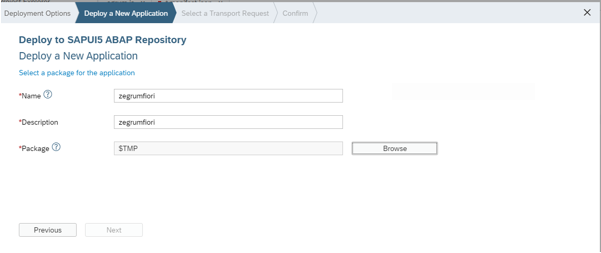
In Figure 57, specify the Name of the new application, provide a Description for the application, and indicate the Package name. In the case of the example illustrated by Figure 57, the application Name is zegrumfiori. Now, click Next to move to the next step.
-
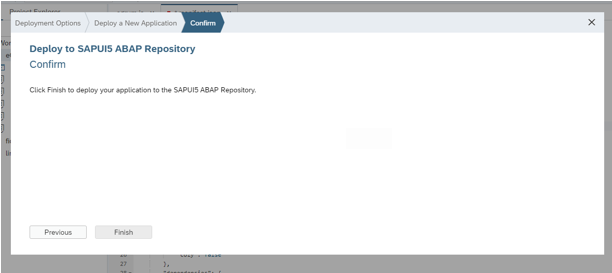
When Figure 58 appears, click Finish to save the changes and complete the deployment process.
- Once application deployment is successful, a service with the same name as the application will be automatically created in the SAP Fiori system. In the case of our example therefore, a service named zegrumfiori will be automatically created.
-
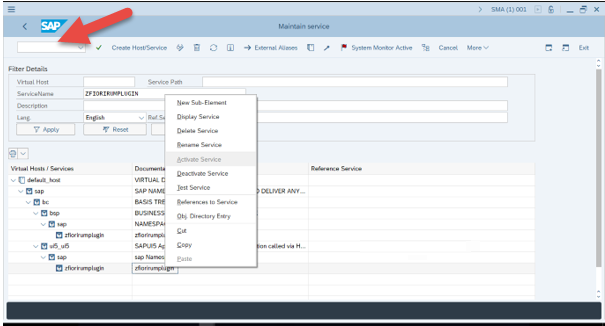
Let us now proceed to activate this service in the SAP backend. For that, first login to the SAP GUI as a SAP administrator. In the SAP GUI, type SICF in the text box you will find at the right top corner of the GUI, and press the Enter key on the keyboard. Figure 59 will then appear. Here, to search for the service that was automatically created, type the name of the service against ServiceName. Once the service is found, the tree-structure under Virtual Hosts/Services will change to indicate the location of the service. You have to activate only that service that is listed under ui5_ui5 -> sap in the tree-structure. For that, right-click on the service name and select the Activate Service option.
-
Next, let us proceed to create a catalog. For that, in the text area indicated by Figure 59, type the transaction code, /n/UI2/FLPD_CUST, and press the Enter key on your keyboard. This transaction will open in a web browser. To create a catalog, click on the encircled '+' icon indicated by Figure 60.

-
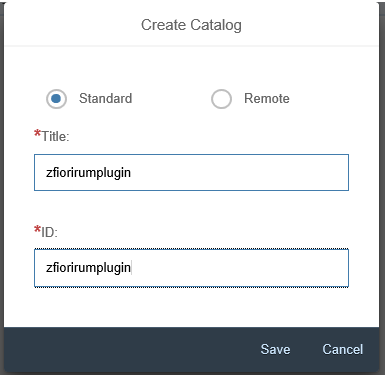
When Figure 61 appears, specify the catalog Title (i.e., name of the new catalog), and assign a unique ID to the catalog. For easy identification, it is recommended that you provide the service name / application name you previously created as the catalog name. Then, click Save to save the changes.
-
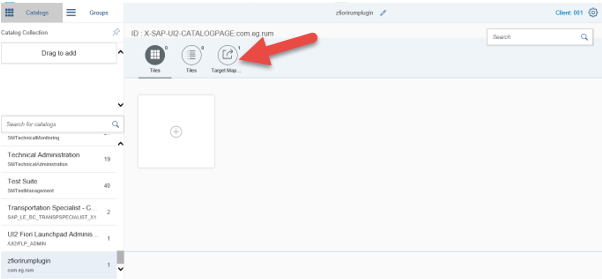
Once the catalog is created, you will find the new catalog listed in the Catalog Collection panel of Figure 62. Double click on that catalog to open it. Then, click on the Target Mapping option indicated by Figure 62.
-
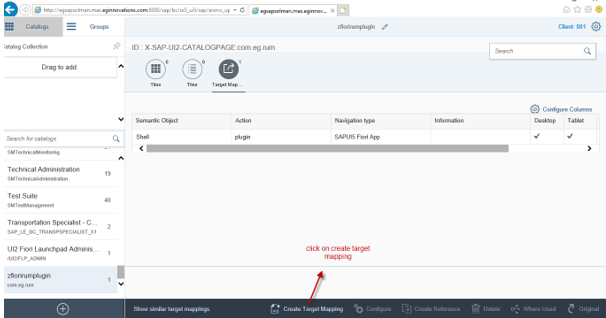
Then, click on the Create Target Mapping option indicated by Figure 63.
-
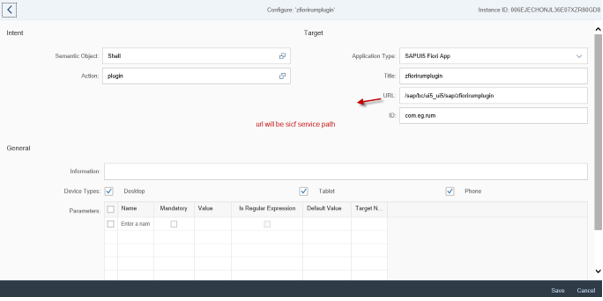
Configure the target mapping using Figure 64 that appears. Here, select Shell as the Semantic Object and plugin as Action. In Title, enter the application name of the eG RUM Plugin. Against URL, specify the path to the service that was automatically created after the eG RUM application was deployed (see step 34 for details). To know the path, look up the Virtual Hosts/Services tree-structure in Figure 59. Even if the eG RUM service is deployed in many locations, the URL should contain the path to the service in the ui5_ui5 location only. As per Figure 59 therefore, the URL will be /sap/bc/ui5_ui5/sap/ zfiorirumplugin. Against ID, specify the Plugin ID that you provided at step 24 above (see Figure 48).
-
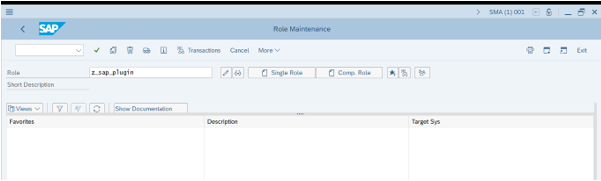
Finally, click Save in Figure 64 to save the catalog. Next, proceed to assign the catalog to a user role. For that, in the text box indicated by Figure 59 above, specify PFCG and press the Enter key on the keyboard. When Figure 65 appears, provide a name to the new role in the Role text box, and click the Single Role button.
-
Figure 66 then appears. Click the Menu option indicated by Figure 66. Under Hierarchy, you will find Role Menu. Right-click on Role Menu and select Assign Catalog from the shortcut menu that appears. A list of catalogs will appear. Select the new catalog you created using steps 36 and 37 above. This will assign that catalog to the role.

Figure 66 : Assigning the newly created catalog to the new role
- Next, click on the User option indicated by Figure 66 above to assign the new role to one/more Fiori users.
- Finally, save all the changes.
-
Now, proceed to verify whether the SAP Fiori Apps has indeed been RUM-enabled or not. For that, first wait for the SAP Fiori Apps you added as a Real User Monitor component in eG Enterprise to start reporting metrics. Then, open the Fiori Launchpad. Click on the F12 key and refresh it to reload. If you find a GET request as indicated by Figure 67, you can conclude that the egrum.js has been successfully loaded. If you find a POST request bearing the RUM collector's IP and port number (as indicated by Figure 67), it means that the browser is sending beacons to the eG RUM collector.
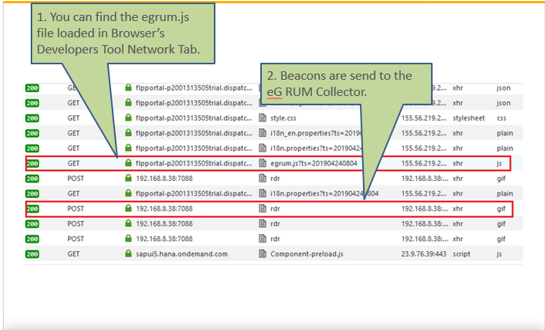
Figure 67 : Verifying whether the eG RUM configuration for SAP Fiori Apps for On-Premises setup is working or not