Instrumenting an Apache Web Server Using Container-Assisted Injection
The sub-sections of this topic provide the instrumentation steps for different flavors/versions and configurations of an Apache web server. This is why, before instrumenting the server, it would help to determine the version of the Apache server in use. The table below lists the command to be run on each operating system to determine the version of the Apache server running on that system.
|
Operating System of Apache Server |
Command for Determining Apache Version |
|
Debian and Mac OS |
apachectl -v |
|
Red Hat Linux and Amazon's EC2 Linux |
httpd -v or /usr/sbin/httpd -v |
|
Other versions of Linux |
apache2 -v or /usr/sbin/apache2 -v If the aforesaid commands do not work, then it could be because the login user does not have permissions to execute the commands. In this case, use the sudo command to grant the required permissions to the login user and run either of the commands again. |
|
Windows |
"C:\Program Files\[Apache directories]\bin\httpd.exe" -v |
Instrumentation Steps for an Apache Web Server 2.2.7 (and above)
If you are using the Apache web server 2.2.7 (and above), you can use the container substitution pattern to automatically inject the eG Real User Monitoring JavaScript agent into your web pages. This allows you to enable the RUM functionality for your web pages without needing to make any code changes.
This mechanism intercepts the response object as it is being returned and makes a string substitution containing the required JavaScript tag at the appropriate place in the HTML.
Note:
Container-assisted RUM script injection can be used to RUM-enable only those web servers that support the mod_substitute and mod_filter modules. If a web server does not support these modules or supports only one of them, then such web servers cannot be RUM-enabled using the container-based injection method.
The IBM HTTP server 8.x (and below) does not include the mod_substitute module. This means that the container-based injection method cannot be used to RUM-enable this server. You will hence have to use one of the alternate approaches depicted by Figure 1 to RUM-enable the IBM HTTP server 8.x (and below). In the case of the IBM HTTP server 9.x (and above) on the other hand, both the mod_substitute and mod_filter modules are supported. The container-based injection method can hence be used here. Use the procedure detailed in the Instrumenting an IBM HTTP Server v9.x (and above) Using Container-Assisted Injection
The instrumentation steps for an Apache web server 2.2.7 (and above) are as follows:
- First, add the web site (on the Apache web server) to be monitored as a Real User Monitor component, using the eG admin interface. When adding, you will find that the RUM code snippet that you need to use for instrumenting the Apache web server is displayed in the eG admin interface. Copy the code snippet.
-
Open the global Apache httpd.conf file and search for the following commands:
LoadModule substitute_module modules/mod_substitute.so
LoadModule filter_module modules/mod_filter.so
- Once you find the commands, check if they are commented. If they are, then uncomment them. On the other hand, if they are already uncommented, leave them as is.
- Create a directory called egrum on the system hosting the Apache server.
-
Create a file named egrum.conf in that directory. Enter the following in that file:
Copy<Location />
AddOutputFilterByType SUBSTITUTE text/html
substitute "s|</head>| -
Then, after the "s|</head>| tag in the above specification, paste the code snippet you copied from the eG admin interface in step 1 of this procedure. Make sure that you paste the snippet as a single line. The contents of the egrum.conf file will now look as shown below:
Copy<Location />
AddOutputFilterByType SUBSTITUTE text/html
substitute "s|</head>|<script charset='UTF-8' type='text/javascript'>
window['egrum-start_time'] = new Date().getTime();
window['Site_Name'] = '57bf9bbe-5712-40e9-929b-f75c5ab300e9-1606389009637';
window['beacon-url'] = 'http://RUM_COLLECTOR_DOMAIN_NAME:PORT';
if(!window['egrum-config']) window['egrum-config'] = {}; (function (config) {config.capture = { jsError:true, resourceDetails:true, ajax:true, ajaxCorrelation:false, overwriteBtmUName:false, excludeURLPattern:'none', ajaxExcludeURLPattern:'none', includeURLPattern:'*'};})(window['egrum-config']);
</script>
<script src='http://RUM_COLLECTOR_DOMAIN_NAME:PORT/rumcollector/egrum.js' async></script>After inserting the code snippet, take care to replace the RUM_COLLECTOR_DOMAIN_NAME:PORT, in the sample snippet above, with the exact domain name and port number of the RUM collector.
-
Then, after the </script> tag in the sample snippet above, type the following:
Copy</head>|inq"
</Location> -
The complete contents of the egrum.conf file should look as shown below:
<Location />
AddOutputFilterByType SUBSTITUTE text/html
substitute "s|</head>|<script charset='UTF-8' type='text/javascript'>
window['egrum-start_time'] = new Date().getTime();
window['Site_Name'] = '57bf9bbe-5712-40e9-929b-f75c5ab300e9-1606389009637';
window['beacon-url'] = 'http://RUM_COLLECTOR_DOMAIN_NAME:PORT';
if(!window['egrum-config']) window['egrum-config'] = {}; (function (config) {config.capture = { jsError:true, resourceDetails:true, ajax:true, ajaxCorrelation:false, overwriteBtmUName:false, excludeURLPattern:'none', ajaxExcludeURLPattern:'none', includeURLPattern:'*'};})(window['egrum-config']);
</script>
<script src='http://RUM_COLLECTOR_DOMAIN_NAME:PORT/rumcollector/egrum.js' async></script></head>|inq"
</Location>
In the sample contents above, the </head>tag highlighted in Red indicates that this code snippet looks for an exact </head> tag match. Alternatively, you can alter the code snippet to look for a <body> tag match, if required.
- Then, save the egrum.conf file.
-
Next, add the location of the egrum.conf file to httpd.conf, as indicated below:
Include [absolutePathTo]/egrum.conf
For instance, if the egrum.conf file resides in the C:\egrum folder, then the above specification will be:
Include C:\egrum\egrum.conf
-
Finally, save the file and restart the Apache web server.
Note:
If Apache HTTP server is configured as a reverse proxy, you must use the Location directive based method , with the ProxyPass and ProxyPassReverse directives, as indicated in the code block below:
<Location />
ProxyPass http://mywebsite.index.net/
ProxyPassReverse http://mywebsite.index.net/
AddOutputFilterByType SUBSTITUTE text/html
substitute "s|</head>|<script charset='UTF-8' type='text/javascript'>
window['egrum-start_time'] = new Date().getTime();
window['Site_Name'] = '57bf9bbe-5712-40e9-929b-f75c5ab300e9-1606389009637';
window['beacon-url'] = 'http://RUM_COLLECTOR_DOMAIN_NAME:PORT';
if(!window['egrum-config']) window['egrum-config'] = {}; (function (config) {config.capture = { jsError:true, resourceDetails:true, ajax:true, ajaxCorrelation:false, overwriteBtmUName:false, excludeURLPattern:'none', ajaxExcludeURLPattern:'none', includeURLPattern:'*'};})(window['egrum-config']);
</script>
<script src='http://RUM_COLLECTOR_DOMAIN_NAME:PORT/rumcollector/egrum.js' async></script></head>|inq"
</Location>
Instrumentation Steps for an Apache HTTP Server on Ubuntu Linux Configured as a Reverse Proxy
If an Apache HTTP server on Ubuntu Linux is configured as a reverse proxy, then do the following to inject the eG RUM JavaScript agent into the web pages:
-
First, add the web site (on the Apache web server) to be monitored as a Real User Monitor component, using the eG admin interface. When adding, you will find that the RUM code snippet that you need to use for instrumenting the Apache web server is displayed in the eG admin interface. Copy the code snippet.
-
Then, make sure that the mod_substitute and mod_filter modules are enabled. For that, first check if these modules are already enabled by issuing the following commands, one after another, at the Ubuntu Linux shell prompt:
ls /etc/apache2/mods-enabled/*substitute*
ls /etc/apache2/mods-enabled/*filter*
If the modules are indeed enabled, then the commands above will return the following output, respectively:
/etc/apache2/mods-enabled/substitute.load
/etc/apache2/mods-enabled/filter.load
On the other hand, if you do not receive the above output, it is a clear indication that the modules are not enabled yet.
-
If the modules are not enabled, then proceed to enable them by issuing the following commands one after another, at the Ubuntu Linux shell prompt:
sudo a2enmod substitute
sudo a2enmod filter
-
Once the modules are enabled, restart the Apache service.
-
Your reverse proxy configuration will be available in /etc/apache2/sites-available directory. For a reverse proxy, you must use Location directive-based method to insert your RUM script, with the ProxyPass and ProxyPassReverse directives, as highlighted in the code block below:
<Location />
ProxyPass http://192.168.1.20:8080/
ProxyPassReverse http:// 192.168.1.20:8080/
AddOutputFilterByType SUBSTITUTE text/html
substitute "s|</head>| PASTE YOUR SINGLE-LINE RUM SCRIPT HERE</head>|inq"
</Location>
-
Insert the RUM code snippet you copied at step 1 of this procedure, to the area indicated by the text 'PASTE YOUR SINGLE-LINE RUM SCRIPT HERE' in the code block above. Note that the 'substitute' link should be a SINGLE LINE. Hence, remove all line breaks.
-
After you insert your script, save the file. Then, execute the following command to validate the Apache configurations.
apachectl configtest
-
If the above command throws any errors, it could imply that your configuration is incorrect. If the command executes successfully on the other hand, restart the Apache service.
Verifying the Successful eG RUM JavaScript Injection
To check whether the eG RUM code snippet has been correctly injected in a web page, do the following:
-
Open the web page in question in a browser. Right-click on the web page and select the View Source option from the quick menu that pops out. You should be able to locate the eG RUM code snippet in the View Source window (see Figure 1).
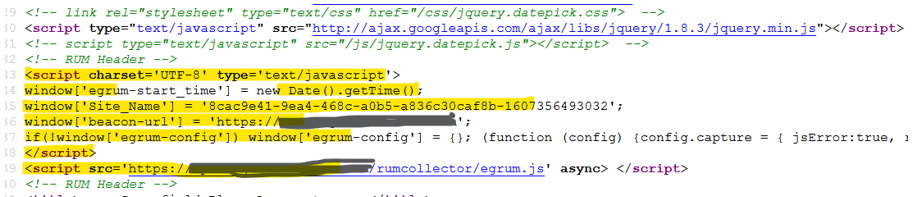
Figure 1 : The HTML source of the web page displaying the eG RUM code snippet
-
Next, close the View Source window and press F12 on the browser with the web page still open. The Developer Console will open. With the console open, reload the web page and look for the following in the console:
-
Search for egrum. If rewrite is working fine, it should show a request for egrum.js (as depicted by Figure 2).

Figure 2 : A request for egrum.js showing up in the Developer Console
-
Then, search for the word rdr. You should find a request for rdr with 200 response code in the Developer Console (as depicted by Figure 3). This means that the RUM beacon is sent properly.
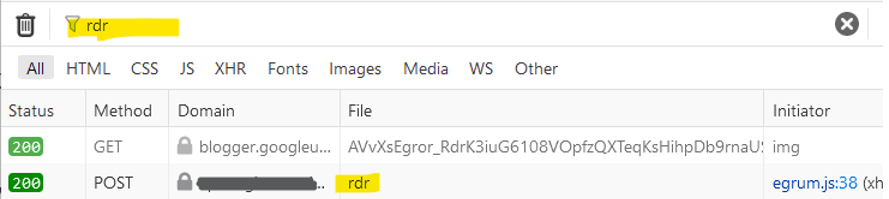
Figure 3 : A request for rdr with 200 response code appearing in the Developer Console
-
Troubleshooting Tips
The table below lists the command that you need to run on each operating system to check for syntax errors in changes you made in the configuration files (egrum.conf and httpd.conf). If no syntax errors are detected, then each of these commands will output a message to that effect.
|
Operating System of Apache Server |
Command for checking whether any syntax errors exist in the configuration files |
|
Debian and Mac OS |
apachectl configtest |
|
Red Hat Linux and Amazon's EC2 Linux |
httpd -t or /usr/sbin/httpd -t |
|
Other versions of Linux |
apache2 -t or /usr/sbin/apache2 -t If the aforesaid commands do not work, then it could be because the login user does not have permissions to execute the commands. In this case, use the sudo command to grant the required permissions to the login user and then run either of the commands again. |
|
Windows |
"C:\Program Files\[Apache directories]\bin\httpd.exe" -t |