How to Save the Generated Reports to a Booklet?
In the past, if multiple reports had to be scheduled for automatic emailing/printing, users had to create a separate schedule for each report. At the scheduled time, each of these reports were then emailed to configured email IDs as separate PDFs. The challenge here was that if users required a holistic view of performance or needed to correlate performance across reports, they had to have multiple PDFs open simultaneously and switch between the PDFs. To enable users to easily analyze historical performance across reports, eG Enterprise provides a Report Booklet.
Users are allowed to choose closely-related reports and add them to a report booklet. This booklet is then saved as a single PDF and emailed.
Creating a Report Booklet
To create a Report Booklet, do the following:
-
By default, any report that is generated by the eG Enterprise contains the
 icon at the top right corner of the report. Clicking this icon will combine the reports and will let you create a new report booklet (see Figure 1).
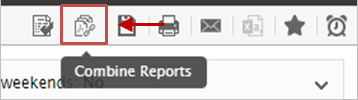
-
Upon clicking the
icon, Figure 2 appears. By default, New Booklet is chosen from the Add to Booklet list. Specify the name of the booklet in the text box adjacent to this list.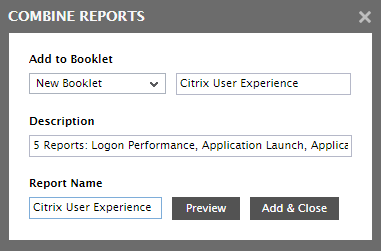
- Then, describe the contents of the booklet in your own words in the Description text box. Provide a Report Name and then click the Add & Close button.
- Clicking the Preview button will allow you to view the generated report in Print mode.
- The booklet is now created and the created booklet can be viewed in the LIST OF BOOKLETS page.
Viewing the List of Booklets
The LIST OF BOOKLETS page appears when you follow the menu sequence: Reporter -> Reporter -> View Booklets.
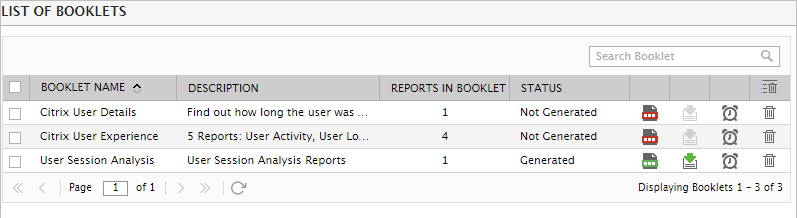
Figure 3 : Viewing the list of booklets
If you have not generated the report earlier, then, the status of the report shown under the STATUS column against the report will be displayed as Not Generated (see Figure 3). To generate the report, click the  icon. Once you have generated the report, the STATUS will be displayed as Generated. Once the report is generated, the
  icon will appear along with the
  icon which helps you to download the report booklet as a PDF file. To delete a booklet, you can click on the
  icon available against the booklet. If you wish to delete all the booklets created in your environment, then, you can select the check box against the BOOKLET NAME label and click the
  icon. To search for a booklet of your choice, you can use the Search Booklet text box. To schedule delivery of the report booklet, you can click on the
  icon. Figure 4 then appears.
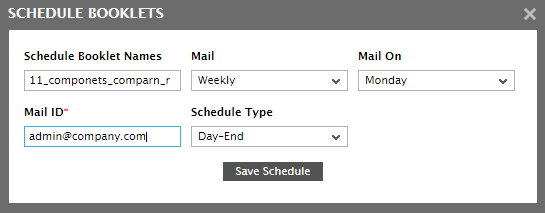
Figure 4 : Scheduling the Booklet
To know more on how to schedule the booklet, refer to How to Schedule Printing/Mailing of a Generated Report/Booklet?.
In Figure 3, if the number of existing booklets exceeds 15, then the list of booklets will be split across pages. Also, a Page text box will be available at the bottom of every page. To go to a particular page, specify the page number in the text box and click the Enter button in your keyboard. Page navigation can also be performed using the arrow buttons available at the bottom of every page. The purpose of each arrow button is explained below:
|
Button |
Purpose |
|---|---|

|
Click to go to the first page |

|
Click to go to the previous page |
|
|
Click to go to the last page |
|
|
Click to go to the next page |


Clicking on a BOOKLET NAME in Figure 3 will automatically open Figure 5 using which you can view all the reports that are contained within the booklet.
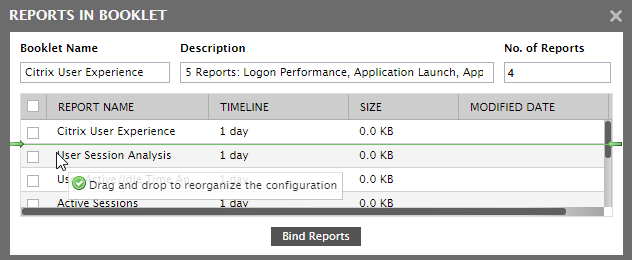
Figure 5 : Reordering the individual reports in a Booklet
By default, in Figure 5, the Booklet Name, Description and the No. of Reports field will be automatically populated along with the list of individual reports that are contained within the booklet. Clicking the Bind Reports button will combine all the reports added to the booklet and a combined report will be generated as a booklet i.e., as a single PDF file. If you wish to view the reports in the booklet in the order of your choice, you can even reorder the reports by a simple drag and drop as shown in Figure 5.
The 'Look and Feel' of the generated Report Booklet
A sample Report Booklet PDF file is provided in the illustration below. The PDF file can either be generated and stored in the location of your choice or can be scheduled to be mailed on a specific date. The cover page of the booklet (see Figure 6) comprises of the name of the report and the Description that you have provided in Figure 2.

Figure 6 : The cover page of the generated Report Booklet
Next, the Table of Contents page (see Figure 7) displays the reports that were bound together in the booklet.
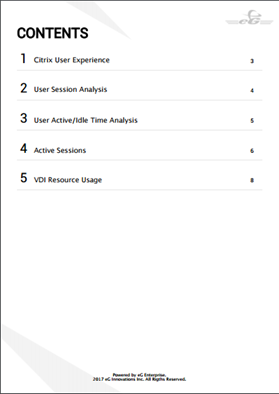
Figure 7 : The Table of Contents page
The individual reports will be printed in the subsequent pages of the booklet. A sample individual report is shown in Figure 8.
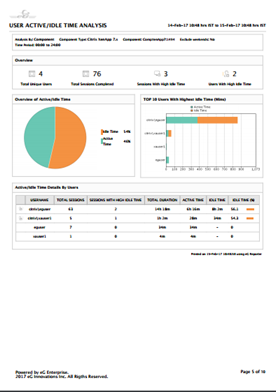
Figure 8 : A sample individual report from the Report Booklet