How to Schedule Printing/Mailing of a Generated Report/Booklet?
This section describes the step by step procedure involved in printing/mailing the report/booklet in detail:
-
The eG Reporter also provides a useful report scheduling capability that automates the process of printing and/or mailing specific reports/booklets (to specific individuals) at pre-defined intervals. To schedule the printing/mailing of the reports/booklets displayed in the Reporter home page, click on the
 button. In Figure 1 that appears next, first, specify whether this report is a single report or a booklet (group of reports generated as per your choice). If this report is a single report, select the Regular option. If you wish to schedule generating a booklet, then select the Schedule Booklet option.
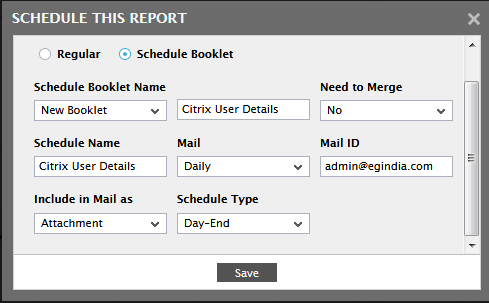
- If the Schedule Booklet option is chosen, then a Schedule Booklet Name list will appear listing all the booklets that have been created in your environment. By default, New Booklet will be chosen from this list. If you wish to create a new booklet, then specify the name of the booklet in the Booklet Name text box.
- The Need to Merge list will appear only if the Schedule Booklet option is chosen. If multiple reports are combined in the same booklet, then, when emails are sent to the administrators, you can either view all the reports in the booklet as separate PDFs or view all the reports as a single PDF in a single mail. If Yes is chosen from this list, then, all the reports scheduled in the booklet would be generated as a single PDF booklet and sent as a single email whereas if No is chosen, then, every report that is combined in the booklet would be generated as a separate PDF and all the PDFs would be sent to the recipient in a single email.
- Next, provide a name for the schedule against the Schedule Name text box as shown in Figure 1.
-
To indicate how often the report/booklet would have to be mailed to a specific recipient, select a frequency from the Mail list box. The options provided therein include:
Note:
-
By default, WeekEnd reports are mailed every Sunday. This default setting can however, be modified by editing the eg_services.ini file (in the <eg_install_dir>\manager\config directory). The ScheduleMailWeekend parameter in the [misc_args] section of this file is set to Sunday, by default. If you so wish, you can specify any other day of the week against this parameter, as shown below:
[MISC_ARGS]
ScheduleMailWeekend=Friday
Say, on September 24, 2014 (Wednesday), a report was generated with a Timeline of 2 weeks; later that day, the same report was scheduled to be mailed Weekly. This means that on the first day of the following week (which is Sunday - September 28, 2014), the report will be automatically generated based on the performance data collected during the last 2 weeks (i.e., for the period spanning September 14 to September 28), and mailed to the specified recipients. Note that, if a report is set to be mailed 'Weekly', such a setting only ensures that the report is mailed once a week; it does not alter the Timeline of the original report. The same applies to 'Monthly' schedules.
Now, let us take another example. Assume that on September 24, 2014 again, a report with a Timeline of 2 weeks was scheduled to be mailed every WeekEnd (which is say, Sunday). This means that on September 28, 2014 (Sunday), the report will be automatically generated for a Timeline of 1 week (spanning September 22 to September 28), and mailed to the specified recipients. Note that 'WeekEnd' schedules not only affect the frequency with which reports are mailed, but also override the 'Timeline' of the original report. The same philosophy applies to "MonthEnd" schedules.
-
By default, scheduled mails are sent before trend computation begins. However, if need be, you can push schedule execution below trend computations - i.e., you can instruct the eG Enterprise system to mail reports after trend calculations are done. To ensure this, do the following:
- Edit the eg_services.ini file in the <eg_install_dir>\manager\config directory.
- In the [misc_args] section of the file, a ScheduleReportsBeforeTrend flag exists that is set to yes, by default. Change this to no, so that schedules are implemented after trending is completed.
- Summary reports will not be generated properly if this option is set. Reports with measure graph, zone reports, comparison reports, etc., will be unaffected.
- You cannot schedule the automatic printing/mailing of reports with an Any timeline.
-
-
If the report need not be mailed but the report is to be printed, then specify None in the Mail ID text box. If the report is to be mailed to a specific recipient (i.e., if the Mail list box does not contain None), then mention the Mail ID of the recipient. You can specify a comma-separated list of mail IDs in the Mail ID text box.
Note:
- To ensure that the reports are mailed to the specified recipients, the SMTP mail host and eG Administrator mail ID need to be properly configured in the eG administrative interface (using the Alerts -> Mail Settings -> Server option).
- By default, the Include in Mail as list is set to Attachment indicating that the generated report would be sent as an attachment when the report is scheduled to be emailed. If you do not wish to view an attachment with the email, but instead want the report to be sent in HTML format in the body of the email, then select the Inline content option.
- Then, indicate the Schedule Type. You can indicate when report scheduling is to occur by picking an option from the Schedule Type list. To generate schedule reports at the end of every day, pick the Day-End option from this list. To generate schedule reports at a configured time every day, pick the Anytime option from this list, and then indicate the exact time of generation using the Schedule at time controls that then appear.
-
If a Thin Client report that is generated in the data format is scheduled for printing/mailing, an additional Schedule Format list box will appear in the SCHEDULE THIS REPORT pop up window (see Figure 2). By default, the PDF option is selected which implies that the generated report will be mailed to the recipient in the PDF format. To mail the report in CSV format select the CSV option from this list box.
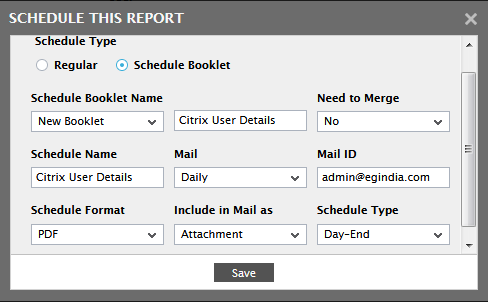
Figure 2 : Adding a new schedule for a generated data report
-
By default, eG Reporter does not allow users to schedule the automatic printing of reports. If you want to schedule report printing, then set the EnableSchedulePrint parameter in the [misc_args] section of the eg_services.ini file (in the <EG_INSTALL_DIR>\manager\config directory) to true (default is false). Once this is done, then, a Print list will additionally appear in the save schedules page. Indicate the frequency with which the report is to be printed by selecting an option from the Print list box. Here again, selecting None would ensure that the report is not printed. In order to print the report as well as email the report to the chosen recipients, then select an option from the Mail list and the Print list and specify the recipients in the Mail Id text box.
Note:
If a network printer is used for printing the reports, then ensure that the Tomcat service of the eG manager is configured to use a domain user’s account. If only a local printer is used, then the Tomcat service can run using the default local system account.
-
Finally, click on the save button to register the schedule. Doing so will reveal the following page that prompts you to click on the Schedules link.
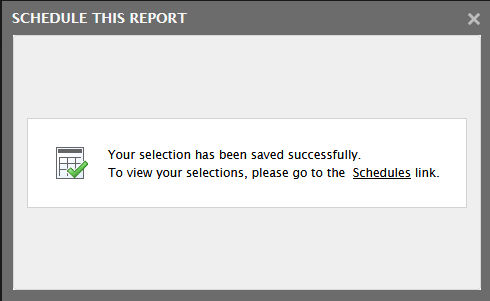
Figure 3 : Clicking on the Schedules link
-
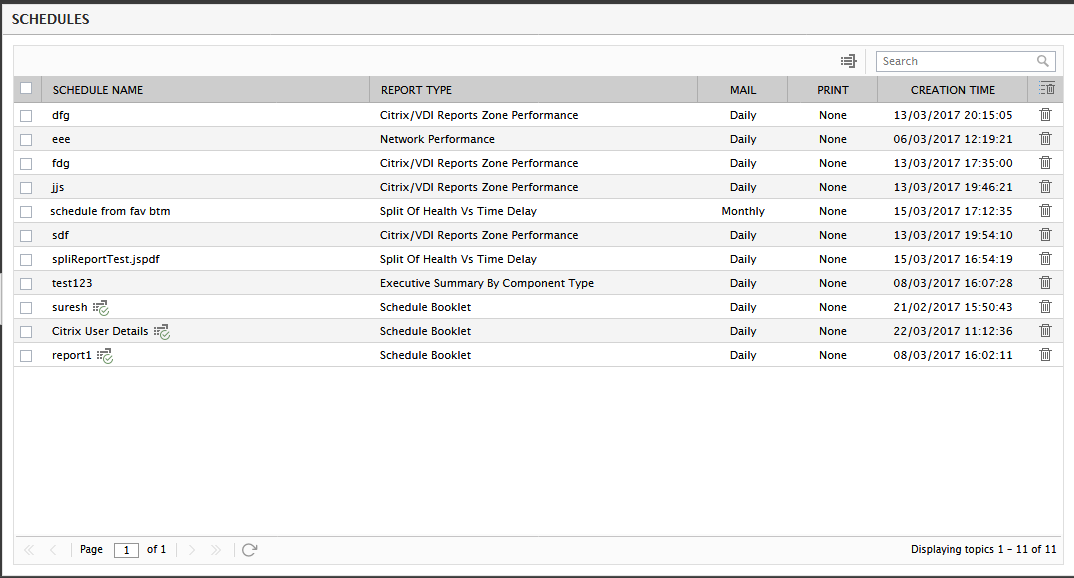
Clicking on the Schedules link will bring up Figure 4. Note that Figure 4 will also appear when the Reporter-> Schedules -> Configure Schedules menu sequence in eG Reporter is followed.
-
Figure 4 provides the details of all the existing schedules (including the newly added schedule). If a report booklet has been scheduled, then those schedules will appear with the
 icon. Clicking on a schedule name here, will open . Using this page, you can modify any of the displayed schedule details, and then click the save button therein to save the changes. Additionally, you can modify the details of the report that is scheduled from this page. To do so, click on the Modify Selection button. This will lead you to the report generation page where you can modify the details of the scheduled report. Clicking the View button would generate the scheduled report.
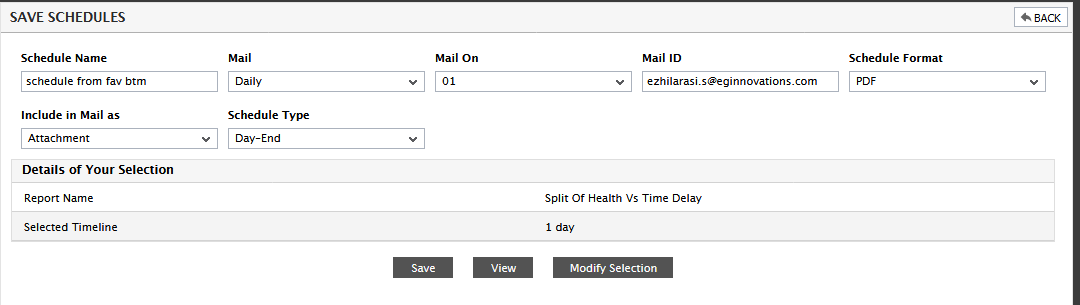
Figure 5 : Link to modify your scheduled report details
- To delete a schedule, just select the check box corresponding to the schedule to be deleted (see
Figure 4), and then, click the Delete button. To select all the schedules in a page for deletion, select the check box against the SCHEDULE NAME at the top of the page. In the SCHEDULES page, if the number of existing schedules crosses 15, then the schedules list will be split across pages. Also, a Page text box will be available at the bottom of every page. To go to a particular page, specify the page number in the text box and click on the Enter button in your keyboard. Page navigation can also be performed using the arrow buttons available at the bottom of every page. The purpose of each arrow button is explained below:
Button Purpose 
Click to go to the first page 
Click to go to the previous page 
Click to go to the last page 
Click to go to the next page -
To combine the scheduled reports into a booklet, just select the check box corresponding to the schedules. A badge then appears on top of the
 icon for e.g., if you have chosen to combine two scheduled reports, then the number 2 would appear above the icon as shown in Figure 6.
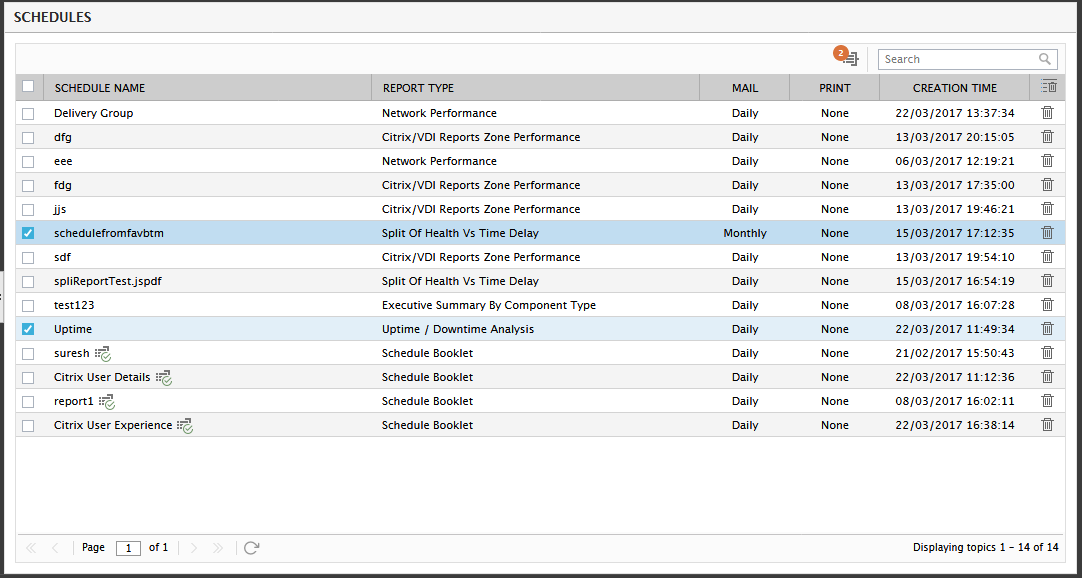
-
Clicking on the
 icon in Figure 6 reveals Figure 7 where you are allowed to add the chosen schedules to a new booklet or to an existing booklet. By default, the Existing Schedule Booklet flag is chosen from the list and the Schedule Booklet Name list displays the list of booklets created earlier (see Figure 7). Select the Schedule Booklet Name and click the Add &Close button to save the changes.
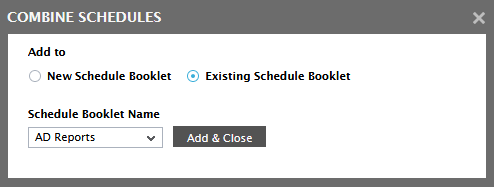
-
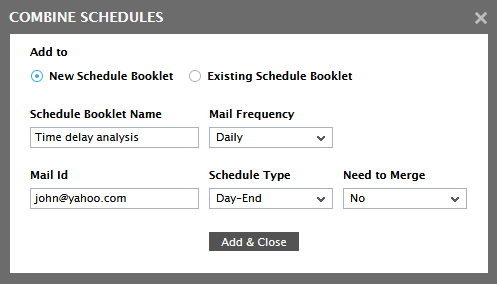
If you choose the New Schedule Booklet option from Figure 7, then Figure 8 appears where you need to provide the Schedule Booklet Name and the other credentials as explained in the steps mentioned above.
-
You can also optionally configure the eG Enterprise system to save the reports that are scheduled to be emailed and/or printed (as the case may be) as PDF files on the eG manager host. By default, this capability is disabled. To enable the capability, edit the eg_services.ini file (in the <EG_INSTALL_DIR>\manager\configdirectory), and set the SaveScheduleReport flag in the [misc] section to yes. Once this flag is turned on, then all scheduled reports will be automatically saved as PDF files in the <EG_INSTALL_DIR>\manager\scheduledReports folder, by default. You can even override this default location by specifying a different location against the SaveSchedulePath parameter in the [misc] section. To view the reports so saved, follow the Reporter -> Schedules -> View Schedule Reports menu sequence. Figure 9 will then appear. Suppose, if you do not wish to receive the report by email but wish to save the report as PDF on the eG manager host, then specify a mail frequency other than None in the Mail list and omit the Mail Id field (leave it as blank). This will ensure you that the email is not sent but the report is saved to the eG manager host based on the mail frequency chosen by you in the Mail list. In some cases, administrators may want to email and print the report at the same time. To do so, just choose a frequency for generating the report from both the Mail and Print lists and specify the Mail Id to which the report is to be emailed. This will help to keep track of the report on the eG manager host as well as the inbox of the mail recipient.
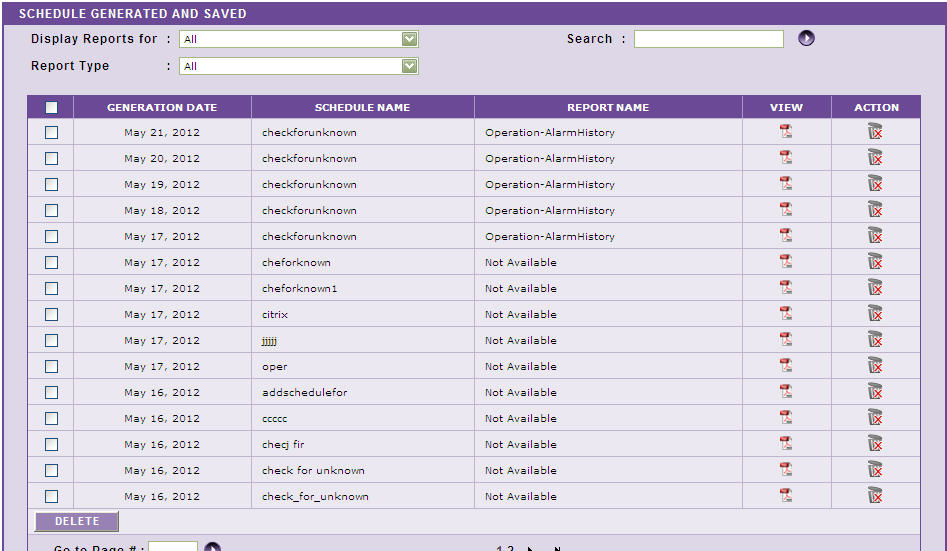
- Figure 9 displays all saved scheduled reports by default. If you want to view only those reports that were scheduled to be generated on a particular day, select that day from the Display Reports for list. By default, this list displays the last 14 days from the current date. You can filter the list further by picking a Report Type.
- If required, you can even use the Search option to search for a particular report. In this case, type the whole or part of the schedule name of that report in the Search text box and click the right-arrow button alongside. This will automatically list all those scheduled reports with schedule names that embed the specified Search string.
- To view any of the scheduled reports as a PDF file, click the view button that corresponds to that report in Figure 9. To delete any of the generated PDF documents, click on the action icon that corresponds to it in Figure 9.
- To delete multiple saved schedules at one shot, select the check boxes that precede each of the PDFs and click the delete button.
-
Also, if the number of scheduled reports saved as PDF crosses 15, then the list of saved schedules will be split across pages. Also, a Page text box will be available at the bottom of every page. To go to a particular page, specify the page number in the text box and click on the Enter button in your keyboard. Page navigation can also be performed using the arrow buttons available at the bottom of every page. The purpose of each arrow button is explained below:
Button Purpose
Click to go to the first page
Click to go to the previous page
Click to go to the last page
Click to go to the next page
Troubleshooting Tips:
Why does the eG Manager installed on a VM skip the generation of scheduled reports often?
When the eG Manager installed on a VM takes too long to time-synchronize with the virtual host on which it is running, then the report schedules configured for Any time periods on this manager were skipped often. In order to resolve this issue, set the AdjustAnyTimeScheduleDate flag that is available in the [MISC] section of the eg_report.ini file in the <eg_install_dir>\manager\config directory to Yes. By default this flag is set to No. Now specify a time duration (in minutes) against the CheckScheduleBeforeMin parameter. By default, this is set to 30 minutes. This indicates that if the AdjustAnyTimeScheduleDate flag is set to Yes, then, before executing a report schedule, the eG manager checks whether any schedules were skipped during the last 30 minutes (by default), and if so, runs that schedule as well. This way, reports will be emailed as per schedule despite delays in time sync-up between the virtual host and the VM running the eG manager.