Installing an eG VM Agent Using SCCM
System Center Configuration Manager (SCCM) is a systems management software product developed by Microsoft for managing large groups of computers running Windows NT, Windows Embedded, OS X, Linux or UNIX, as well as Windows Phone, Symbian, iOS and Android mobile operating systems. Configuration Manager provides remote control, patch management, software distribution, operating system deployment, network access protection and hardware and software inventory.
Like many other software, the eG VM Agent software can also be distributed or remotely deployed on multiple Windows virtual desktops on the cloud using the SCCM.
The broad steps to achieve this are as follows:
-
Building a package for eG VM Agent installation using SCCM
-
Deploying the package using SCCM
Each of these steps are explained in detail below.
Building a Package Using SCCM
The steps are as follows:
-
Create a shared folder in your network and allow all Windows virtual desktops on which the eG VM agent is to be installed to access that shared folder.
-
Install the eG VM Agent on any Windows virtual desktop on the cloud.
-
After successful installation of the VM agent, copy the <EG_VM_AGENT_INSTALL_DIR> - by default, this will be the eGVMAgent directory - from that Windows virtual desktop to the shared folder you created in step 1 above.
-
Next, login to the SCCM host and open Notepad. Save the file as setup.bat. A sample setup.bat script is provided below:
echo ##eG VM Agent Installation### > c:\windows\Temp\egagent.log
GOTO STEP1
:STEP1
echo ############# Starting STEP1 ############ >> c:\windows\Temp\egagent.log
mkdir c:\eGVmAgent
GOTO STEP2
:STEP2
echo #########Starting STEP2####### >> c:\windows\Temp\egagent.log
xcopy /S /I /E eGVmAgent c:\eGVmAgent
GOTO STEP3
:STEP3
echo #########Starting STEP3####### >> c:\windows\Temp\egagent.log
start c:\eGVmAgent\lib\CreateVmAgent.bat
GOTO STEP4
:STEP4
echo #########Starting STEP4####### >> c:\windows\Temp\egagent.log
netsh advfirewall firewall add rule name="eGVMagent Port" dir=in action=allow protocol=TCP localport=60001
GOTO STEP5
:STEP5
echo #########Starting STEP5####### >> c:\windows\Temp\egagent.log
net start egvmagent
:EOF
-
This sample script does the following:
-
Creates a directory called eGVMAgent in the C drive of the target Windows virtual desktop.
-
Copies the contents of the eGVMAgent directory (that was copied to the shared folder in step 3 above) to c:\eGVMAgent.
-
Runs the CreateVMAgent.bat file in the lib folder of C:\eGVMAgent to install the VM agent.
-
Opens the TCP port 60001 on Windows firewall on the VM agent host.
-
Starts the eG VM Agent
-
-
If you choose to write your own batch file for installing and setting up the VM agent, then make sure it performs all the actions described above. However, you can, if you want, deploy the VM agent in a different directory (and not c:\eGVMAgent) on the virtual desktop. In this case, make sure the script reflects the same.
-
Even if you decide to use the sample script as is, you can still configure a different directory as the install directory of the VM agent. In this case, make sure that all the areas highlighted in Bold in the sample script above reflects the new directory.
-
Save the file.
-
Next, start the SCCM's Deployment wizard. Figure 1 will then appear, where you have to provide the Name of the package being built. For convenience, name the package as eGVMAgent.

Figure 1 : Specifying package information
-
Make sure that the The package contains source files check box is selected. Then, use the Browse button alongside the Source folder text box to browse for the shared folder in which the VM agent executable, the *.iss file, and the setup.bat have been copied.
-
Then, click the Next button to proceed. Figure 2 will appear.
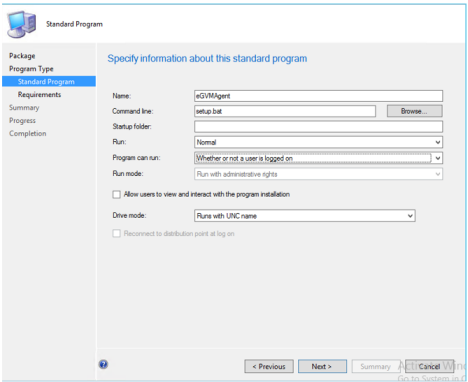
-
In Figure 2, against Command line, enter setup.bat - the name of the batch file that contains the commands to deploy the VM agent on a target Windows virtual desktop.
-
Then, from the Program can run drop-down, select the Whether or not a user is logged on option, so that VM agent installation can proceed whether/not a user is logged into a Windows virtual desktop.
-
Then, click Next to move to the next step. Figure 3 will appear.
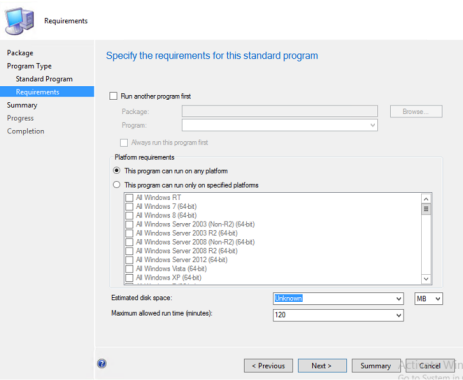
Figure 3 : Selecting the platform on which the package should be deployed
-
From the Platform requirements section of Figure 3, select the This program can run on any platform option. From the list of platforms, select the Windows platforms on which the package should be deployed. Then, click the Next button.
-
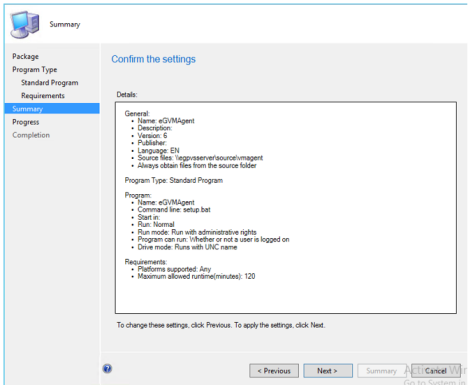
Figure 4 will then appear displaying a quick summary of the package settings you configured. Review the settings and click the Next button to trigger package creation.
-
If package creation is successful, then Figure 5 will then appear informing you of the same.
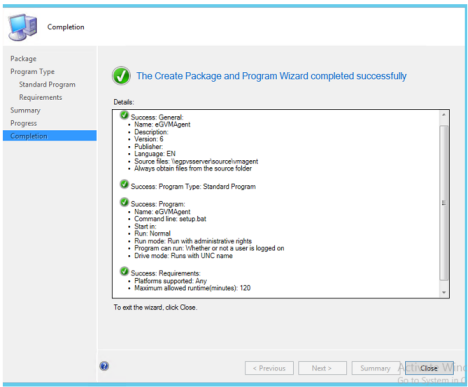
Figure 5 : The message that appears upon successful package creation
-
Finally, click the Close button to exit the wizard.
Deploying the eGVMAgent Package Using SCCM
Once the package is created, you need to deploy the package on the target Windows virtual desktops on the cloud using SCCM. To do this, follow the steps below:
-
In the Configuration Manager console, click Software Library.
-
In the Software Library workspace, expand Application Management, and then click Packages.
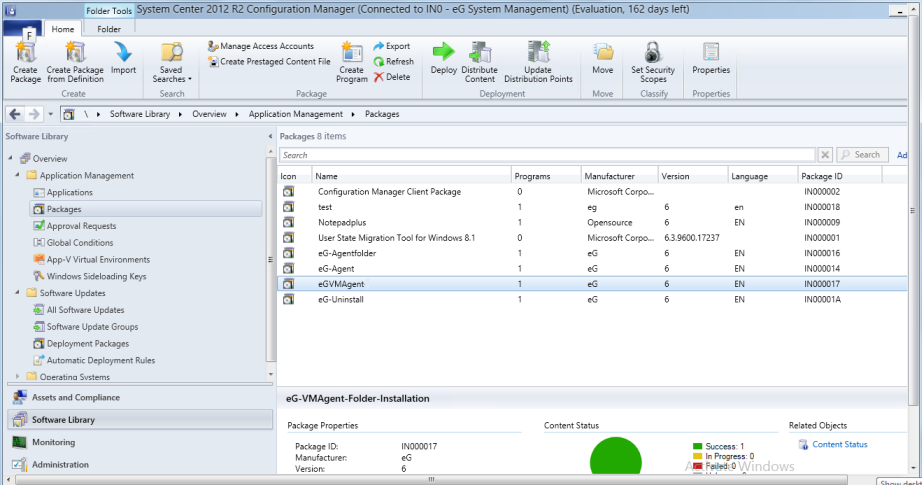
Figure 6 : Selecting the eGVMAgent package for deployment
-
Select the package that you want to deploy. In our case, this will be the 'eGVMAgent' package you created as described in Section 1.1 above, Then, in the Home tab in the Deployment group, click Deploy (as indicated by the figure below).
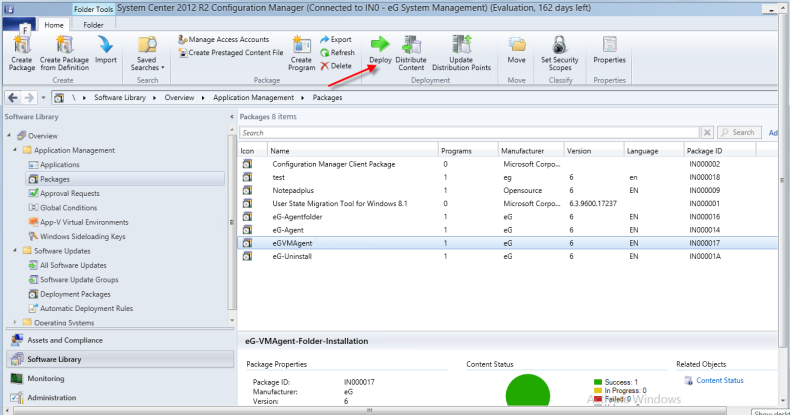
Figure 7 : Deploying the chosen package
-
On the General page of the Deploy Software Wizard, specify the name of the package and program that you want to deploy, the collection to which you want to deploy the package and program, and optional comments for the deployment.
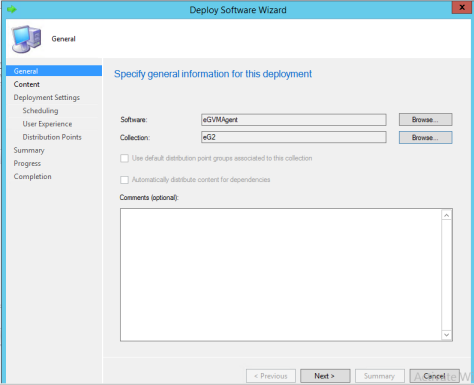
Figure 8 : Selecting the collection on which the package is to be deployed
-
Select Use default distribution point groupsassociated to this collection if you want to store the package content on the collections default distribution point group. If you did not associate the selected collection with a distribution point group, this option will be unavailable. Click Next to proceed.
-
On the Content page of the Wizard, click Add, and then select the distribution points or distribution point groups to which you want to deploy the content that is associated with this package and program. Click Next to proceed.
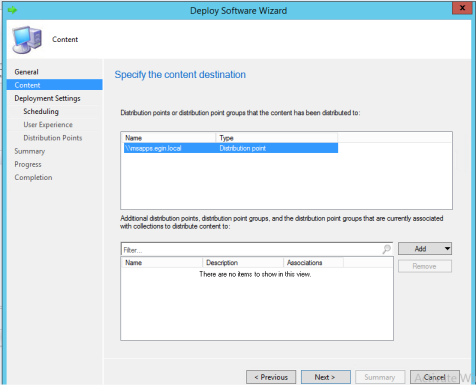
Figure 9 : Selecting the distribution points
-
On the Deployment Settings page of the Wizard, choose Action as install, pick a purpose for this deployment, and specify options for wake-up packets, and metered connections:
-
Purpose - Choose from:
-
Available - If the application is deployed to a user, the user sees the published package and program in the Application Catalog and can request it on demand. If the package and program is deployed to a device, the user will see it in Software Center and can install it on demand.
-
Required - The package and program is deployed automatically, according to the configured schedule. However, a user can track the package and program deployment status and install it before the deadline by using Software Center.
-
-
Send wake-up packets – If the deployment purpose is set to Required and this option is selected, a wake-up packet will be sent to computers before the deployment is installed to wake the computer from sleep at the installation deadline time. Before you can use this option, computers must be configured for Wake On LAN.
Select Allow clients on a metered Internet connection to download content after the installation deadline, which might incur additional costs if required.
Note:
The Pre-deploy software to the user's primary device option is not available when you deploy a package and program.
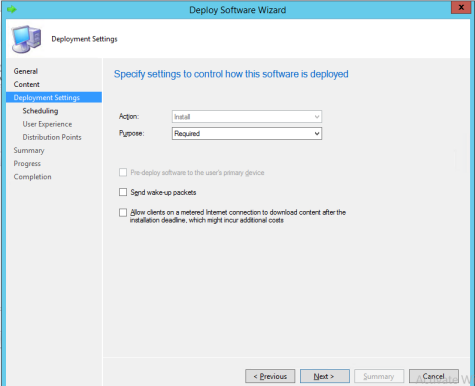
Figure 10 : Specifying an action and purpose
-
-
Click Next to proceed. On the Scheduling page of the Wizard, configure when this package and program will be deployed or made available to client devices.
The options on this page will vary depending on whether the deployment action is set to Available or Required. Click Next to proceed.
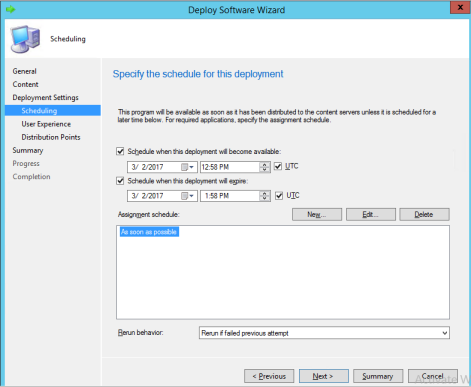
Figure 11 : Scheduling the package deployment
-
If the deployment purpose is set to Required, configure the rerun behavior for the program from the Rerun behavior drop-down list. Choose from the following options:
Rerun behavior
More information
Never rerun deployed program
The program will not be rerun on the client, even if the program originally failed, or the program files are changed.
Always rerun program
The program will always be rerun on the client when the deployment is scheduled, even if the program has already successfully run. This can be useful when you use recurring deployments in which the program is updated, for example with antivirus software.
Rerun if failed previous attempt
The program will be rerun when the deployment is scheduled only if it failed on the previous run attempt.
Rerun if succeeded on previous attempt
The program will be rerun only if it previously ran successfully on the client. This is useful when you use recurring advertisements in which the program is routinely updated, and in which each update requires the previous update to be successfully installed.
-
On the User Experience page of the Wizard, specify the following information and then click Next to proceed.:
-
Allow users to run the program independently of assignments – If enabled, users can install this software from the application catalogue regardless of any scheduled installation time.
-
Software installation – Allows the software to be installed outside of any configured maintenance windows.
-
System restart (if required to complete the installation) – If the software installation requires a device restart to complete, allow this to happen outside of any configured maintenance windows.
-
Embedded Devices - For Configuration Manager SP1 only. When you deploy packages and programs to Windows Embedded devices that are write filter enabled, you can specify to install the packages and programs on the temporary overlay and commit changes later, or commit the changes at the installation deadline or during a maintenance window. When you commit changes at the installation deadline or during a maintenance window, a restart is required and the changes persist on the device.
Note:
When you deploy a package or program to a Windows Embedded device, make sure that the device is a member of a collection that has a configured maintenance window.

Figure 12 : Specifying the user experience
-
-
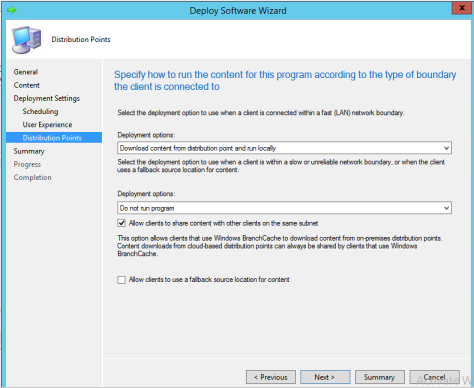
On the Distribution Points page of the Wizard, specify the following information and click Next to proceed.:
-
Deployment options – Specify the actions that a client should take to run program content. You can specify behavior when the client is in a fast network boundary, or a slow or unreliable network boundary.
-
Allow clients to share content with other clients on the same subnet – Select this option to reduce load on the network by allowing clients to download content from other clients on the network that already downloaded and cached the content. This option utilizes Windows Branch Cache and can be used on computers that run Windows Vista SP2 and later.
-
Allow clients to use a fallback source location for content – If enabled, clients can search other distribution points in the hierarchy for required content if this is not available on the specified distribution point or distribution point groups.
-
Figure 13 : Specifying how to run the content for the program
-
On the Summary page of the Wizard, review the actions that will be taken and then click Next to proceed.
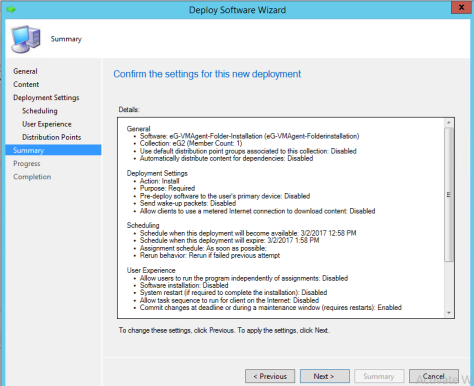
Figure 14 : Viewing a summary of the settings
-
Finally, click Close to exit the wizard.
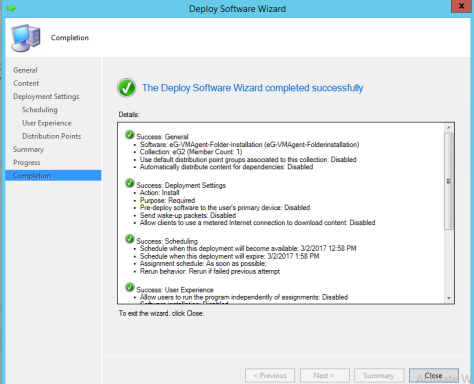
Figure 15 : Completion of deployment wizard
-
You can view the deployment in the Deployments node of the Monitoring workspace and in the details pane of the package deployment tab when you select the deployment.
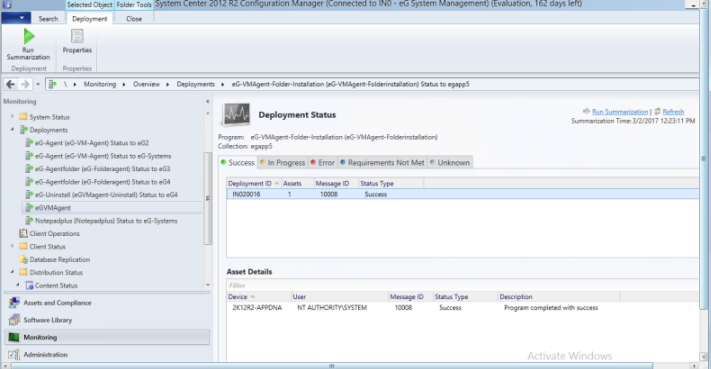
Figure 16 : Viewing the status of the deployment
Note:
If you configured the option Run program from distribution point on the Distribution Points page of the Deploy Software Wizard, do not clear the option Copy the content in this package to a package share on distribution points, because this will make the package unavailable to run from distribution points.