Transport Rule Hits Test
You can use mail flow rules (also known as transport rules) to identify and take action on messages that flow through your Office 365 organization. Mail flow rules are similar to the Inbox rules that are available in Outlook and Outlook on the web. The main difference is mail flow rules take action on messages while they're in transit, and not after the message is delivered to the mailbox. Mail flow rules contain a richer set of conditions, exceptions, and actions, which provides you with the flexibility to implement many types of messaging policies.
A mail flow rule is made of conditions, exceptions, actions, and properties:
- Conditions: Conditions identify the messages that you want to apply the actions to.
- Exceptions: Exceptions, optionally identify the messages that the actions shouldn't apply to.
- Actions: Actions specify what to do to messages that match the conditions in the rule, and don't match any of the exceptions.
- Properties: Properties specify other rules settings that aren't conditions, exceptions or actions. For example, when the rule should be applied, whether to enforce or test the rule, and the time period when the rule is active.
All messages that flow through your organization are evaluated against the enabled mail flow rules in your organization. To know whether any of these messages match a configured rule, and if so, which rule it is, use the Transport Rule Hits test. This test evaluates incoming and outgoing messages against configured transport rules, and reports the count of messages that conform to any of the rules. Detailed diagnostics of the test reveal which messages match which rule and what action has been taken on such messages. This enables administrators to review and evaluate their rule and action configurations, and figure out if rules need to be fine-tuned.
Target of the test : Exchange Online
Agent deploying the test : A remote agent
Outputs of the test : One set of results for each event type related to transport rules
First-level descriptor: Event type
| Parameters | Description |
|---|---|
|
Test period |
How often should the test be executed |
|
Host |
The host for which the test is to be configured. By default, this is portal.office.com |
|
Tenant Name |
This parameter applies only if you want the eG agent to use Azure AD Certificate-based Authentication for accessing and monitoring an O365 tenant and its resources. Azure AD certificate-based authentication (CBA) enables customers to allow or require users to authenticate with X.509 certificates against their Azure Active Directory (Azure AD) for applications and browser sign-in. When monitoring highly secure Office 365 environments, you can configure the eG agent to identify itself to a tenant using a valid X.509 certificate, so that it is allowed secure access to the tenant and its resources. By default, the value of this parameter is none. This means that, by default, the eG agent does not use certificate-based authentication to connect to an O365 tenant. On the other hand, if you want the eG agent to use this modern authentication technique to securely access a tenant's resources, you should do the following:
|
|
O365 User Name, O365 Password, and Confirm Password |
For execution, this test requires the privileges of an O365 user who is vested with the View-Only Audit Logs, View-Only Recipients, Mail Recipients, and Mailbox Import Export permissions. Configure the credentials of such a user against O365 User Name and O365 Password text boxes. Confirm the password by retyping it in the Confirm Password text box. While you can use the credentials of any existing O365 user with the afore-said privileges, it is recommended that you create a special user for monitoring purposes using the Office 365 portal and use the credentials of that user here. To know how to create a new user using the Office 365 portal and assign the required privileges to that user, refer to Creating a New User in the Office 365 Portal |
|
Domain, Domain User Name, Domain Password, and Confirm Password |
These parameters are applicable only if the eG agent needs to communicate with the Office 365 portal via a Proxy server. In this case, in the Domain text box, specify the name of the Windows domain to which the eG agent host belongs. In the Domain User Name text box, mention the name of a valid domain user with login rights to the eG agent host. Provide the password of that user in the Domain Password text box and confirm that password by retyping it in the Confirm Password text box. On the other hand, if the eG agent is not behind a Proxy server, then you need not disturb the default setting of these parameters. By default, these parameters are set to none. |
|
Proxy Host, Proxy Port, Proxy User Name, and Proxy Password |
These parameters are applicable only if the eG agent needs to communicate with the Office 365 portal via a Proxy server. In this case, provide the IP/host name and port number of the Proxy server that the eG agent should use in the Proxy Host and Proxy Port parameters, respectively. If the Proxy server requires authentication, then specify the credentials of a valid Proxy user against the Proxy User Name and Proxy Password text boxes. Confirm that password by retyping it in the Confirm Password text box. If the Proxy server does not require authentication, then specify none against the Proxy User Name, Proxy Password, and Confirm Password text boxes. On the other hand, if the eG agent is not behind a Proxy server, then you need not disturb the default setting of any of the Proxy-related parameters. By default, these parameters are set to none. |
|
DD Frequency |
Refers to the frequency with which detailed diagnosis measures are to be generated for this test. The default is 1:1. This indicates that, by default, detailed measures will be generated every time the test runs, and also every time the test detects a problem. You can modify this frequency, if you so desire. Also, if you intend to disable the detailed diagnosis capability for this test, you can do so by specifying none against DD Frequency. |
|
Detailed Diagnosis |
To make diagnosis more efficient and accurate, the eG Enterprise embeds an optional detailed diagnostic capability. With this capability, the eG agents can be configured to run detailed, more elaborate tests as and when specific problems are detected. To enable the detailed diagnosis capability of this test for a particular server, choose the On option. To disable the capability, click on the Off option. The option to selectively enabled/disable the detailed diagnosis capability will be available only if the following conditions are fulfilled:
|
| Measurement | Description | Measurement Unit | Interpretation |
|---|---|---|---|
|
Total hits |
Indicates the number of messages that conform to transport rules. |
Number |
The value of this measure is a sum of the values of the Inbound rule hits and Outbound rule hits measures. |
|
Inbound rule hits |
Indicates the number of incoming messages that conform to transport rules. |
Number |
Use the detailed diagnosis of this measure to know which incoming messages matched which rule and what action was taken on them. |
|
Outbound mail hits |
Indicates the number of outgoing messages that conform to transport rules. |
Number |
Use the detailed diagnosis of this measure to know which outgoing messages matched which rule and what action was taken on them. |
|
Unique senders |
Indicates the total number of unique senders of messages that match one/more transport rules. |
Number |
|
|
Unique receivers |
Indicates the number of unique recipients of messages that match one/more transport rules. |
Number |
|
The detailed diagnosis of the Inbound rule hits measure lists the 10 messages that were received recently, which conformed to one/more transport rules. The ID of the messages, the subject of the messages, when they were sent/received, the sender and receiver of such messages, the rules that they matched, and the actions that were taken on them are revealed as part of detailed diagnosis. This will enable administrators to review and evaluate their rule and action configurations, and figure out if rules need to be fine-tuned.
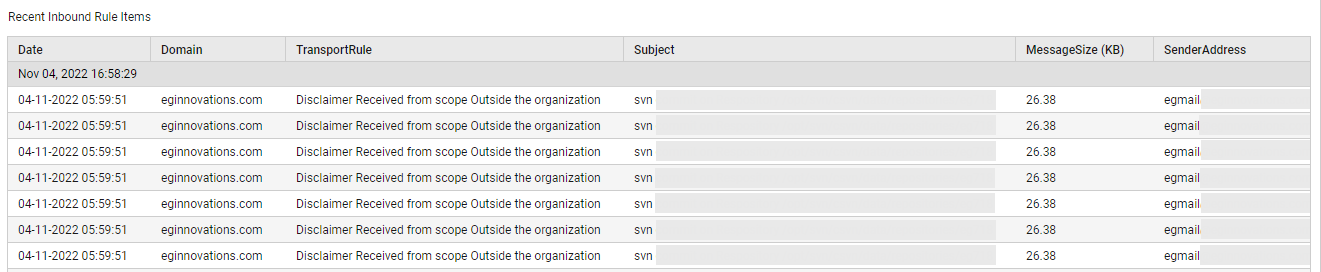
Figure 1 : The detailed diagnosis of the Inbound rule hits measure
The detailed diagnosis of the Outbound rule hits measure lists the 10 messages that were sent recently, which conformed to one/more transport rules. The ID of the messages, the subject of the messages, when they were sent/received, the sender and receiver of such messages, the rules that they matched, and the actions that were taken on them are revealed as part of detailed diagnosis. This will enable administrators to review and evaluate their rule and action configurations, and figure out if rules need to be fine-tuned.
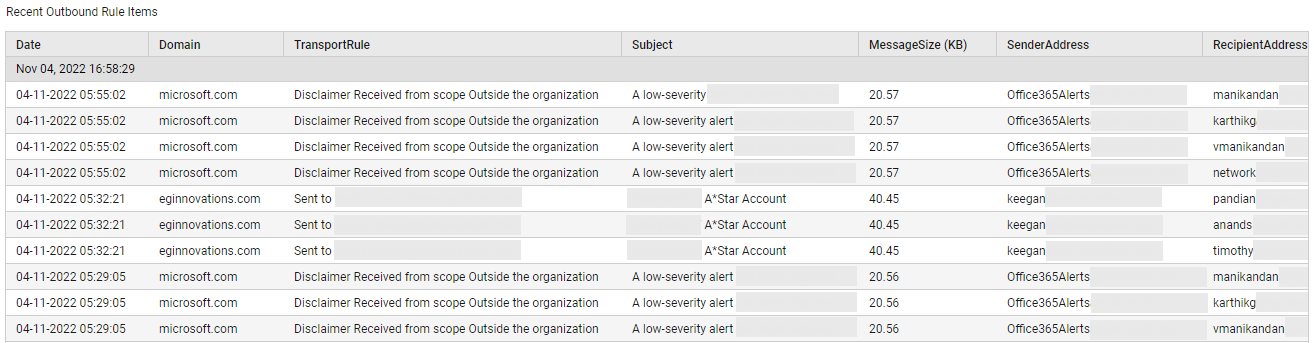
Figure 2 : The detailed diagnosis of the Outbound rule hits measure