JVM Threads Test
This test reports the status of threads running in the JVM. Details of this test can be used to identify resource-hungry threads.
Note:
If the Mode parameter of this test is set to SNMP, then stack trace will not be available. Also, detailed diagnostics will not report CPU Time.
Target of the test : A Java application
Agent deploying the test : An internal/remote agent
Outputs of the test : One set of results for the Java application being monitored
| Parameter | Description |
|
Test period |
How often should the test be executed |
|
Host |
The host for which the test is to be configured. |
|
Port |
The port number at which the specified host listens to |
|
Metric Collection Type |
This test can extract metrics from the Java application using either of the following mechanisms:
To configure the test to collect metrics from the eg_btm.jar file, select the JAR option. On the other hand, to configure the test to use SNMP or JMX options, choose the Others option. By default, JAR option is chosen here. |
|
Mode |
This flag will appear only when the Others option is chosen against the Metric Collection Type flag. To configure the test to use SNMP to extract metrics from the target Java application, select the SNMP option. On the other hand, choose the JMX option to configure the test to use JMX instead. By default, the JMX option is chosen here. |
|
JMX Remote Port |
This parameter appears only if the Mode is set to JMX. Here, specify the port at which the JMX listens for requests from remote hosts. Ensure that you specify the same port that you configured in the management.properties file in the <JAVA_HOME>\jre\lib\management folder used by the target application . To know more, refer to Enabling JMX Support for JRE |
|
JNDI Name |
This parameter appears only if the mode is set to JMX. The JNDIname is a lookup name for connecting to the JMX connector. By default, this is jmxrmi. If you have resgistered the JMX connector in the RMI registery using a different lookup name, then you can change this default value to reflect the same. |
|
JMX User, JMX Password, and Confirm password |
These parameters appear only if the Mode is set to JMX. If JMX requires authentication only (but no security), then ensure that the user and password parameters are configured with the credentials of a user with read-write access to JMX. To know how to create this user, refer to Configuring the eG Agent to Support JMX Authentication. Confirm the password by retyping it in the Confirm Password text box. |
|
Provider |
This parameter appears only if the Mode is set to JMX. This test uses a JMX Provider to access the MBean attributes of the target Java application and collect metrics. Specify the package name of this JMX Provider here. By default, this is set to com.sun.jmx.remote.protocol. |
|
Timeout |
Specify the duration (in seconds) for which this test should wait for a response from the target Java application. If there is no response from the target beyond the configured duration, the test will timeout. By default, this is set to 240 seconds if the Mode is JMX, and 10 seconds if the Mode is SNMP. |
|
JMX Registry SSL |
This parameter appears only if the Mode is set to JMX. If you have registered the JMX connector in an SSL-enabled RMI registry , set this flag to Yes. By default, this is set to No. |
|
SNMPPort |
This parameter appears only if the Mode is set to SNMP. Here specify the port number through which the server exposes its SNMP MIB. Ensure that you specify the same port you configured in the management.properties file in the <JAVA_HOME>\jre\lib\management folder used by the target application. To know more, refer to Enabling SNMP Support for JRE |
|
SNMP Version |
This parameter appears only if the Mode is set to SNMP. The default selection in the SNMP version list is v1. However, for this test to work, you have to select SNMP v2 or v3 from this list, depending upon which version of SNMP is in use in the target environment. |
|
SNMP Community |
This parameter appears only if the Mode is set to SNMP. Here, specify the SNMP community name that the test uses to communicate with the mail server. The default is public. This parameter is specific to SNMP v1 and v2 only. Therefore, if the SNMP version chosen is v3, then this parameter will not appear. |
|
User Name |
This parameter appears only when v3 is selected as the SNMP version. SNMP version 3 (SNMPv3) is an extensible SNMP Framework which supplements the SNMPv2 Framework, by additionally supporting message security, access control, and remote SNMP configuration capabilities. To extract performance statistics from the MIB using the highly secure SNMP v3 protocol, the eG agent has to be configured with the required access privileges – in other words, the eG agent should connect to the MIB using the credentials of a user with access permissions to be MIB. Therefore, specify the name of such a user against this parameter. |
|
Context |
This parameter appears only when v3 is selected as the SNMPVERSION. An SNMP context is a collection of management information accessible by an SNMP entity. An item of management information may exist in more than one context and an SNMP entity potentially has access to many contexts. A context is identified by the SNMPEngineID value of the entity hosting the management information (also called a contextEngineID) and a context name that identifies the specific context (also called a contextName). If the USERNAME provided is associated with a context name, then the eG agent will be able to poll the MIB and collect metrics only if it is configured with the context name as well. In such cases therefore, specify the context name of the username in the context text box. By default, this parameter is set to none. |
|
Auth Pass |
Specify the password that corresponds to the above-mentioned user name. This parameter once again appears only if the snmpversion selected is v3. |
|
Confirm Password |
Confirm the AuthPass by retyping it here |
|
AuthType |
This parameter too appears only if v3 is selected as the SNMPversion. From the AuthType list box, choose the authentication algorithm using which SNMP v3 converts the specified username and password into a 32-bit format to ensure security of SNMP transactions. You can choose between the following options:
|
|
Encryptflag |
This flag appears only when v3 is selected as the SNMPversion. By default, the eG agent does not encrypt SNMP requests. Accordingly, the flag is set to No by default. To ensure that SNMP requests sent by the eG agent are encrypted, select the Yes option. |
|
EncryptType |
If the EncryptFlag is set to Yes, then you will have to mention the encryption type by selecting an option from the EncryptType list. SNMP v3 supports the following encryption types:
|
|
Encrypt Password |
Specify the Encryption Password here. |
|
Confirm Password |
Confirm the Encryption Password by retyping it here. |
|
PCT Medium CPU Util Threads |
By default, this parameter is set to 50. This implies that, by default, the threads for which the current CPU consumption is between 50% and 70% (the default value of the pct high cpu util threads parameter) will be counted as medium CPU-consuming threads. The count of such threads will be reported as the value of the Medium CPU threads measure. This default setting also denotes that threads that consume less than 50% CPU will, by default, be counted as Low CPU threads. If need be, you can modify the value of this parameter to change how much CPU should be used by a thread for it to qualify as a medium CPU-consuming thread. This will consequently alter the count of low CPU-consuming threads as well. |
|
PCT High CPU Util Threads |
By default, this parameter is set to 70. This implies that, by default, the threads that are currently consuming over 70% of CPU time are counted as high CPU consumers. The count of such threads will be reported as the value of the High CPU threads measure. If need be, you can modify the value of this parameter to change how much CPU should be used by a thread for it to qualify as a high CPU-consuming thread. |
|
Max Thread Count |
By default, this parameter is set to 20. This implies that the detailed diagnosis of the Runnable threads, Waiting threads, and Timed waiting threads measures will by default display only the top-20 JVM threads in terms of CPU consumption. To view more threads as part of detailed diagnostics, increase the value of this parameter. To view all threads that are in the said state (eg., runnable, waiting, and timed waiting), specify All or * against this parameter. |
|
Thread Dump Limit |
By default, for the purpose of reporting detailed diagnostics, this test collects details of all the threads that the target application uses. This is why, this parameter is set to none by default. For optimal application performance, you may want to limit the number of threads for which the test should collect details. This limit can be specified against Thread Dump Limit. For instance, if you set this parameter to 500, then the test will collect details for only up to a maximum of 500 threads. If the application spawns more than 500 threads, then the test will not collect the details of any thread. In such a case, detailed diagnostics will not be reported by this test. |
|
Long Blocked Limit |
By default, the Long running blocked threads measure, reports the count of threads that have been blocked for 3 consecutive test execution cycles or more. You can change the value of this parameter, based on the needs of your environment. For instance, you can change the value of this parameter to 5. In this case, only those threads that have remained blocked for 5 test cycles or more will be included in the count of Long running blocked threads. |
|
Web Thread |
By default, this parameter is set to none. This means that this test monitors all Web/HTTP threads by default. If you want to instruct the test to monitor only specific Web/HTTP threads, then provide a comma-separated list of Web/HTTP thread patterns in this text box. For instance, your specification can be: http-exec*,catalina-http*. The test will compute the CPU usage of threads that match the configured patterns and report it as the value of the CPU usage of Web/HTTP threads measure. |
|
RMI Thread |
By default, this parameter is set to none. This means that this test monitors all RMI threads by default. If you want to instruct the test to monitor only specific RMI threads, then provide a comma-separated list of RMI thread patterns in this text box. For instance, your specification can be: RMI-TCP*,-RMI*. The test will compute the CPU usage of threads that match the configured patterns and report it as the value of the CPU usage of RMI threads measure. |
|
USEPS |
This flag is applicable only for AIX LPARs. By default, on AIX LPARs, this test uses the tprof command to compute CPU usage. Accordingly, this flag is set to No by default. On some AIX LPARs however, the tprof command may not function properly (this is an AIX issue). While monitoring such AIX LPARs therefore, you can configure the test to use the ps command instead for metrics collection. To do so, set this flag to Yes. Note: Alternatively, you can set the AIXUSEPS flag in the [AGENT_SETTINGS] section of the eg_tests.ini file (in the <EG_INSTALL_SIR>\manager\config directory) to yes (default: no) to enable the eG agent to use the ps command for CPU usage computations on AIX LPARs. If this global flag and the USEPS flag for a specific component are both set to no, then the test will use the default tprof command to compute CPU usage for AIX LPARs. If either of these flags is set to yes, then the ps command will perform the CPU usage computations for monitored AIX LPARs. In some high-security environments, the tprof command may require some special privileges to execute on an AIX LPAR (eg., sudo may need to be used to run tprof). In such cases, you can prefix the tprof command with another command (like sudo) or the full path to a script that grants the required privileges to tprof. To achieve this, edit the eg_tests.ini file (in the <EG_INSTALL_DIR>\manager\config directory), and provide the prefix of your choice against the AixTprofPrefix parameter in the [AGENT_SETTINGS] section. Finally, save the file. For instance, if you set the AixTprofPrefix parameter to sudo, then the eG agent will call the tprof command as sudo tprof. |
|
Data over TCP |
This parameter is applicable only if mode is set to SNMP. By default, in an IT environment, all data transmission occurs over UDP. Some environments however, may be specifically configured to offload a fraction of the data traffic – for instance, certain types of data traffic or traffic pertaining to specific components – to other protocols like TCP, so as to prevent UDP overloads. In such environments, you can instruct the eG agent to conduct the SNMP data traffic related to the monitored target over TCP (and not UDP). For this, set this flag to Yes. By default, this flag is set to No. |
|
Engine ID |
This parameter appears only when v3 is selected as the SNMPVersion. Sometimes, the test may not report metrics when AES192 or AES256 is chosen as the Encryption type. To ensure that the test report metrics consistently, administrators need to set this flag to Yes. By default, this parameter is set to No. |
|
DD Frequency |
Refers to the frequency with which detailed diagnosis measures are to be generated for this test. The default is 1:1. This indicates that, by default, detailed measures will be generated every time this test runs, and also every time the test detects a problem. You can modify this frequency, if you so desire. Also, if you intend to disable the detailed diagnosis capability for this test, you can do so by specifying none against this parameter. |
|
Detailed Diagnosis |
To make diagnosis more efficient and accurate, the eG Enterprise embeds an optional detailed diagnostic capability. With this capability, the eG agents can be configured to run detailed, more elaborate tests as and when specific problems are detected. To enable the detailed diagnosis capability of this test for a particular server, choose the On option. To disable the capability, click on the Off option. The option to selectively enable/disable the detailed diagnosis capability will be available only if the following conditions are fulfilled:
|
| Measurement | Description | Measurement Unit | Interpretation |
|---|---|---|---|
|
Total threads |
Indicates the total number of threads (including daemon and non-daemon threads). |
Number |
|
|
Runnable threads |
Indicates the current number of threads in a runnable state. |
Number |
The detailed diagnosis of this measure, if enabled, lists the names of the top-20 (default) runnable threads in terms of their CPU usage. The time for which the thread was in a blocked state, waiting state, etc., are provided as part of the detailed diagnostics. You can change the sort order to view threads by waiting time, blocked time, etc. |
|
Blocked threads |
Indicates the number of threads that are currently in a blocked state. |
Number |
If a thread is trying to take a lock (to enter a synchronized block), but the lock is already held by another thread, then such a thread is called a blocked thread. The detailed diagnosis of this measure, if enabled, provides in-depth information related to all the blocked threads. |
|
Waiting threads |
Indicates the number of threads that are currently in a waiting state. |
Number |
A thread is said to be in a Waiting state if the thread enters a synchronized block, tries to take a lock that is already held by another thread, and hence, waits till the other thread notifies that it has released the lock. Ideally, the value of this measure should be low. A very high value could be indicative of excessive waiting activity on the JVM. You can use the detailed diagnosis of this measure, if enabled, to figure out which threads are currently in the waiting state. By default, the top-20 waiting threads in terms of CPU usage will be listed. You can change the sort order to view threads by waiting time, blocked time, etc. While waiting, the Java application program does no productive work and its ability to complete the task-at-hand is degraded. A certain amount of waiting may be acceptable for Java application programs. However, when the amount of time spent waiting becomes excessive or if the number of times that waits occur exceeds a reasonable amount, the Java application program may not be programmed correctly to take advantage of the available resources. When this happens, the delay caused by the waiting Java application programs elongates the response time experienced by an end user. An enterprise may use Java application programs to perform various functions. Delays based on abnormal degradation consume employee time and may be costly to corporations. |
|
Timed waiting threads |
Indicates the number of threads in a TIMED_WAITING state. |
Number |
When a thread is in the TIMED_WAITING state, it implies that the thread is waiting for another thread to do something, but will give up after a specified time out period. To view the details of threads in the TIMED_WAITING state, use the detailed diagnosis of this measure, if enabled. By default, the top-20 timed waiting threads in terms of CPU usage will be listed. You can change the sort order to view threads by waiting time, blocked time, etc. |
|
Low CPU threads |
Indicates the number of threads that are currently consuming CPU lower than the value configured in the PCT Medium CPU Util Threads text box. |
Number |
To know which threads are consuming low CPU, use the detailed diagnosis of this measure. |
|
Medium CPU threads |
Indicates the number of threads that are currently consuming CPU that is higher than the value configured in the PCT Medimum CPU Util Threads text box and is lower than or equal to the value specified in the PCT High CPU Util Threads text box. |
Number |
To know which threads are consuming medium CPU, use the detailed diagnosis of this measure. |
|
High CPU threads |
Indicates the number of threads that are currently consuming CPU that is greater than the percentage configured in the PCT High CPU Util Threads text box. |
Number |
Ideally, the value of this measure should be very low. A high value is indicative of a resource contention at the JVM. Under such circumstances, you might want to identify the resource-hungry threads. To know which threads are consuming excessive CPU, use the detailed diagnosis of this measure. |
|
Peak threads |
Indicates the highest number of live threads since JVM started. |
Number |
|
|
Total threads |
Indicates the the total number of threads started (including daemon, non-daemon, and terminated) since JVM started. |
Number |
|
|
Daemon threads |
Indicates the current number of live daemon threads. |
Number |
|
|
Deadlock threads |
Indicates the current number of deadlocked threads. |
Number |
Ideally, this value should be 0. A high value is a cause for concern, as it indicates that many threads are blocking one another causing the application performance to suffer. The detailed diagnosis of this measure, if enabled, lists the deadlocked threads and their resource usage. |
|
CPU usage of all Low CPU threads |
Indicates the average CPU usage of those threads that are consuming CPU lower than the value configured in the PCT Medium CPU Util Threads text box. |
Percent |
To know which threads are consuming low CPU, use the detailed diagnosis of the Low CPU threads measure. |
|
CPU usage of all Medium CPU threads |
Indicates the average CPU usage of those threads that are consuming CPU that is higher than the value configured in the PCT Medimum CPU Util Threads text box and is lower than or equal to the value specified in the PCT High CPU Util Threads text box. |
Percent |
To know which threads are consuming medium CPU, use the detailed diagnosis of the Medium CPU threads measure. |
|
CPU usage of all High CPU threads |
Indicates the average CPU usage of those threads that are consuming CPU that is greater than the percentage configured in the PCT High CPU Util Threads text box.. |
|
To know which threads are consuming medium CPU, use the detailed diagnosis of the High CPU threads measure. If one/more threads are consuming high CPU, then you need to figure out what CPU-intensive activity these threads were engaged in - RMI activity? were they processing web/HTTP requests? was it internal activity such as garbage collection? or any other activity? To figure this out, you can compare the values of all metrics grouped under the head, CPU usage by thread type. These metrics are, namely - CPU usage of Web/HTTP threads, CPU usage of RMI threads, CPU usage of other threads, and CPU usage of GC and Internal Activity. |
|
CPU usage of Web/HTTP threads |
Indicates the percentage of CPU resources utilized by threads that are serving Web/HTTP requests. |
Percent |
Compare the value of this measure with that of the CPU usage of RMI threads, CPU usage of other threads, and CPU usage of GC and Internal Activity measures to determine where threads spent maximum CPU resources - in RMI activity? processing web/HTTP requests? internal activity such as garbage collection? or any other activity? |
|
CPU usage of RMI threads |
Indicates the percentage of CPU resources utilized by threads engaged in RMI activity. |
Percent |
RMI threads typically enable an object on a JVM to invoke methods on an object on another JVM - eg., enabling JMX connection to a JVM. Compare the value of this measure with that of the CPU usage of Web/HTTP threads, CPU usage of other threads, and CPU usage of GC and Internal Activity measures to determine where threads spent maximum CPU resources - in RMI activity? processing web/HTTP requests? internal activity such as garbage collection? or any other activity? |
|
CPU usage of GC and Internal Activity |
Indicates the percentage of CPU resources utilized by threads engaged in garbage collection and other JVM internal activity. |
Percent |
Compare the value of this measure with that of the CPU usage of Web/HTTP threads, CPU usage of other threads, and CPU usage of RMI threads measures to determine where threads spent maximum CPU resources - in RMI activity? processing web/HTTP requests? internal activity such as garbage collection? or any other activity? |
|
CPU usage of other threads |
Indicates the percentage of CPU resources utilized by threads involved in JVM activities other than the ones mentioned above - i.e., other than web/HTTP request processing, RMI activity, GC and internal activity. |
Percent |
Compare the value of this measure with that of the CPU usage of Web/HTTP threads, CPU usage of GC and Internal Activity and CPU usage of RMI threads measures to determine where threads spent maximum CPU resources - in RMI activity? processing web/HTTP requests? internal activity such as garbage collection? or any other activity? |
|
Blocking Threads |
Indicates the number of unique threads that hold a lock that is being requested by other threads. |
Number |
The detailed diagnosis of this measure, if enabled, provides in-depth information related to all the threads that are blocking other threads by holding a lock. |
|
Long running blocked threads |
Indicates the number of threads that have been running for more than the number of test cycles configured against the LONG BLOCKED LIMIT parameter. |
Number |
Use the detailed diagnosis of this measure to know which threads have been blocked for a long time. |
|
Started threads |
Indicates the number of threads that have started. |
Number |
|
|
Locking threads |
Indicates the number of threads which are holding the locks. |
Number |
A locking thread is the thread that currently owns a lock (monitor) and is executing a synchronized block or method. Admins monitor locking and locked threads to identify performance bottlenecks, deadlocks, long waits, and contention issues. This helps ensure the Java application remains responsive, stable, and scalable, and prevents problems like hung requests, CPU waste, slow transactions, and system outages in production environments. |
|
Locked threads |
Indicate the number of threads which are blocked because locks are help by another thread. |
Number |
A locked thread is a thread that cannot proceed because it is waiting to acquire that lock, so it remains blocked until the lock is released. Admins monitor locking and locked threads to identify performance bottlenecks, deadlocks, long waits, and contention issues. This helps ensure the Java application remains responsive, stable, and scalable, and prevents problems like hung requests, CPU waste, slow transactions, and system outages in production environments. |
Note:
If the mode for the JVM Threads test is set to SNMP, then the detailed diagnosis of this test will not display the Blocked Time and Waited Time for the threads. To make sure that detailed diagnosis reports these details also, do the following:
- Login to the application host.
- Go to the <JAVA_HOME>\jre\lib\management folder used by the target application, and edit the management.properties file in that folder.
-
Append the following line to the file:
com.sun.management.enableThreadContentionMonitoring
- Finally, save the file.
Accessing Stack Trace using the STACK TRACE link in the Measurements Panel
While viewing the measures reported by the JVM Threads test, you can also view the resource usage details and the stack trace information for all the threads, by clicking on the stack trace link in the Measurements panel.
Note:
If the mode set for the JVM Threads test is SNMP, the stack trace details may not be available.
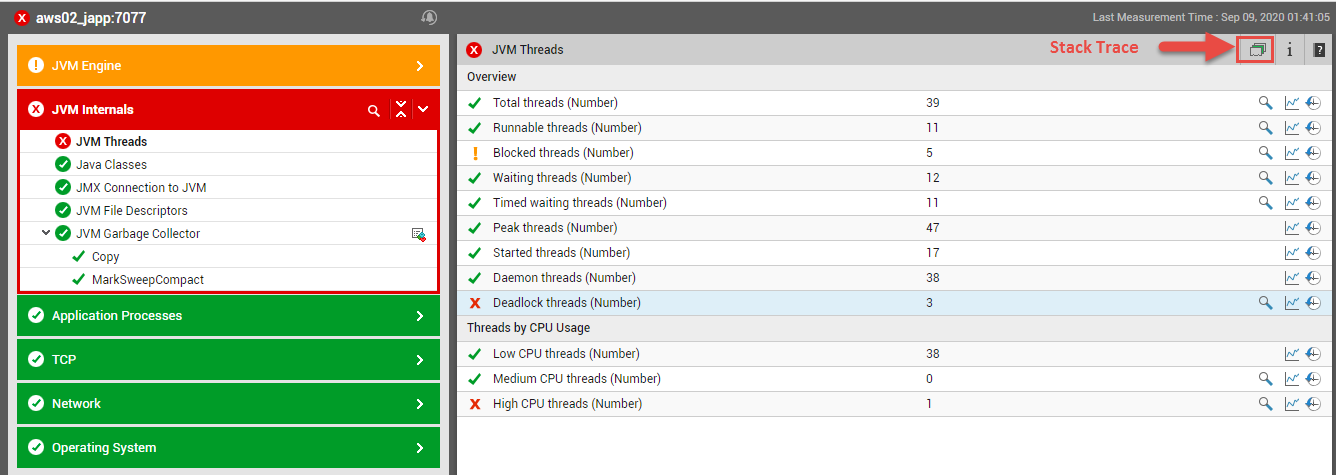
Figure 1 : The STACK TRACE link
A stack trace (also called stack backtrace or stack traceback) is a report of the active stack frames instantiated by the execution of a program. It is commonly used to determine what threads are currently active in the JVM, and which threads are in each of the different states – i.e., alive, blocked, waiting, timed waiting, etc.
Typically, when a Java application begins exhibiting erratic resource usage patterns, it often takes administrators hours, even days to figure out what is causing this anomaly – could it be owing to one/more resource-intensive threads being executed by the application? If so, what is causing the thread to erode resources? Is it an inefficient piece of code? In which case, which line of code could be the most likely cause for the spike in resource usage? To be able to answer these questions accurately, administrators need to know the complete list of threads that the application executes, view the stack trace of each thread, analyze each stack trace in a top-down manner, and trace where the problem originated.
eG Enterprise simplifies this seemingly laborious procedure by not only alerting administrators instantly to excessive resource usage by a target application, but also by automatically identifying the problematic thread(s), and providing the administrator with quick and easy access to the stack trace information of that thread; with the help of stack trace, administrators can effortlessly drill down to the exact line of code that requires optimization.
To access the stack trace information of a thread, click on the Stack Trace icon in the Measurements panel, as indicated by Figure 1.
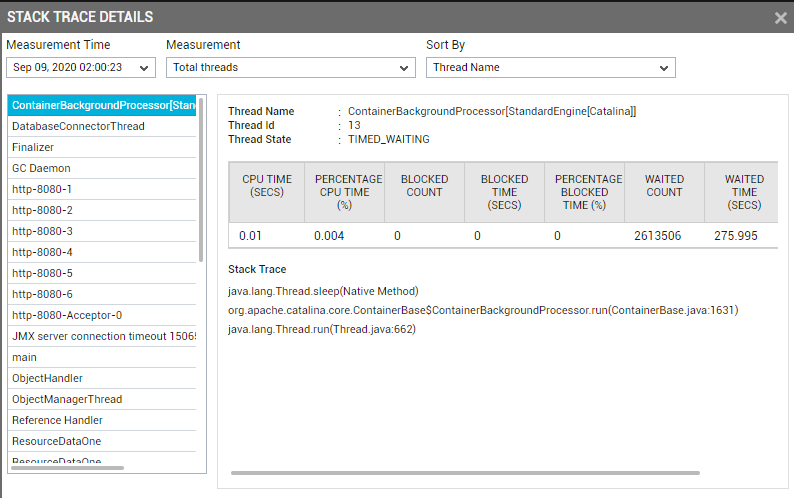
Figure 2 : Stack trace of a resource-intensive thread
Figure 2 that appears comprises of two panels. The left panel, by default, lists all the threads that the target application executes, sorted in the alphabetical order of the thread names. Accordingly, the Total Threads option is chosen by default from the Measurement list and the Thread Name option is chosen by default from the Sort By list. If need be, you can override the default setting by choosing a different option from the Measurement list – in other words, instead of viewing the complete list of threads, you can choose to view threads of a particular type or which are in a particular state alone in Figure 2, by selecting a different Measurement from Figure 2. For instance, to ensure that the left panel displays only those threads that are currently in a runnable state, select the Runnable threads option from the Measurement list. The contents of the left panel will change as depicted by Figure 3.
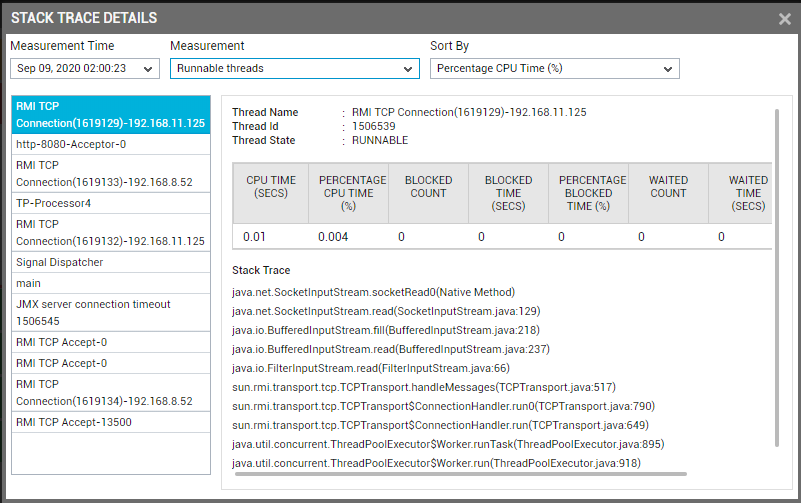
Figure 3 : Thread diagnosis of runnable threads
Also, note that once you choose the Runnable threads measure from the Measurement list, the Percentage CPU Time (%) option will be automatically chosen from the Sort By list. As a result, in the left panel of Figure 3, threads will be listed in the descending order of their Percent CPU Time . This implies that, by default, the first thread in the list will be the thread that is currently active and consuming the maximum CPU. You can change the sort order by selecting a different option from the Sort By list in Figure 3.
Typically, the contents of the right panel change according to the thread chosen from the left. The first thread is the default selection from the left panel. In the case of Figure 3 above, this will be the thread that consumes the maximum CPU. In this case therefore, the right panel will display the details of the leading CPU consumer. Besides the name and state of the chosen thread, the right panel will provide the following information:
- Cpu Time : The amount of CPU processing time (in seconds) consumed by the thread during the last measurement period;
- Percentage Cpu Time: The percentage of time the thread was using the CPU during the last measurement period;
- Blocked Count: The number of times during the last measurement period the thread was blocked waiting for another thread;
- Blocked Time: The total duration for which the thread was blocked during the last measurement period;
- Percentage Blocked Time: The percentage of time (in seconds) for which the thread was blocked during the last measurement period;
- Waited Count: The number of times during the last measurement period the thread was waiting for some event to happen (eg., wait for a thread to finish, wait for a timing event to finish, etc.);
- Waited Time: The total duration (in seconds) for which the thread was waiting during the last measurement period;
- Percentage Waited Time: The percentage of time for which the thread was waiting during the last measurement period.
In addition to the above details, the right panel provides the Stack Trace of the thread.
In the event of a sudden surge in the CPU usage of the target Java application, the Stack Trace Details window of Figure 3 will lead you to the CPU-intensive thread, and will also provide you with the Stack Trace of that thread. By analyzing the stack trace in a top-down manner, you can figure out which method/routine called which, and thus locate the exact line of code that could have contributed to the sudden CPU spike.
If the CPU usage has been increasing over a period of time, then, you might have to analyze the stack trace for one/more prior periods, so as to perform accurate root-cause diagnosis. By default, the Stack Trace Detailswindow of Figure 3 provides the stack trace for the current measurement period only. If you want to view the stack trace for a previous measurement period, you will just have to select a different option from the Measurement Time list. By reviewing the code executed by a thread for different measurement periods, you can figure out out if the same line of code is responsible for the increase in CPU usage.