Enabling JMX Support for JRE
In older versions of Java (i.e., JDEnabling JMX Support for JREK/JRE 1.1, 1.2, and 1.3), very little instrumentation was built in, and custom-developed byte-code instrumentation had to be used to perform monitoring. From JRE/JDK 1.5 and above however, support for Java Management Extensions (JMX) were pre-built into JRE/JDK. JMX enables external programs like the eG agent to connect to the JRE of an application and pull out metrics in real-time.
By default, JMX requires no authentication or security (SSL). In this case therefore, to use JMX for pulling out metrics from a target application, the following will have to be done:
- Login to the application host.
-
The <JAVA_HOME>\jre\lib\management folder used by the target application will typically contain the following files:
- management.properties
- jmxremote.access
- jmxremote.password.template
- snmp.acl.template
-
Edit the managerment.properties file, and append the following lines to it:
com.sun.management.jmxremote.port=<Port No>
com.sun.management.jmxremote.ssl=false com.sun.management.jmxremote.authenticate=false
For instance, if the JMX listens on port 9005, then the first line of the above specification would be:
com.sun.management.jmxremote.port=9005
-
Then, save the file.
-
Next, edit the start-up script of the target application, and add the following line to it:
-Dcom.sun.management.config.file=<management.properties_file_path>
-Djava.rmi.server.hostname=<IP Address>
-
For instance, on a Windows host, the <management.properties_file_path> can be expressed as: D:\bea\jrockit_150_11\jre\lib\management\management.properties
-
On other hand, on a Unix/Linux/Solaris host, a sample <management.properties_file_path> specification will be as follows: /usr/jdk1.5.0_05/jre/lib/management/management.properties
-
In the second line, set the <IP Address> to the IP address using which the Java application has been managed in the eG Enterprise system. Alternatively, you can add the following line to the startup script: -Djava.rmi.server.hostname=localhost
-
Save this script file too.
-
Next, during test configuration, do the following:
-
Set JMX as the mode;
-
Set the port that you defined in step 3 above (in the management.properties file) as the jmx remote port;
-
Set the user and password parameters to none.
-
Update the test configuration.
-
On the other hand, if JMX requires only authentication (and no security), then the following steps will apply:
- Login to the application host. If the application is executing on a Windows host, then, login to the host as a local/domain administrator.
-
As stated earlier, the <java_home>\jre\lib\management folder used by the target application will typically contain the following files:
- management.properties
- jmxremote.access
- jmxremote.password.template
- snmp.acl.template
- First, copy the jmxremote.password.template file to any other location on the host, rename it as as jmxremote.password, and then, copy it back to the <JAVA_HOME>\jre\lib\management folder.
- Next, edit the jmxremote.password file and the jmxremote.access file to create a user with read-write access to the JMX. To know how to create such a user, refer to Configuring the eG Agent to Support JMX Authentication.
- Then, proceed to make the jmxremote.password file secure by granting a single user “full access” to that file. For monitoring applications executing on Windows in particular, only the Owner of the jmxremote.password file should have full control of that file. To know how to grant this privilege to the Owner of the file, refer to Securing the ‘jmxremote.password’ file .
-
In case of applications executing on Solaris / Linux hosts on the other hand, any user can be granted full access to the jmxremote.password file, by following the steps below:
- Login to the host as the user who is to be granted full control of the jmxremote.password file.
-
Issue the following command:
chmod 600 jmxremote.password
- This will automatically grant the login user full access to the jmxremote.password file.
-
Next, edit the management.properties file, and append the following lines to it:
com.sun.management.jmxremote.port=<Port No>
com.sun.management.jmxremote.ssl=false
com.sun.management.jmxremote.authenticate=true
com.sun.management.jmxremote.access.file=<Path of jmxremote.access> com.sun.management.jmxremote.password.file=<Path of jmxremote.password>
For instance, assume that the JMX remote port is 9005, and the jmxremote.access and jmxremote.password files exist in the following directory on a Windows host: D:\bea\jrockit_150_11\jre\lib\management. The specification above will then read as follows:
com.sun.management.jmxremote.port=9005
com.sun.management.jmxremote.access.file=D:\\bea\\jrockit_150_11\\jre\\lib\\management\\jmxremote.access
com.sun.management.jmxremote.password.file=D:\\bea\\jrockit_150_11\\jre\\lib\\management\\jmxremote.password
-
If the application in question is executing on a Unix/Solaris/Linux host, and the jmxremote.access and jmxremote.password files reside in the /usr/jdk1.5.0_05/jre/lib/management folder of the host, then the last 2 lines of the specification will be:
com.sun.management.jmxremote.access.file=/usr/jdk1.5.0_05/jre/lib/management/jmxremote.access
com.sun.management.jmxremote.password.file=/usr/jdk1.5.0_05/jre/lib/management/jmxremote.password -
Finally, save the file.
-
Then, edit the start-up script of the target web application server, include the following line in it, and save the file:
-Dcom.sun.management.config.file=<management.properties_file_path>
-Djava.rmi.server.hostname=<IP Address>
For instance, on a Windows host, the <management.properties_file_path> can be expressed as: D:\bea\jrockit_150_11\jre\lib\management\management.properties. On other hand, on a Linux/Solaris host, a sample <management.properties_file_path> specification will be as follows: /usr/jdk1.5.0_05/jre/lib/management/management.properties
-
In the second line, set the <IP Address> to the IP address using which the Java application has been managed in the eG Enterprise system. Alternatively, you can add the following line to the startup script of the target web application server: -Djava.rmi.server.hostname=localhost
-
Next, during test configuration, do the following:
- Set jmx as the mode;
- Ensure that the port number configured in the management.properties file at step 5 above is set as the jmx remote port;
- Make sure that the user and password parameters of the test are that of a user with readwrite rights to JMX. To know how to create a new user and assign the required rights to him/her, refer to Configuring the eG Agent to Support JMX Authentication.
Note:
eG Enterprise cannot use JMX that requires both authentication and security (SSL), for monitoring the target Java application.
Securing the ‘jmxremote.password’ file
To enable the eG agent to use JMX (that requires authentication only) for monitoring a Windows-based Java application, you need to ensure that the jmxremote.password file in the <java_home>\jre\lib\management folder used by the target application is accessible only by the Owner of that file. To achieve this, do the following:
- Login to the Windows host as a local/domain administrator.
- Browse to the location of the jmxremote.password file using Windows Explorer.
-
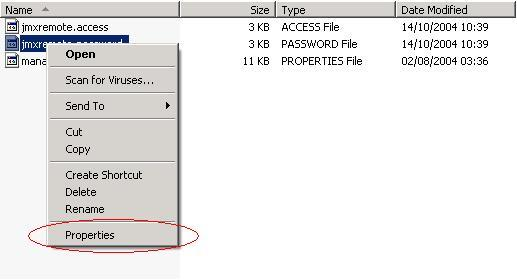
Next, right-click on the jmxremote.password file and select the Properties option (see Figure 1).
-
From Figure 2 that appears next, select the Security tab.
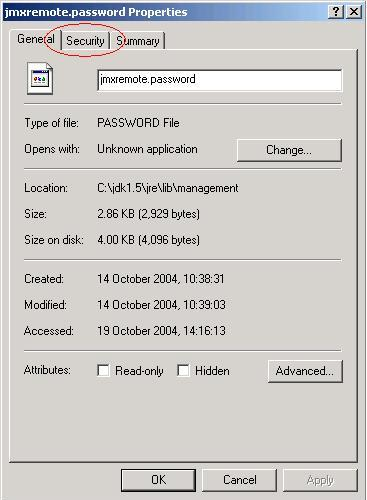
Figure 2 : The Properties dialog box
However, if you are on Windows XP and the computer is not part of a domain, then the Security tab may be missing. To reveal the Security tab, do the following:
-
Open Windows Explorer, and choose Folder Options from the Tools menu.
-
Select the View tab, scroll to the bottom of the Advanced Settings section and clear the check box next to Use Simple File Sharing.
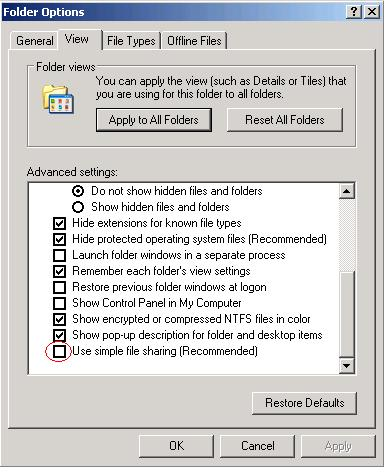
Figure 3 : Deselecting the ‘Use simple file sharing’ option
-
Click OK to apply the change
-
When you restart Windows Explorer, the Security tab would be visible.
-
-
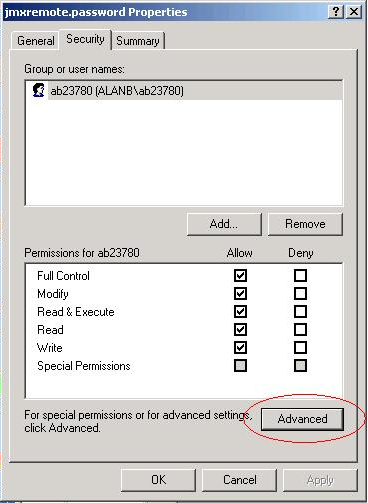
Next, select the Advanced button in the Security tab of Figure 4.
-
Select the Owner tab to see who the owner of the file is.

Figure 5 : Verfying whether the Owner of the file is the same as the application Owner
-
Then, proceed to select the Permissions tab in Figure 5 to set the permissions. If the jmxremote.password file has inherited its permissions from a parent directory that allows users or groups other than the Owner to access the file, then clear the Inherit from parent the permission entries that apply to child objects check box in Figure 6.
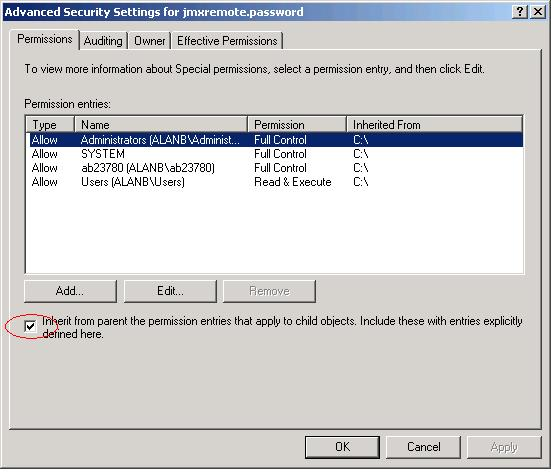
Figure 6 : Disinheriting permissions borrowed from a parent directory
-
At this point, you will be prompted to confirm whether the inherited permissions should be copied from the parent or removed. Press the Copy button in Figure 7.

-
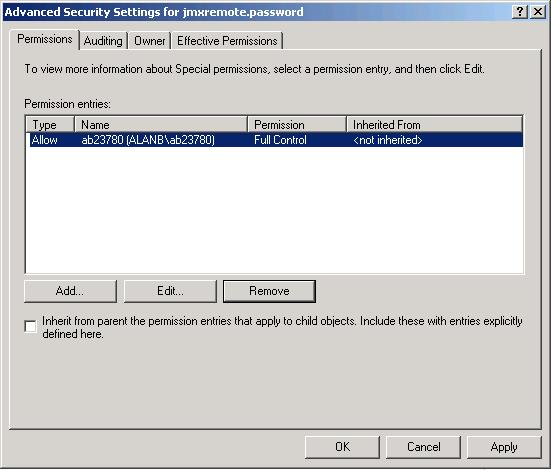
Next, remove all permission entries that allow the jmxremote.password file to be accessed by users or groups other than the file Owner. For this, click the user or group and press the Remove button in Figure 8. At the end of this exercise, only a single permission entry granting Full Control to the owner should remain in Figure 8.
- Finally, click the Apply and ok buttons to register the changes. The password file is now secure, and can only be accessed by the file owner.
Note:
If you are trying to enable JMX on a Linux host, you might encounter issues with the way hostnames are resolved.
To solve it you might have to set the -Djava.rmi.server.hostname=<hostname or localhost or ip> property in the startup script of the target web application server.
If you are in local, simply try with -Djava.rmi.server.hostname=localhost or -Djava.rmi.server.hostname=127.0.0.1.
Configuring the eG Agent to Support JMX Authentication
If the eG agent needs to use JMX for monitoring a Java application, and this JMX requires authentication only (and not security), then every test to be executed by such an eG agent should be configured with the credentials of a valid user to JMX, with read-write rights. The steps for creating such a user are detailed below:
- Login to the application host. If the application being monitored is on a Windows host, then login as a local/domain administrator to the host.
-
Go to the <java_home>\jre\lib\management folder used by the target application to view the following files:
- management.properties
- jmxremote.access
- jmxremote.password.template
- snmp.acl.template
-
Copy the jmxremote.password.template file to a different location, rename it as jmxremote.password, and copy it back to the <java_home>\jre\lib\management folder.
-
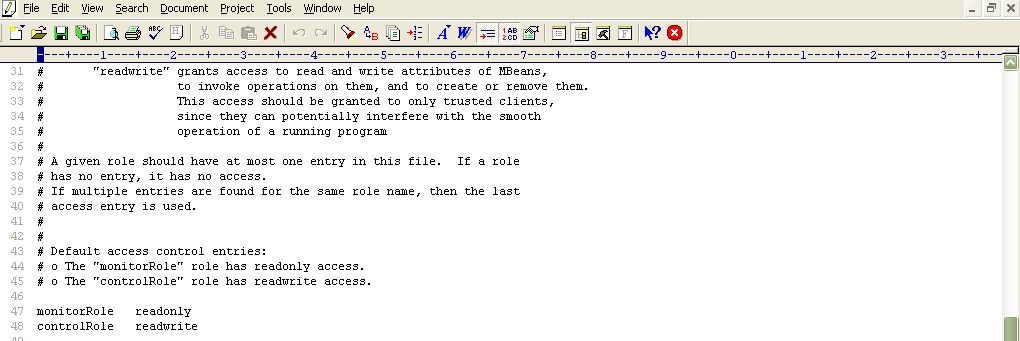
Open the jmxremote.password file and scroll down to the end of the file. By default, you will find the commented entries indicated by Figure 9 below:

Figure 9 : Scrolling down the jmxremote.password file to view 2 commented entries
- The two entries indicated by Figure 9 are sample username password pairs with access to JMX. For instance, in the first sample entry of Figure 9 monitorRole is the username and QED is the password corresponding to monitorRole. Likewise, in the second line, the controlRole user takes the password R&D.
-
If you want to use one of these pre-defined username password pairs during test configuration, then simply uncomment the corresponding entry by removing the # symbol preceding that entry. However, prior to that, you need to determine what privileges have been granted to both these users. For that, open the jmxremote.access file in the editor.
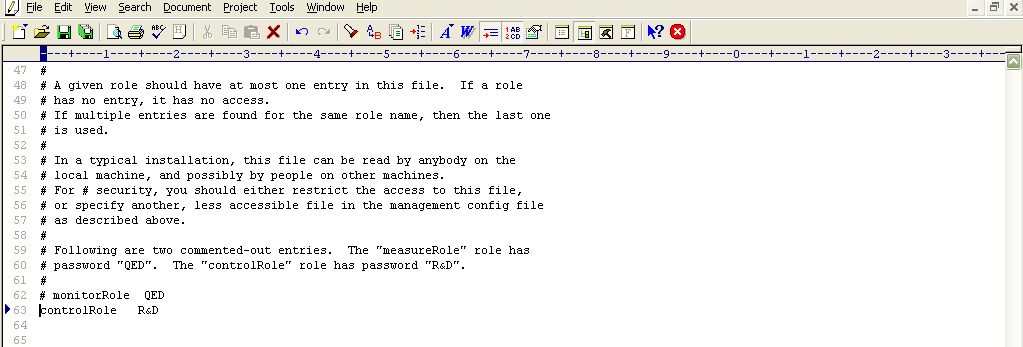
- Scrolling down the file (as indicated by Figure 10) will reveal 2 lines, each corresponding to the sample username available in the jmxremote.password file. Each line denotes the access rights of the corresponding user. As is evident from Figure 10, the user monitorRole has only readonly rights, while user controlRole has readwrite rights. Since the eG agent requires readwrite rights to be able to pull out key JVM-related statistics using JMX, we will have to configure the test with the credentials of the user controlRole.
-
For that, first, edit the jmxremote.password file and uncomment the controlRole <password> line as depicted by Figure 11.
- Then, save the file.
-
If a security manager is enabled for the target Java application, then you also need to make sure that the controlRole is allowed full access to the javax.management.MBeanPermission. To grant full access to the controlRole, do the following:
-
Edit the java.policy file in the <JAVA_HOME>\jre\lib\security directory of the target Java application.
-
Insert the following entry at the top of the file's contents (see Figure 12):
grant principal javax.management.remote.JMXPrincipal "controlRole" {
permission javax.management.MBeanPermission "*", "*";
};
-
Then, save the file.
If this is not done, then a java.security.AccessControlException will occur, when the eG agent attempts to connect to the JRE using JMX.
-
- You can now proceed to configure the tests with the user name controlRole and password R&D.
- Alternatively, instead of going with these default credentials, you can create a new username password pair in the jmxremote.password file, assign readwrite rights to this user in the jmxremote.access file, and then configure the eG tests with the credentials of this new user. For instance, let us create a user john with password john and assign readwrite rights to john.
-
For this purpose, first, edit the jmxremote.password file, and append the following line (see Figure 13) to it:
john john
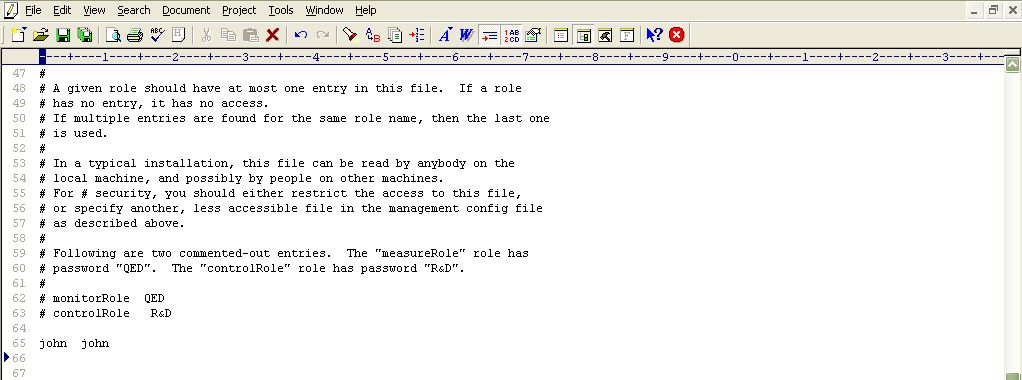
- Save the jmxremote.password file.
-
Then, edit the jmxremote.access file, and append the following line (see Figure 14) to it:
john readwrite
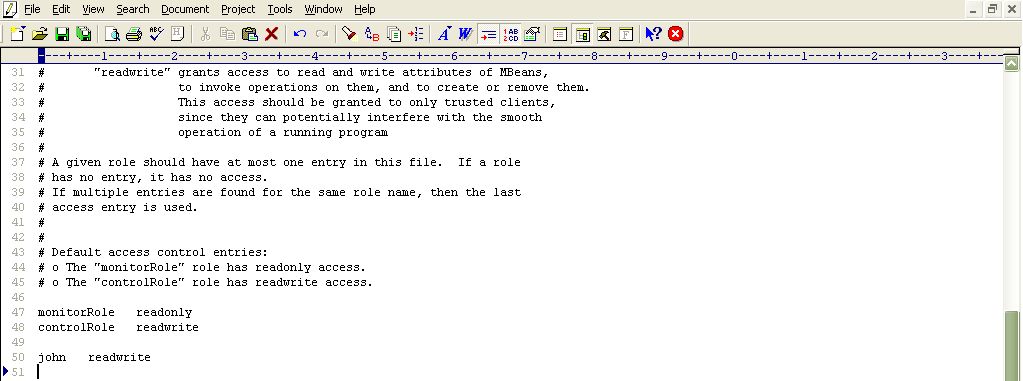
Figure 14 : Assigning rights to the new user in the jmxremote.access file
- Then, save the jmxremote.access file.
-
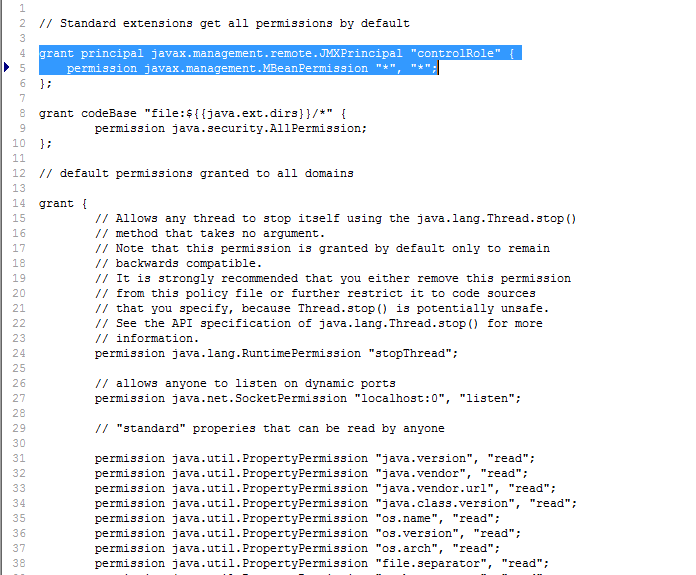
Next, if a security manager object is enabled for your Java application, then insert the following entry at the top of the contents of the java.policy file (in the <JAVA_HOME>\jre\lib\security folder (see Figure 15).

Figure 15 : Editing the java.policy file to grant john full access to javax.management.MBeanPermission
- Finally, proceed to configure the tests with the user name and password, john and john, respectively.