AWS Simple Queue Service (SQS) Test
Amazon Simple Queue Service (Amazon SQS) offers a reliable, highly-scalable hosted queue for storing messages as they travel between applications or microservices. It moves data between distributed application components and helps you decouple these components.
The following illustration describes the lifecycle of an Amazon SQS message, from creation to deletion.
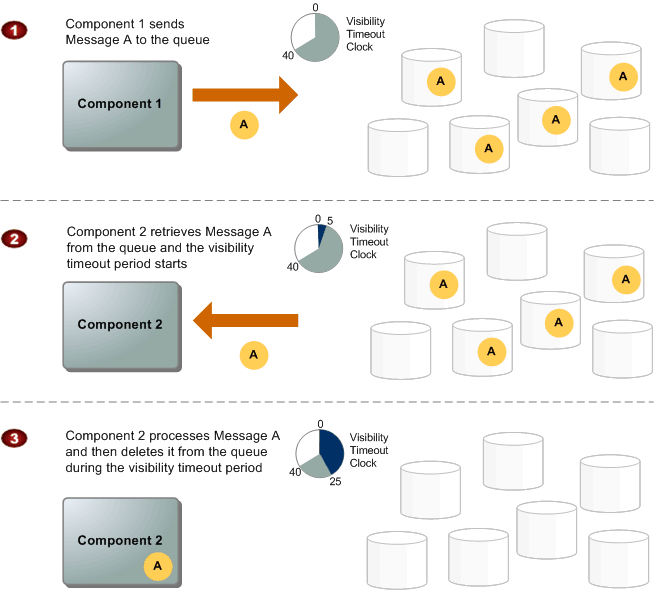
Figure 1 : A typical message cycle
- Component 1 sends Message A to a queue, and the message is distributed across the Amazon SQS servers redundantly.
- When Component 2 is ready to process a message, it consumes messages from the queue, and Message A is returned. While Message A is being processed, it remains in the queue and is not returned to subsequent receive requests for the duration of the visibility timeout.
- Component 2 deletes Message A from the queue to prevent the message from being received and processed again once the visibility timeout expires.
To ensure the optimal performance of the SQS, administrators should keep an eye on the flow of messages into and out of each queue and proactively capture potential anomalies. For instance, administrators should track the length of each queue, so that they can capture an Overlimit error before it occurs. Likewise, administrators should check whether the size of messages in and the count of empty messages returned by the queues are well-within the prescribed limits. Besides detecting probable problems, administrators should also able to rapidly diagnose the root-cause of the problems - is it because of an improper configuration? or is it because of an unexpected/unplanned overload? Based on this diagnosis, administrators should then initiate measures to eliminate the root-cause so as to prevent the problems. The AWS Simple Queue Service (SQS) test helps with the quick detection of problems in SQS, accurate diagnosis of their root-cause, and thus facilitates their prompt redressal!
This test auto-discovers the queues that have been created and reports the count of messages sent to, inflight, and received from each queue. In the process, the test points to queues that are about to violate their message limit. By reporting the number of messages delayed, deleted messages, and the age of the oldest undeleted message in each queue, the test provides useful pointers to what can be done to maximize overall queue performance and avoid errors - should the visibility period be changed? should the retention period of messages be altered? should more queues be created to handle the load? The test also monitors the average size of messages in each queue, and turns the spotlight on those queues that contain many messages that violate the prescribed size limit. This way, the test prompts administrators to look for alternative means to send large messages, so that the load on queues can be reduced and message processing is faster. Additionally, the test also pinpoints queues that returned many empty messages, prompting administrators to rethink their choice of polling mechanism (long or short).
Target of the test: Amazon Cloud
Agent deploying the test : A remote agent
Outputs of the test : One set of results for each message queue
First-level descriptor: AWS Region
Second-level descriptor: Queue name
| Parameter | Description |
|---|---|
|
Test Period |
How often should the test be executed. |
|
Host |
The host for which the test is to be configured. |
|
Access Type |
eG Enterprise monitors the AWS cloud using AWS API. By default, the eG agent accesses the AWS API using a valid AWS account ID, which is assigned a special role that is specifically created for monitoring purposes. Accordingly, the Access Type parameter is set to Role by default. Furthermore, to enable the eG agent to use this default access approach, you will have to configure the eG tests with a valid AWS Account ID to Monitor and the special AWS Role Name you created for monitoring purposes.
Some AWS cloud environments however, may not support the role-based approach Note that the Secret option may not be ideal when monitoring high-security cloud environments. This is because, such environments may issue a security mandate, which would require administrators to change the Access Key and Secret Key, often. Because of the dynamicity of the key-based approach, Amazon recommends the Role-based approach for accessing the AWS API. |
|
AWS Account ID to Monitor |
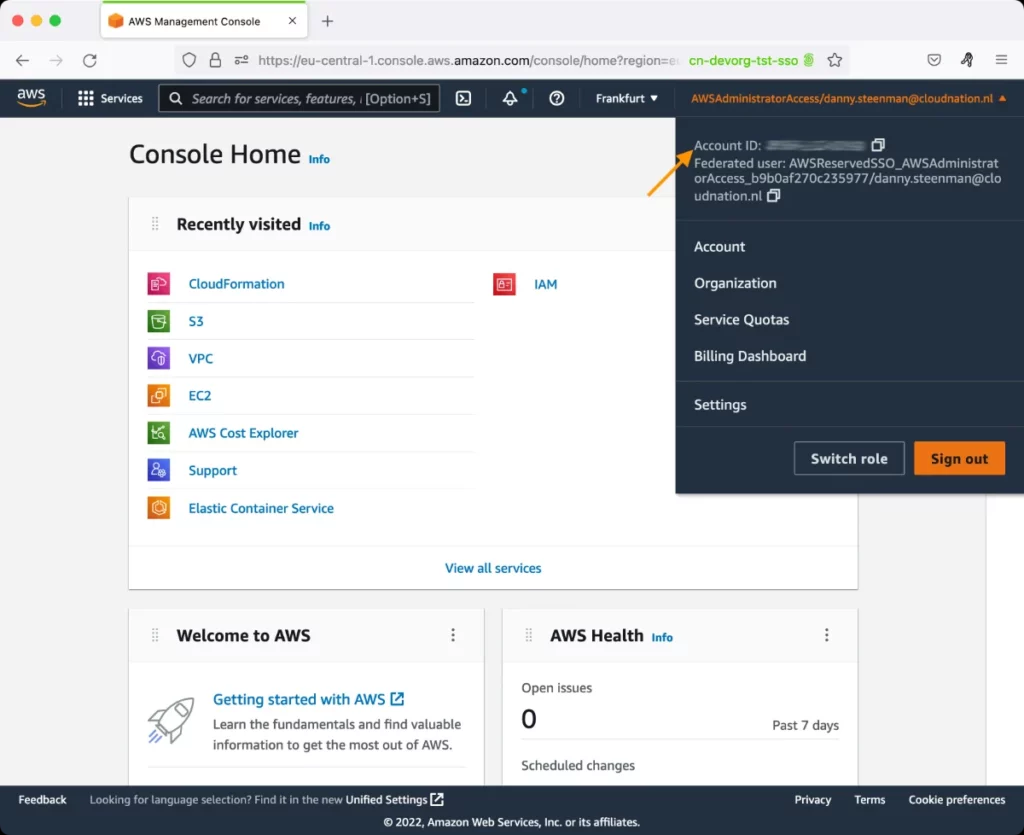
This parameter appears only when the Access Type parameter is set to Role. Specify the AWS Account ID that the eG agent should use for connecting and making requests to the AWS API. To determine your AWS Account ID, follow the steps below:
|
|
AWS Role Name |
This parameter appears when the Access Type parameter is set to Role. Specify the name of the role that you have specifically created on the AWS cloud for monitoring purposes. The eG agent uses this role and the configured Account ID to connect to the AWS Cloud and pull the required metrics. To know how to create such a role, refer to Creating a New Role. |
|
AWS Access Key, AWS Secret Key, Confirm AWS Access Key, Confirm AWS Secret Key |
These parameters appear only when the Access Type parameter is set to Secret.To monitor an Amazon cloud instance using the Secret approach, the eG agent has to be configured with the access key and secret key of a user with a valid AWS account. For this purpose, we recommend that you create a special user on the AWS cloud, obtain the access and secret keys of this user, and configure this test with these keys. The procedure for this has been detailed in the Obtaining an Access key and Secret key topic. Make sure you reconfirm the access and secret keys you provide here by retyping it in the corresponding Confirm text boxes. |
|
Proxy Host and Proxy Port |
In some environments, all communication with the AWS cloud and its regions could be routed through a proxy server. In such environments, you should make sure that the eG agent connects to the cloud via the proxy server and collects metrics. To enable metrics collection via a proxy, specify the IP address of the proxy server and the port at which the server listens against the Proxy Host and Proxy Port parameters. By default, these parameters are set to none , indicating that the eG agent is not configured to communicate via a proxy, by default. |
|
Proxy User Name, Proxy Password, and Confirm Password |
If the proxy server requires authentication, then, specify a valid proxy user name and password in the Proxy User Name and Proxy Password parameters, respectively. Then, confirm the password by retyping it in the Confirm Password text box. By default, these parameters are set to none, indicating that the proxy sever does not require authentication by default. |
|
Proxy Domain and Proxy Workstation |
If a Windows NTLM proxy is to be configured for use, then additionally, you will have to configure the Windows domain name and the Windows workstation name required for the same against the Proxy Domain and Proxy Workstation parameters. If the environment does not support a Windows NTLM proxy, set these parameters to none. |
|
Exclude Region |
Here, you can provide a comma-separated list of region names or patterns of region names that you do not want to monitor. For instance, to exclude regions with names that contain 'east' and 'west' from monitoring, your specification should be: *east*,*west* |
|
Default Connection Region |
By default, this test connects to the endpoint URL of the us-east-1 region to collect the required metrics. If the default us-east-1 region is not enabled in the target environment, then, for this test to collect the required metrics, specify the region that is enabled in the target environment. |
| Measurement | Description | Measurement Unit | Interpretation |
|---|---|---|---|
|
Messages send |
Indicates the number of messages added to this queue |
Number |
A high value of this measure is indicative of high messaging activity between application components. |
|
Size of messages added to the queue |
Indicates the average size of messages in this queue |
KB |
SQS supports messages with a minimum size of 1 byte and a maximum size of 262,144 bytes (256 KB). If the value of this measure is consistently higher than 256 KB, it means that many messages in the queue are more than 256 KB in size. To reduce the load on the queue, you can send messages larger than 256 KB using the Amazon SQS Extended Client Library for Java. This library allows you to send an Amazon SQS message that contains a reference to a message payload in Amazon S3. The maximum payload size is 2 GB. |
|
Messages received |
Indicates the number of messages that this queue returned in response to ReceiveMessage API calls. |
Number |
|
|
Empty messages received |
Indicates the number of ReceiveMessage API calls for which this queue did not return a message. |
Number |
A low value is desired for this measure. This is because, empty responses and false empty responses increase the cost of using Amazon SQS. If the value of this measure is very high, you may want to consider employing Long Polling. Long polling helps reduce your cost of using Amazon SQS by reducing the number of empty responses (when there are no messages available to return in reply to a ReceiveMessage request sent to an Amazon SQS queue) and eliminating false empty responses (when messages are available in the queue but aren't included in the response):
|
|
Messages deleted |
Indicates the number of messages deleted from this queue. |
Number |
A high value is desired for this measure. If too few messages are deleted, then it may increase the count of inflight messages in the queue. If the number of inflight messages in standard queues is allowed to grow beyond a prescribed limit, an OverLimit error will occur. To avoid this, you may have to do any of the following:
|
|
Messages delayed |
Indicates the number of messages in this queue that are delayed and not available for reading immediately. |
Number |
This can happen when the queue is configured as a delay queue or when a message has been sent with a delay parameter. Delay queues let you postpone the delivery of new messages in a queue for the specified number of seconds. If you create a delay queue, any message that you send to that queue is invisible to consumers for the duration of the delay period. You can use the CreateQueue action to create a delay queue by setting the DelaySeconds attribute to any value between 0 and 900 (15 minutes). You can also change an existing queue into a delay queue using the SetQueueAttributes action to set the queue's DelaySeconds attribute. Instead of an entire queue, you can delay specific messages in a queue. Amazon SQS message timers allow you to specify an initial invisibility period for a message that you add to a queue. For example, if you send a message with the DelaySeconds parameter set to 45, the message is not visible to consumers for the first 45 seconds during which the message stays in the queue. The default value for DelaySeconds is 0. Note that FIFO queues do not support timers on individual messages. Messages with message timers and messages in delay queues may take longer to be processed owing to the delay factor. |
|
Messages available for retrieval |
Indicates the number of messages available for retrieval from this queue. |
Number |
|
|
Messages that are inflight |
Indicates the number of messages inflight in this queue. |
Number |
Messages are considered in flight if they have been sent to a client but have not yet been deleted or have not yet reached the end of their visibility window. For standard queues, there can be a maximum of 120,000 inflight messages per queue. If you reach this limit, Amazon SQS returns the OverLimit error message. To avoid reaching the limit, you should delete messages from the queue after they are processed. You can also increase the number of queues you use to process your messages. For FIFO queues, there can be a maximum of 20,000 inflight messages per queue. If you reach this limit, Amazon SQS returns no error messages. |
|
Age of oldest non-deleted messages |
Indicates the approximate age of the oldest non-deleted message in this queue. |
Secs |
A very high value for this measure can indicate that one or more messages are not getting deleted as frequently as desired. To ensure timely processing and deletion of messages, prudently set the visibility timeout period and the message retention period. |