
Disk Space Test
This test monitors the space usage of every disk partition on a host. While this test typically reports the space usage of every physical disk partition on a host, when monitoring hosts running Windows host however, this test reports usage metrics of physical and logical partitions.
Target of the test : Any host system
Agent deploying the test : An internal agent
Outputs of the test : One set of results for each physical/logical disk partition and/or NFS drive on the host monitored
| Parameter | Description |
|---|---|
|
Test Period |
How often should the test be executed. |
|
Host |
The host for which the test is to be configured. |
|
Discover NFS |
Set this flag to Yes, if you want the test to automatically discover NFS drives on your system and report their status as well. By default, this flag is set to No. |
|
Use Sudo |
This parameter applies only to Linux and Solaris systems. By default, the USE SUDO parameter is set to No. This indicates that, by default, this test will report metrics by executing the df -Pk –l command on the Solaris host. However, in some highly secure environments, the eG agent install user may not have the permissions to execute this command directly. In such cases, do the following:
|
|
Sudo path |
This parameter is relevant only when the use sudo parameter is set to ‘Yes’. By default, the sudo path is set to none. This implies that the sudo command is in its default location – i.e., in the /usr/bin or /usr/sbin folder of the target Solaris host. In this case, the eG agent automatically runs the metastat command with sudo from its default location, once the use sudo flag is set to Yes. However, if the sudo command is available in a different location in your environment, you will have to explicitly specify the full path to the sudo command in the sudo path text box to enable the eG agent to run the sudo command. |
|
High Security |
This flag is applicable only when the target Linux host is monitored in the agentless manner. In highly secure environments, eG Enterprise could not perform agentless monitoring on a Linux host using SSH. To enable monitoring of the Linux hosts in such environments, set the HIGH SECURITY flag to Yes. It indicates that eG Enterprise will connect to the target Linux host in a more secure way and collect performance metrics. By default, this flag is set to No. |
|
Exclude |
Against this parameter, you can provide a comma-separated list of disk partitions that you want to exclude from monitoring. For example, on Unix systems, you can use this parameter to exclude temporary partitions that the Unix system itself creates from monitoring. |
|
Domain, Domain user, Domain password and Confirm password |
When monitoring a Windows system, if the Discover NFS flag of this test is set to Yes, then the test should be configured with the privileges of a valid domain user in order to auto-discover NFS drives and report their usage and status. In such a case therefore, specify a valid Windows domain name against Domain, provide the name of a valid user in that domain against Domain user, and specify the password of that user against Domain password. Once the domain user credentials are provided, the test auto-discovers all those NFS drives on the target Windows system to which the configured domain user has access. In the Confirm password text box, retype the Password of the configured domain user here. |
|
Timeout |
Specify the maximum duration (in seconds) for which the test will wait for a response from the server. The default timeout period is 30 seconds. |
|
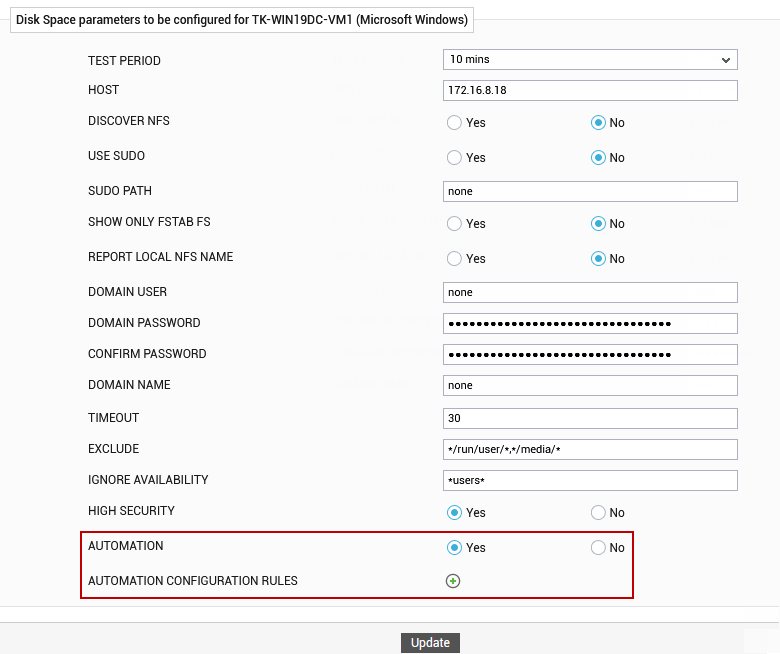
Automation and Automation Configuration Rules |
These parameters will appear only after the eG agent reports information of the disks to the eG manager in the first measurement period. When an application is installed/launched or services are run from a drive, one or more temporary files/folders may be created in the system drive or in other drives from which the operations are performed. Such temporary files/folders occupy considerable amount of space and may degrade the performance of the system which may result in poor user experience. To improve the performance of the system, administrators had to delete those files manually. Besides, there may be a few files/folders that are accessed less frequently or are no longer required in that drive. If the temporary/unnecessary files/folders are not removed at regular intervals, administrators will not be able to allocate enough disk space for critical files and folders. Also, administrators may be forced to periodically identify temporary/unnecessary files/folders and painstakingly delete them manually. Moreover, alerts raised when such temporary/unnecessary files/folders occupy the entire disk may not be of much importance to the administrators. To avoid such false alerts and unproductive work of manually deleting the files/folders, eG Enterprise offers the Automation capability. To enable this capability, administrators have to reconfigure this test. By default, the Automation parameter is set to No. If this flag is set to Yes, the Automation Configuration Rules parameter will then appear. Using the Automation Configuration Rules parameter, administrators can define rules to automatically delete unwanted files/folders from one or more available disks. To define the configuration rules, click on the encircled plus icon provided against the Automation Configuration Rules parameter. For more details on configuring the rules, refer to the Configuring Automation Clean-up Rules. Note: These parameters are applicable only for the test associated with the chosen component. These parameters will not be applied to other components even if the Apply to other components button is clicked in the Specific test Configuration page. |
|
DD Frequency |
Refers to the frequency with which detailed diagnosis measures are to be generated for this test. The default is 1:1. This indicates that, by default, detailed measures will be generated every time this test runs, and also every time the test detects a problem. You can modify this frequency, if you so desire. Also, if you intend to disable the detailed diagnosis capability for this test, you can do so by specifying none against DD frequency. |
|
Detailed Diagnosis |
To make diagnosis more efficient and accurate, the eG Enterprise embeds an optional detailed diagnostic capability. With this capability, the eG agents can be configured to run detailed, more elaborate tests as and when specific problems are detected. To enable the detailed diagnosis capability of this test for a particular server, choose the On option. To disable the capability, click on the Off option. The option to selectively enable/disable the detailed diagnosis capability will be available only if the following conditions are fulfilled:
|
| Measurement | Description | Measurement Unit | Interpretation | ||||||||||||||
|---|---|---|---|---|---|---|---|---|---|---|---|---|---|---|---|---|---|
|
Total capacity |
Indicates the total capacity of a disk partition. |
MB |
|
||||||||||||||
|
Used space |
Indicates the amount of space used in a disk partition. |
MB |
|
||||||||||||||
|
Free space |
Indicates the current free space available for each disk partition of a system. |
MB |
|
||||||||||||||
|
Percent usage |
Indicates the percentage of space usage on each disk partition of a system. |
Percent |
A value close to 100% can indicate a potential problem situation where applications executing on the system may not be able to write data to the disk partition(s) with very high usage. The detailed diagnosis of this measure reveals the name of the top-n file/directory, total size of the file/directory and percentage of space usage. |
||||||||||||||
|
Drive availability |
Indicates whether/not this drive is available currently. |
Percent |
If the drive is available, then this measure will report the value 100. If not, then this measure will report the value 0. This measure gains significance when monitoring NFS drives, as it enables you to identify those drives that are no longer mapped to the system. |
||||||||||||||
|
Cleanup automation status |
Indicates the current status of cleanup automation. This measure will appear only if the Automation parameter is set to Yes. |
|
The values reported by this measure and its numeric equivalents are mentioned in the table below:
Note: By default, this measure reports the Measure Values listed in the table above to indicate the current status of cleanup automation. The graph of this measure however, represents the status of a port using the numeric equivalents only. The detailed diagnosis of this measure reveals the following:
|
In case of Hyper-V and Hyper-V VDI components, the Disk Space test reports metrics for an additional Total descriptor. For this descriptor, the test reports the total disk capacity and space usage across all the disk partitions of the monitored Hyper-V host.
Configuring Automation Clean-up Rules
To save the time and effort involved in cleaning up the unwanted files/folders from the drives, eG Enterprise offers an easy-to-use auto-configure option in the form of an encircled plus icon that is given against the Automation Configuration Rules parameter. Note that this parameter will appear only if you set the Automation flag to Yes.
To configure the automation clean-up rules, do the following:
-
Click on the encircled plus icon given against the Automation Configuration Rules parameter (see Figure 1).
-
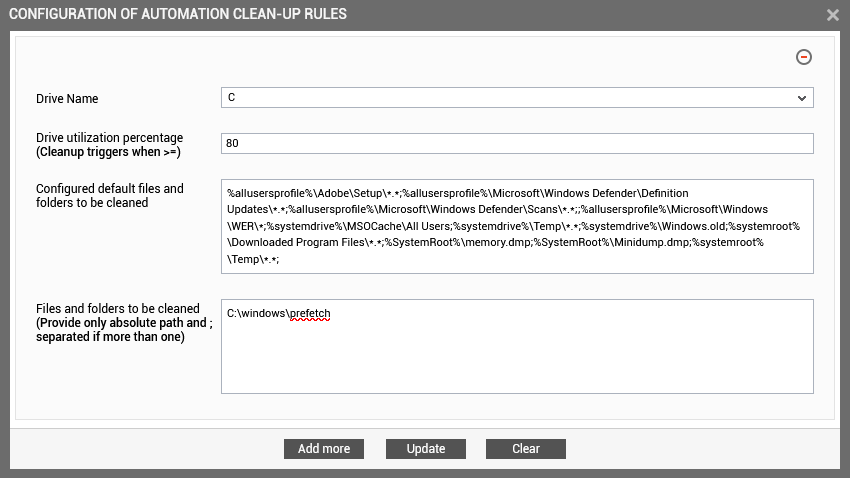
The configuration of automation clean-up rules window will then appear (see Figure 2).
-
In Figure 2, specify the following for defining rules for one or more drives:
-
Choose the drive for which you wish to define clean-up rules from the Drive name drop-down list.
-
Next, enter the utilization percentage of the specified drive in the Drive utilization percentage text box. When the drive utilization reaches/exceeds the value specified in this text box, the clean-up process will be triggered for the chosen drive.
-
If you select a drive in which the operating system files are stored from the Drive name drop-down list, then the Configured default files and folder to be cleaned text box will appear. This text box will display a recommended list of files and folders to be cleaned from the system drive. This list is pre-configured in the eg_tests.ini file. However, you can edit this list, if required, as follows:
- Edit the eg_tests.ini file in the <EG_INSTALL_DIR>\manager\config directory.
-
In the [Automation_Default_Values] section of the file, absolute paths to files and folders in the root drive of the Windows operating system will be given as a semi-colon separated list against the DiskSpaceTest.Windows.path parameter as shown below:
DiskSpaceTest.Windows.path=%allusersprofile%\Adobe\Setup\*.*;%allusersprofile%\Microsoft\WindowsDefender\Definition Updates\*.*;%allusersprofile%\Microsoft\Windows Defender\Scans\*.*;;%allusersprofile%\Microsoft\Windows\WER\*;%systemdrive%\MSOCache\Users;%systemdrive%\Temp\*.*;%systemdrive%\Windows.old;%systemroot%\Downloaded Program Files\*.*;%SystemRoot%\memory.dmp;%SystemRoot%\Minidump.dmp;%systemroot%\Temp\*.*;
You can also predefine the list of files and folders for non-Windows operating systems by specifying your list against the DiskSpaceTest.Non_Windows.path parameter.
-
Save the file after making the required changes.
Note that this text box will not appear if you choose a non-system drive from the Drive Name drop-down list.
-
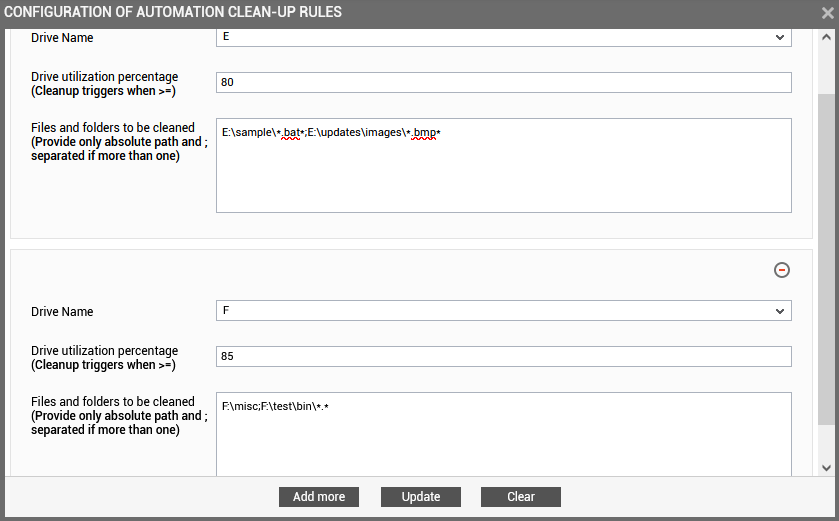
Next, specify full path to a file/folder or a list of files and folders that are not included in the predefined list in the Files and folders to be cleaned text box . This text box is common for all drives on the target host. For non-system drives, you can configure the list of files/folders to be cleaned-up by specifying full path to the same in the Files and folders to be cleaned text box (see Figure 3). You can clean-up more than one file/folder by configuring the full path to the files/folders in a semi-colon separated list. The full path to the files/folders should be specified as follows based on your requirement:
-
To clean-up a specific file from the chosen drive or its folders/subfolders, specify the full path as <drive>/<folder&sub-folders>/<fileToBeDeleted>. For example, E/test.doc, E/misc/sample.txt, E/test.doc;E/misc/sample.txt.
-
To clean-up a specific folder and its content from the chosen drive, specify the full path as <drive>/<folders&subfolders>/<folderToBeCleaned>. For example, E/misc/old.
-
To clean-up all contents of specific folder, specify the full path as <drive>/<folders&subfolders>/<contentsOfTheFolderToBeCleaned>/*. For example, E/misc/old/*. In the process, the contents of the specified folder will be cleaned up but the folder will exist in the drive.
-
To clean-up all files available in a specific folder, specify the full path as <drive>/<folders&subfolders>/<contentsOfTheFolderToBeCleaned>/*.*. For example, E/misc/old/*.*. In the process, all files available in the specified folder will be cleaned up but the folder and its sub-solders (if any) will exist in the drive.
-
To clean-up files with specific pattern/name, specify the full path as <drive>/<folders&subfolders>/log*.*.

Figure 3 : Configuring automation rules for non-system drive
-
-
-
You can add more rules for different drives in the Automation Configuration Rules page by clicking on the Add more button. Note that you cannot add the system drive for more than one time. However, you can add more than one rule for non-system drives. To remove a specification that pre-exists, just click on the encircled minus icon that corresponds to it (see Figure 4). Upon clicking the Clear button, you can remove all the specifications that you configured.
-
Finally, click the Update button to save the configurations.
