How to Monitor VMware vCenter Using eG Enterprise?
Once the pre-requisites for monitoring vCenter are in place, proceed to manage the VMware vCenter, For this, follow the steps below:
- Log into the eG administrative interface.
-
eG Enterprise cannot automatically discover the VMware vCenter. You need to manually add vCenter using the COMPONENTS page (see Figure 1) that appears when the Infrastructure -> Components -> Add/Modify menu sequence is followed. Remember that components manually added are managed automatically.
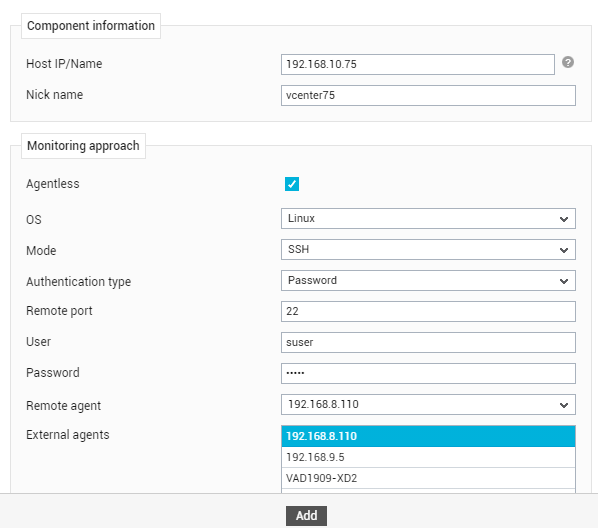
- In Figure 1 that then appears, specify the Host IP/Name of the vCenter server to be monitored, and assign a unique Nick name to the server.
-
Since eG Enterprise monitors vCenter servers in an 'agentless' manner by default, the Agentless flag is enabled by default. Then, specify the following for monitoring vCenter in an agentless manner:
- OS: Set OS as Linux, if the vCenter server being monitored is a Linux-based appliance. If vCenter is running on a Windows system, then set OS as some flavor of Windows.
- Mode: Set Mode as SSH, if vCenter server being monitored is a Linux-based appliance. If vCenter is running on a Windows system, then set Mode as Perfmon.
-
Authentication type: This is applicable only if the Mode is set to SSH. If you want the remote agent to communicate with a target host via SSH, then you should also pick an encryption type/mode for the SSH connection. The options here are: Password authentication and Keybased authentication. If you want the SSH connection to use the Password Authentication mode, then, first make sure that Password Authentication is enabled on the target host.
For this, follow the steps below:
- Login to the VMware vCenter server that is installed as a Linux-based appliance
- Edit the sshd_config file in the /etc/ssh directory.
- Check whether the Password Authentication flag in the sshd_config file is set to no. If so, set it to yes.
- Then, save the file and restart/signal the SSH daemon (eg., using kill -1 <sshd pid>)
- Finally, set the Authentication type flag of this test to Keybased.
If you want the SSH connection to use the Key-based Authentication mode instead, then first make sure that Key-based authentication is enabled on the target host. For this purpose, you will require a public/private key pair. A public/private key pair is available in the /opt/egurkha/agent/sshkeys/ directory of the eG agent. While the private key is available in the file named id_rsa, the public key is contained within the file authorized_keys. The pass phrase associated with the default private key is eginnovations. You now have the option to proceed with the default keys or generate a different key pair.
If you decide to go with the keys bundled with the eG agent, do the following:
- To enable key-based authentication, the private key should remain in the /opt/egurkha/agent/sshkeys/ directory of the eG agent, and the public key should be copied to the vCenter appliance to be monitored. To achieve this, first login to the vCenter appliance to be monitored as the eG user.
- Create a directory named .ssh in the <USER_HOME_DIR> on the host using the command: mkdir ~/.ssh.
- Next, copy the authorized_keys file from the /opt/egurkha/agent/sshkeys/ directory on the eG agent host to the <USER_HOME_DIR>/.ssh directory on the vCenter appliance. Make sure that the permission of the .ssh directory and the authorized_keys file is 700.
On the other hand, if you want to generate a new key pair, then do the following:
- Login to the vCenter appliance to be monitored as an eG user.
-
From the <USER_HOME_DIR>, execute the command: ssh-keygen -t rsa. Upon executing the command, you will be requested to specify the full path to the file to which the key is to be saved. By default, a directory named .ssh will be created in the <USER_HOME_DIR>, to which the key pair will be saved. To go with the default location, simply press Enter.
Generating public/private rsa key pair.
Enter file in which to save the key (/home/egurkha/.ssh/id_rsa): -
Next, you will be prompted to provide a pass phrase. Provide any pass phrase of your choice.
Enter passphrase (empty for no passphrase): eginnovations
Enter same passphrase again: eginnovations -
If the key pair is created successfully, then the following messages will appear:
Your identification has been saved in /home/egurkha/.ssh/id_rsa.
Your public key has been saved in /home/egurkha/.ssh/id_rsa.pub.
The key fingerprint is:
09:f4:02:3f:7d:00:4a:b4:6d:b9:2f:c1:cb:cf:0e:e1 dclements@sde4.freshwater.com - The messages indicate that the private key has been saved to a file named id_rsa in the <USER_HOME_DIR>/.ssh, and the public key has been saved to a file named id_rsa.pub in the same directory. Now, rename the id_rsa.pub file as authorized_keys.
- Then, to enable key-based authentication, login to the eG agent host.
- Copy the id_rsa file from the <USER_HOME_DIR>/.ssh directory of the target vCenter appliance to the <EG_INSTALL_DIR>\agent\sshkeys directory on the eG agent host.
-
Finally, log into target vCenter appliance once again (as the eG user) and lock the file permissions down to prevent other users from being able to read the key pair data, using the following commands:
chmod go-w ~/
chmod 700 ~/.ssh
chmod go-rwx ~/.ssh/*
Once Key-based authentication is enabled, then set the Authentication type flag of this test to Keybased. Also, when prompted, specify the Key file name.
- Remote port: If SSH is chosen as the Mode, then this will be 22 by default. Make sure that this port is opened on the vCenter host.
-
User and Password: This is applicable only if Linux is chosen as the OS - i.e., if the vCenter server being monitored is a Linux-based appliance. Typically, when monitoring any Linux host remotely, you need to configure User and Password with the credentials of an SSH user with rights to access the target Linux host via SSH. However, when monitoring a vCenter server appliance remotely, the SSH user whose credentials are to be provided here should also have shell access. In this case therefore, configure User and Password with the credentials of an SSH user who has shell access. Alternatively, you can grant shell access to any SSH user whose credentials are configured here. To achieve this, do the following:
- Make note of the User and Password specified here for an SSH user.
- Then, login to the vCenter appliance as a root user.
- Open the shell prompt.
-
Run the vipw command. This command is used to edit the file /etc/passwd.
-
If the command runs successfully, the contents of the /etc/passwd file will be displayed in editable mode.
-
In the contents, look for an entry that begins with the user name you noted in step 1. For instance, if the remote agent connects to and monitors the vCenter appliance as user elvis, then look for an entry that begins with elvis. Typically, this entry will be as follows:
elvis:x:1012:4045::/opt/egurkha:/bin/appliancesh
Change this entry as follows:
elvis:x:1012:4045::/opt/egurkha:/bin/bash
- Finally, save the file.
- Remote Agent and External Agent: From the Remote Agent drop-down, pick a remote agent for monitoring the vCenter server in an agentless manner. Next, assign one/more External Agents for monitoring the network connection to the vCenter host.
- Finally, click the Add button to add the vCenter server.
- Next, try to sign out of the eG admin interface.
-
When you attempt to sign out, a list of unconfigured tests appears (see Figure 2).
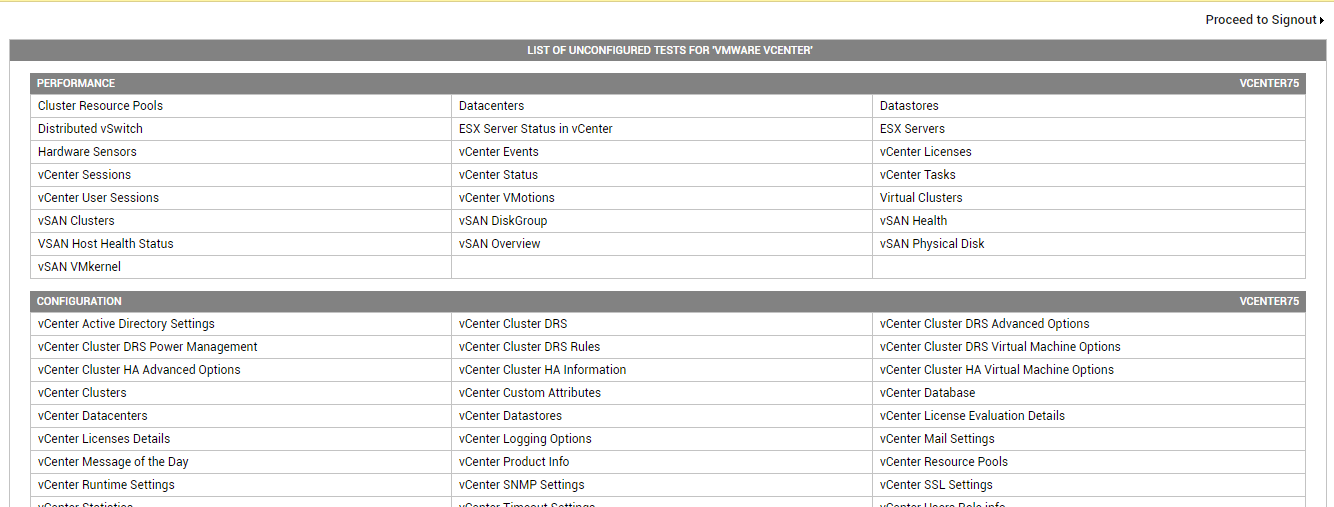
Figure 2 : List of Unconfigured tests for the vCenter server
-
Click on any test from the list of unconfigured tests to configure it. Say, you click on the Datacenters test. Figure 3 will then appear.
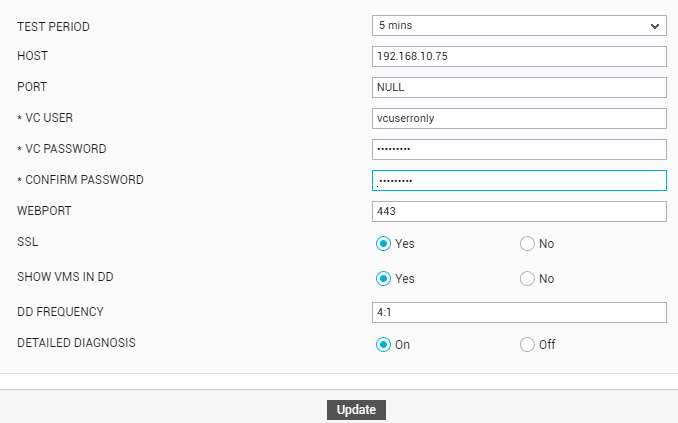
- To know how to configure the parameters for the tests, refer to Monitoring VMware vCenter.
- Finally, sign out of the eG administrative interface.