Configuring the Dell Compellent SMI-S Provider using a Local User Account (v5.5.4 and above)
To configure the Dell Compellent SMI-S Provider using a Local User Account, follow the steps as discussed below:
- Login to the Windows server on which the the Dell Compellent Data Collector Manager is installed.
- Create a local user on the server. The maximum length of the username and password should be 8 characters. Note that the specified password should be Alpha-numeric. No special characters are allowed while specifying the user name.
-
Add the local user to the Administrators group by following the steps mentioned below:
- Select the Groups option from the Local User and Groups subnode of the Server Manager node. A context sensitive Groups section will appear in the right panel.
- Clicking the Administrators group will invoke the Administrators Properties pop up window (see Figure 1)
- The user that you have created will be listed in the Members section as shown in Figure 1.
- Select the user and click the Add button to add the user to the Administrators group.
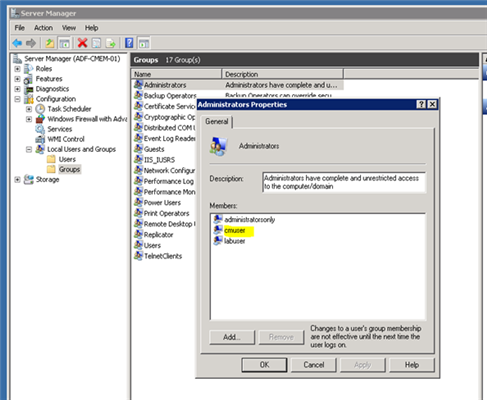
Figure 1 : Adding the created local user to the Administrators group
-
Then, you will be required to associate this user to the Logon as a Service policy. To assoicate this user to the policy, do the following:
- Follow the menu sequence in the Windows server: Start -> All Programs -> Administrative Tools -> Local Policies -> User Rights Assignment
- A list of policies will then appear in the context sensitive right panel. Clicking the Logon as a Service policy will invoke the Logon as a service Properties window (see Figure 2).
- Select the local user that you have created and click the Add User or Group button. Finally, clicking the OK button will register the necessary changes.
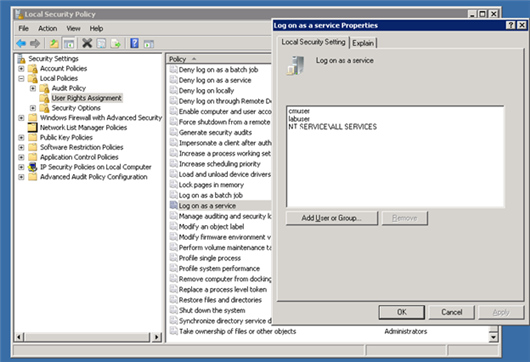
Figure 2 : Associating the user to the Logon as a service policy
Note:
For the changes made in Step 3 and Step 4 to be effective, logoff and login to the Windows server with the credentials of the created local user.
- Once you have provided the necessary privileges to the created local user, you will be required to add the same user to the Compellent Enterprise Manager.
-
If you have used the open security policy, then you can add the user through the Enterprise Manager Client Application. If you have used the Advanced security policy, then you can add the user from the Data Collector Manager Interface. Since we have used the open security policy, the user is added through the Enterprise Manager Client Application (see Figure 3).
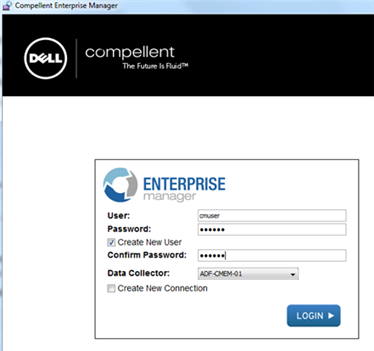
Figure 3 : Adding a new user through the Compellent Enterprise Manager Client Application
- Select the Create New User check box (see Figure 3) and then specify the User which is the same as the local user that you have created on the Windows server.
- Specify the Password and then click the LOGIN button. The password need not be the same as that of the password of the local user.
-
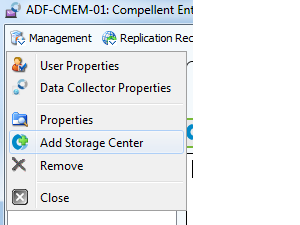
Next, add the target Dell Compellent Storage Center that is to be monitored by clicking the Add Storage Center option that appears upon clicking the Management menu (see Figure 4):
-
In Figure 5 that appears, specify the following:
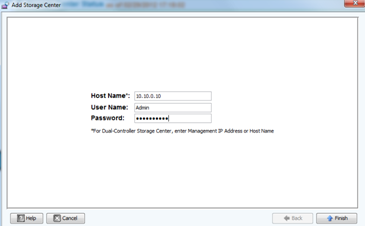
Figure 5 : Specifying the credentials of the target Dell Compellent Storage Center
- Host Name – Specify the IP address of the target Dell Compellent Storage Center
- User Name – Specify the name of the user who is authorized to access the target Storage Center
- Password - Specify the password that corresponds to the specified User Name.
Note:
If the user has been successfully added, then you can view the user when you click the User Viewer that appears upon clicking the Properties button of the Compellent Enterprise Manager Data Collector.
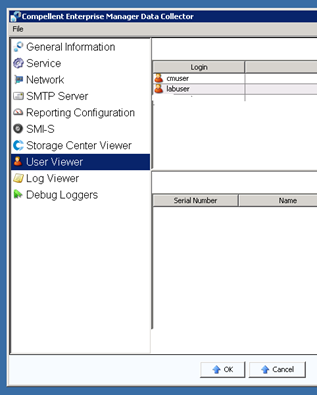
Figure 6 : Viewing the created user by clicking the User Viewer node
-
Once you have created the Compellent Enterprise Manager User, you will be required to provide the necessary Data Collector Service Properties by following the menu sequence: Start -> All Programs -> Compellent Technologies -> Compellent Enterprise Manager -> Compellent Enterprise Data Collection Manager - > Service. Figure 7 will then appear.
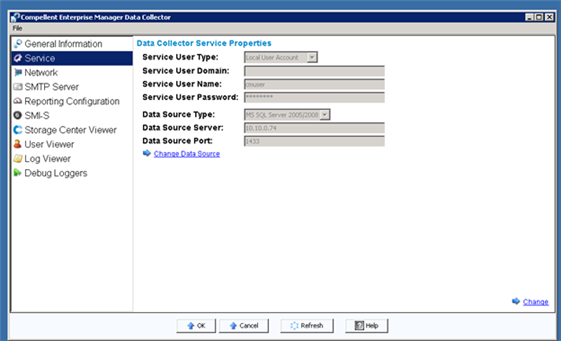
- Clicking the Change link in Figure 7 will enable you to edit the properties of the Data Collector Service. Now, choose Local User Account from the Service User Type drop down list.
- Then, in the Service User Name and Service User Password text boxes, specify the credentials of the local user that you have created in Step 2.
-
Finally, you will be required to enable the SMI-S Server properties as shown in Figure 8 . Clicking the Change link in Figure 8 will enable you to make the following changes to the SMI-S Server Configuration:
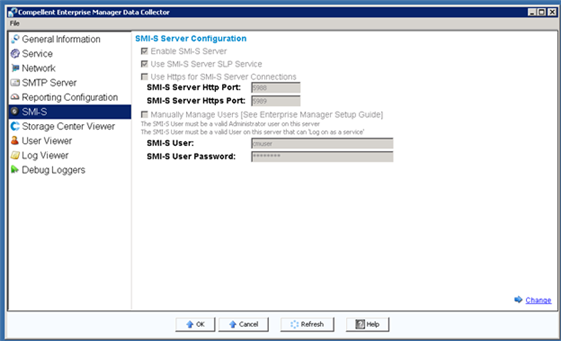
Figure 8 : Enabling the SMI-S Server properties
- Select the checkbox that appears before the Enable SMI-S Server option.
- Uncheck the Use Https for SMI-S Server Connections option.
- Uncheck the Manually Manage Users option and then provide the credentials of the Enterprise Manager user that you have created in the SMI-S User and SMI-S User Password text boxes.
- Finally, clicking the Apply Changes link will apply the changes that you have made in the SMI-S Server Configuration section.
- Now, you can proceed to configure the tests that pertain to the Dell Compellent Storage Center.