Configuring the Remote Agent to Obtain the Inside View of Windows VMs, using the eG VM Agent
To provide the inside view of a Unix VM, the eG agent uses secure shell (SSH). To obtain the inside view of a Windows VM, the eG agent offers two options. The first option uses Windows File & Print Sharing services to push monitoring components to the VMs. These monitoring components are then executed on the VM to collect metrics from the VMs. To push monitoring components to the VM and to periodically invoke these components, the eG agent requires domain administrator privileges to all the VMs being monitored.
In many production environments, strict security restrictions are enforced, and it may not be possible to configure a monitoring solution with domain administration privileges for each of the VMs. To handle such environments, the eG VM monitor uses a lightweight monitoring component called the eG VM Agent, which is installed inside each of the VMs to obtain metrics regarding the health of the VMs. The eG VM Agent can be best described as a software that can be installed on the Windows virtual machines of a virtual infrastructure to allow a single eG agent to obtain an inside view of these VMs, without domain administrator privileges.
Users have multiple options to choose from when it comes to installing the eG VM Agent. These options have been discussed below:
- Manually install the eG VM Agent on every Windows VM using the executable that eG Enterprise includes;
- Bundle the eG VM Agent as part of a template VM, and use this template to create multiple VMs; this way, the eG VM Agent is automatically available in all the VMs that are created using the template;
- Use a software distribution solution such as Microsoft System Center to distribute the eG VM Agent software to existing VMs from a central location;
Use the install procedure that is ideal for your environment, and quickly get the eG VM Agent up and running. The detailed manual installation procedure has been discussed hereunder:
- To install the eG VM Agent on a 32-bit VM, double-click on the eGVMAgent.exe, and to install the same on a 64-bit VM, double-click the eGVMAgent_64.exe.
-
Figure 1 then appears. Click on the Next button in Figure 1 to continue.
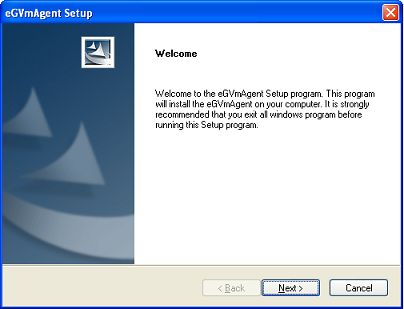
Figure 1 : Welcome screen of the eG VM Agent installation wizard
-
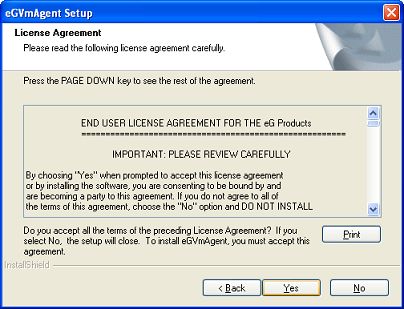
When Figure 2 appears, click on Yes to accept the displayed license agreement.
-
Use the Browse button in Figure 3 to indicate the location in which the agent should be installed, and click the Next button to proceed.
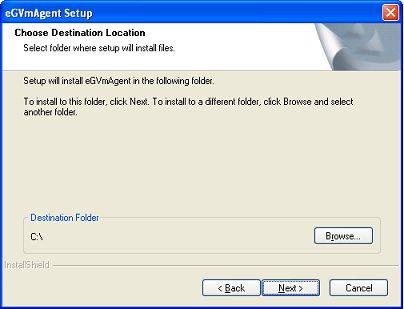
Figure 3 : Specifying the install directory of the eG VM Agent
-
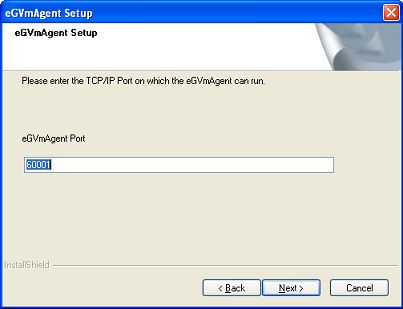
Next, specify the port at which the VM agent listens for requests from the eG agent. The default port is 60001. After port specification, click on the Next button in Figure 4 to proceed.
-
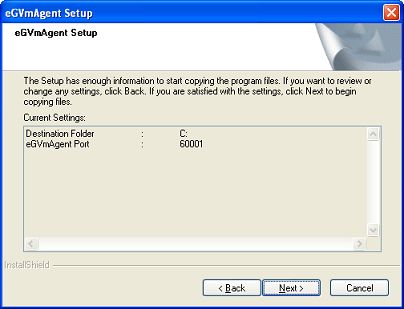
A summary of your specifications then follows (see Figure 5). Click Next to proceed.
-
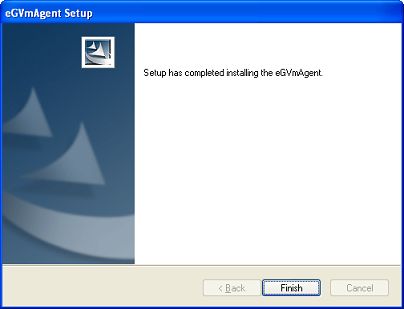
Finally, click the Finish button in Figure 6 to complete the installation.