Managing the SMTP Sender/Receiver Components
The next step to emulating the email sending/receiving activity in an target mail service environment is to manage the SMTP Mail Sender and Mail Receiver components, and assign an external agent to each component.
For this, follow the steps below:
-
Login to the eG admin interface.
-
Follow the Infrastructure -> Components -> Add/Modify menu sequence.
-
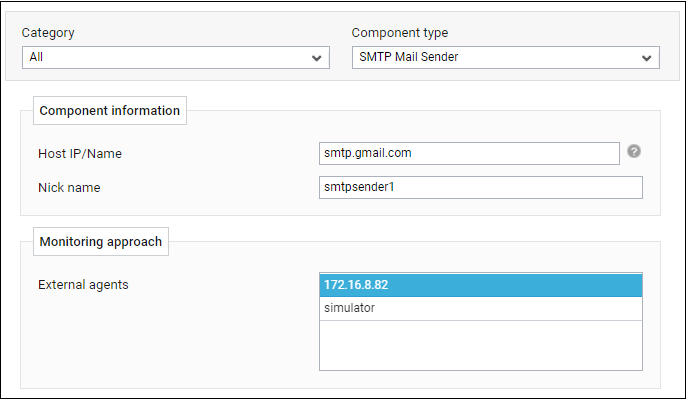
First, let us add the SMTP Mail Sender component. Using this component, you can emulate the mail sending activity. To add such a component, in the page that appears next, select SMTP Mail Sender as the Component type, and then click the Add New Component button.
-
Figure 1 will then appear.
-
Specify the Host IP/Name of target component. Below are the IMAP addresses of some of the key mail service providers:
Email Provider
SMTP Address
Send Port
Gmail
smtp.gmail.com
465
Yahoo
smtp.mail.yahoo.com
465
Exchange Online
Outlook.office365.com
587
Exchange on premises
<<Exchange server IP>>
465
-
Provide a unique Nick name for the component.
-
Then, assign an external agent to the SMTP Mail Sender component, by selecting an option from the External agents list box inFigure 1.
-
Finally, click the Add button to add the component.
-
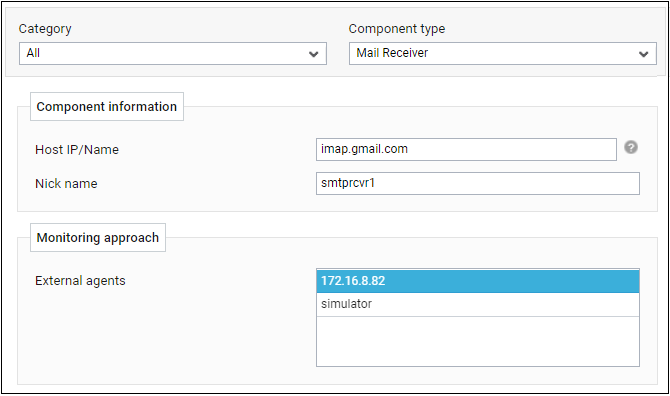
Once you return to the Add Components page, proceed to add the Mail Receiver component. Using this component, you can simulate the email receiving process. To add such a component, in the Add Components page, select Mail Receiver as the Component type, and then click the Add New Component button.
-
Figure 2 will then appear.
-
Specify the Host IP/Name of target component. Below are some of the key IMAP and POP3 providers:
Email Provider
IMAP Address
Receive Port
Gmail
imap.gmail.com
993
Yahoo
imap.mail.yahoo.com
993
Exchange Online
Outlook.office365.com
993
Email Provider
POP3 Address
Receive Port
Gmail
pop.gmail.com
995
Yahoo
pop.mail.yahoo.com
995
Exchange Online
Outlook.office365.com
995
-
Provide a unique Nick name for the component.
-
Then, assign an external agent to the Mail Receiver component, by selecting an option from the External agents list box in Figure 2.
-
Note:
If the sender and receiver are in the same location, then you can assign the same external agent to the Sender and Receiver components. On the other hand, if the sender and receiver are in different locations, it will make sense to assign a different external agent to the Sender and Receiver components.
-
Finally, click the Add button to add the component.