Adding OLVM Manager 4.x
eG Enterprise cannot auto-discover OLVM Manager 4.x. This implies that you need to manually add the component for monitoring. The steps for manually adding the OLVM Manager 4.x component are detailed below:
-
Log into the eG administrative interface.
-
Click on the Add Component button in the right corner of the Components at a Glance page that appeared or follow the Infrastructure -> Components -> Add/Modify menu sequence.
-
The Components page will then appear. In the Components page, select OLVM Manager 4.x as the Component type and click the Add New Component button.
-
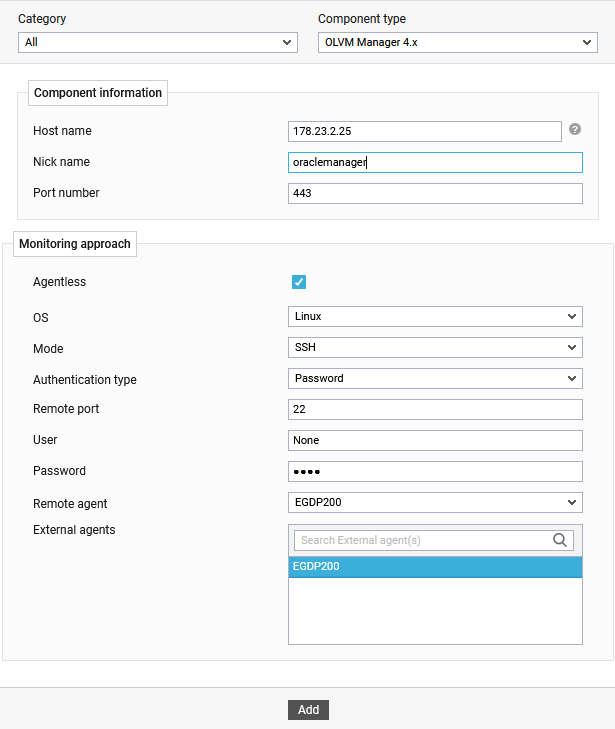
Figure 1 will then appear.
-
When Figure 1 appears, specify the Host IP the Nick name and Port Number. By default the Port Number will be 443.
-
Since OLVM Manager 4.x can be monitored in an Agentless manner alone, the Agentless flag will be enabled by default.
-
By default, Linux is selected as the OS, SSH as the Mode, Password as the Authentication type, and the Remote Port is set to 22.
-
Provide the User and Password.
-
Then, pick the Remote Agent that should do agentless monitoring of the server.
-
Next, assign an External Agent to the server.
-
Finally, click the Add button to add the server to the eG Enterprise system. Components manually added will be automatically managed by eG Enterprise.