Configuring the eG Manager for Linux Systems
After the installation, the eG manager needs to be configured for proper functioning. The eG manager configuration involves:
The sections that follow discuss each of these steps elaborately.
Setting Up the eG Manager
eG manager setup involves configuring the IP address and port number of the eG manager, SSL enabling it, enabling/disabling support for double-byte characters, and configuring manager redundancy if required.
To setup the eG manager, do the following
- For configuring the eG manager, first login as the eG user.
- For the eG manager to operate correctly, a valid license must be available at the location /opt/egurkha/bin.
- It is essential to ensure that a database server is available to host the eG database. The database server used for the eG database can either reside on the eG manager itself or it could be hosted on an external server. The installation process will attempt to connect to the database server and install the eG database. The sizing requirements for the eG database depend on the number of servers to be monitored.
-
Next, at the prompt issue the following command:
/opt/egurkha/bin/setup_manager
The following message will appear.
Configuring the eG Manager...
The licensing terms for eG products are mentioned in the file
/opt/egurkha/license_agreement.
PLEASE READ THIS FILE BEFORE PROCEEDING FURTHER.
-
Press y for accepting the terms. Once the licensing terms have been accepted, the configuration process prompts the user to enter the full hostname or the IP address of the host on which the eG manager is being configured. Pressing n on the other hand, indicates non-acceptance of the licensing terms and terminates the configuration process.
Please indicate if you accept the eG licensing terms y/n [n]
-
In this stage, enter the full hostname or the IP address of the host on which the eG manager is being configured. If the domain name service is used in the target environment, use the full hostname. Otherwise, specify the IP address. Also, enter the port number on which the eG manager listens for requests (from the agents and from the users) [default is 7077]
Port configuration for the eG Manager
*********************************************************************
Enter the full hostname (or IP address) of this host:
Enter the port number for the eG Manager [7077]:
Note:
-
While specifying the host name/IP address of the manager, please take care of the following aspects:
- If the host name is provided when installing the manager, use this name (and not the IP address) for accessing the user interface via the web browser.
- If the host name is provided, make sure that forward and reverse lookups for this name are enabled via the DNS service in the target environment.
- When providing an IP address for the eG manager, note that only an IPv4 address can be provided. To configure the eG manager on a host that has been configured with an IPv6 address, you will have to provide the fully-qualified host name of that host or an alias name, at the above prompt.
-
-
Following this you will be required to indicate if the manager is to be configured to use SSL or not.
Do you want the eG Manager to be SSL enabled y/n [n] :
Enter y to enable SSL, or n to disable it.
-
The eG Enterprise system provides users with the option to view and key in data in a language of their choice. Different users connecting to the same manager can view data in different languages. However, languages such as French, Chinese, Japanese, Korean etc, support a double-byte character set. To view data in the eG user interface in languages such as French, Chinese, Japanese, Korean etc, the eG manager should be explicitly configured to display and process double-byte characters. In such a case, enable double-byte support for the eG manager by specifying y. On the other hand, for handling the character sets of English language, the eG manager need not be double-byte enabled. At such times, enter n to disable double-byte support for the eG manager.
Do you require the eG Manager to be double-byte enabled (for East Asian languages) y/n ? n
-
Next, the setup_manager script invokes the setup_cluster script (from the /opt/egurkha/bin directory) to configure the redundant manager capability of eG Enterprise. eG Enterprise offers a redundant manager option wherein a secondary management console can act as an active or passive standby for the primary console. This capability, together with the ability to deploy redundant external agents in multiple locations, ensures that there is no single point of failure for the monitoring solutions. For more details about manager redundancy, refer to the eG User Manual.
When setup_cluster executes, it first requests your confirmation to enable manager redundancy.
Would you like to enable eG manager redundancy y/n [n]? y
If n is specified, the setup_cluster script will automatically terminate, and the setup_manager script will continue executing. To configure manager redundancy at any later point in time, execute the setup_cluster script separately, from the /opt/egurkha/bin directory. The procedure for this has been provided in the Configuring Manager Redundancy topic.
-
If y is specified at step 9, you will be required to indicate whether SSL has been enabled for the manager being configured.
Please indicate if your eG Manager uses SSL y/n :[n] n
Press y to confirm SSL-enabling and n to deny it.
-
Next, indicate whether Network Address Translation (NAT) is used.
Please specify if you use Network Address Translation(NAT) y/n :[n] y
NAT facilitates multiple managers spanning geographies to communicate with one another. In such a case, specify y here. If not, enter n.
-
If NAT is used (i.e., if y is specified at step 13), provide the NAT IP (or hostname), using which the managers interact with each other.
Please enter the NAT IP/hostname:
-
Similarly, also indicate whether Port Address Translation (PAT) is used. PAT again comes into play only when the managers span geographies. In such a case, enter y. If not, press n.
Please specify if you use Port Address Translation(PAT) y/n :[n]y
-
If y is specified against PAT usage, then specify the PAT port number.
Please enter the PAT port: 8088
-
Then, specify y if the manager uses a proxy server for communicating with the other managers in the redundant cluster.
Please indicate if you would use proxy server for communications y/n :[n] y
-
If a proxy server is indeed used, you will then have to provide the IP address (or hostname) and port number of the proxy server.
Please enter the hostname of the proxy: 192.168.10.60
Please enter the port of the proxy: 80
-
Indicate whether further authentications for the proxy server are required, and if so, proceed to provide the user name and password to be used for the proxy.
Do you need authentication for the proxy? y/n [n]: y
Please enter the username to be used for the proxy: user
Please enter the password for user :
Please re-enter the password for user :
-
Next, state whether the manager being configured is to be set as the primary manager.
Is this a primary eG Manager y/n [n]? n
-
If the current manager is not a primary manager (i.e., if n is specified at step 21), then it means it is a secondary manager. Therefore, proceed to provide the IP address and port number of the primary manager with which this secondary manager communicates.
Please enter the hostname of the primary eG Manager: 192.168.10.59
Please enter the port of the primary eG Manager: 7077
Note:
- A target environment can have only one primary manager and one secondary manager.
- An admin user can login to the primary manager only.
- When running setup_cluster on a secondary manager, make sure that you specify the IP/hostname of the primary manager depending upon how you have configured the cluster in the primary manager. In other words, if when running setup_cluster on the primary manager, you have provided the IP address of the primary manager, then make sure that you provide the IP address only when setup_cluster prompts you for the details of the primary manager on the secondary manager.
-
Finally, indicate whether the primary manager uses SSL or not by specifying y or n.
Please indicate if your primary eG Manager uses SSL y/n [n]: n
Once this is specified, the setup_cluster script will exit, and the setup_manager script will resume.
Note:
Ensure that primary and secondary managers in a cluster use a separate database.
-
With that, the configuration of the eG manager setup ends. Upon successful configuration, the following messages appear:
***********************************************************
If there were no errors, the eG Manager has been installed.
You will now need to create the eG database. To do so, open a browser and
access the URL https://<EG_MANAGER_IPORHOSTNAME>:<EG_MANAGER_PORT>
Once the database is set up, use the commands /opt/egurkha/bin/start_manager
and /opt/egurkha/bin/stop_manager to start and stop the manager.
You will need a valid license to start the eG Manager.
Please contact support@eginnovations.com to request for a license.
***********************************************************
Configuring the eG Database
After setting up the eG manager, proceed to configure the eG database. The eG manager stores real-time performance metrics, history of alarms, detailed diagnostics, thresholds, and even performance trends in this database.
If a SQL database pre-exists on Microsoft Azure, you can configure such a database as the eG database. Likewise, if a SQL Managed Instance is available on the Azure cloud, then that managed instance can be configured as the eG backend. On the other hand, if a Microsoft Azure SQL database / SQL Managed Instance is not in use in your environment, then it is essential to ensure that an Oracle / Microsoft SQL server is available to host the eG database. Such a database server can either reside on the eG manager itself or it could be hosted on an external server.
To enable you to easily configure an eG database, a special web page is provided. To access this web page, do the following:
- From any supported browser, connect to the URL: http://<eGManagerIPorHostName>:<eGManagerPort> or https://<eGManagerIPorHostName>:<eGManagerPort>, depending upon whether/not the eG manager is SSL-enabled.
-
Figure 1 will then appear.
-
Using Figure 1, you can pick a backend for the eG manager, and configure an eG database on it. The sections below elaborately discuss how this web page can be used to perform the following:
- Configure a Microsoft SQL database (on a Microsoft SQL server or on Microsoft Azure or on an Amazon RDS instance) or a SQL Managed Instance on the Azure cloud as the eG database;
- Configure an Oracle database on an Oracle database server or on Amazon RDS instance as the eG database;
Using Microsoft SQL Database
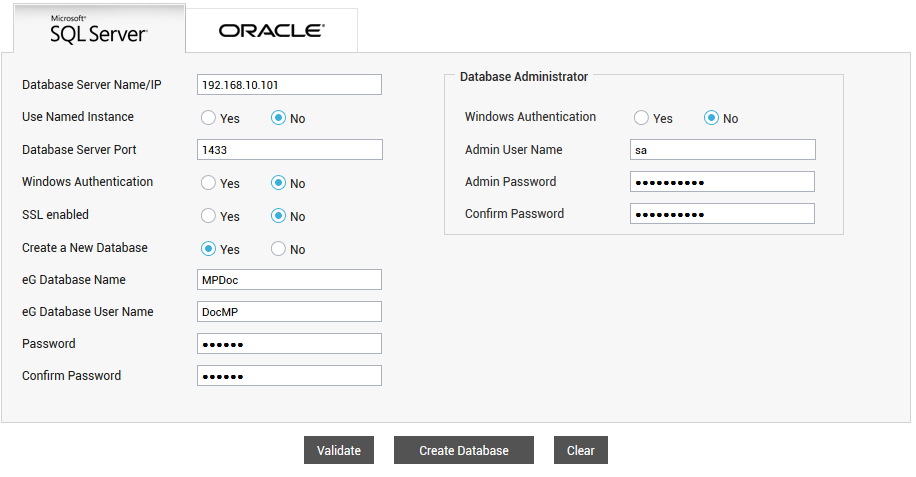
As soon as the web page opens, the Microsoft SQL Server tab page opens in it by default (see Figure 2).
Figure 2 : Configuring the eG database on a Microsoft SQL Server
If you choose to configure a Microsoft SQL database (on Azure or on a Microsoft SQL server) or a SQL Managed Instance on Azure as the eG backend, then do the following using Figure 2:
-
First, enter the location of the Microsoft SQL server by specifying the hostname and port on which the server is hosted against Database Server Name/IP. If you have already configured a SQL database on Microsoft Azure and want to use this database as the eG database, then, against Database Server Name/IP, provide the fully-qualified SQL server name that Azure auto-generates when creating a SQL database.
Note:
- If the Microsoft SQL server being configured is part of a Microsoft SQL Cluster, then make sure you specify the virtual cluster IP address / cluster name as the hostname / IP address of the Microsoft SQL server in Figure 2.
-
If the Microsoft SQL server being configured is part of an SQL AlwaysOn Availability Group, then make sure you specify the name of the availability group listener as the hostname / IP address of the Microsoft SQL server. An availability group listener is the name of the SQL server to which clients can connect in order to access a database in a primary or secondary replica of an AlwaysOn availability group. If such a SQL server is not configured with a listener name, then enter the virtual cluster IP address or cluster name against hostname / IP address.
-
To know how to determine the host name / IP address of the Amazon RDS instance that hosts the eG database, follow the steps detailed in
-
To know how to determine the host name / IP address of the Azure SQL Managed Instance that hosts the eG database, follow the steps detailed in
-
To know how to determine the host name / IP address of the Azure SQL Database that is configured as the eG database, follow the steps detailed in
-
If the Microsoft SQL server being configured uses named instances, then set the Use Named Instance flag to Yes. Then, specify the name of the instance against the Instance Name field, as depicted by Figure 3.
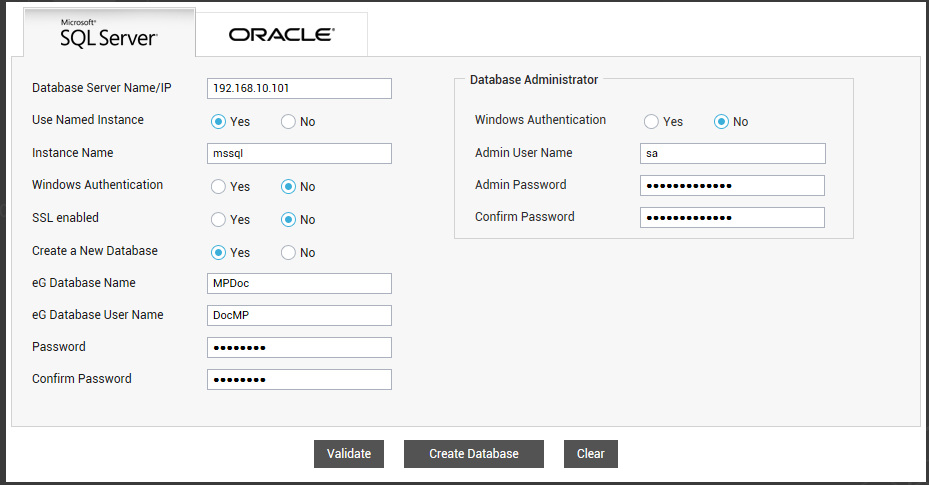
Figure 3 : Specifying the name of the SQL server instance to use
-
On the other hand, if the Microsoft SQL server does not use named instances, then set the Use Named Instance flag to No, and enter the port at which the SQL server listens in the Database Server Port text box (see Figure 2).
Note:
-
To know how to determine the port number of the Amazon RDS instance that hosts the eG database, follow the steps detailed in
-
To know how to determine the port number of the Azure SQL Managed Instance that hosts the eG database, follow the steps detailed in
-
To know how to determine the port number of the Azure SQL Database that is configured as the eG database, follow the steps detailed in
-
- Next, indicate what type of authentication is enabled for the target Microsoft SQL server. If Windows authentication is enabled, then set the Windows Authentication flag to Yes. If SQL Server authentication is enabled, then set the Windows Authentication flag to No.
-
If the Windows Authentication flag is set to Yes, then an additional NTLMv2 enabled flag will appear (see Figure 4). In some Windows networks, NTLM (NT LAN Manager) may be enabled. NTLM is a suite of Microsoft security protocols that provides authentication, integrity, and confidentiality to users. NTLM version 2 (“NTLMv2”) was concocted to address the security issues present in NTLM.If NTLMv2 is enabled for the target Microsoft SQL server, then set the NTLMv2 enabled flag to Yes; else, set it to No.
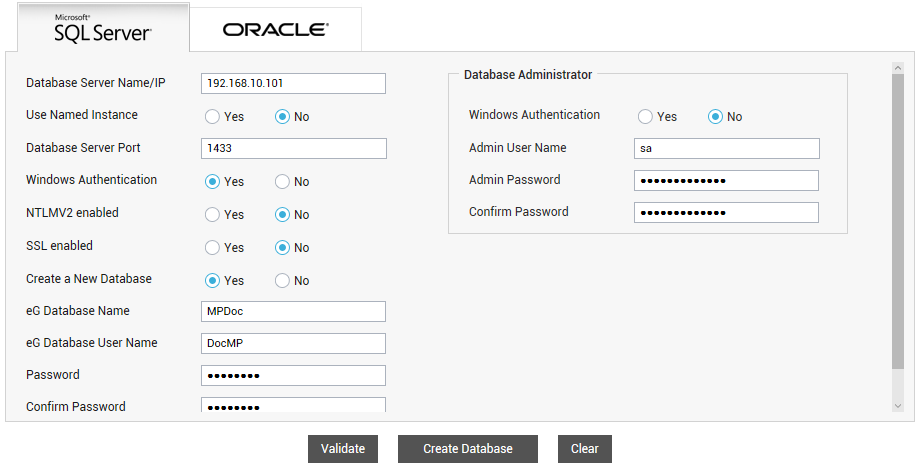
Figure 4 : Indicating whether/not the Microsoft SQL server is NTLMv2 -enabled
- Then, you need to indicate whether the Microsoft SQL server instance that will be hosting the eG database is SSL-enabled or not. If not, set the SSL enabled flag to No; if it is SSL-enabled, set the flag to Yes. However, when configuring an existing SQL database on Azure (or an Azure SQL managed instance) as the eG database, you must set the SSL enabled flag to Yes, as the SQL database on Azure (or an Azure SQL managed instance) is SSL-enabled by default. You can also refer to
- Next, specify whether/not a new database has to be created to host the eG database. To create a new database, set the Create a New Database flag to Yes. To use an existing database instead, set the Create a New Database flag to No. Note that when configuring an Azure SQL database as the eG database, only an existing database on Azure can be used.
-
If the Create a New Database flag is set to Yes, then specify the name of the new database that you want to create in the eG Database Name text box (see Figure 4). On the other hand, if the Create a New Database flag is set to No, then, in the Existing databasename text box, mention the name of the existing database in which the eG manager will be storing metrics (see Figure 5). When using an existing SQL database on Azure therefore, enter the name you assigned to that database when you created it on Azure, against Existing database name.
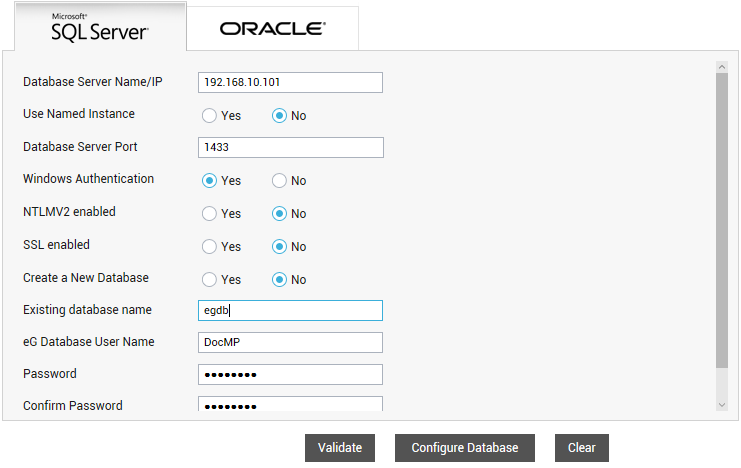
Figure 5 : Using an existing database on the Microsoft SQL server as the eG database
Note:
-
Whether you create a new database or choose to use an existing one, make sure that the eG Database Name or the Existing database name (as the case may be) you specify in Figure 5Figure 4 does not include the following special characters:
Special character
Description
*
Asterisk
+
Plus
[
Opening square bracket
]
Closing square bracket
/
Forward slash
;
Semicolon
:
Colon
<
Lesser Than
>
Greater Than
?
Question Mark
|
Pipe
-
If you choose to set an existing database on an Azure SQL managed instance as the eG database, then you may want to check the list of databases that pre-exist to make your choice. For that, do the following:
-
Login to Azure portal and select the SQL Managed Instances option from the list of Azure services.
-
Zoom into the instance that hosts the eG database by clicking on it. Then, pick the Databases option from the left panel to view the list of databases that pre-exist on that instance. The databases that pre-exist will then be listed in the right panel (see Figure 17).
-
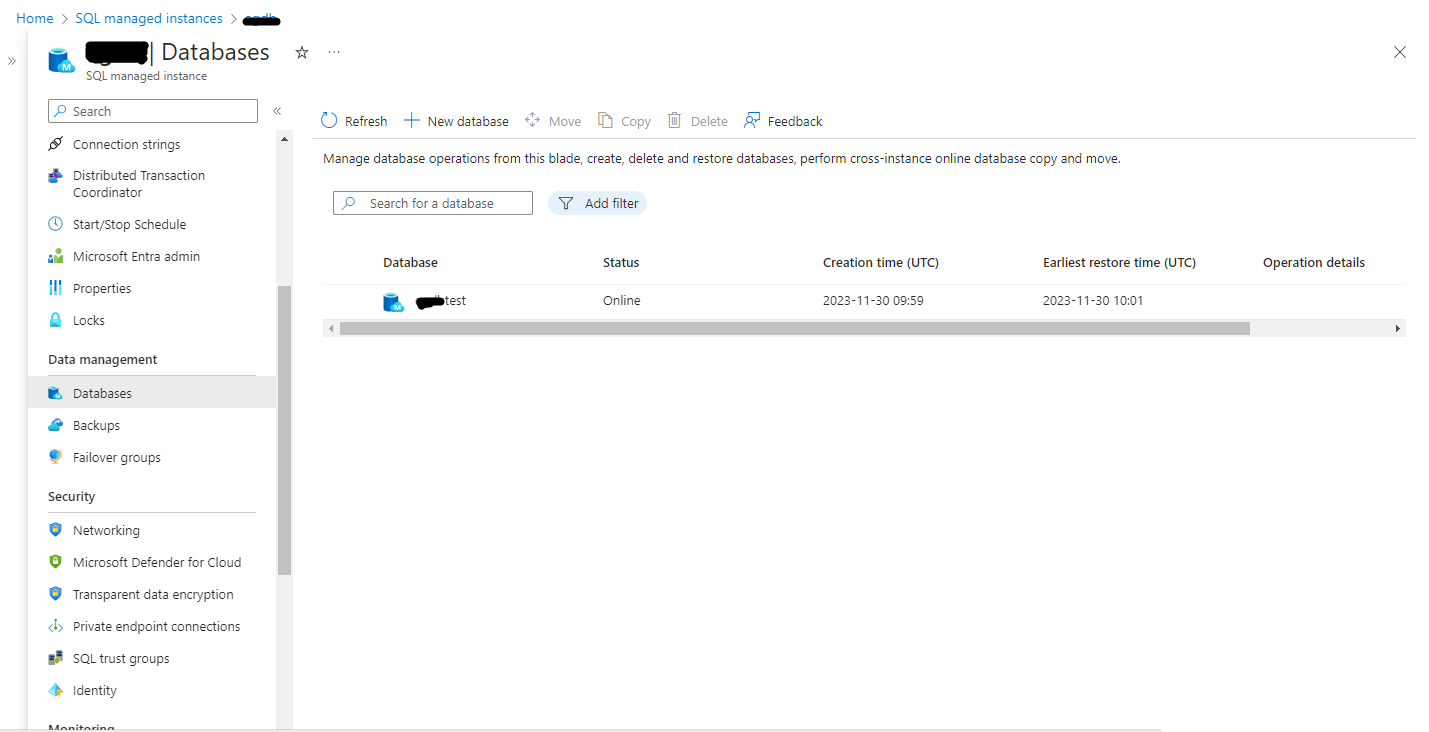
Figure 6 : List of databases that pre-exist on the Azure SQL Managed Instance
-
-
The eG database is created in the Microsoft SQL server’s database using a special user account. Next, specify the user name and password to be used for this account. If you want to create a new database for the eG manager - i.e., if you have set the Create a New Database flag to Yes and have specified a new eG Database Name (see Figure 4) - then you can use either a new user account for creating that database, or an existing user account. However, if you want to use an existing database as the eG database - i.e., if you have set the Create a New Database flag to No and have specified an Existing database name (see Figure 5) - then you should use an existing user account alone for configuring that database. When using the SQL database on Azure therefore, use the user account you associated with that database when creating it on Azure.
Note:
When using an existing user account , make sure that you use an account vested with DBOwner, VIEW SERVER STATE, and VIEW ANY DEFINITION rights on the specified database. Likewise, if you want to manually create a new user account for monitoring purposes, and then use it when configuring the eG database, then make sure that you assign that user account DBOwner, VIEW SERVER STATE, and VIEW ANY DEFINITION privileges.
-
If Windows Authentication is enabled on the Microsoft SQL server - i.e., if the Windows Authentication flag is set to Yes - then the user should be a valid Windows domain user. Accordingly, provide a valid domain user's name against eG Database User Name, type the password of that user against Password, confirm the password by retyping it against Confirm Password, and specify the Domain Name to which that user belongs (see Figure 7).
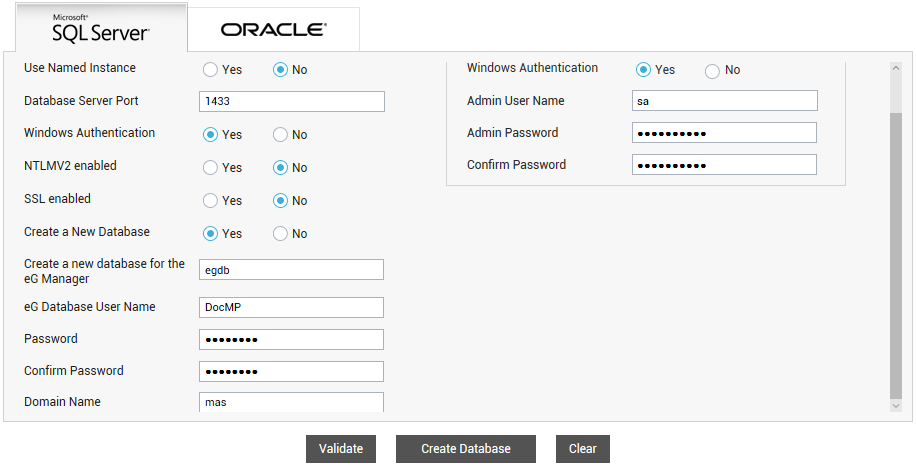
Figure 7 : Specifying the credentials of the special database user, when Windows Authentication is enabled
-
On the other hand, if SQL Server Authentication is enabled on the Microsoft SQL Server - i.e., if the Windows Authentication flag is set to No - then you will not be required to indicate the domain to which the special database user belongs. In this case therefore, provide a valid user name against eG Database User Name, type the password of that user against Password, and confirm the password by retyping it against Confirm Password (see Figure 8).
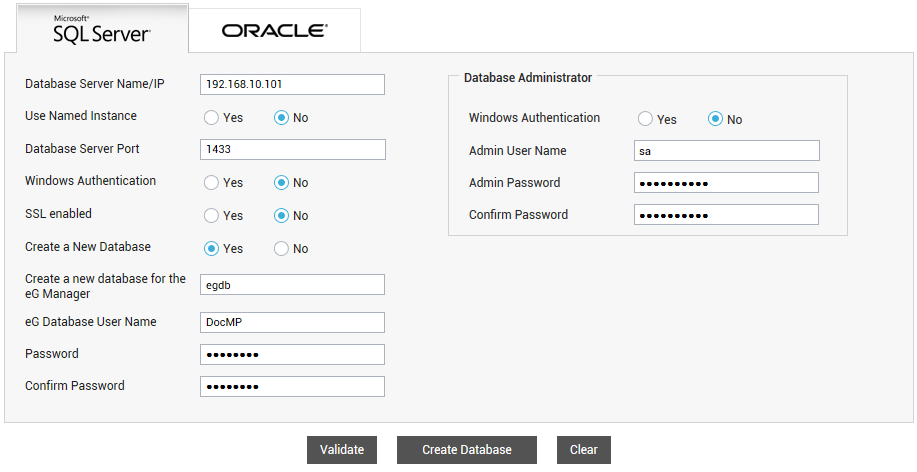
Figure 8 : Specifying the credentials of the special database user, when SQL Server Authentication is enabled
Note:
-
Make sure that the eG Database User Name you provide in Figure 7 or Figure 8 - whether it is that of a new user or an existing user - does not contain the following special characters:
Special character
Description
[
Opening square bracket
]
Closing square bracket
/
Forward slash
\\
Double back slash
-
Ensure that the Password provided (in Figure 8) for the special database user is a strong password. Strong passwords are defined by the following parameters:
- Has at least 6 characters
- Does not contain “Administrator” or “Admin”
-
Contains characters from three of the following categories:
- Uppercase letters (A, B, C, and so on)
- Lowercase letters (a, b, c, and so on)
- Numbers (0, 1, 2, and so on)
- Non-alphanumeric characters (#, &, ~, and so on)
-
Does not contain the corresponding username
For instance, if the name of the special database user is egdb, then the password that you set for this user should be a strong password such as, db123$%#@.
Note that without a ‘strong password’, the eG manager installation will fail.
-
Also, make sure that the Password you provide inFigure 8 for the special database user does not include any of the following special characters:
Special character
Description
[
Opening square bracket
]
Closing square bracket
'
Single quote
-
- Only a database administrator is authorized to create a new database on a Microsoft SQL server. Therefore, if you have chosen to configure a new database for the eG manager in step 7 above , then make sure you configure the Database Administrator section in Figure 8 with the credentials of the database administrator. This way, you can make sure that setup has the necessary rights to create the database on the target Microsoft SQL server. For that, first indicate whether/not Windows Authentication is enabled for the database administrator. If it is, then set the Windows Authentication flag to Yes. On the other hand, if only SQL Server Authentication is enabled, then set the Windows Authentication flag to No.
-
Next, ensure that the credentials of the database administrator are provided. If Windows Authentication is enabled - i.e., if the Windows Authentication flag in the Database Administrator section is set to Yes - then you will have to provide the name of a valid Windows domain user with database administrator privileges against Admin User Name, specify his/her password against Password, confirm the password by retyping it against Confirm Password, and also provide the Domain Name to which the database administrator belongs (see Figure 9).
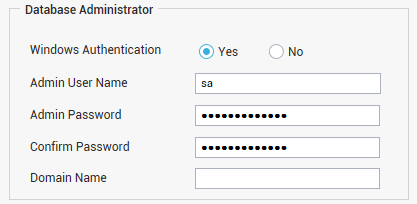
Figure 9 : Providing the credentials of a DBA with Windows Authentication enabled
-
On the other hand, if SQL Server Authentication is enabled - i.e., if the Windows Authentication flag in the Database Administrator section is set to No - you will not be required to indicate the domain to which the database administrator belongs; in this case therefore, you only have to provide the Admin User Name and Admin Password, and confirm the password by retyping it against Confirm Password (see Figure 10).
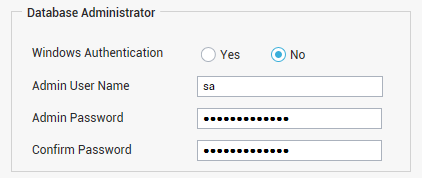
Figure 10 : Providing the credentials of a DBA without Windows Authentication enabled
Note:
Typically, when providing database administrator credentials, sa user name and password are used. If, due to security concerns, you decide not to use the sa user's credentials, then you can create a user with the following server roles: securityadmin, serveradmin, and public, and then provide that user’s credentials in the Database Administrator section depicted by Figure 10. Figure 11, Figure 12, and Figure 13 depict how to create a new user with the aforesaid privileges using the Microsoft SQL Server Management Studio.
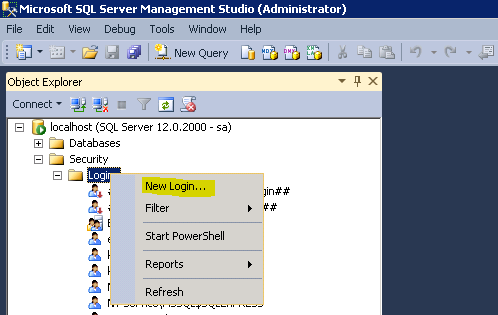
Figure 11 : Choosing to create a new login
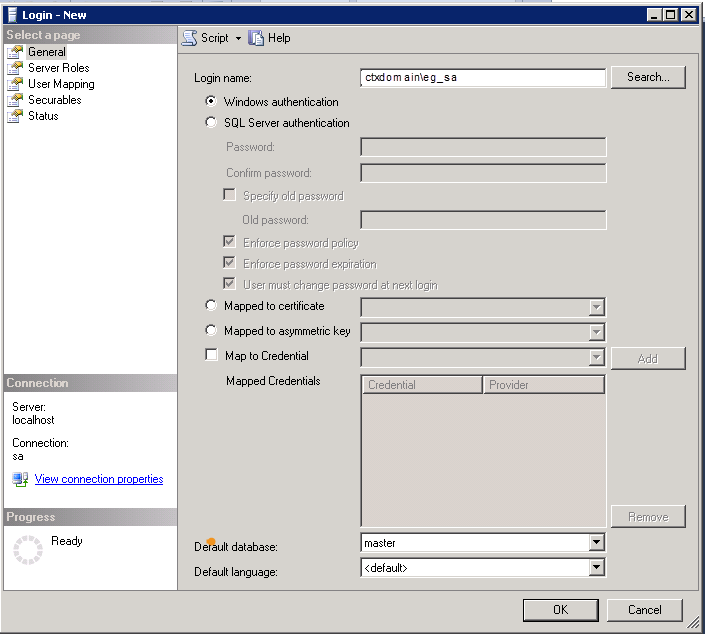
Figure 12 : Creating a new user
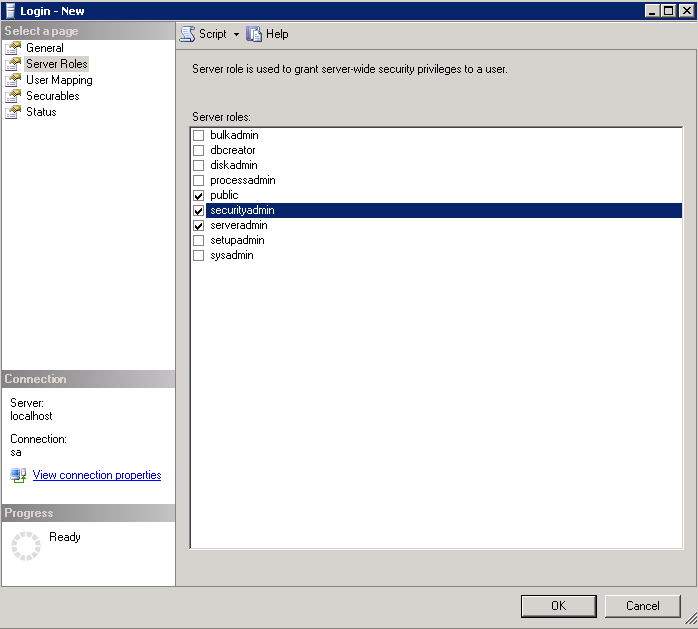
Figure 13 : Granting the requisite privileges to the new user
When creating a new DBA, make sure that the user name you provide for the new DBA user does not contain special characters. Also, ensure that either provide a strong password for the user. Strong passwords are defined by the following parameters:
- Has at least 6 characters
- Does not contain “Administrator” or “Admin”
-
Contains characters from three of the following categories:
- Uppercase letters (A, B, C, and so on)
- Lowercase letters (a, b, c, and so on)
- Numbers (0, 1, 2, and so on)
- Non-alphanumeric characters (#, &, ~, and so on)
-
Does not contain the corresponding username
For instance, if the name of the database administrator is egdb, then the password that you set for this user should be a strong password such as, db123$%#@. Note that without a ‘strong password’, the eG manager installation will fail.
If you do not want to provide a strong password, then, make sure that the Enforce password policy option is disabled while creating the user profile in the Microsoft SQL Server Management Studio.
- You can check the veracity of your database server, database, database user, and DBA configurations by clicking the Validate button in Figure 8. If your specifications are valid, then a message to that effect will appear. If not, an error message will appear, prompting you to check the eGManager_Install log file in the drive that hosts the eG manager, for more details. You can then make changes to your specifications based on the error message logged in the log file.
- Once validation is successful, proceed to create the database by clicking the Create Database button in Figure 8. This button will appear only if the Create a New Database flag is set to Yes and a new eG Database Name is provided. On the other hand, if you had chosen to use an existing database by setting the Create a New Database flag to No, then click the Configure Database button to configure that database as the eG database.
- Setup will then proceed to create/configure the database and database user account. In the process, if setup finds that the database name and/or database user name provided in Figure 8 already exist on the target Microsoft SQL server, then it will prompt you to confirm whether you want to use the same names or change them. Click the OK button in the message box to proceed with the same names. Click Cancel to return to Figure 8, so you can change the database and/or database user names.
-
Once database configuration completes successfully, setup will allow you to configure certain basic manager settings, so that the eG manager begins monitoring and alerting in no time! To know what these settings are and how to configure them, refer to Configuring the Basic Manager Settings.
Note:
By default, the eG manager is configured for agent-based monitoring - i.e., when a server is auto-discovered and then managed, it is monitored in an agent-based manner. Administrators have an option to set agentless monitoring as the default for the eG manager.
On Windows systems, the script <EG_INSTALL_DIR>\lib\set_manager_default can be used to set agentless monitoring as the default option for the eG manager. The output of this script is shown below:
Do you want to set the eG manager for agentless monitoring by default? y/n[n]: y
**************************************************************
Changes to the eG manager default setting have been successfully made!
**************************************************************
Using Oracle Database
If you want to configure the eG database on an Oracle database server, then, click the Oracle tab page in the web page that appears soon after successful manager installation. Figure 14 will then appear.
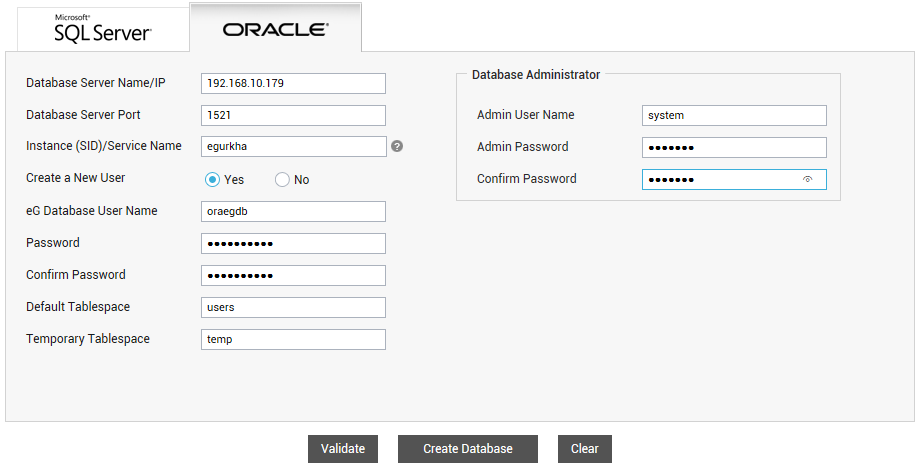
Figure 14 : Configuring the eG database on an Oracle database server
To configure the eG database on Oracle, do the following using Figure 14:
-
Enter the name/IP address of the Oracle database server / Amazon RDS instance you want to use in the Database Server Name/IP text box.
Note:
To know how to determine the IP address / host name of the Amazon RDS instance that hosts the eG database, follow the steps detailed in
-
Against Database Server Port, specify the port at which the Oracle database server listens. By default, this is 1521.
Note:
To know how to determine the port number of the Amazon RDS instance that hosts the eG database, follow the steps detailed in
-
Next, in the Instance (SID)/Server Name text box, specify the name of the Oracle instance the eG manager should use.
Note:
An Oracle database server that supports the 'Multi-tenant architecture' can also be configured to serve as the eG Enterprise backend. The multi-tenant architecture enables an Oracle database to function as a multitenant container database (CDB). A CDB includes zero, one, or many customer-created pluggable databases (PDBs). If you want to use a CDB as the eG database, then make sure you provide its SID against Instance (SID)/Service Name. On the other hand, when configuring a PDB as the eG database, it is mandatory that you specify its Service name in the Instance (SID)/Service Name name text box.
-
The eG manager requires a special Oracle database user account to store its measures. You can either create a new account for this purpose, or use an existing user account. If you want setup to automatically create a new user account on Oracle for the eG manager to use, first set the Create a New User flag in Figure 14 to Yes. Then, specify the name of the new user account in the eG Database User Name text box, provide a Password for the new user, and confirm the password by retyping it in the Confirm Password text box.
Note:
-
When creating a new user, make sure that the eG Database User Name you specify in Figure 14 does not include the following special characters:
Special character
Description
[
Opening square bracket
]
Closing square bracket
\
Back slash
"
Double quotes
=
Equal to
/
Forward slash
\\
Double back slash
-
Similarly, make sure that the Password you provide in Figure 14does not include the following special characters:
Special character
Description
=
Equal to
\
Back slash
"
Double quotes
- If the user chooses not to have the user account created by the configuration process, the user account has to be created manually on the Oracle database server with connect, resource, and select_catalog privileges. To know how to create such a user, refer to
Once the user account is created, you can then use step 5 below to configure an existing database for the eG manager's use.
-
-
If you want to use an existing database user account for the eG manager, first set the Create a New User flag to No (see Figure 15). Then, specify the name of the existing user in the eG Database User Name text box, provide the valid Password of that user, and confirm the password by retyping it in the Confirm Password text box.
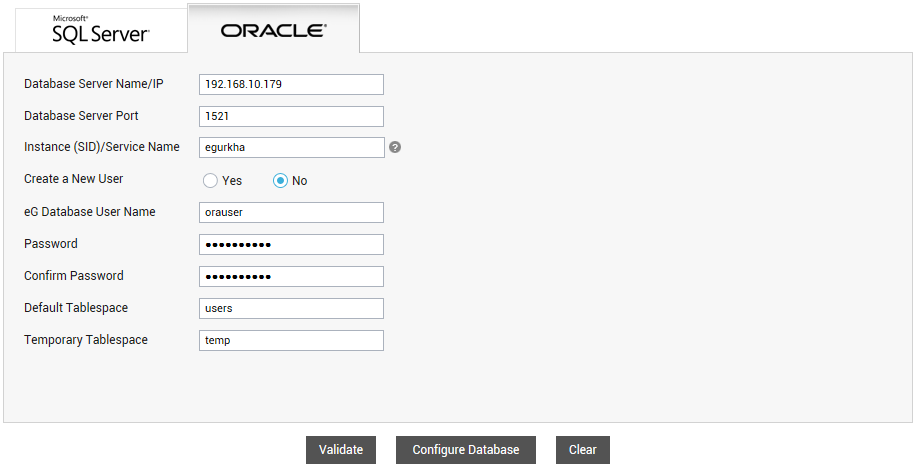
Figure 15 : Configuring an existing database user account for the eG manager
Note:
-
If you set an existing database user as the eG database user at step 5, then before configuring the eG manager to use Oracle as its backend, make sure that connect, select_catalog, and resource privileges are granted to the existing user.
-
When using an existing user, make sure that the eG Database User Name you specify in Figure 15does not include the following special characters:
Special character
Description
[
Opening square bracket
]
Closing square bracket
\
Back slash
"
Double quotes
=
Equal to
/
Forward slash
\\
Double back slash
-
Similarly, make sure that the Password you provide in Figure 15 does not include the following special characters:
Special character
Description
=
Equal to
\
Back slash
"
Double quotes
-
-
To create a new user account for an Oracle database server, a data tablespace and a temporary tablespace have to be associated with the new user account (as shown in Figure 14). For this purpose, specify the same in the Default Tablespace and Temporary Tablespace text boxes, respectively. On the other hand, if you will be using an existing user account, then make sure that the Default Tablespace and Temporary Tablespace text boxes are configured with the default and temporary tablespace that is already mapped to the specified database user account. The default values for the data and temporary tablespaces values are users and temp, respectively.
- Database administrator privileges are required for creating a new database user. Therefore, if you have chosen to create a new database user - i.e., if the Create a New User flag is set to Yes - then, you will have to use the Database Administrator section of Figure 14 to configure the credentials of the database administrator. For that, type the name of database administrator against Admin Name, specify the password of the database administrator against Password, and confirm the password by retyping it against Confirm Password. On the other hand, if you want to use an existing user account for the eG manager, then you will not have to provide database administrator credentials. In this case therefore, the Database Administrator section will not appear (see Figure 15).
- To check the veracity of your configuration, click the Validate button in Figure 15. If your specifications are valid, then a message to that effect will appear. If not, an error message will appear, prompting you to check the eGManager_Install log file in the drive that hosts the eG manager, for more details. You can then make changes to your specifications based on the error message logged in the log file.
- Once validation is successful, proceed to create the new database user by clicking the Create Database button in Figure 14. This button will appear only if the Create a New User flag is set to Yes and a new eG Database User Name is provided. On the other hand, if you had chosen to use an existing database user account by setting the Create a New User flag to No, then click the Configure Database button (see Figure 15) to configure the specified database user account for use by the eG manager.
- Setup will then proceed to create/configure the database user account. In the process, if setup finds that the database user name provided in Figure 14 or Figure 15 already exists, then it will prompt you to confirm whether you want to use the same user name or change it. Click the OK button in the message box to proceed with the same user name. Click Cancel to return to Figure 14, so you can change the user name.
- Once database configuration completes successfully, setup will allow you to configure certain basic manager settings, so that the eG manager begins monitoring and alerting in no time! To know what these settings are and how to configure them, refer to Configuring Basic Manager Settings.
Configuring the Basic Manager Settings
Once the eG database is successfully configured, setup automatically opens the Manager Configuration page (seeFigure 16). This page enables you to indicate what type of environment your eG manager deployment needs to monitor. Depending upon the type of environment, you can even turn on/off certain key capabilities of the eG manager using this page. This way, you can custom-define how your manager performs monitoring and alerting, enforce organizational security policies, and enable the auditing of manager operations, without even logging into the eG management console!
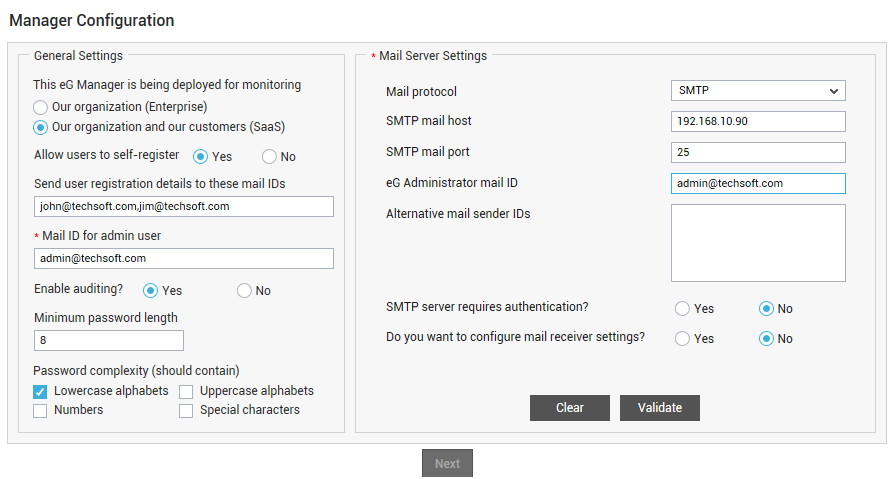
Figure 16 : Configuring the basic manager settings
Using Figure 16, do the following:
-
First, choose the deployment model for the eG manager - Enterprise or SaaS. These models are briefly discussed below:
-
Enterprise: This model is ideal if your eG manager will be monitoring only your organization's IT infrastructure. In this case, eG's agent-based/agentless monitors will be deployed on and will pull metrics from the components in your infrastructure only. The employees of your organization will be the primary stakeholders and consumers of the performance data so collected.
Such a model is typically, administrator-driven. In other words, an administrator will be responsible for performing all administrative activities related to the eG manager - this includes, installing agents, managing the components, configuring thresholds, tests and alerting, managing users, building segments and services, defining zones, and more. The other stakeholders - i.e., the employees - will usually be vested with only monitoring rights, or in some special cases, very limited administrative rights, as the administrator deems fit.
If you want to deploy the eG manager for Enterprise, then select the Our Organization (Enterprise) option in Figure 16.
-
SaaS: This model is ideal if you are a Managed Service Provider (MSP), providing infrastructure hosting and management services to multiple customers. Monitoring is quiet often a cloud-based service that an MSP offers to each of their customers. If you are an MSP, you will want the eG manager to not just monitor your infrastructure, but also that of your customers. This means that an eG manager centrally deployed in the MSP infrastructure will be managing agents deployed in the customer infrastructure as well.
The SaaS model also helps where a single eG manager manages agents used by different departments (eg., Development, Testing, Support etc.) / support groups (Europe Support, EMEA Support, USA Support etc.) / IT domains (Network administration, Database administration, Windows administration etc.).
With the SaaS model, eG Enterprise fully supports mult-tenancy. Unlike the Enterprise model, in SaaS, the administrator will not be the sole custodian of administrative rights. Instead, these rights will be delegated to the individual tenants - say, MSP customers, department heads/workers, support personnel who are part of different support groups, or IT domain experts. The tenants are thus empowered to deploy the agents they want, manage the components they wish to monitor, and customize accesses, monitoring, and alerting based on the requirements of their infrastructure. The central administrator will continue to hold unrestricted administrative rights, which will enable him/her to manage monitoring licenses of the tenants, oversee performance and problems across tenant infrastructures, and even override a tenant's monitoring configuration if required.
If you want to deploy the eG manager for SaaS, then select the Our Organization and our customers (SaaS) option in Figure 16.
-
-
In a SaaS deployment, tenants are by default allowed to self-register with the SaaS manager. This is why, if the Our Organization and our customers (SaaS) option is chosen as the deployment model, an Allow users to self-register flag will appear, which will be set to Yes by default. In some SaaS environments, for security reasons, the administrator may prefer to completely control tenant registrations, instead of allowing tenants this flexibility. In such a case, the administrator can set the Allow users to self-register flag to No. If this is done, then only an administrator will be able to register a tenant by creating a profile in the eG Enterprise system for that tenant.
- If the Allow users to self-register flag is set to Yes, then a Send user registration details to these mail IDs text box will appear. In this text box, specify a comma-separated list of email IDs to which the registration details of a tenant has to be sent soon after that tenant self-registers with the SaaS manager. This way, you can have key personnel in an organization notified every time a tenant self-registers with the SaaS manager.
- Next, specify the Mail ID for admin user. The admin user is one of the default users of the eG Enterprise system. This user is automatically created by the eG Enterprise system, soon after an eG manager is deployed. This user has unrestricted administrative and monitoring powers. If you login to the eG management console as user admin (with default password admin), you can configure your environment for monitoring, and also view performance and problem statistics pertaining to your environment. Typically, an administrator's mail ID is assigned to the default admin user. This way, the admin user can receive email notifications whenever the eG manager detects issues in any core component of the eG architecture - say, the eG database - or in any component of the monitored IT infrastructure. This enables the admin user to keep tabs on the health of the eG Enterprise system and that of the monitored environment.
-
Using Figure 16, you can also enable/disable audit logging for your eG manager. An audit log can be best described as a simple log of changes, typically used for tracking temporal information. The eG manager can be configured to create and maintain audit logs in the eG database, so that all key configuration changes to the eG Enterprise system, which have been effected via the eG user interface, are tracked.
The eG audit logs reveal critical change details such as what has changed, who did the change, and when the change occurred, so that administrators are able to quickly and accurately identify unauthorized accesses/modifications to the eG Enterprise system.
By default, audit logging is disabled. To enable it, set the Enable auditing? flag to Yes (see Figure 16).
-
Users with administrative rights to the eG Enterprise system can allow other users access to the eG management console, by configuring a dedicated profile in eG for each user. Using the profile, the administrator assigns login credentials - i.e., login user name and password - to a user. At any given point in time, the administrator or the corresponding user can change his/her login password.
In some high-security environments, password policies are often defined, which dictate how long and how strong a login password should be. If, for security reasons, you want to define and enforce a password policy for the login passwords of eG users, you can do so using the options provided by Figure 23.
For instance, in the Minimum password length text box of Figure 16, specify the minimum number of characters a login password should contain. When creating/modifying the password of an eG user, you need to make sure that at least this many characters are present in the password; if not, eG will automatically reject the password and insist that you specify another one.
You can also define the password strength, by selecting the checkboxes you need under Password complexity. For example, if you want the login password of an eG user to compulsorily contain some lowercase characters and numbers, then select the Lowercase alphabets and Numbers checkboxes in Figure 16.
Note:
Password policies set here apply only to local users of eG Enterprise, and not domain and SAML users.
-
Then, proceed to configure Mail Server Settings. Here, you provide details of the mail server that eG should use for sending emails. This specification is optional for an Enterprise deployment, but is mandatory for a SaaS deployment.
In case of an Enterprise deployment, you need to configure a mail server only if you want to enable email alerting - i.e., only if you want your users to receive problem alerts by email. If you do not want to enable email alerting, then the mail server settings need not be defined.
In case of a SaaS deployment on the other hand, it is mandatory to configure a mail server. This is because, without a mail server, verification codes cannot be emailed to MSP customers who attempt to register with the eG manager. In the absence of a verification code, the registration will fail. As a result, eG Enterprise will be unable to monitor customer environments for the MSP.
To configure a mail server, specify the following:
- The protocol through which you wish to transmit or send the outgoing mail messages across the Internet Protocol (IP) networks has to be selected from the Mail protocol list box. The SMTP option would be selected by default in this list box. If the mail server through which you wish to send the mail messages is SSL-enabled, then select, SMTP-SSL from the Mail protocol list box. If your mail server offers enhanced security and provides certificate based authentication, select the SMTP-TLS option from the Mail protocol list.
- The identity (IP address or host name) of the mail server to be used by the eG manager for generating alarms has to be entered in the smtpmail host text box. The port at which the mail host listens has to be provided in the SMTP mail port text box.
- In MSP environments typically, different support groups are created to address performance issues relating to different customers. These support groups might prefer to receive problem intimation from customer-specific mail IDs instead of the global admin mail ID, so that they can instantly identify the customer environment that is experiencing problems currently. Moreover, this way, every support group will be enabled to send status updates on reported issues directly to the concerned customer, instead of overloading the admin mailbox. To facilitate this, Figure 16 allows the administrator to configure multiple Alternative Mail sender IDs - normally, one each for every customer in case of an MSP environment. While configuring multiple sender IDs in the space provided, ensure that you press the Enter key on your keyboard after every mail ID. This way, every ID will occupy one row of the text area. Later, while creating a new user using the eG administrative interface, the administrator can select one of these configured sender IDs from the Mail sender list and assign it to the new user. This ensures that all email alerts received by the user are generated by the chosen ID only.
-
If the mail server requires users to login before sending mails, then select the Yes option against the SMTP server requires authentication? field. By default, authentication is set to No. Upon selecting Yes, you will be required to provide a valid SMTP user name and SMTP password for logging into the mail server. Confirm the password by retyping it in the SMTP confirm password text box.
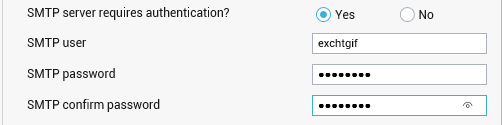
Figure 17 : Configuring the SMTP login credentials, if SMTP server requires authentication
-
To safeguard from spam, some mail servers are configured so that they will allow mails to be sent from a system only if that system is also used to receive mails. To allow the eG manager to use such mail servers to send email alerts, additional configuration is needed. In such a case, select the Yes option against the Do you want to configure mail receiver settings? field.
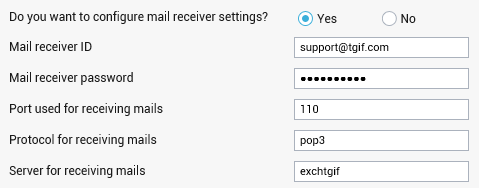
- Mail receiver ID: Specify the login name to be used for receiving mails.
- Mail receiver password: The password of the mail receiver needs to be specified here.
- Port used for receiving mails: The port number on the mail server to which the mail manager connects needs to be provided here.
- Protocol for receiving mails: Mention the protocol used for receiving mails. The protocol can be either POP3 or IMAP
-
Server for receiving mails: Specify the server to which the mail manager will connect to receive mails.
By default this field is set to No. When you enable this authentication to Yes, you need to specify the following details in the corresponding text boxes (see Figure 18):
- To verify whether/not your mail server settings are correct, click the Validate button in Figure 16. This brings incorrect/invalid specifications to your notice, so you can amend them. Once validation is successful, click the Next button in Figure 16 to proceed.
-
If you have configured an Oracle database backend for the eG manager, thenFigure 19 will appear.

Figure 19 : Confirming whether/not the Oracle DB license enables support for Partitioning feature
'Partitioning' is a licensed capability, which is available only for Oracle 12c (and above). If your Oracle database server license enables partitioning support, then you can have the eG manager store performance and configuration metrics in partitions on the eG database. If you have configured Oracle database server 12c (or above) as the eG backend, and if your Oracle DB license enables the 'Partitioning' feature, then click Yes in Figure 19 to confirm support. If you confirm support, then setup will automatically create a partition and store metrics in it. On the other hand, if the manager is not configured to use an Oracle database server 12c (or above) as its backend, or if your DB license does not support the 'Partitioning' feature, then click the No button in Figure 19. In this case, data insertions on the Oracle backend will be done based on available space – i.e., data will be inserted into any space available anywhere in a table.
-
Figure 20 will then appear, displaying the URL using which the eG manager should be accessed. The default URL will be of the format http://<eGManagerIPorHostName>:<eGManagerPort> or https://<eGManagerIPorHostName>:<eGManagerPort>, depending upon whether/not the manager is SSL-enabled. If your eG manager is behind the NAT, then you may want to replace the default URL with the externally accessible URL. Then, click the Update button.
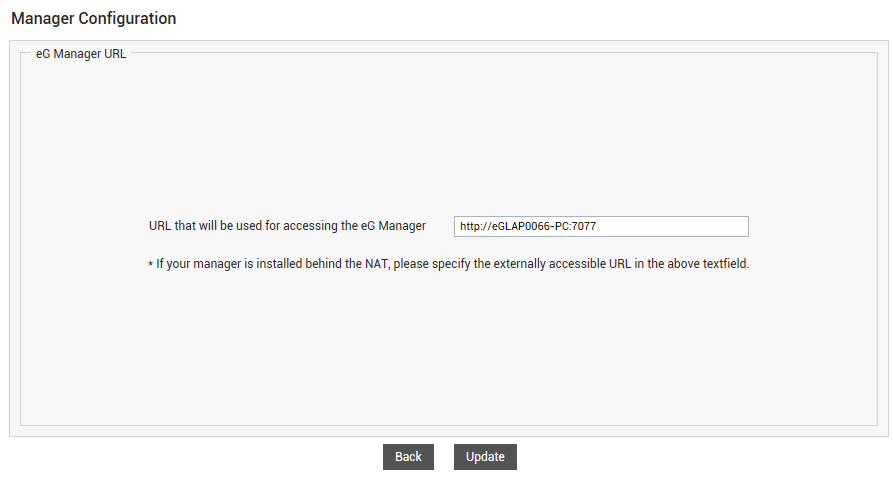
Figure 20 : The URL that will be used for accessing the eG manager
-
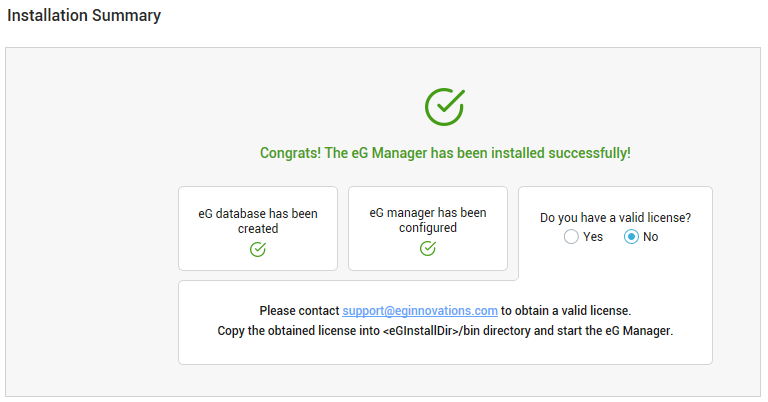
Figure 21 will then appear informing you of the successful installation of the eG manager. If you have a valid eG license, then set the Do you have a valid license? flag to Yes. Then, specify the full path to the license file against Choose a license file text box. You can even use the Browse button to locate the license file. Finally, click the Upload License button.
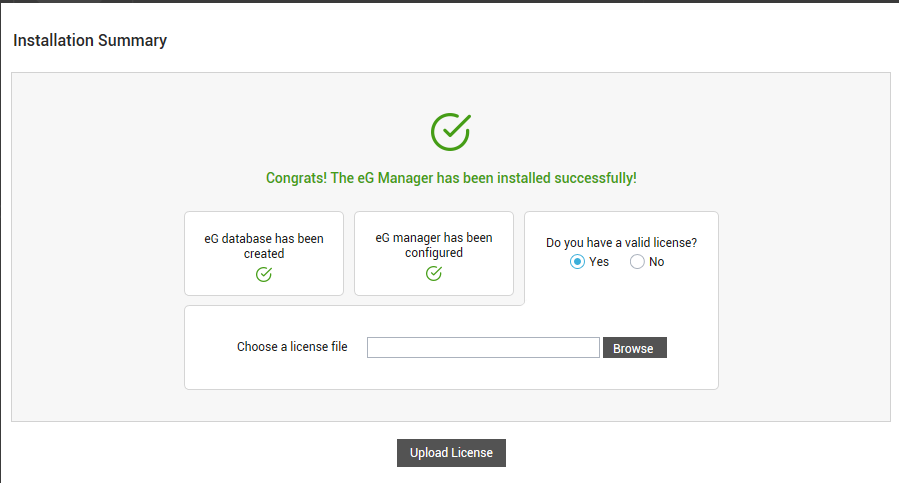
Figure 21 : Uploading the license file
On the other hand, if you do not have a valid license file, then set the Do you have a valid license? flag to No (see Figure 22). In which case, you can write to support@eginnovations.com requesting for a valid eG license. Once you receive the license file, make sure you copy it to the /opt/egurkha/bin folder. Then, start the manager.