Integrating with MS Teams
Microsoft Teams is a unified communication and collaboration platform that combines persistent workplace chat, video meetings, file storage, and application integration.
eG Enterprise integrates with a team channel, so that eG alerts are automatically routed to that channel. This way, users connected to that channel will be notified of anomalies and will be able to track them to closure.
To integrate eG Enterprise with a Microsoft Teams channel, follow the broad steps below:
-
Create a Power Automate Workflow in MS Teams, with a Webhook trigger for sending webhook alerts to a channel;
-
Configure eG Enterprise with the Webhook URL to which alerts are to be sent;
-
Edit the Workflow created at step 1 to parse JSON action;
-
Configure the Workflow created at step 1 to post messages in a channel or to post card in a chat or channel
Each of these steps is elaborately discussed hereunder.
Configuring a Workflow in Microsoft Teams with a Webhook Trigger
eG Enterprise leverages the Power Automate workflows integrated into Microsoft Teams. An MS Teams Power Automate workflow automates repetitive tasks and business processes by connecting Microsoft Teams with other apps and services, such as Outlook, SharePoint, and Planner. The first step to integrating eG Enterprise with MS Teams therefore is to create such a workflow.
For this, follow the steps below:
-
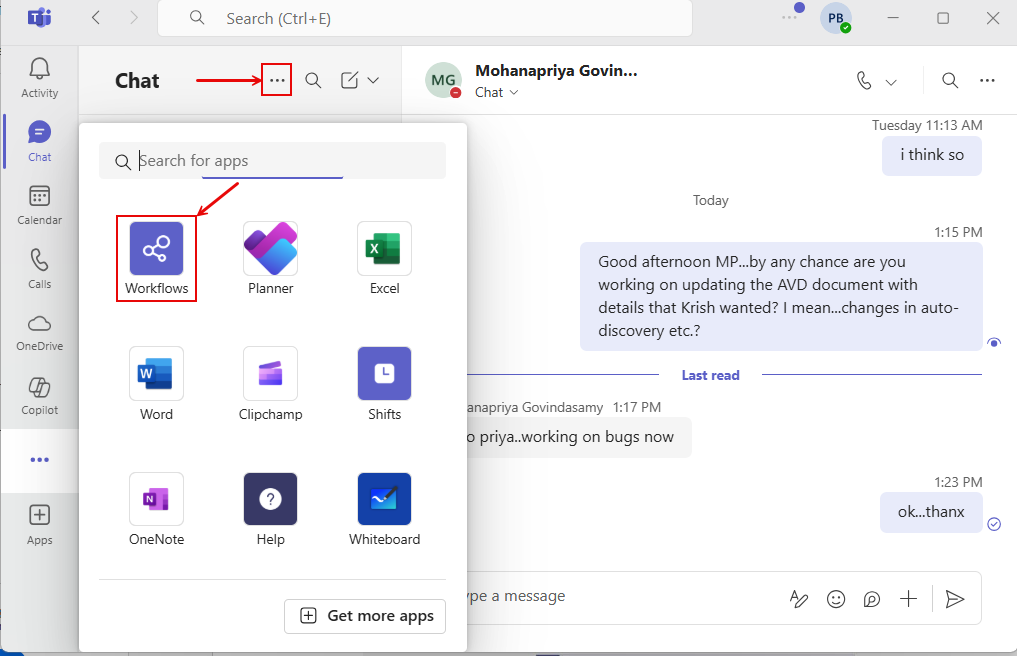
Launch the Microsoft Teams app. Click on the 'three dotted icon' (indicated by Figure 3) to view the list of apps that Teams offers. If you find 'Workflows' in that list (see Figure 3), click on it. If you are unable to locate 'Workflows', then search for the same using the 'Search for apps' text box in Figure 3.
-
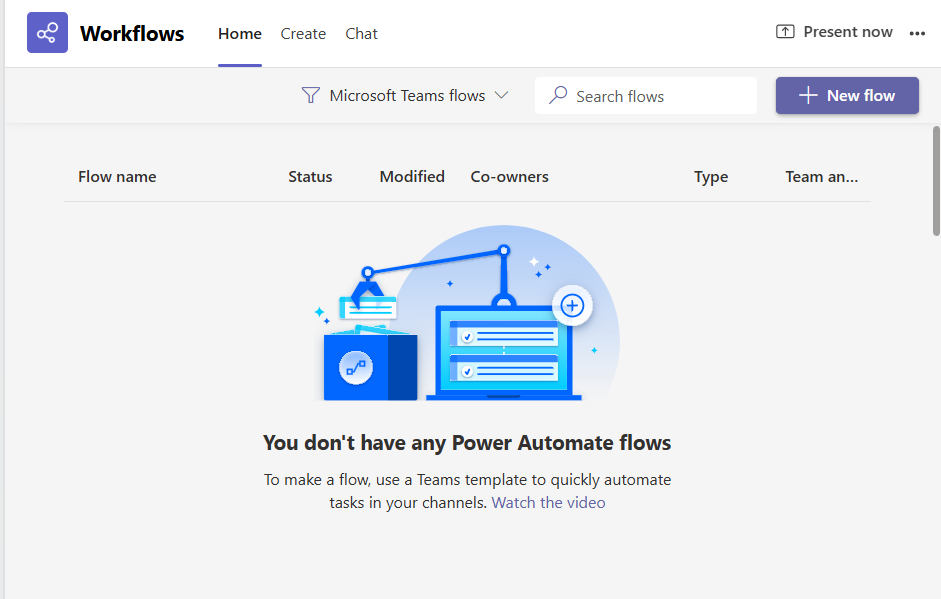
Figure 4 will then appear. Click on the New Flow button in Figure 4 to create a new workflow.
-
This will invoke Figure 5. The workflow we are creating should send webhook alerts to a Teams channel. So, click on the Send webhook alerts to a channel option in Figure 5.
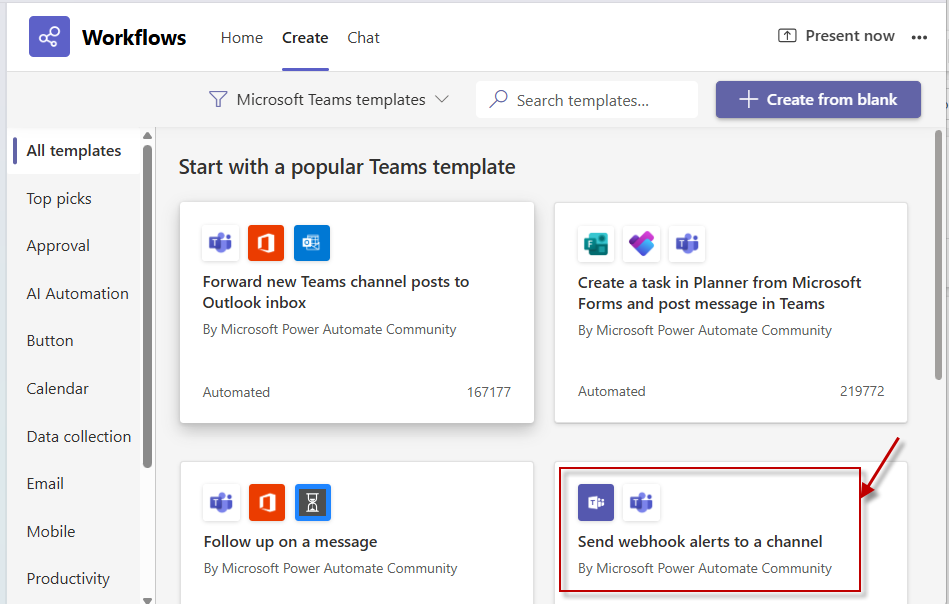
Figure 5 : Choosing to create a workflow that sends webhook alerts to a channel
-
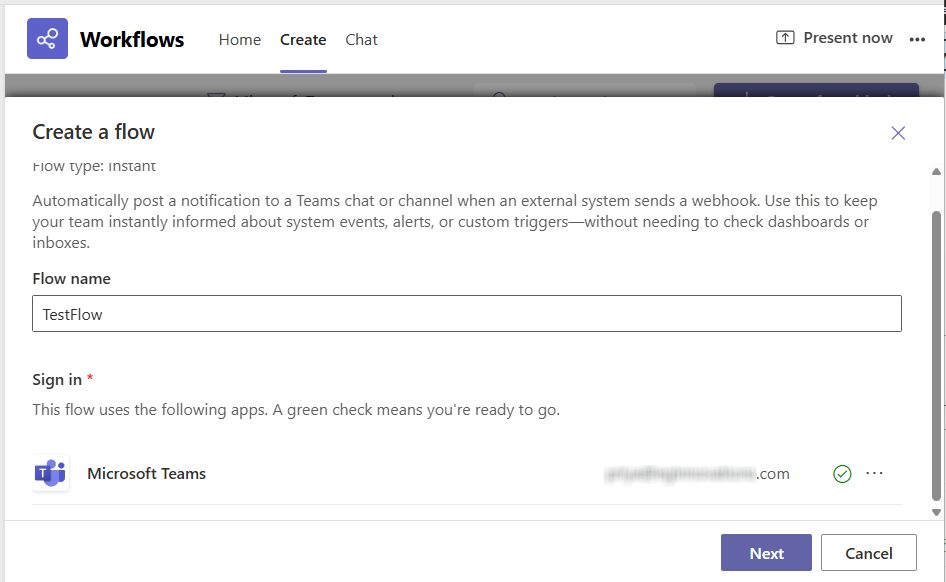
Figure 6 will then appear. Specify the Flow name in Figure 6. Then, you need to authenticate the flow, so it has the permission necessary to send web hook alerts to a Teams channel. For that, you need to configure the flow with a valid Teams account. If the flow is successfully authenticated, a 'tick' mark will appear alongside. Then, click on the Next button to proceed.
-
Figure 7 will then appear. Here, select the Microsoft Teams Team and Microsoft Teams Channel to which the workflow being created should send webhook alerts.
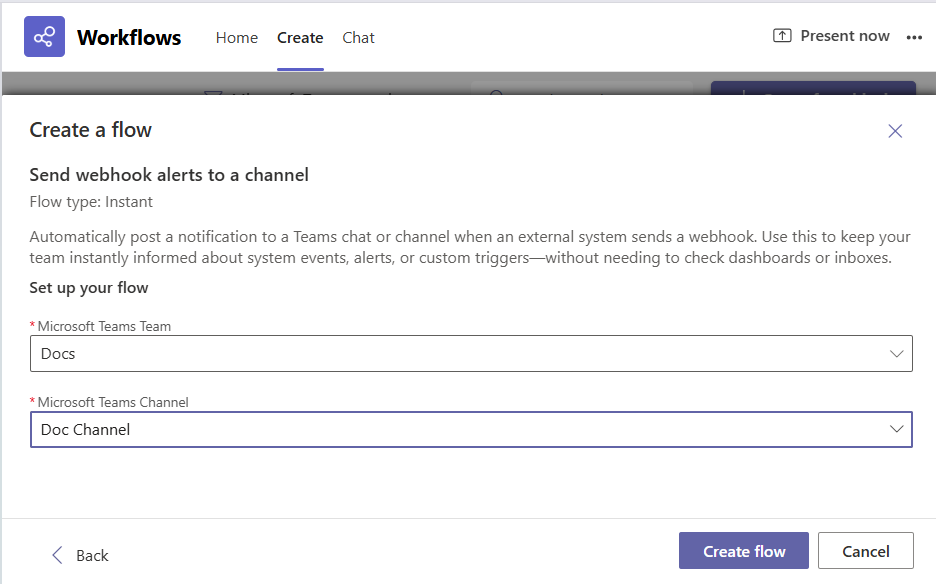
Figure 7 : Selecting the Microsoft Teams Team and Channel to which the alerts are to be sent
-
Finally, click on the Create flow button in Figure 7 to create the workflow.
-
Upon successful creation of the workflow, the webhook URL will be displayed (see Figure 8). Copy the URL to Notepad, as you will need it when configuring the eG Enterprise system.
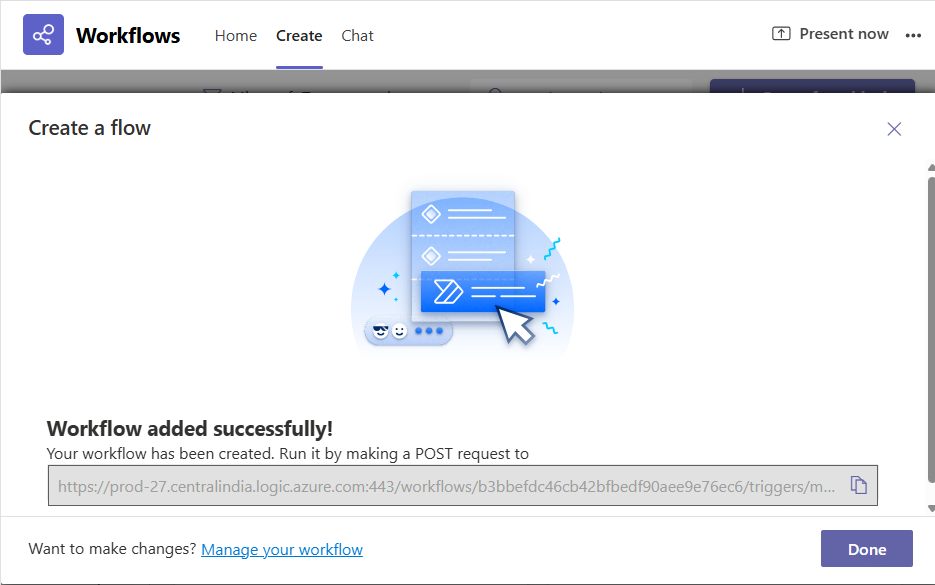
Figure 8 : The Workflow successfully created with a Webhook URL
Configuring eG Enterprise to Use the Webhook URL for Integrating with Microsoft Teams
To achieve this, follow the steps below:
- Login to the eG administrative interface.
-
Select the Manager option from the Settings tile.
-
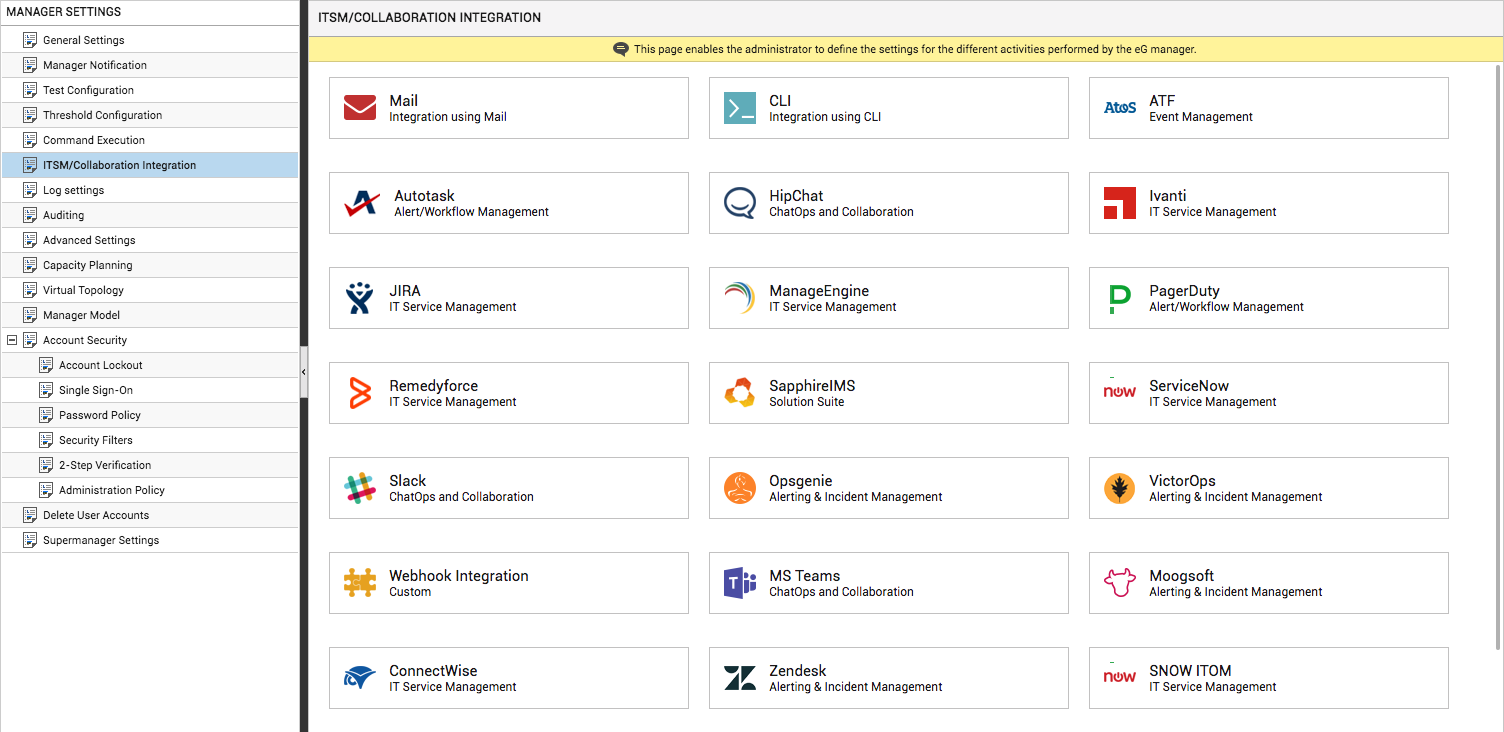
Figure 9 will then appear. From the manager settings tree in the left panel of Figure 9, select the ITSM/Collaboration Integration node. The third-party ITSM/Collaboration tools that eG Enterprise can integrate with will be listed in the right panel.
-
Now, click on the MS Teamsoption in the right panel (see Figure 9). An MS Teams section will now appear in the right panel (see Figure 10).
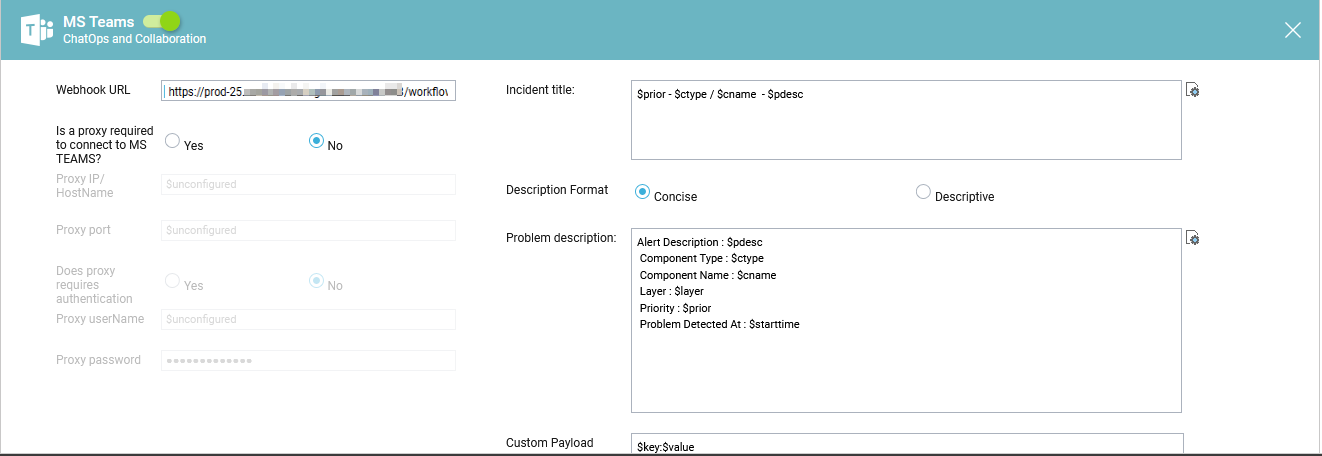
- To enable integration with MS Teams, first slide the MS Teams slider in Figure 10 to the right.
-
Then, specify the following in Figure 10:
- Webhook URL: Specify the webhook URL to which the eG alerts should be sent as a JSON payload using a POST request. This is the URL that MS Teams automatically generates once the Power Automate workflow is successfully created (see in Figure 7). Refer to Configuring a Workflow in Microsoft Teams with a Webhook Trigger to know how to generate this URL. Once you obtain the URL, copy it and paste it here.
- Is a proxy required to connect to MS Teams?: By default, this flag is set to No. However, if in your environment, a proxy server is used to route all client connections to MS Teams, then set this flag to Yes.
- Proxy IP/HostName: This parameter is applicable only if the 'Is a proxy required to connect to MS Teams?' flag is set to 'Yes'. In this case, specify the IP address or hostname of the proxy server that is used to connect to MS Teams.
- Proxy port: This parameter is applicable only if the 'Is a proxy required to connect to MS Teams?' flag is set to 'Yes'. In this case, specify the port number at which the proxy server listens for connection requests.
- Does proxy require authentication?: This parameter is applicable only if the 'Is a proxy required to connect to MS Teams?' flag is set to 'Yes'. Where a proxy server is in use, set this flag to Yes if that server requires authentication to allow accesses.
- Proxy username and Proxy password: These parameters become relevant only if the 'Does proxy require authentication?' flag is set to 'Yes'. In this case, provide the valid credentials of a Proxy user against Proxy username and Proxy password.
-
Incident title: Specify the title format for all eG alerts that are routed to the team channel. The default format is as follows:
-
Description Format and Problem description: Use these parameters to indicate the format in which problem information should be communicated by the eG manager to MS Teams. By default, the Description Format flag is set to Concise. In this case, the Problem description will be of the format indicated by Figure 13 below:
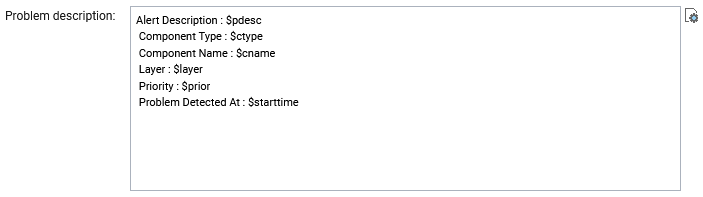
Figure 13 : The Concise Problem Description
The Concise Problem description, as you can see, is characterized by a list of label : variable pairs. In each pair, the 'label' is a static value that qualifies/describes the value of the 'variable' that follows. The 'variable' on the other hand will be substituted at run time by relevant alert information. For instance, in the pair Alert Description : $pdesc, 'Alert Description' is the static label that will be sent as is to MS Teams. This label implies that the value that follows it will be a brief problem description. The variable $pdesc will be replaced at run time by the actual problem description contained within the corresponding alarm. You can change 'labels' if you so need, but you are advised against changing the variable names.
If you set the Description Format to Descriptive instead, then, by default, the Problem description you see in Figure 14 will be displayed.
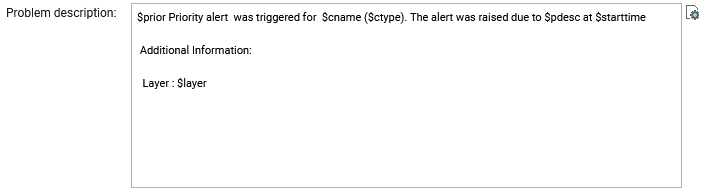
Figure 14 : The Descriptive Problem description
Unlike the Concise format, where key elements of the alert information are listed one after another, the Descriptive format reads like a 'meaningful problem statement. It is structured like a sentence, with variables embedded within. These variables will assume actual values at run time. Here again, you are free to play around with the sentence structure, but are advised against changing the variable names.
Regardless of the format you choose, the following variables apply by default:
If required, you can override the default Problem description, so it includes additional problem details. For that, click on the$cname
The name of the problem component
$ctype
The component type to which the problem component belongs
$pdesc
A brief description of the problem
$layer
The problematic layer
$prior
The problem priority/severity
$starttime
The date/time at which the problem was first detected
 icon alongside Problem description. This will open Figure 15.
- Custom payload: Use custom payload to customize the alert information you send to a team channel, so that it includes additional static information.

Figure 17 : Defining the Custom Payload
Typically, the details of an eG alert are sent as JSON payload to the configured Webhook URL. Every piece of information contained within an eG alert - eg., priority, component name, component type etc. - is represented in the JSON file as a $key:$value pair, where 'key' denotes the alert field, and 'value' denotes the actual value of that field at run time. The 'key' is configured based on what the MS TeamsAPI supports. For instance, if the API represents alarm priorities using the key 'prior', then the same key will be used in the JSON file for denoting alarm priorities. Accordingly, the entry for alarm priority in the JSON file will be $prior:$value. The $value will be Critical, Major, Minor, or Normal, depending upon the actual priority of the alarm being sent.
If you want eG incidents routed to a team channel to include additional information, then you can define a Custom Payload for that information as a $key:$value pair. For example, say, you want incidents to indicate the FQDN of the eG manager that generated the incidents. Say that the FQDN of your eG manager is egmanager.innovations.com. To include this information in MS Teams incidents, do the following:
First, check whether the MS Teams API supports a 'key' that can be used for capturing the 'source' of alerts/incidents. If no such key exists, then you cannot proceed with the Custom Payload configuration. On the other hand, if such a key is available, then proceed to replace the $key in your Custom Payload specification, with that key value. For the purpose of our example, let us assume that the API supports the key named 'source'. In this case therefore, substitute '$key' with 'source'.
Then, proceed to explicitly specify the FQDN of your eG manager in the place of $value. This is because, you can use the Custom Payload configuration to add only 'static' information - i.e., information that you explicitly configure, and hence will never change. In the case of our example therefore, the $value will be egmanager.innovations.com.
The complete Custom Payload specification will now be: source:egmanager.innovations.com
-
Use Adaptive card layout: If you require, then you can customize the Power Automate Workflow you created (for the purpose of this integration) to do one of the following:
-
Post an eG alarm as a message in an MS Teams channel, (OR);
-
Post an eG alarm as an Adaptive card in a chat or channel.
To implement option (b) above, you need to first design the layout of the Adaptive card using a card designer. Then, you need to set the Use Adaptive card layout flag to Yes.
However, if you want to run with option (a), then set the Use Adaptive card layout flag to No.
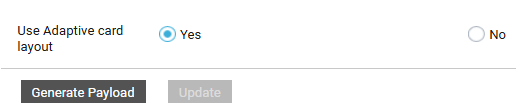
Figure 18 : Choosing to use/not use an Adaptive card layout
-
-
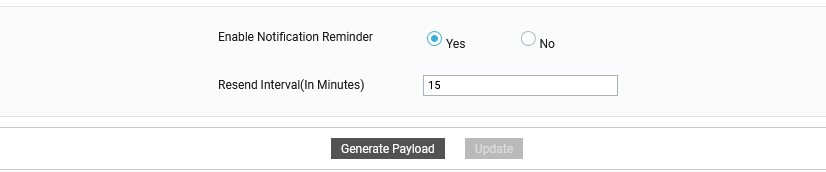
Enable Notification Reminder: If eG alerts remain unresolved beyond a permissible period, then you can have the eG manager leverage PowerAutomate Workflow to escalate such alerts to say, help desk managers, via Microsoft Teams messages. This ensures timely managerial intervention and speedy resolution of long-running performance issues.
To enable alarm escalation via Microsoft Teams, first set the Enable Notification Reminder flag in Figure 19 to Yes.
-
Resend Interval(In Minutes): This parameter will appear only if the 'Enable Notification Reminder' flag is set to 'Yes'. In this text box, specify the duration (in minutes) beyond which an open alarm should be escalated, so that reminders seeking immediate action are promptly sent to specified recipients (via Microsoft teams) and/or configured Teams channels.
Note:
The option to send reminder messages for open alarms will be available to the eG - MS Teams integration only if event-based TT integration is disabled for the eG manager. In other words, the Enable Notification Reminder flag will appear in this page only if the Enable event-based TT integration flag is set to No (in the TT Integration Settings section of the MANAGER SETTINGS page).
$prior - $ctype / $cname - $pdesc
The ‘dollared’ ($) text in the format above is a key, the value of which varies at run time, depending upon the information contained in the eG alarms. For example, in the default format above, $prior is a key that represents the alarms priority, and changes according to the priority of the actual alarm that is sent by the eG manager to MS Teams. You are advised against changing any of the key names.
The other keys that are part of the default format are discussed in the table below:
$cname
Will display the name of the problem component
$ctype
Will display the component type to which the problem component belongs
$pdesc
Will display a brief description of the problem
If required, you can override the default Incident Title, so it includes additional details about the problem condition - e.g., problem priority, alert ID etc. For that, click on the
icon alongside Incident Title. Figure 11 will then appear. 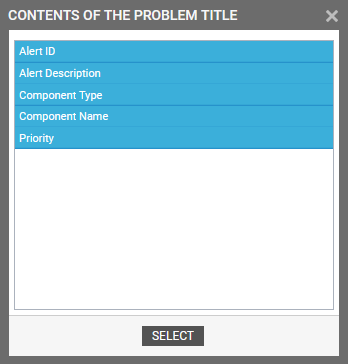
Figure 11 : Adding additional problem information to Incident Title
From Figure 11, select the information you want included in the Incident Title and click on the SELECT button. The Incident Title will then change as depicted by Figure 12.

Figure 12 : Customized Incident Title
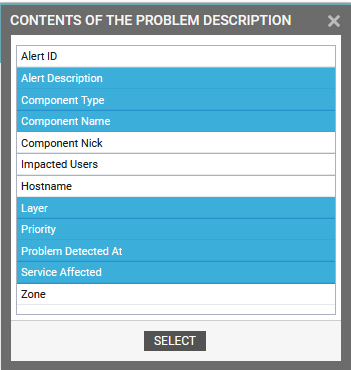
Figure 15 : Selecting the details to be included in the Problem description
Say, you want the problem description to include the name of the business service that was impacted by the problem condition. In this case, select Service Affected from Figure 15 and click the SELECT button. The Problem description will then change as depicted by Figure 16 below:

Figure 16 : Problem description changed to include Service Affected
-
Then, click on the Generate Payload button. Doing so will automatically convert the Problem description (see Figure 13 and Figure 14 ) into a JSON Payload. A message to that effect will then appear (see Figure 20). Click on the OK button in Figure 20.
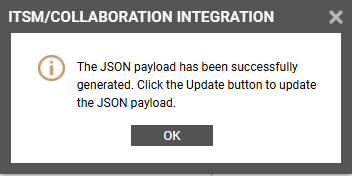
Figure 20 : A message indicating that the JSON payload has been successfully generated
-
Figure 21 will then appear, where you will be able to see the generated JSON Payload. This JSON can be copied and used in the "Parse JSON" action within the Teams workflow. The generated JSON payload will be populated with the exact values from the alert fields and pushed into the designated Teams Webhook.
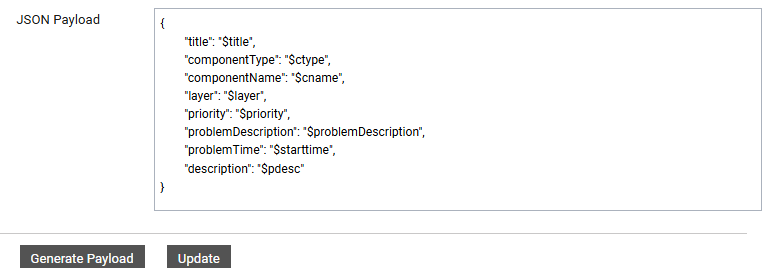
Figure 21 : The JSON Payload that is generated
The default JSON Payload structure will be as follows:
{
"title": “$title",
"problemDescription": "$problemDescription",
"problemTime": "$starttime",
"priority": "$prior",
"layer": "$layer",
"componentType": "$ctype",
"componentName": "$cname",
"description": "$pdesc"
}
The mapping between eG alarm fields and the elements of the default JSON payload is as follows:
S. No.
eG Alarm Fields
Applicable Data
1.
title
$prior - $ctype / $cname
2.
problemDescription
Priority :$prior Component Type : $ctype Component Name : $cname Layer :$layer Problem description : $pdesc Problem Start Time : $starttime
3.
componentName
Name of Component
4.
componentType
Type of the Component
5.
layer
Name of the layer
6.
Priority
Alarm priority
7.
problemTime
Alarm start time
8.
description
Description
-
If you click on the Generate Payload button after you set the Use Adaptive card layout flag to Yes, then the generated JSON Payload will include an additional priorityColor parameter (see Figure 22).
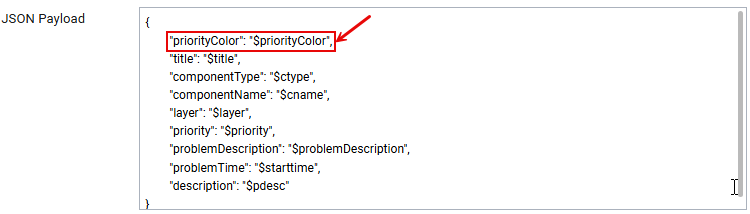
Figure 22 : The generated JSON Payload after the Use Adaptive card layout is set to Yes
The priorityColor parameter ensures that the alert notifications from eG Enterprise that are posted as Adaptive cards to an MS Teams chat/channel carry a priority-based color coding. This color code will be applied to the 'text' field in the Adaptive Card layout, so that the IT team can figure out the problem severity at a single glance.
-
Similarly, if you click on the Generate Payload button after you set the Enable Notification Reminder flag to Yes, then the generated JSON Payload will include two additional parameters, namely - reminderMessage and sendReminder (see Figure 21).
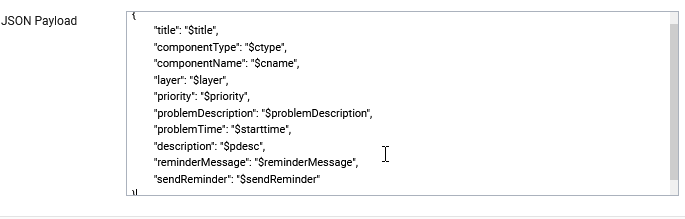
Figure 23 : JSON Payload after Alarm escalation is enabled
The sendReminder variable indicates whether/not reminder messages are to be sent for unresolved alarms. The reminderMessage variable represents the default header that will be included in all reminder messages.
-
Copy the JSON Payload that eG Enterprise generates to Notepad or any other editor.
- Finally, click the Update button in Figure 21 to save the changes.
Note:
-
If new fields are added to the Incident Title, Problem description, or Custom Payload, or if the status of the Use Adaptive card layout parameter is changed, or if existing fields are modified or removed in the Incident Title, Problem description, or Custom Payload, it is necessary to regenerate the payload and update. After generating the payload, copy and paste it into the "Parse JSON" action in the workflow.
-
By default, the CONTENTS OF PROBLEM DESCRIPTION window (see Figure 15) does not list the Last Measure Value option. This is because, the IsEventBasedTroubleTicketingEnabled flag and the ShowLastMeasureValue flag in the [TT_INTEGRATION] section of the eg_services.ini file in the <EG_MANAGER_INSTALL_DIR>\manager\config directory (on Windows; on Unix, this will be the /opt/egurkha/manager/config directory) are set to No by default.
If you want the last value of the problem measure to be included in the Problem description, then you should first make sure that the Last Measure Value parameter is available for selection in Figure 15. For that, set the IsEventBasedTroubleTicketingEnabled flag and the ShowLastMeasureValue flag mentioned above to Yes. Finally, save the file.
Once Last Measure Value appears in Figure 15 you can select it, click the SELECT button, and thus add it to the Problem description.
Parsing JSON Action
For this, follow the steps below:
-
Launch the Microsoft Teams app. Click on the 'three dotted icon' (indicated by Figure 24) to view the list of apps that Teams offers. Click on Workflows in the list.
-
Figure 25 will then appear listing the existing Workflows.
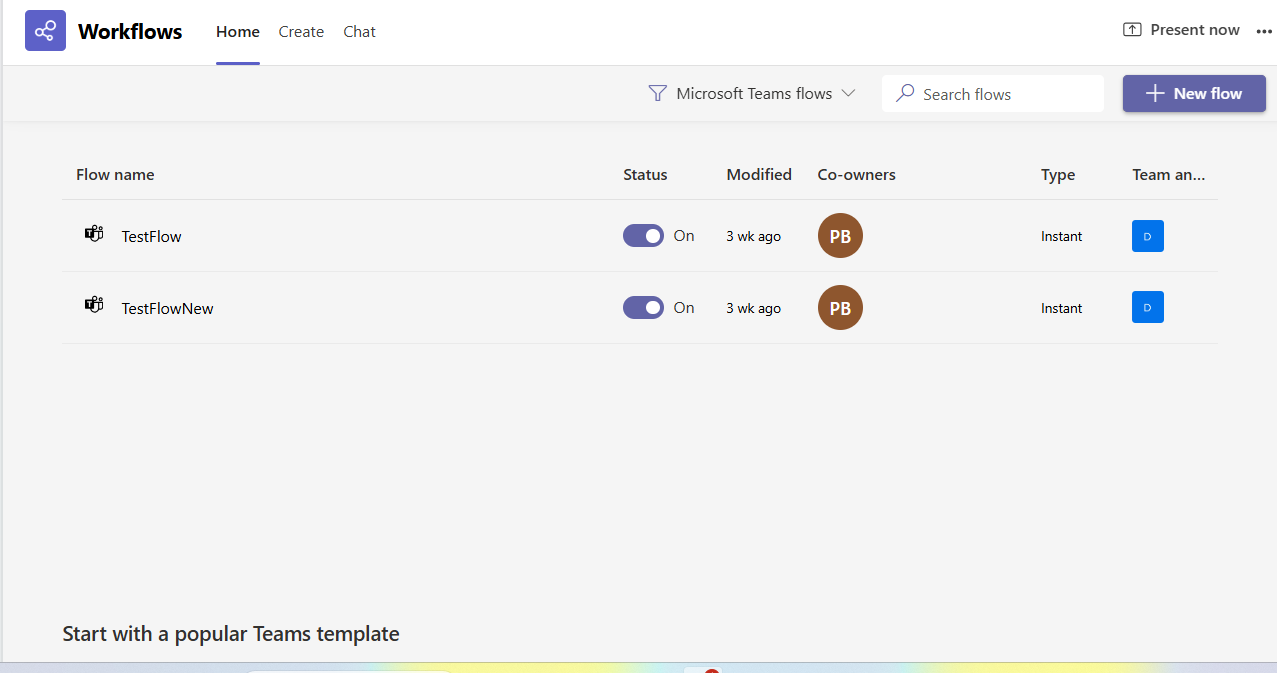
-
Proceed to edit the workflow you created previously. For that, move your mouse pointer over the workflow you want to edit. Three dots (arranged vertically) will then appear at the end of the row. Click on the dots and then select the Edit option that appears in the menu that pops out.

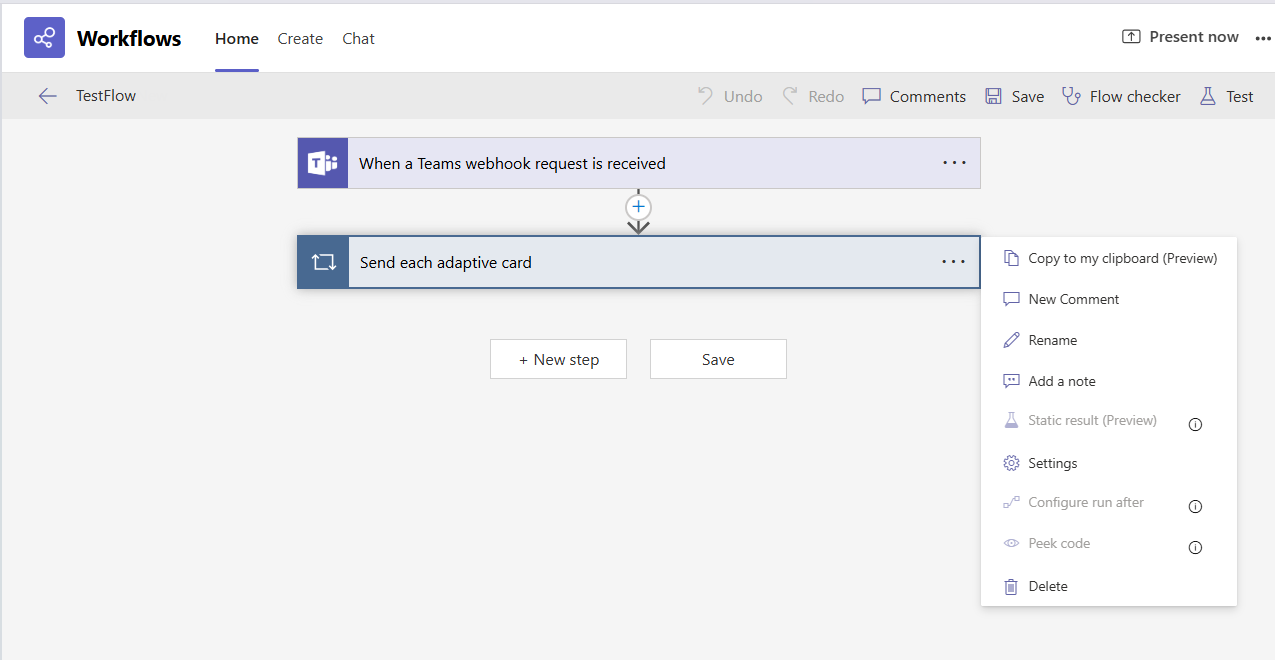
Figure 26 : Editing the workflow
-
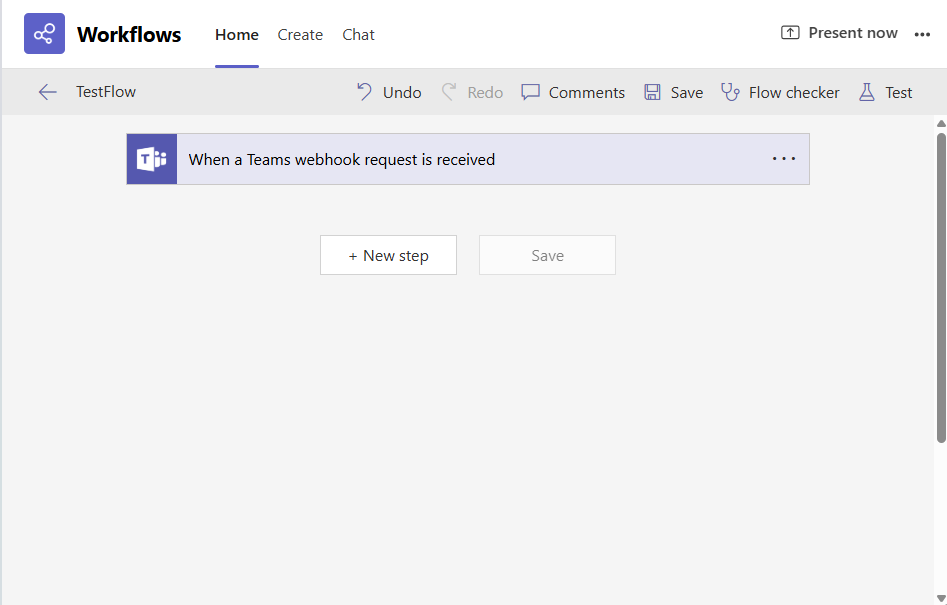
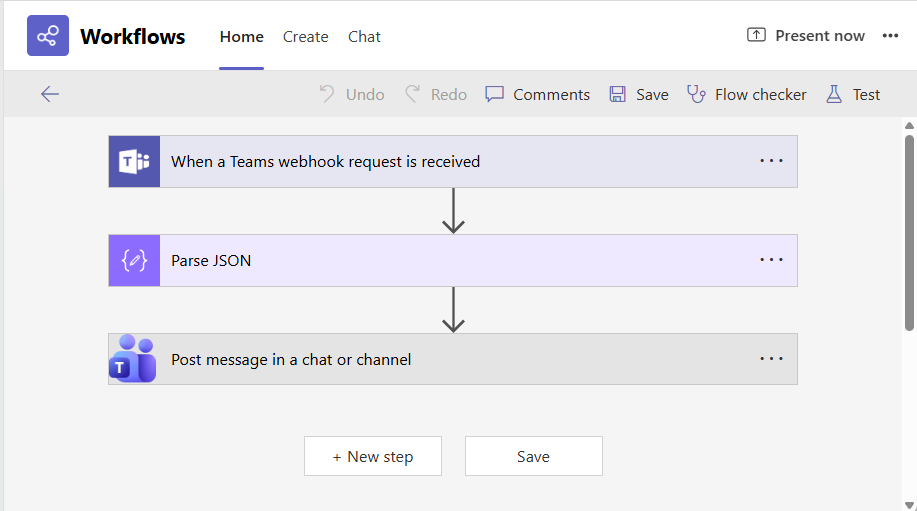
Figure 27 will then appear listing the default steps bundled into the workflow. Since the second step in the flow is to parse JSON action, you need to first delete the default second step - i.e., sending adaptive card. For that, click on the three dots alongside the second step in Figure 27, and select the Delete option from the menu that pops out.
-
A message requesting your confirmation to proceed with the deletion will appear (see Figure 28).
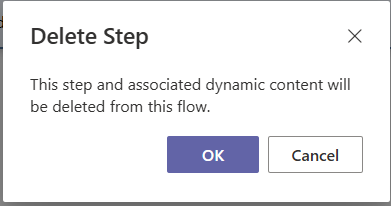 ]
]Figure 28 : A message box requesting your confirmation to delete the chosen step
-
Click on OK in Figure 28 to confirm deletion. Figure 29 will then appear. Click on New step to create a new step.
-
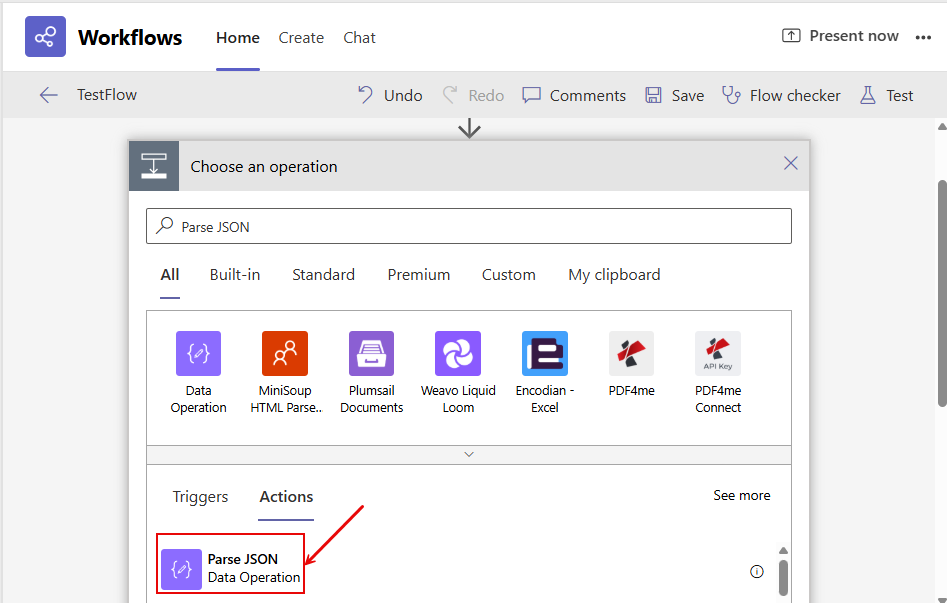
Figure 30 will then appear. Since the new step needs to parse the JSON payload, type 'Parse JSON' in the Search box, and click the magnifying glass icon alongside, to search for an operation of the same name. Once Parse JSON appears in the Actions list, click on it.
-
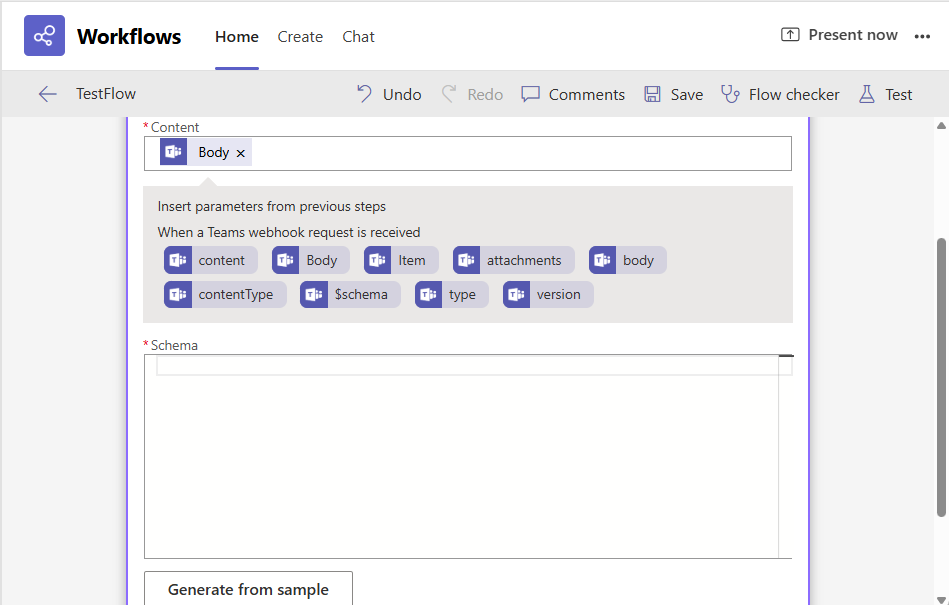
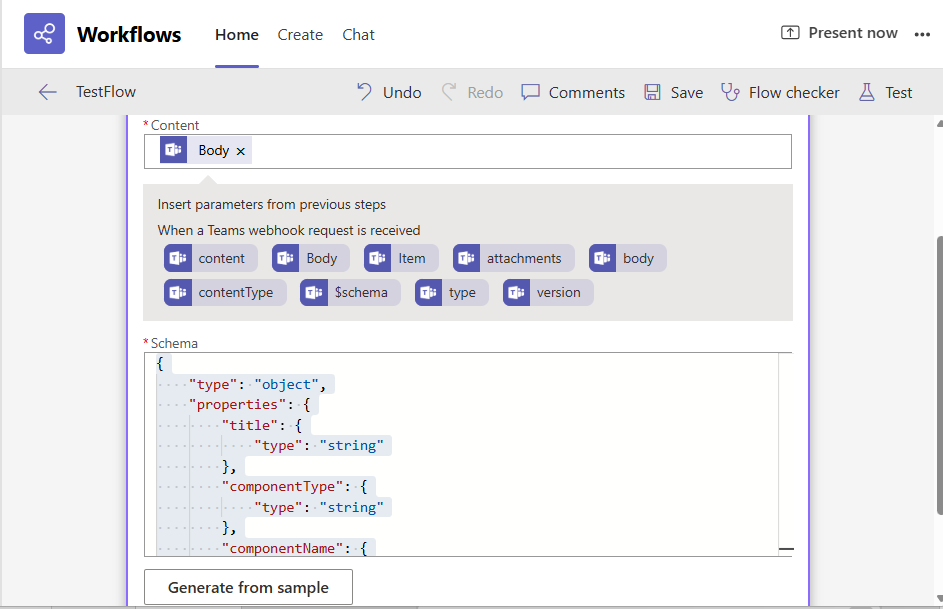
This will invoke Figure 31 If you place your cursor inside the Content box of Figure 31, a list of dynamic content options will be displayed beneath. Pick the Body option, so that it populates the Content box. Then, click the Generate from sample button in Figure 31.
-
This will invoke Figure 32. Here, paste the JSON Payload (generated by eG Enterprise) copied from Figure 21.
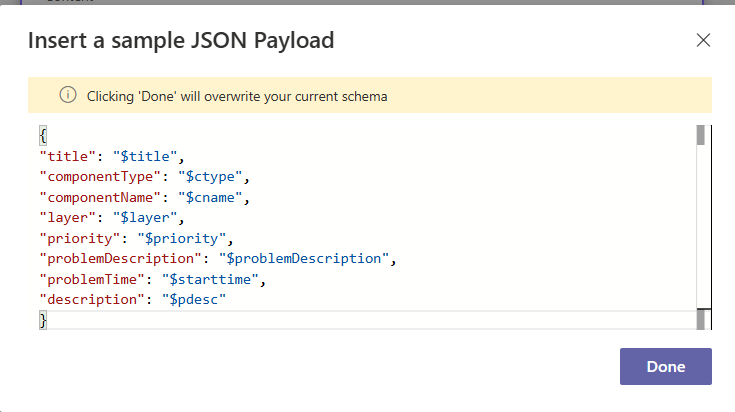
Figure 32 : Copying the JSON Payload generated by eG Enterprise
-
Finally, click the Done button in Figure 32. Based on the JSON Payload you input, the Schema will be generated, as shown by Figure 33.
Configuring the Workflow to Post Messages to an MS Teams Channel
The next step is to configure the Power Automate Workflow to do one of the following:
-
Post eG alerts to an MS Teams Channel, (OR);
-
Capture eG alerts into an Adaptive Card, which can then be posted to an MS Teams Chat or Channel
While option (a) has been discussed hereunder, option (b) has been discussed in Configuring the Workflow to Post Card to an MS Teams Chat / Channel.
To achieve option (a), follow the steps below:
-
Launch the Microsoft Teams app. Click on the 'three dotted icon' to view the list of apps that Teams offers. Click on Workflows in the list.
-
When the existing workflows are listed, proceed to edit the workflow you created for purpose of this integration.
-
Then, click on New step to create a new step.
-
This will bring up Figure 34. Type 'post message' in the Search text box and click the magnifying glass icon. Once the resulting Actions list displays 'Post message to a chat or channel', click on it.
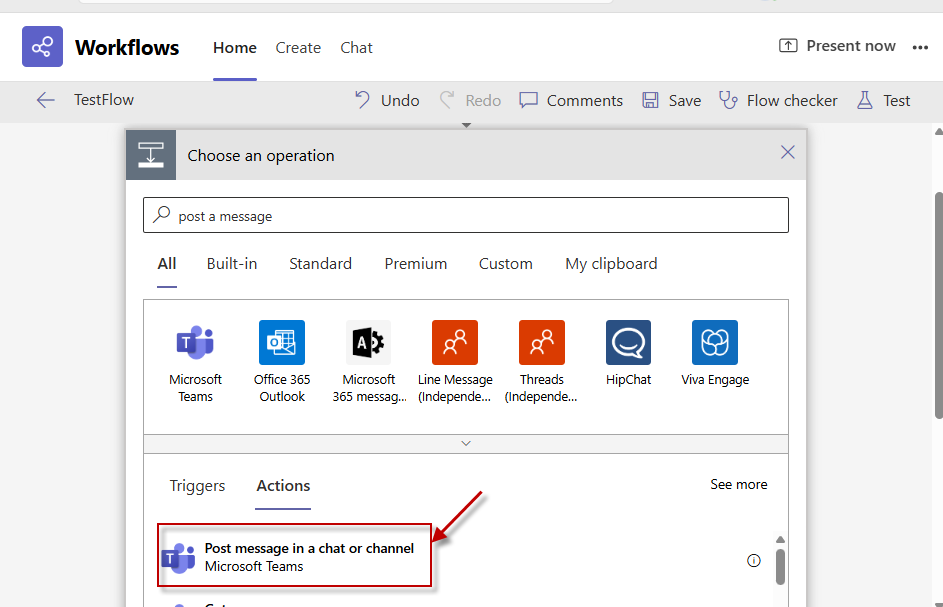
Figure 34 : Selecting the 'Post message to a chat or channel' option
-
Figure 35 will then appear. Here, select the Flow bot option from the Post as drop-down. Then, pick the Channel option from the Post in drop-down. Next, select the Team and Teams Channel to which the message is to be posted,.
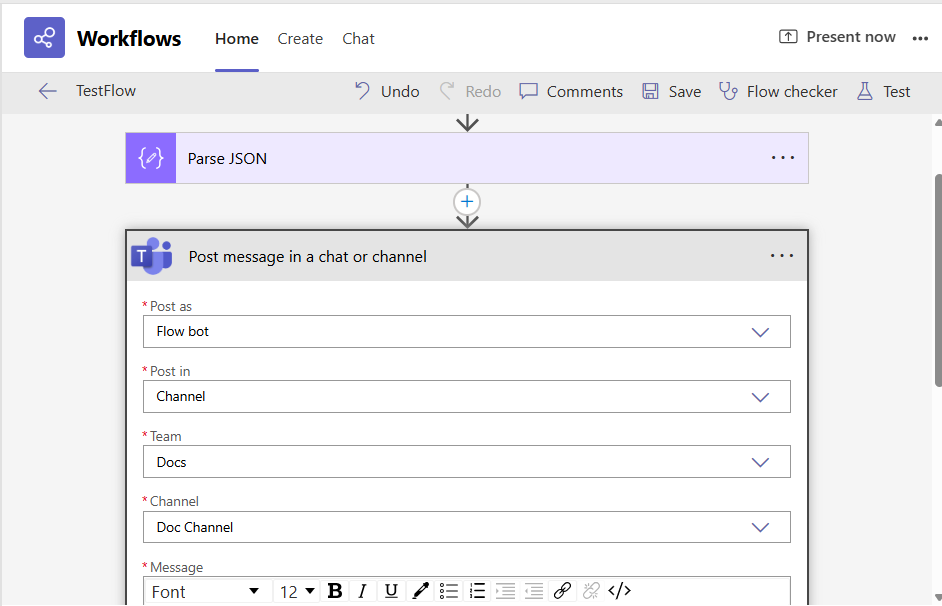
Figure 35 : Configuring the team and channel to which the message is to be posted
-
Finally, place your cursor inside the Message text area to configure the message to be posted. Doing so will make all properties of the Parse JSON action to be available for inclusion in the message body (see Figure 36). Select the properties that you want included in the message body and click the Save button.
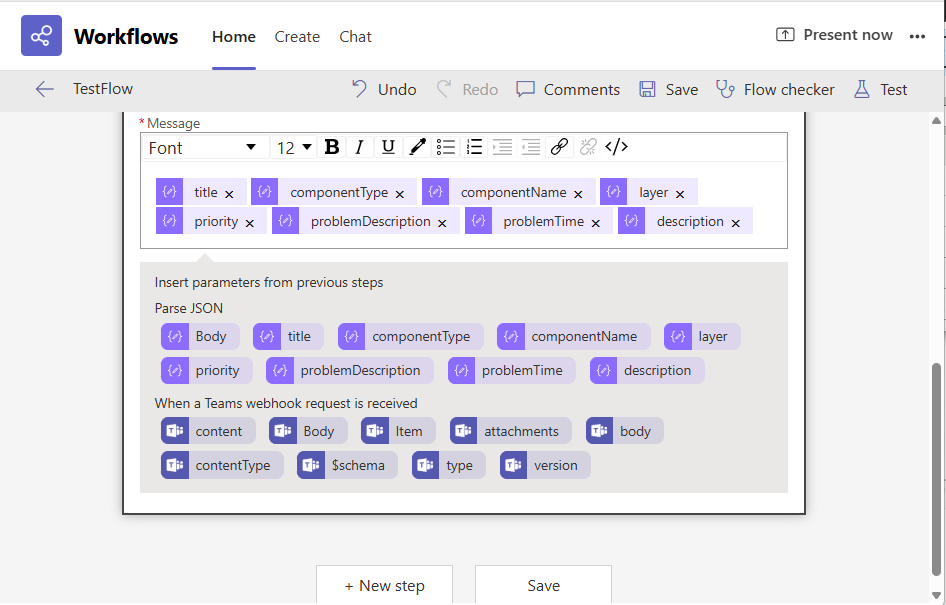
-
When performing the Parse JSON action, if the JSON you copied from the eG management console had included parameters related to 'reminder messages', then those parameters too will be available for inclusion in the message body (as indicated by Figure 37). If you want, you can drag and drop those parameters too in the message body. However, note that for 'reminder messages', the title parameter you add to your message will automatically include a 'Reminder' label.
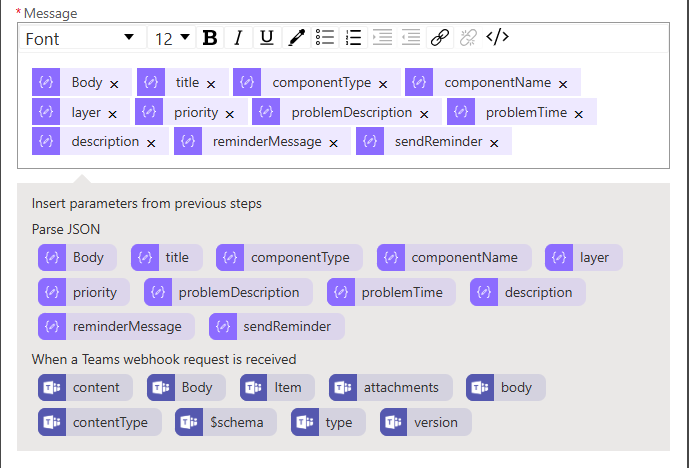
Figure 37 : Parameters available for inclusion in the body of a Reminder Message
Configuring the Workflow to Post Card to an MS Teams Chat / Channel
For this purpose, do the following:
-
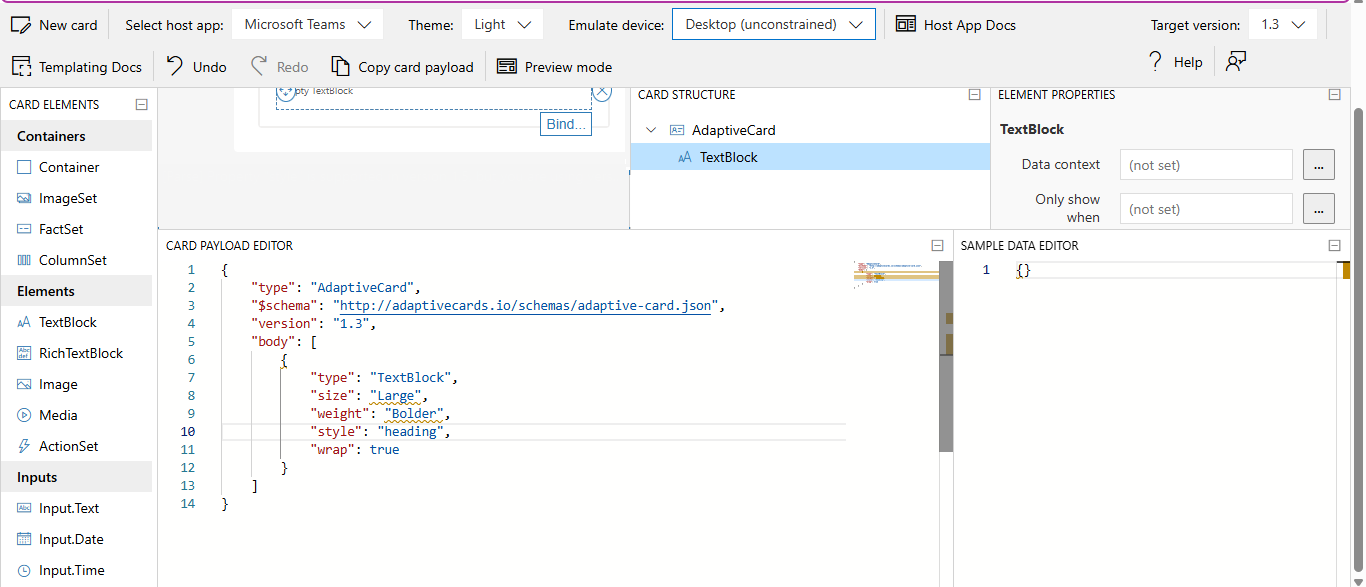
Use the https://adaptivecards.io/designer to visually build an Adaptive card. Figure 38 illustrates an Adaptive card being designed using the designer. While designing the card, make sure you use Adaptive Card version 1.3 and select host app as Microsoft Teams. Also, drag and drop the specified elements and configure the properties of the card.
-
Then, launch the Microsoft Teams app. Click on the 'three dotted icon' to view the list of apps that Teams offers. Click on Workflows in the list.
-
When the existing workflows are listed, proceed to edit you created for purposes of this integration.
-
Then, click on New step to create a new step.
-
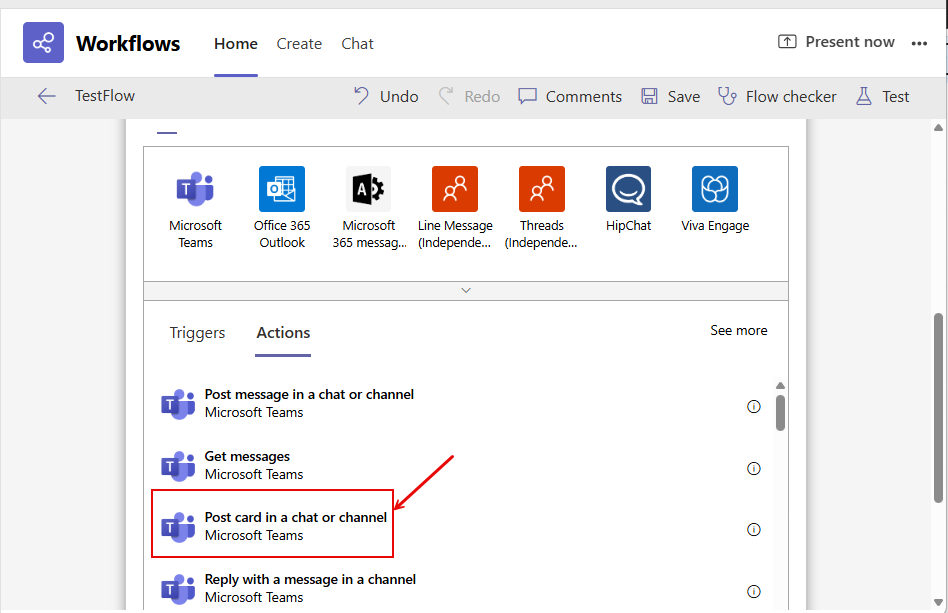
Figure 39 will then appear. Locate the Post card in a chat or channel option in the Actions list of Figure 39 and click on it.
-
Figure 40 will then appear. Here, select the Flow bot option from the Post as drop-down. Then, pick the Channel option from the Post in drop-down. Next, select the Team and Teams Channel to which the message is to be posted.
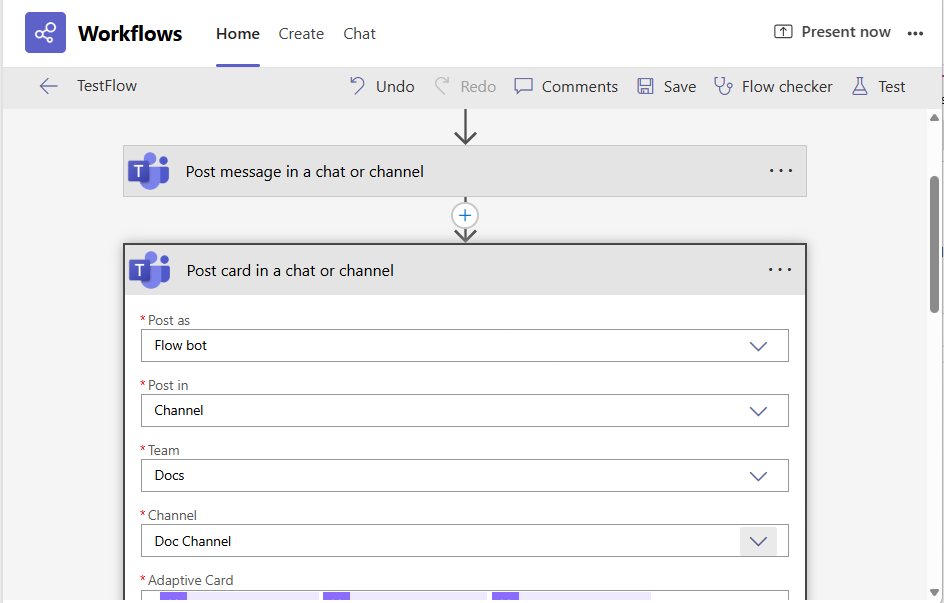
Figure 40 : Configuring the team and channel to which the message is to be posted
-
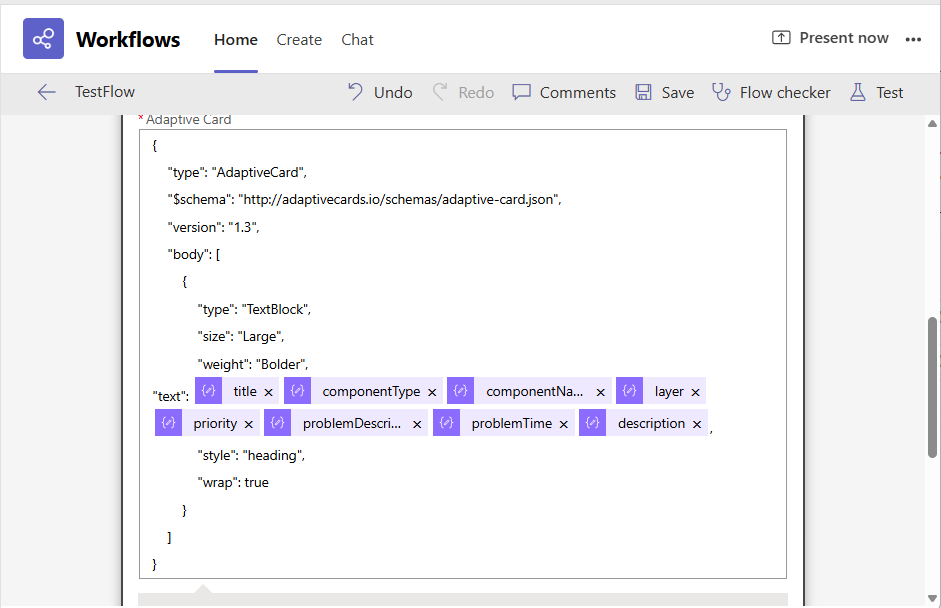
Then, copy the contents of the Custom Payload Editor that you see in the card designer of Figure 38, and paste these contents inside the Adaptive Card text area of Figure 41.
-
Against the "text": parameter of the pasted payload (see Figure 41), place the parsed JSON properties such as title, componentType, etc.
Note that when posting 'reminder messages', the payload you copy to and then from the Adaptive card designer will include the sendReminder and reminderMessage parameters. These parameters therefore will be available for inclusion against the "text" parameter (see Figure 42).
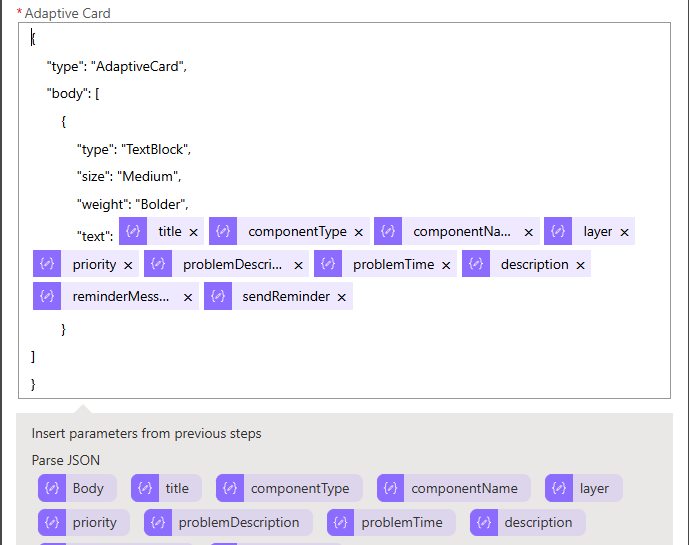
Figure 42 : Configuring the Adaptive card properties for a Reminder Message
Note that you can choose not to include the 'reminder message' related parameters in the card. The title parameter, once included in the card properties, will automatically include the label 'Reminder', in case of 'reminder messages'.
-
Finally, save the configuration. Once the setup is complete, the Flow bot will automatically post messages according to the defined triggers. The Adaptive Card will accurately display the dynamic content.
Configuring the Workflow to Send Reminder Notifications to a Specific User
As mentioned already, the Power Automate Worklow can be instrumented to send out 'Reminder Messages', only if the eG manager - MS Teams integration has been configured to send out such messages for alarms that remain unresolved beyond a configured period of time.
These 'Reminder Messages' can be sent to specific email recipients alone, (OR) to specific recipients and to a Teams channel.
This section describes the procedure to be followed to instrument the workflow to send Reminder Messages to specific users alone. To achieve this, follow the steps below after you complete the 'Parse JSON' step detailed in Parsing JSON Action:
-
Launch the Microsoft Teams app. Click on the 'three dotted icon' to view the list of apps that Teams offers. Click on Workflows in the list.
-
When the existing workflows are listed, proceed to edit the workflow you created for purpose of this integration.
-
Then, click on New step to create a new step (after the 'Parse JSON' step).
-
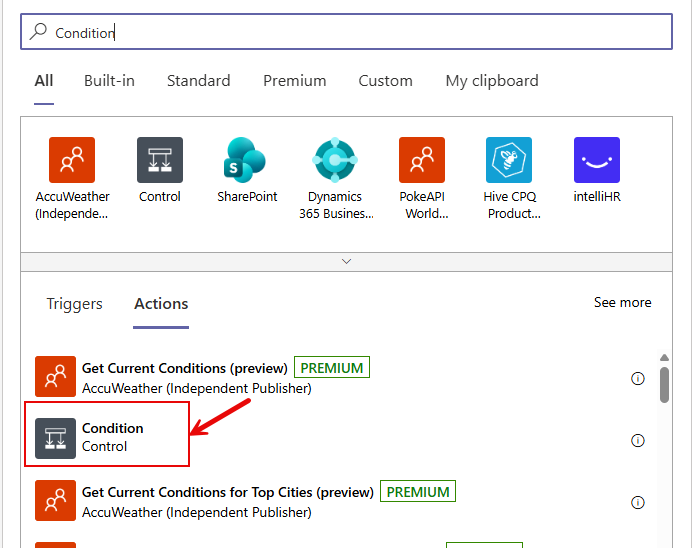
Figure 43 will then appear. Type 'Condition' in the Search text box in Figure 43, and click on the Condition action when it appears in the search results (as indicated by Figure 41).
-
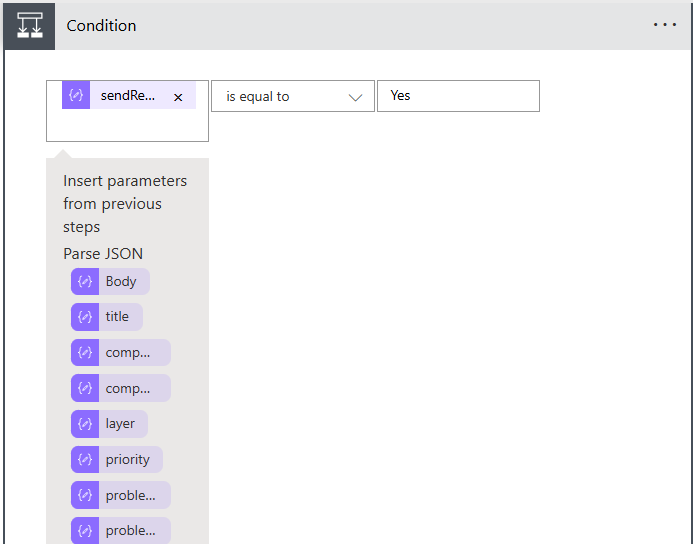
Figure 44 will then appear. The first step to defining a Condition action, is to configure the 'basis' for the condition. In our case, the Condition logic is based on whether/not the sendReminder parameter in the parsed JSON payload is set to Yes/No. In other words, the logic relies on whether/not the Enable Reminder Notification in the eG-MS Teams integration is set to Yes or No. To set this as the 'basis', select sendReminder from the first Choose a value field in Figure 44, pick the is equal to option from the next drop-down, and then enter Yes in the last Choose a value text box (as done in Figure 45).

Figure 44 : The options to configure the basis for the Condition logic
-
Then, proceed to configure the Action you want to perform if the configured basic condition becomes true - i.e., if the sendReminder flag is set to Yes. For that, click on Add an action in the If yes section that appears (see Figure 46).
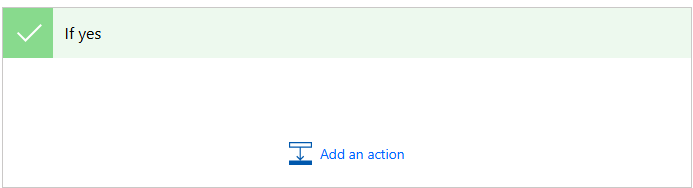
Figure 46 : Clicking on Add an action option in the If yes section
-
Figure 47 will then appear. In our case, the 'If yes' condition is to send 'reminder messages' to a specific user. In other words, if the eG-MS Teams integration has been set to escalate outstanding issues to managers via reminder messages, then the 'If yes' action is to instruct the workflow to send these messages to a specific user. For that, type 'Post a choice of ' in the Search text box in Figure 47, and click on the Post a choice of options as the Flow bot to a user action that appears in the search results.
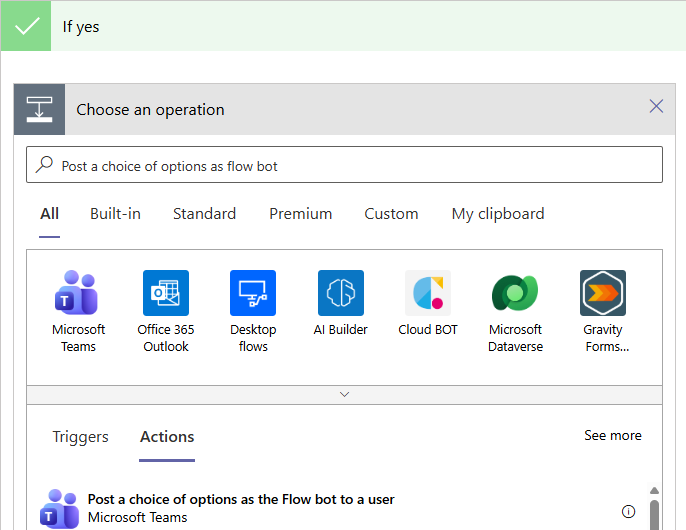
Figure 47 : Selecting a Post a choice of options as the Flow bot to a user
-
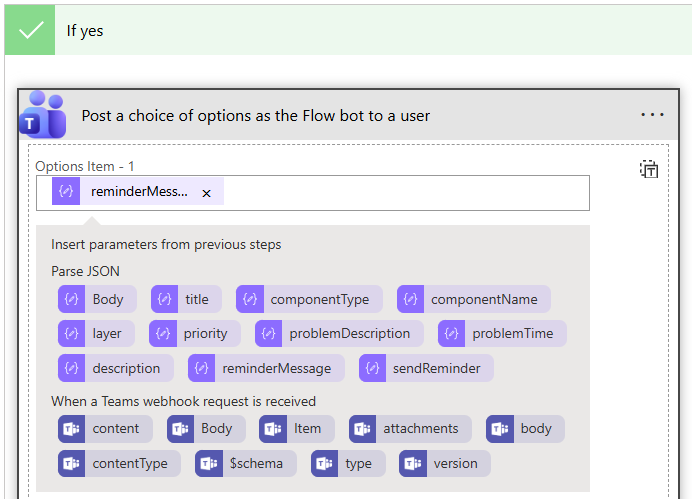
This will open Figure 48. Use the dynamic content displayed under Options Item - 1 field in Figure 48 to indicate the subject for the reminder messages. For instance, you can pick the reminderMessage parameter from the dynamic content generated from the parsed JSON payload .
-
Next, against Recipient, specify the email ID of the user who should receive the reminder/escalation messages.
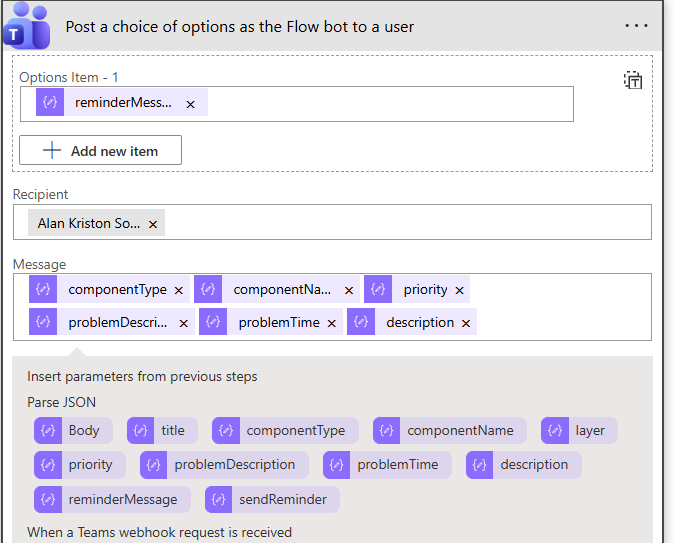
Figure 49 : Configuring the email ID of the Recipient of reminder messages
-
Next, proceed to configure the body of the reminder Message. For this, you can pick parameters from the dynamic content that is generated from the prased JSON payload - e.g., componentName, componentType etc.
-
Finally, configure the Headline for the reminder messages. From the dynamic content, you can pick the title parameter. Note that for reminder messages, the title parameter includes the label 'Reminder' by default.
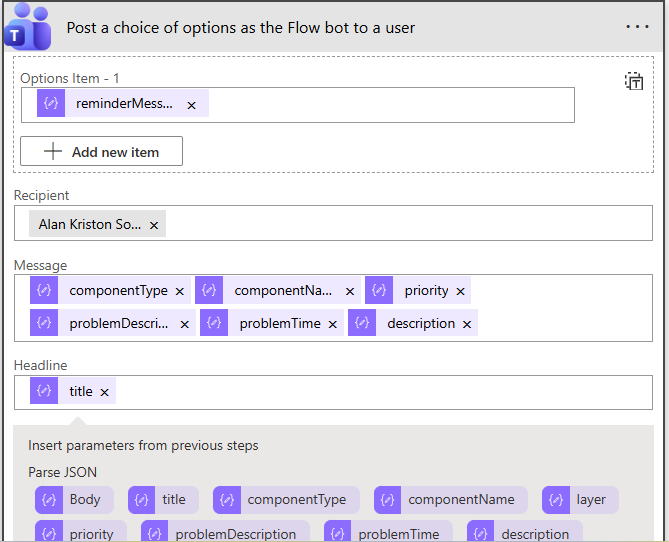
Figure 50 : Configuring the Headline for reminder messages
-
That completes the 'If yes' condition. Now, move on to configure the 'If no' condition. In our case, if the eG-MS Teams integration is not enabled for alarm escalation and reminder messaging - i.e., if the Enable Reminder Notification flag in the eG web console is set to No - then, it means alarm escalation need not be performed. The workflow can simply post eG alerts as messages to a Teams channel. For that, first click the Add an action option in the If no section of Figure 51.
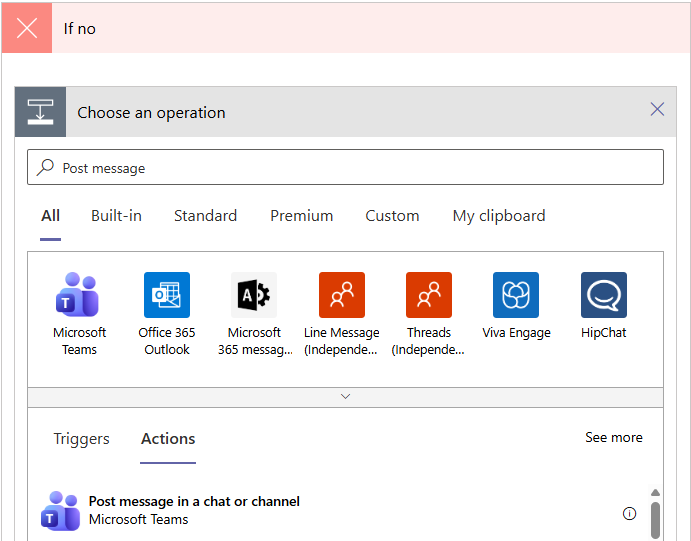
Figure 51 : Choosing an operation as part of 'If no' condition specification
-
Then, proceed as described by steps 4-7 in Configuring the Workflow to Post Messages to an MS Teams Channel.
Configuring the Workflow to Send Reminder Notifications to a Specific User and a Microsoft Teams Channel
To achieve this, follow the broad steps below:
-
Configure the workflow to send reminder notifications to Microsoft Teams Channel; for this, follow the instructions provided in Configuring the Workflow to Post Messages to an MS Teams Channel.
-
Then, configure the workflow to send reminder messages to a specific user; for this, follow the instructions outlined in this section.
To instrument the workflow to send reminder notifications to a specific user, do the following after Configuring the Workflow to Post Messages to an MS Teams Channel.
-
Launch the Microsoft Teams app. Click on the 'three dotted icon' to view the list of apps that Teams offers. Click on Workflows in the list.
-
When the existing workflows are listed, proceed to edit the workflow you created for purpose of this integration.
-
Figure 52 will then appear.
-
Then, move your mouse pointer over the arrow connecting the second and third steps in Figure 52 until an encircled '+' icon appears. If you click on the '+', a menu will pop up (see Figure 53). Since the workflow should post reminder messages to a channel while sending the same messages to a specific user as well, you need to add a new step 'parallel' to the 'Post message in a chat or channel' step in Figure 52. For that, click on the Add a parallel branch option from the pop-up menu (see Figure 53).
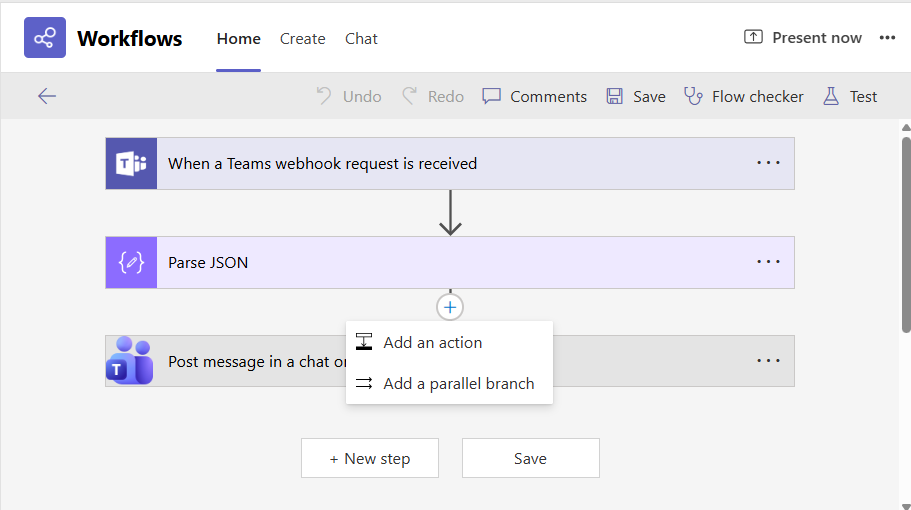
Figure 53 : Selecting the Add a parallel branch option from the pop-up menu
-
Figure 54 will then appear. Type 'Post a choice of options' in the Search text box in the Choose an operation section of Figure 54, and then click on the Post a choice of options as the Flow bot to a user option from the Actions list.
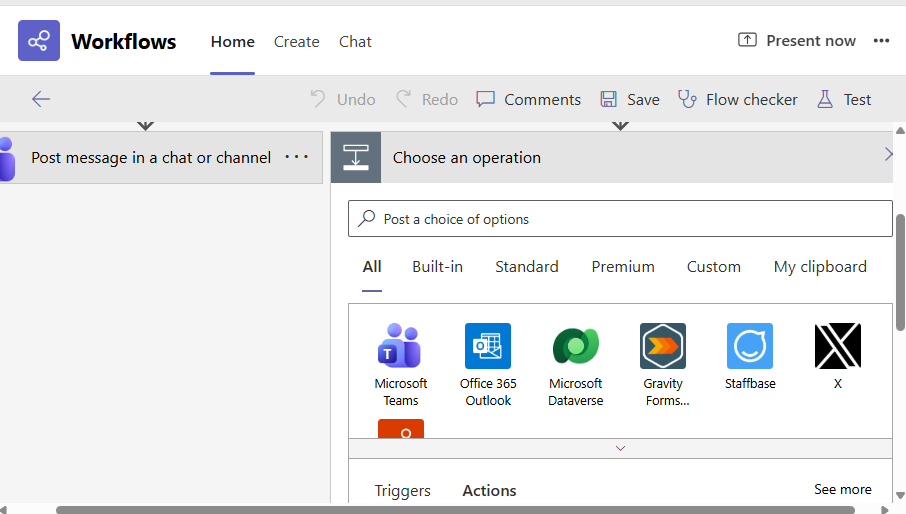
Figure 54 : Choosing the action to Post a choice of options as the Flow bot to user
-
Figure 55 will then appear. Use the dynamic content displayed to configure Options Items - 1, to represent the subject of the reminder messages. Then, provide the email ID of the Recipient of the reminder messages. Configure the Message body using the dynamic content once again, and specify the Headline too the same way.
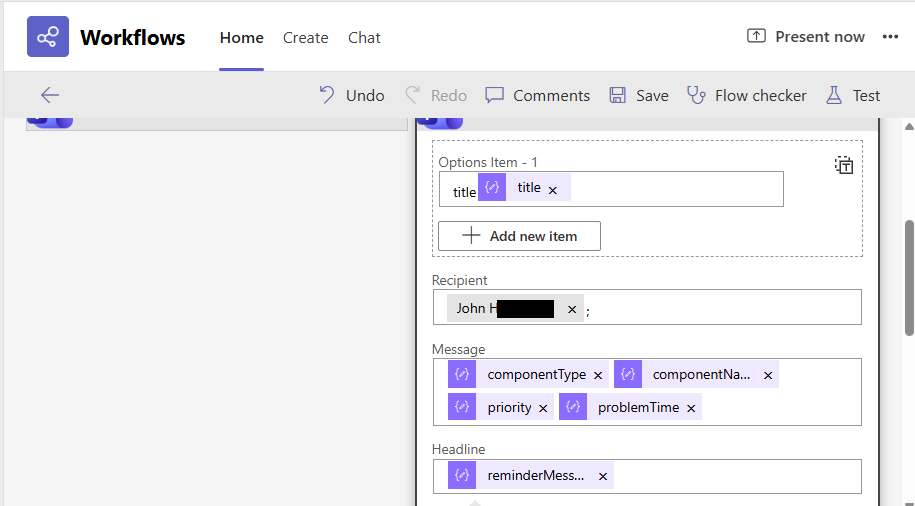
Figure 55 : Configuring the message to send reminder messages to a user as well
Note:
Starting August 2025, Work flows will be assigned new trigger URLs (replacing the old logic.azure.com URLs). The old URLs will stop working after November 30, 2025, which means any tools or applications using them will fail unless updated.
Please follow the below steps to update the URL:
-
Identify affected flows: Review all Power Automate flows in your environment that use HTTP triggers or Teams webhook triggers.
-
Check the warning banner: A banner will appear on your flow details page or within the designer, displaying the old URL that has been replaced. This serves as a reminder to update all references to the outdated URL with the new one.
-
Read the banner details: The following banner will appear:
“Click here to copy the new trigger URL. The old trigger URL <trigger URL> will stop working on November 30, 2025. Your tools that use this flow WILL break unless you update them with the new URL.”
-
Copy the new trigger URL: Open the flow in Power Automate Designer and copy the updated URL displayed in the HTTP trigger card.
-
Replace the old URL in the Webhook URL field in the eG MS Teams Integration UI.
-
Test the flow is triggering correctly.