Adding/Modifying/Deleting Components
Adding Components
In the cases in which eG Enterprise’s discovery process is not able to discover a specific component or set of components (like network node, load balancers etc.), the Add/Modify option in the Components menu of the Infrastructure tile permits the user to explicitly add the component for monitoring by eG Enterprise. After choosing the Add/Modify option, first select the Category to which the component to be added belongs. In eG Enterprise, components are grouped into categories based on their functionality – for instance, Oracle and Microsoft SQL servers are grouped under the category Database servers and VMware vSphere and Citrix XenServers are grouped under the category Virtualization Platforms. If a specific Category is chosen, then only those component types that belong to the selected category will be available for selection in the Component type list of Figure 1. By default, All is chosen as the Category, which is why all component-types monitored out-of-the-box by eG Enterprise are by default available for selection in the Component type list.
Next, select the type of component to be managed from the Component type list (see Figure 1). By default, the Component type list includes all those component types that are supported out-of-the-box by the eG Enterprise. To filter the Component type list, you can use the Show managed component types only check box. By default, this check box will be unchecked, indicating that the Component type drop-do wn will by default list all component types that are supported out-of-the-box by the eG Enterprise. Select the Show managed component types only check box if you want the Component type drop-down to list only those component types with at least one managed component. This way, you can filter out all those component types for which not even one component is managed.
For each type of component chosen from the Component type list, the administrator can add a new component for monitoring by choosing the Add New Component option Figure 1.
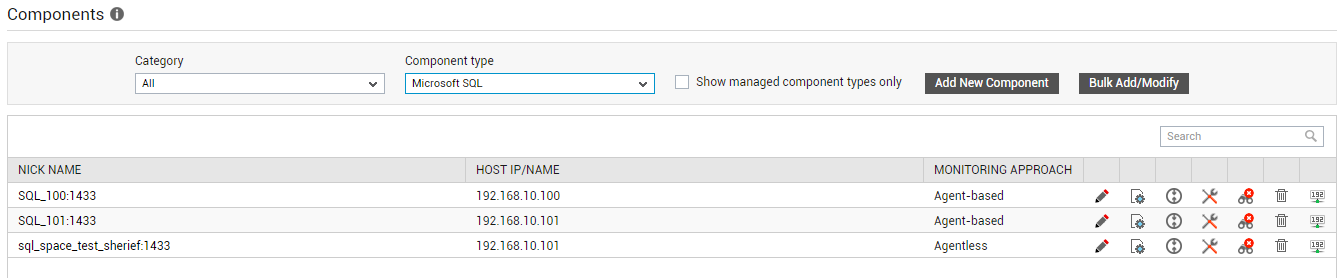
Figure 1 : Manually adding a new component for monitoring by eG Enterprise
Figure 2 then appears, using which you can build a profile for the new component by specifying a variety of parameters.
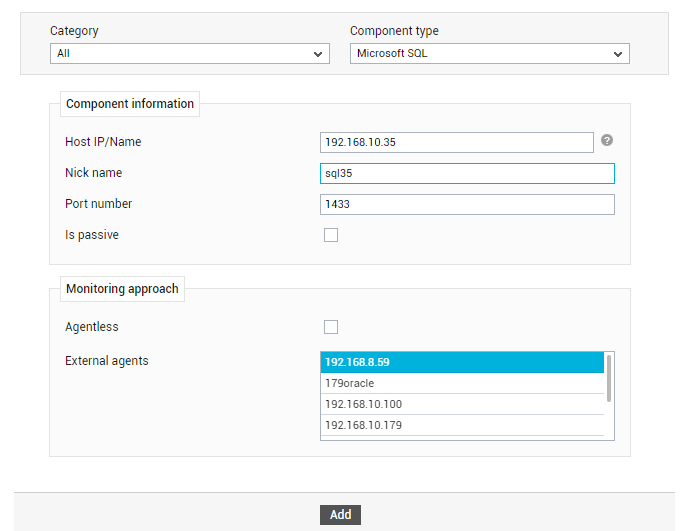
Figure 2 : Configurations to be specified when adding a new component
These parameters may differ from one type of component to another. Figure 2 depicts the standard set of parameters that need to be defined when adding a new component. This includes the following:
-
Host IP/Name: Specify the IP address or the ‘fully qualified host name’ of the component being added.
Note:
If you choose to specify the IP address of a component against Host IP/Name, then remember that this IP address can be an IPv4 or an IPv6 address.
-
Nick name: A nick name is a logical name that is associated with the host being monitored. The nick name specified here should match the ones specified while installing the eG agent.
Note:
- While specifying a nick name for a component, ensure that you do not use the same name as that of the internal name of the component-type. For instance, you cannot add a component of type Generic_server with the nick name Generic_server. To know the internal component type names, follow the procedure discussed in
- If required, both the Host IP/Name and Nick name parameters of a component can be configured with the IP address of that component. However, if the Host IP/Name parameter has been configured with the target component’s IPv6 address, then you cannot configure the Nick name parameter also with that IPv6 address; in this case, the Nick name should be some other logical name by which you want to identify the component.
- While specifying a nick name for a component, ensure that you do not use the same name as that of the internal name of the component-type. For instance, you cannot add a component of type Generic_server with the nick name Generic_server. To know the internal component type names, follow the procedure discussed in
- Port number: The default port on which the component listens will be displayed. You can change this, if required. If a component type has multiple default ports, then the first port in the comma-separated list displayed/configured against the component type in will be displayed here. For components that are not associated with ports, the port number has to be specified as NULL.
-
Agentless: By selecting/deselecting the Agentless checkbox (see Figure 2), indicate whether the component being added is to be monitored in an agentless or agent-based manner. By default, this will be set to no.
Reference:
For more details on eG’s agentless monitoring, refer to Agentless Monitoring below.
Note:
If two components have the same IP-nickname combination but different monitoring modes, then eG will not be able to monitor those components properly - i.e., if one component is managed as agent-based and the other, agentless, then eG will not be able to monitor both the components.
-
Internal agent assignment: Next, indicate whether the eG Enterprise system’s Internal agent assignment is Auto or Manual. This option will be available to you only if Agentless support is set to No.Also, the Agent per System feature should be enabled in the eG license. By default, the Internal agent assignment flag will be set to Auto.
Reference:
For more details on the Internal Agent Assignment parameter, refer to Internal Agent Assignment below.
- Is passive: Where cluster monitoring is supported, eG Enterprise enables users to indicate at the time of component addition, whether the component being added is an active or passive server in the cluster. In this case, the Add Component page includes an additional Is passive flag (see Figure 3). This flag is unchecked by default, which implies that the component being added is an active server in a cluster, by default. If this flag is checked, it indicates that the server being added is a passive server in a cluster. In this case, no alerts will be generated if the server is not running. Measures will be reported as “Not applicable’ by the agent if the server is not up.
- External agents: From the External agents box that lists all the external agents that have been configured in the environment, select the external agent(s) that will monitor the component being added from an external perspective. By default, the eG agent on the eG manager’s host serves as the external agent for the entire monitored environment. If required, you can configure additional external agents. To know how, refer to Asset Management of this document.
In the case of some components, a few additional parameters may have to be configured. For instance, when adding an Oracle database server, the name of the Oracle instance has to be specified in the SID text box. Multiple SIDs can also be provided as a comma-separated list.
Note:
If multiple sids are specified for an Oracle database server, then eG Enterprise system will represent each such SID as a separate Oracle database server. For instance, if an Oracle server, 192.168.10.100:1521,has been added with the sids – eg and egdemo – then, when this specification is updated, two new Oracle database servers will be added to the eG Enterprise system – namely, the server 192.168.10.100:1521:eg and the server 192.168.10.100:1521:egdemo.
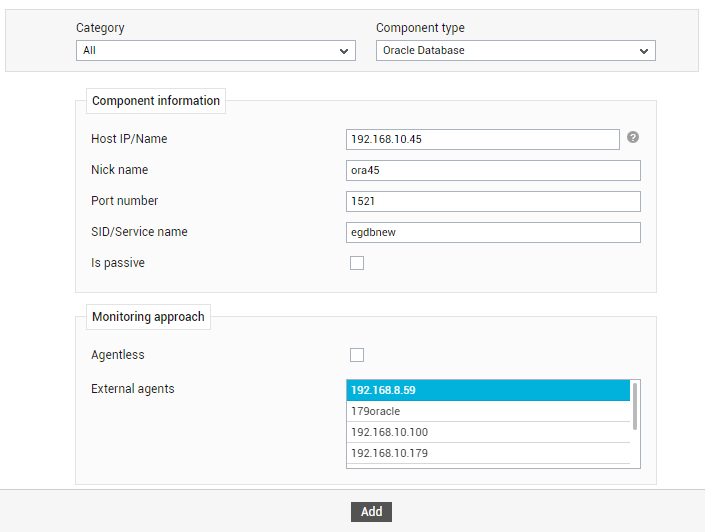
Figure 3 : Parameters that need to be configured when adding an Oracle database server
In the case of the Microsoft web servers (e.g., IIS web or IIS SSL servers), an additional field called mts enabled appears. eG's discovery process does not automatically discover Microsoft Transaction Servers (MTSs). Using the mts enabled option, an administrator can specify whether an MTS server is executing on the same host as a Microsoft web server (IIS or IIS SSL). If required, the administrator can associate an MTS server with the host that executes the Microsoft IIS web server or SSL server.
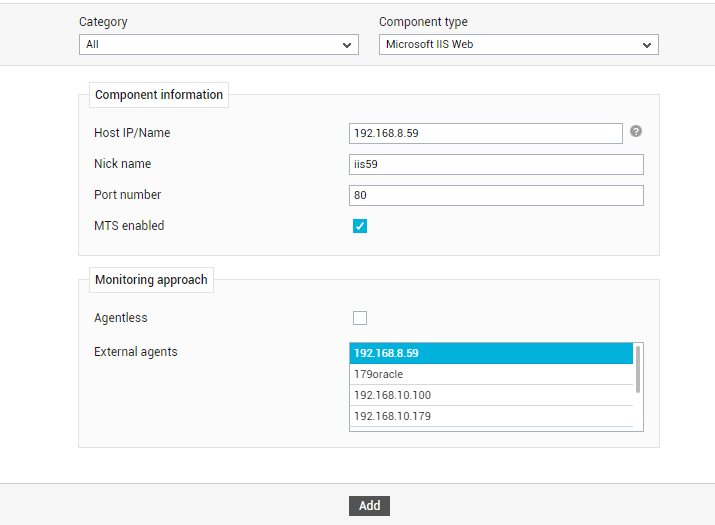
Figure 4 : Parameters to be configured when adding an IIS web server
Once values are provided for all parameters, click the Add button in Figure 4 to add the new component. As soon as the Add button is clicked, the eG manager checks the existing IP address to host name mapping of the component. If the specified host name or nick name does not exist in the existing mapping, the user is alerted to ensure that additional care is taken while specifying the host name (see Figure 5). Note that Figure 5 allows you to choose between assigning the specified host name to the new component alone, and assigning it to all components with the specified IP. Choose the required option and click on the update button. To change the hostname, click on the Back button to return to the Add Component page.
