How to Configure Published Resources for Monitoring?
To configure the applications / desktops that the simulator has to launch, click on the ![]() icon against Published Resources in Figure 1.
icon against Published Resources in Figure 1.
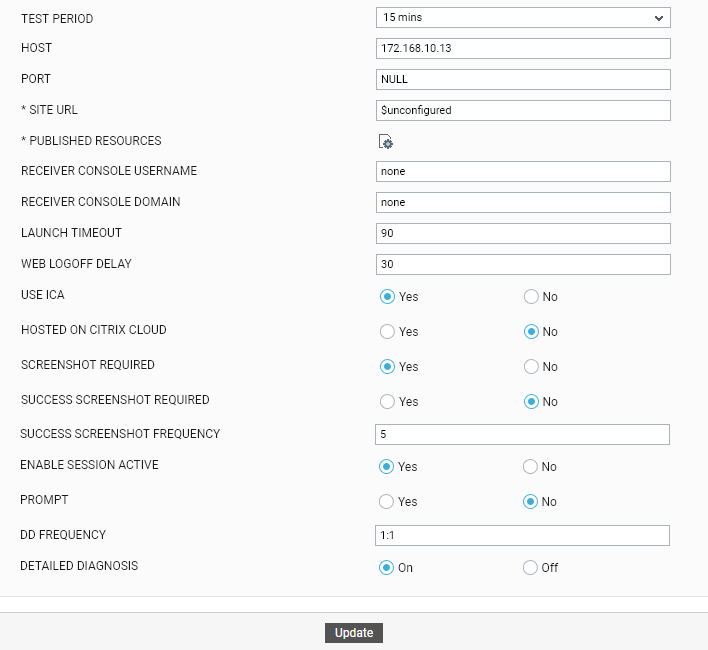
Figure 1 : The Citrix Logon Simulator Test configuration page
In Figure 2 that appears provide a comma-separated list of Published resources to be launched. The resource can be an application / desktop. When providing application/desktop names, make sure you provide the same name using which the applications/desktops are displayed in the StoreFront or Citrix ADC web console. Also, make sure that the User you specify is authorized to launch all the applications/desktops configured in the comma-separated list of Published resources. To provide a comma-separated list of Published resources, click on the ![]() icon against Published Resources in Figure 2.
icon against Published Resources in Figure 2.
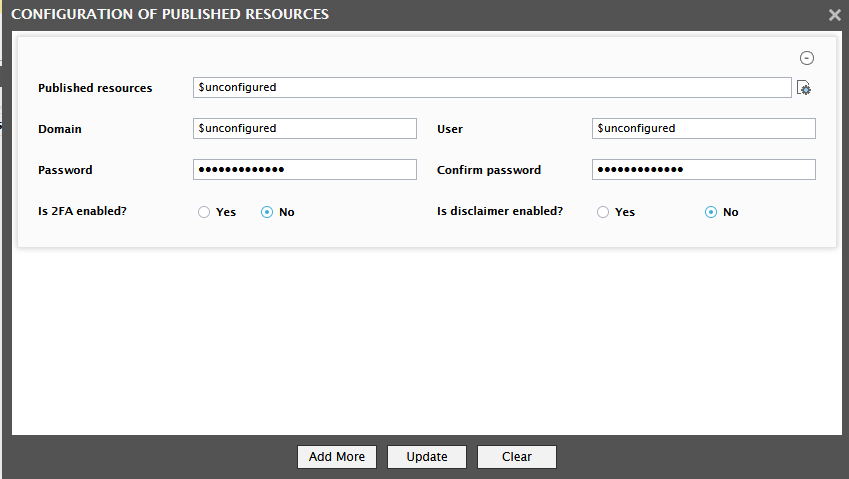
Figure 2 : Configuration of published resources
Figure 2 then appears.
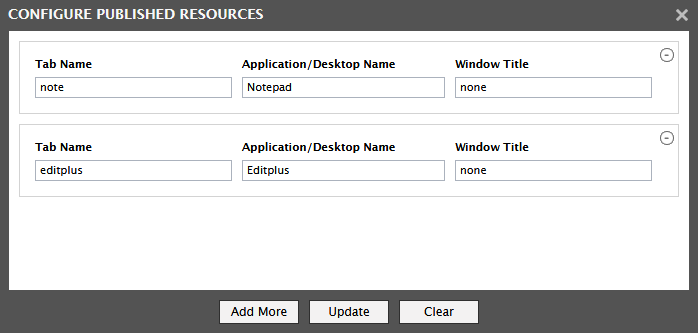
Figure 3 : Configuring the published resources to be launched
Specify the following in Figure 2:
-
Tab Name: If the simulator is simulating accesses to Citrix XenApp/XenDesktop 7.x, and StoreFront v2.x (or below) is used for the simulation, then the main page of the console will contain two tab pages - Apps and Desktops. The application/desktop that the simulator should launch may be in any of these tab pages. If the application/desktop to be launched is in the tab page that is set as the default landing page, then set the Tab Name to none. On the other hand, if the application/desktop to be launched is not in the default landing page, then you must specify the exact Tab Name of the tab page in which that application/desktop is present.
Note:
The Tab Name is not case-sensitive.
-
Application/Desktop Name: Specify the exact name of the Application/Desktop to be launched. When providing the application/desktop name, make sure you provide the same name using which that application/desktop is displayed in the StoreFront or Citrix ADC web console.
Note:
The Application/Desktop Name is not case-sensitive.
Before configuring the names of resources published on Citrix XenApp / XenDesktop 7.x, ensure the following:
- The desktop or application configured here should be included as "Favorites" in the StoreFront or Citrix ADC web console.
- You can auto subscribe users to applications by setting "KEYWORDS:Auto" in the published application's description in the Citrix XenDesktop Broker.
-
Additionally, for launching published desktops, set the autoLaunchDesktop flag to false in the web.config file under C:\inetpub\wwwroot\Citrix\<storename>Web folder on the StoreFront server. You can auto subscribe users to applications by setting "KEYWORDS:Auto" in the published application's description in the Citrix XenDesktop Broker.
Before configuring the names of resources published on Citrix XenApp / XenDesktop 6.x, make sure that these applications/desktops are available in the Main page of the Citrix Web Interface Management console.
-
Window Title: Typically, any application/desktop that is launched opens in a separate window. Sometimes, a different name may be displayed for the launched application/desktop in that window's title bar. If there is a mismatch between the name in the StoreFront/Citrix ADC console and the name in the launched window title, then the simulator may wrongly report a successful launch as a failure. To avoid this, where the application/desktop name in the StoreFront/ADC console is different from the application/desktop name displayed in the launch window title, use the Window Title text box to specify the name thatis displayed for the configured Application/Desktop in the session window's title bar.
Note:
You can specify either the partial or exact name that is displayed for the configured Application/Desktop in the session window's title bar.
Finally, click the Add More button in Figure 2 to add more applications/desktops to be launched. If you do not want to add any more applications/desktops, click the Update button in Figure 2 to save the changes and exit the CONFIGURE PUBLISHED RESOURCES window. You will then return to Figure 4, where you can proceed to provide the other details required for the simulation.
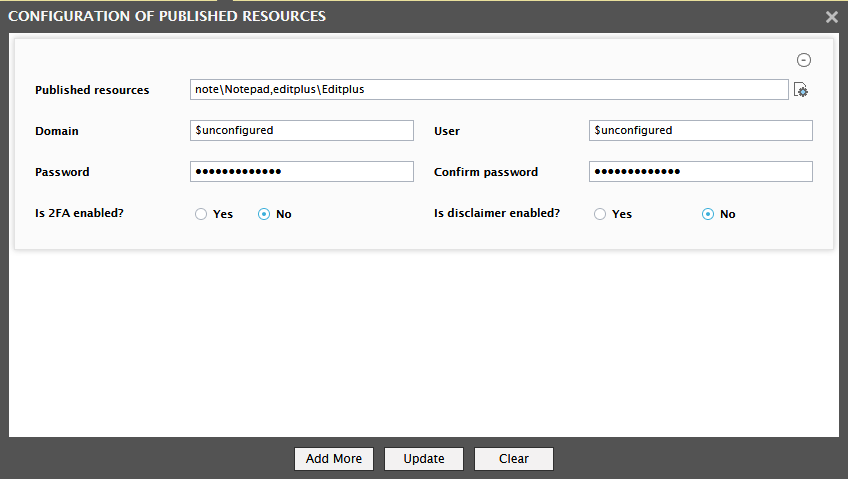
Using Figure 4, you can easily configure multiple resources that you want the simulator to launch and also the valid user credentials for accessing each resource. For this, follow the steps below:
-
Using the Domain, User, Password, and Confirm Password parameters, configure the credentials of the user who is authorized to launch the configured resources.
Note:
If the Storefront server is enabled with two-factor authentication and you have specified the relevant 2FA code, then, specify none against the Domain text box.
- Is 2FA enabled?: Two-factor authentication (2FA), often referred to as two-step verification, is a security process in which the user provides two authentication factors to verify they are who they say they are. If StoreFront is enabled with two-factor authentication, then to authenticate the specified User login, StoreFront will require an additional layer of security other than the Password you have provided. This can be any piece of information that only the User knows or has immediately in hand - such as a verification code that StoreFront provides. This is why, if StoreFront is enabled with two-factor authentication, you will have to set the Is 2FA enabled? flag to Yes, and then specify the verification code in the text box that appears alongside. On the other hand, if StoreFront is not enabled with two-factor authentication, set this flag to No. Note that only static 2FA and TOTP - based dynamic 2FA is supported for user authentication. If dynamic 2FA (TOTP) is used for user authentication, then, you may need to specify the secret key obtained while registering the logon simulation endpoint device as a TOTP device against the text box that appears when you set this flag to Yes. Once the device is registered, during every simulation, the logon simulator will automatically generate the TOTP code based on the specified secret key. To know how to register the Logon simulation endpoint device and obtain the secret key for generating TOTP automatically, refer to Generating Secret Key for TOTP based User Authentication.
- Is disclaimer enabled?: Some high-security Citrix environments may have been configured to display a 'disclaimer', whenever a user attempts to login to a server/desktop in the environment. Such disclaimers typically include statements that delimit the scope of access, uphold confidentiality or protect copyright laws, and mitigate the risk of virus infections or data losses that may be caused by unauthorized access. If such a disclaimer is enabled for your environment, then set this flag to Yes. In this case, the simulator will accept the disclaimer and proceed with the simulation. If no such disclaimer has been configured for your environment, set this flag to No.
If you do not want to configure any more resources for launching, then click the Update button in Figure 4 to save the changes. To add another resource for launching, click the Add More button. This will add an empty record to Figure 4. Here, specify the names of more Published resources, and then use the Domain, User, Password, and Confirm Password parameters to provide the credentials of a user who is authorized to launch those resources.
At any given point in time, you can exclude/delete a resource from the simulation by clicking the  button corresponding to that resource in Figure 4.
You can also clear all the configured resources and their launch details at one shot, by clicking the Clear button in Figure 4.