Advanced Features
Importing/Exporting Configuration Across eG Managers
Multiple eG managers are common in many IT infrastructures. Using industry-standard best practices, administrators of such environments may have fine-tuned the configuration (tests, thresholds, data cleanup frequencies, etc.) of one of the eG managers, and may want to apply the same settings to the other managers. To achieve this, administrators may have to painstakingly document the ‘ideal’ configuration and then manually login to each manager to apply the documented settings one by one. To reduce the manual effort and time involved in this exercise, eG Enterprise enables administrators to quickly apply the configuration of one manager to other managers at one go, using a simple export-import routine. With this capability, administrators can use the eG management interface to quickly export and import the following configurations between managers:
- Default test configurations
- List of enabled/disabled tests
- Default threshold configurations
- Global threshold settings
- Alarm policies
- Data cleanup frequencies
- Fix history
To export the configuration settings of a manager – say, Manager A – do the following:
- Login to the eG administrative interface of Manager A.
-
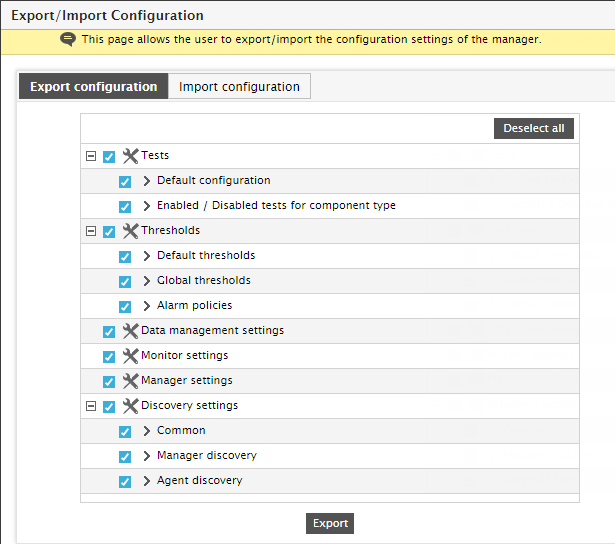
Select the Export/Import Configuration option from the Miscellaneous menu of the Admin tile. Figure 30 will appear.
-
By default, the Export configuration tab page of Figure 30 will open. This tab page allows you to choose the configuration settings that you want to export from the current eG manager. As stated earlier, the following configurations are available for export:
- Default test configurations
- List of enabled/disabled tests
- Default threshold configurations
- Global threshold settings
- Alarm policies
- Data cleanup frequencies
- Manager and monitor settings
- eG manager and agent discovery settings
To select a configuration, click on the check box corresponding to it. Since some configurations have been grouped under a head, selecting a group head automatically selects all configurations under that head. For instance, selecting the Tests group, automatically selects the Default configuration and Enabled / Disabled tests for component type options. To deselect all displayed configuration settings, click on the Deselect all button. To select all displayed configuration settings, click on the Select all button.
-
Once all the required configuration settings have been selected, click on the Export button to begin exporting the chosen settings. eG Enterprise exports the configuration settings you select to a zip file, which is by default named in the following format: <Fully qualified host name of eG manager>_eGconfig_<Date of export>.zip. This zip file will by default be downloaded to the default download destination that you have configured in your browser. Once the export completes successfully, the contents of this zip file will be displayed on-screen for you to take a look (see Figure 31).
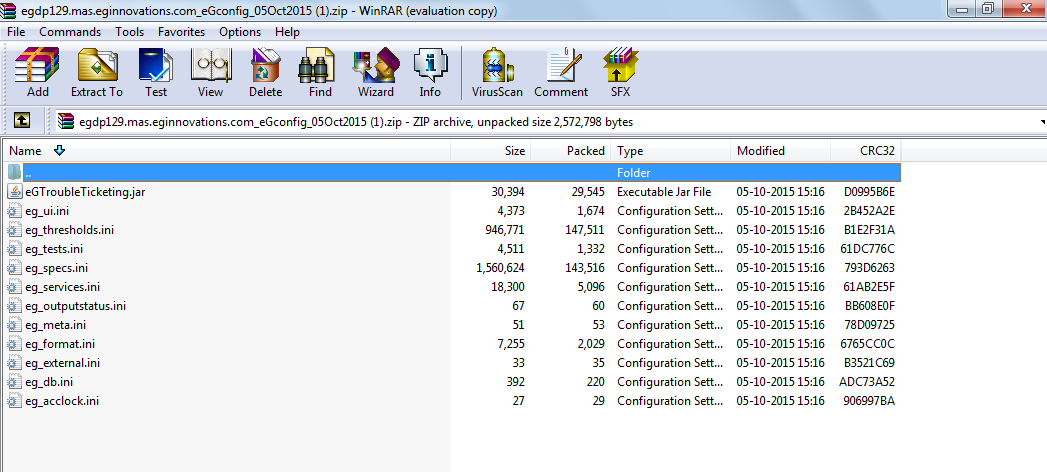
Figure 31 : Contents of the zip file containing the exported configuration files
To enable another manager – say, Manager B - to import this configuration, follow the steps below:
- First, copy this zip file from the default download destination to any folder on Manager B’s host.
- Then, login to Manager B’s administrative interface and select theExport/Import Configuration option from the Miscellaneous menu of the Admin tile.
-
Figure 32 will appear. This time, click on the Import configuration tab page in Figure 32 to open it.

- Using the Choose File button in Figure 32, browse Manager B’s host to locate the zip file that contains the configurations to be imported.
- Then, click on the Upload button to upload the file to Manager B.
-
Figure 33 will then appear. With the help of Figure 33, you can choose the specific configuration settings you want to import. To select a configuration, click on the check box corresponding to it. Since some configurations have been grouped under a head, selecting a group head automatically selects all configurations under that head. For instance, selecting the Tests group, automatically selects the Default configuration and Enabled / Disabled tests for component type options. To deselect all displayed configuration settings, click on the Deselect button. To select all displayed configuration settings, click on the Select all button.
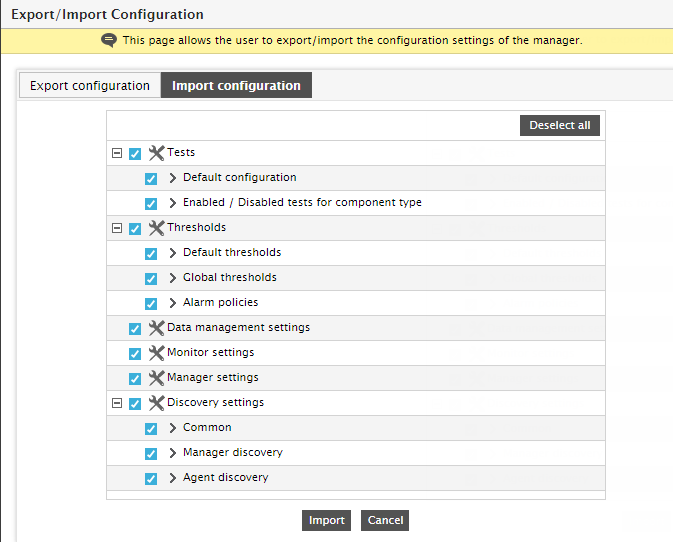
Figure 33 : Selecting the configuration settings to be imported
- To begin the import of the selected settings, click on the Import button in Figure 33.
-
If import is successful, a message to that effect will appear.
Note:
- The default configuration of host-level tests in Manager A will overwrite the default configuration of the same tests in Manager B post the import, regardless of the component-type to which the tests are mapped.
- On the other hand, changes made to an application-level test’s default configuration in Manager A, can be viewed in Manager B post the import, only if one/more applications of the same type are managed in Manager B.
- In case of default threshold configurations, post the import, all default threshold specifications related to host-level tests in Manager A wil overwrite the default threshold settings of the same tests in Manager B, regardless of component-type. However, the default threshold settings of application-level tests in Manager A will be applied to Manager B post the import, only if one/more applications of the same type are managed in Manager B.
- Alarm policies and data management settings configured in Manager A will overwrite the existing configurations in Manager B after a successful import. On the other hand, the fix history maintained by Manager A will be appended to the fix history that pre-exists in Manager B, post the import. Accordingly, if you access the Knowledge Base Search page in the eG monitoring console of Manager B and click the Submit button, the complete history of fixes maintained by that manager and the fix history imported from Manager A will be displayed therein. This is why, you will find the Knowledge Base Search page display the details of even those fixes that pertain to components that are not managed by Manager B.